Keras-Alexnet-图片分类
Keras-Alexnet-图片分类
普遍认为深度学习的开端是2006年,但它真正受到学术界和工业界的广泛关注,却是从2012年Alexnet在大规模图像分类中获得成功应用开始的。Alexnet是深度学习发展史上的突破性成果,使得神经网络重新回到了人工智能的风口浪尖。
目录
- Keras-Alexnet-图片分类
- 1、原始数据集
- 2、Alexnet网络细节
- 3、模型求解结果
- 4、对模型的一些深入思考
- 5、具体代码
- 6、项目链接
1、原始数据集
原始图片文件夹train:包含1200张猫的图片,1200张狗的图片,尺寸不尽相同。

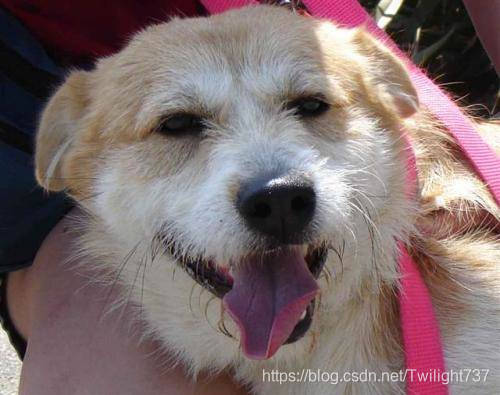
将2400张rgb图片做灰度处理,得到2400张灰度图,再将它们resize到(224,224)。打乱数据集中图片顺序,取前2000张作为训练集,后400张作为测试集。
train_x : 2000, 224, 224
train_y : 2000, 2
test_x : 400, 224, 224
test_y : 400, 2
2、Alexnet网络细节
Alexnet网络结构如下:
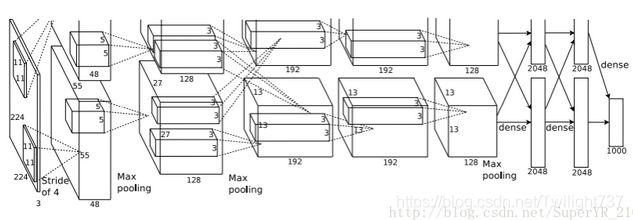 在ILSVRC竞赛过程中,Hinton团队使用了两台GPU同时进行训练,所以上图网络结构中的卷积、池化、全连接都是分为两组的,实际情况下我们使用一组结构就好。
Alexnet网络结构主要分为八轮。前五轮是卷积层,后三轮是全连接层。本例中输入图像的尺寸是(224,224,1)。
初始层:
第1层:输入层,Input(224,224,1)。
第一轮卷积:
第2层:96个卷积核, kernel_size=11, strides=4, padding=‘same’。
第3层:Relu激励。
第4层:最大池化,pool_size=3, strides=2, padding=‘same’。
第5层:标准化归一层,BatchNormalization。
第二轮卷积:
第6层:256个卷积核, kernel_size=5, strides=1, padding=‘same’。
第7层:Relu激励。
第8层:最大池化,pool_size=3, strides=2, padding=‘same’。
第9层:标准化归一层,BatchNormalization。
第三轮卷积:
第10层:384个卷积核, kernel_size=3, strides=1, padding=‘same’。
第11层:Relu激励。
第四轮卷积:
第12层:384个卷积核, kernel_size=3, strides=1, padding=‘same’。
第13层:Relu激励。
第五轮卷积:
第14层:256个卷积核, kernel_size=3, strides=1, padding=‘same’。
第15层:Relu激励。
第16层:最大池化,pool_size=3, strides=2, padding=‘same’。
第一轮全连接:
第17层:feature map拉直成向量,Flatten()。
第18层:全连接,Dense(4096)。
第19层:Relu激励。
第20层:Dropout(0.5)。
第二轮全连接:
第21层:全连接,Dense(4096)。
第22层:Relu激励。
第23层:Dropout(0.5)。
第三轮全连接:
第24层:全连接,Dense(2)。
第25层:outputs = softmax激励层。
3、模型求解结果
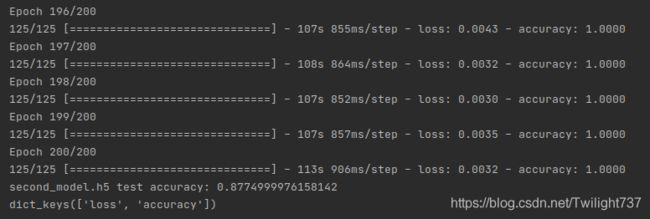
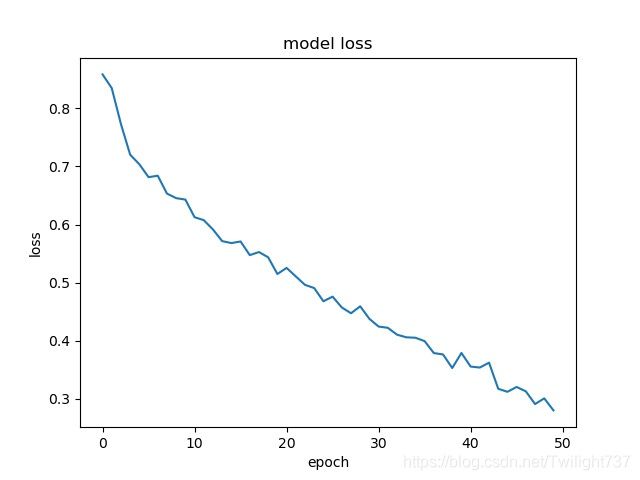
因为时间原因,自己分了两次训练。第1次训练了50轮,将模型保存了下来,第2次加载上次训练的模型,接着训练了200轮,总共花费了约8h,最后有点训练过拟合了。
第1次训练的loss时序图、accuracy时序图:
 第2次训练的loss时序图、accuracy时序图:
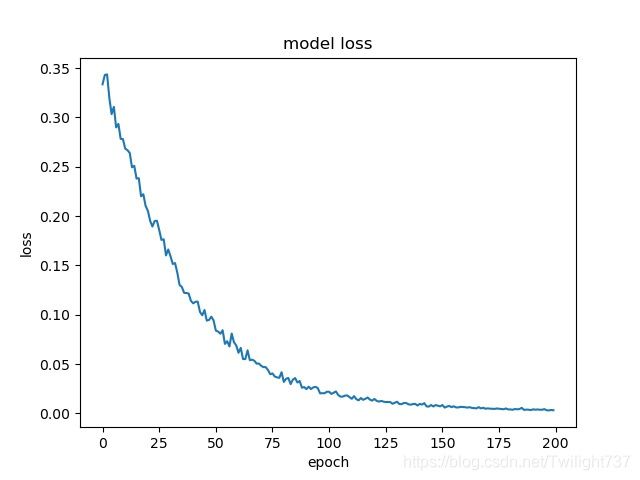
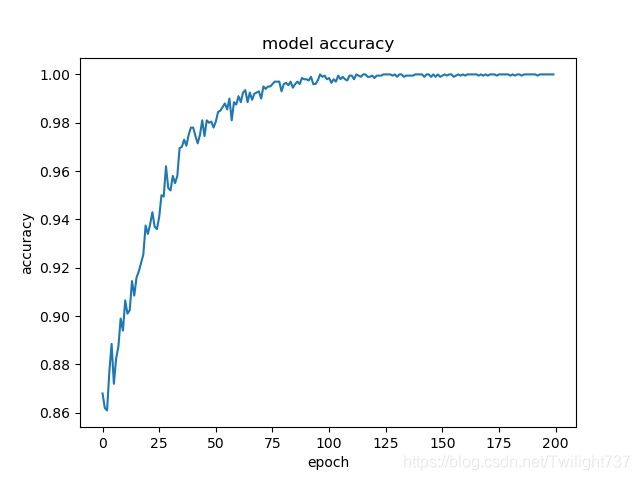
模型有点训练过拟合了,后面100轮训练集精度都到了99.99%,应该提前结束训练的。
4、对模型的一些深入思考
思考1:对于keras中kernel_size、stride、paddning=same计算过程的理解?
keras中可以设定padding的参数:“same”、“valid”,两者区别就是padding过程中采取的策略不同。“valid”代表只进行有效的卷积,对边界数据不处理,而“same”代表保留边界处的卷积结果。
举个例子:

 由此就可导出input尺寸和output尺寸的计算公式,下图中取整为向上取整:

思考2:为什么dropout可以防止过拟合?
dropout层,使得训练过程中按照一定的概率(一般情况下:隐藏层采样概率为0.5,输入层采样概率为0.8)随机删除网络中的神经元。
dropout可以被想象成集成大量神经网络的Bagging方法。Bagging通过结合几个模型降低泛化误差,通过分别训练几个不同的模型,让所有的模型表决输出,类似于多个弱分类器集成一个强分类器。不同的模型通常不会在测试机上产生完全相同的误差,多个模型的投票表决会使得不同模型间的不同误差相互抵消,从而取得更好的效果。
我们使用相同的数据集去训练不同的神经网络,一般会得到不同的结果,我们可以采用求平均的”或“多数得胜的策略来决定最终的结果。因为不同的子结构会产生不同的过拟合情况,取平均可能将“相反”的误差相互抵消,从而使得整个网络减少过拟合程度。
另外,dropout可以减少神经元之间复杂的共适应关系。dropout技术使得某两个神经元不一定每次都在一个子网络结构中出现,这就迫使网络去学习更加鲁棒的特征。
思考3:dropout可不可以用于卷积层中,还是它只能用于全连接层?
dropout 最初是为全连接网络层量身定制的,很多框架里没有实现卷积层的dropout,但最近的一些进展使得dropout开始用于卷积和循环神经网络层。
但标准的dropout一般是不能用于卷积层的,原因是因为在卷积层中图像中相邻的像素共享很多相同的信息,如果它们中的任何一个被删除,那么它们所包含的信息可能仍然会从仍然活动的相邻像素传递。所以卷积层中的dropout只是增加了对噪声输入的鲁棒性,而不是在全连接层中观察到的模型平均效果。
思考4:准备训练数据集中的shuffle技巧。
shuffle,中文意思是洗牌,混乱。shuffle在机器学习与深度学习中的含义是,将训练模型的数据集进行打乱的操作。
原始的数据,在样本均衡的情况下可能是按照某种顺序进行排列,如前半部分为某一类别的数据,后半部分为另一类别的数据。但经过打乱之后数据的排列就会拥有一定的随机性,在顺序读取的时候下一次得到的样本为任何一类型的数据的可能性相同。
shuffle是一种数据集预处理的技巧,因为机器学习的假设和对数据的要求就是要满足独立同分布,所以任何样本的出现都需要满足“随机性”。在数据有较强次序特征的情况下,shuffle显得至关重要。
shuffle可以防止训练过程中的模型抖动,有利于模型的健壮性。假设训练数据分为两类,在未经过shuffle的训练时,首先模型的参数会去拟合第一类数据,当大量的连续数据(第一类)输入训练时,会造成模型在第一类数据上的过拟合。当第一类数据学习结束后模型又开始对大量的第二类数据进行学习,这样会使模型尽力去逼近第二类数据,造成新的过拟合现象。这样反复的训练模型会在两种过拟合之间徘徊,造成模型的抖动,也不利于模型的收敛和训练的快速收敛。
思考5:如何理解Alexnet中,局部响应归一化LRN层的作用?
局部响应归一化层LRN,一般在激活、池化后使用,在Alexnet网络中使用到过。
归一化有什么好处?归一化有助于快速收敛;对局部神经元创建竞争机制,使得其中响应比较大的值变得相对更大,抑制其他反馈较小的神经元,增强了模型的泛化能力。
LRN用得并不多。后期很多研究者发现LRN起不到太大作用。现在来看,AlexNet的主要贡献是ReLU、dropout、最大池化,这些技术基本上在AlexNet后的大多数主流架构中都能见到,而LRN渐渐销声匿迹,从后面的ResNet、DenseNett等网络就能看出,LRN似乎已经被BN层所取代。
思考6:Alexnet相比于Lenet,亮点在哪?今后自己来搭建网络模型能学到什么经验?
(1)Alexnet使用Relu激活函数,而在此之前的Lenet往往采用sigmoid激活函数。
(2)Alexnet在全连接层引入了dropout机制。
(3)Alexnet在卷积池化之后,引入局部响应归一化,改善网络性能。
(4)传统网络池化窗口都是非重叠的,Alexnet使用了重叠池化。
今后自己来搭建网络模型时,可以借助以下经验:
(1)激活函数一般都选用LeakyReLU,最后一层分类用softmax。
(2)凡是需要接入全连接层,采用dropout。
(3)凡是接入卷积层,后面都跟上“1个leakyrelu”、“1个maxpool”、“1个BN”。
思考7:什么情况下,Lenet难以解决,必须依靠深层网络Alexnet、VGG来处理?
我自己的理解是:以前Lenet做图片分类,需要分类的类别数太少了,所以想解决这个问题还不算难,但一旦目标分类涉及到上千个维度,可能Lenet就不起作用了,于是才有了后面更深的网络模型:Alexnet、VGG、GoogleNet。ImageNet图像分类大赛是1000类图像分类问题,训练数据集126万张图像,验证集5万张,测试集10万张(标注未公布)。
还有一种情况,如果是要处理的是那种看上去就很难分类的问题,这时GoogleNet、VGG这种巨无霸网络就可以发挥大作用了。比如说用它来处理花卉分类问题,这个分类过程连人眼都很难分清楚,这时Lenet网络肯定不合适。
5、具体代码
数据集加工:
import cv2
import numpy as np
import random


def read_data():
    data_x = np.zeros((2400, 224, 224))
    data_y = np.zeros((2400, 2))

    for i in range(1200):
        cat_image = cv2.imread("/home/archer/CODE/PF/data/train/cat." + str(i + 1) + ".jpg")
        cat_gray_image = cv2.cvtColor(cat_image, cv2.COLOR_BGR2GRAY)
        cat_resize_image = cv2.resize(cat_gray_image, (224, 224), interpolation=cv2.INTER_AREA)

        data_x[i, :, :] = cat_resize_image / 255
        data_y[i, :] = np.array([1, 0])

    print('the cat images have been download !')

    for i in range(1200, 2400):
        dog_image = cv2.imread("/home/archer/CODE/PF/data/train/dog." + str(i - 1199) + ".jpg")
        dog_gray_image = cv2.cvtColor(dog_image, cv2.COLOR_BGR2GRAY)
        dog_resize_image = cv2.resize(dog_gray_image, (224, 224), interpolation=cv2.INTER_AREA)

        data_x[i, :, :] = dog_resize_image / 255
        data_y[i, :] = np.array([0, 1])

    print('the dog images have been download !')

    return data_x, data_y


def make_network_data():
    data_x, data_y = read_data()
    random_index = np.arange(0, 2400, 1)
    random.shuffle(random_index)

    train_x = np.zeros((2000, 224, 224))
    train_y = np.zeros((2000, 2))
    test_x = np.zeros((400, 224, 224))
    test_y = np.zeros((400, 2))

    for i in range(2000):
        index = random_index[i]
        train_x[i, :, :] = data_x[index, :, :]
        train_y[i, :] = data_y[index, :]

    for i in range(400):
        index = random_index[2000 + i]
        test_x[i, :, :] = data_x[index, :, :]
        test_y[i, :] = data_y[index, :]

    return train_x, train_y, test_x, test_y
Alexnet网络搭建:
import numpy as np
import keras
import matplotlib.pyplot as plt
from keras.models import load_model
import cv2


def create_network():
    inputs = keras.layers.Input((224, 224, 1))

    # First convolution
    conv1 = keras.layers.Conv2D(96, kernel_size=11, strides=4, padding='same')(inputs)  # 56, 56, 96
    relu1 = keras.layers.LeakyReLU()(conv1)                                             # 56, 56, 96
    pool1 = keras.layers.MaxPooling2D(pool_size=3, strides=2, padding='same')(relu1)    # 28, 28, 96
    bn1 = keras.layers.BatchNormalization()(pool1)                                      # 28, 28, 96

    # Second convolution
    conv2 = keras.layers.Conv2D(256, kernel_size=5, strides=1, padding='same')(bn1)     # 28, 28, 256
    relu2 = keras.layers.LeakyReLU()(conv2)                                             # 28, 28, 256
    pool2 = keras.layers.MaxPooling2D(pool_size=3, strides=2, padding='same')(relu2)    # 14, 14, 256
    bn2 = keras.layers.BatchNormalization()(pool2)                                      # 14, 14, 256

    # Third convolution
    conv3 = keras.layers.Conv2D(384, kernel_size=3, strides=1, padding='same')(bn2)     # 14, 14, 384
    relu3 = keras.layers.LeakyReLU()(conv3)                                             # 14, 14, 384

    # Fourth convolution
    conv4 = keras.layers.Conv2D(384, kernel_size=3, strides=1, padding='same')(relu3)   # 14, 14, 384
    relu4 = keras.layers.LeakyReLU()(conv4)                                             # 14, 14, 384

    # Fifth convolution
    conv5 = keras.layers.Conv2D(256, kernel_size=3, strides=1, padding='same')(relu4)   # 7, 7, 256
    relu5 = keras.layers.LeakyReLU()(conv5)                                             # 7, 7, 256
    pool3 = keras.layers.MaxPooling2D(pool_size=3, strides=2, padding='same')(relu5)    # 7, 7, 256

    fl = keras.layers.Flatten()(pool3)          # 12544

    # First fully connected
    dense1 = keras.layers.Dense(4096)(fl)       # 4096
    relu6 = keras.layers.LeakyReLU()(dense1)    # 4096
    drop1 = keras.layers.Dropout(0.5)(relu6)    # 4096

    # Second fully connected
    dense2 = keras.layers.Dense(4096)(drop1)    # 4096
    relu7 = keras.layers.LeakyReLU()(dense2)    # 4096
    drop2 = keras.layers.Dropout(0.5)(relu7)    # 4096

    # Third fully connected
    dense3 = keras.layers.Dense(2)(drop2)       # 2

    outputs = keras.layers.Activation('softmax')(dense3)

    model = keras.models.Model(inputs=inputs, outputs=outputs)
    model.summary()

    return model


# batch generator: reduce the consumption of computer memory
def generator(train_x, train_y, batch_size):

    while 1:
        row = np.random.randint(0, len(train_x), size=batch_size)
        x = train_x[row]
        y = train_y[row]
        yield x, y


# create model and train and save
def train_network(train_x, train_y, test_x, test_y, epoch, batch_size):
    train_x = train_x[:, :, :, np.newaxis]
    test_x = test_x[:, :, :, np.newaxis]

    model = create_network()
    model.compile(loss='categorical_crossentropy', optimizer='adadelta', metrics=['accuracy'])

    history = model.fit_generator(generator(train_x, train_y, batch_size), epochs=epoch,
                        steps_per_epoch=len(train_x) // batch_size)

    score = model.evaluate(test_x, test_y, verbose=0)
    print('first_model test accuracy:', score[1])

    model.save('first_model.h5')
    show_plot(history)


# Load the partially trained model and continue training and save
def load_network_then_train(train_x, train_y, test_x, test_y, epoch, batch_size, input_name, output_name):
    train_x = train_x[:, :, :, np.newaxis]
    test_x = test_x[:, :, :, np.newaxis]

    model = load_model(input_name)
    history = model.fit_generator(generator(train_x, train_y, batch_size),
                                  epochs=epoch, steps_per_epoch=len(train_x) // batch_size)

    score = model.evaluate(test_x, test_y, verbose=0)
    print(output_name, 'test accuracy:', score[1])

    model.save(output_name)
    show_plot(history)


# plot the loss and the accuracy
def show_plot(history):
    # list all data in history
    print(history.history.keys())

    plt.plot(history.history['loss'])
    plt.title('model loss')
    plt.ylabel('loss')
    plt.xlabel('epoch')
    plt.savefig('loss2.jpg')
    plt.show()

    plt.plot(history.history['accuracy'])
    plt.title('model accuracy')
    plt.ylabel('accuracy')
    plt.xlabel('epoch')
    plt.savefig('accuracy2.jpg')
    plt.show()
主函数调用
import getdata as gt
import network as nt
import cv2


if __name__ == "__main__":
    train_x, train_y, test_x, test_y = gt.make_network_data()
    nt.train_network(train_x, train_y, test_x, test_y, epoch=50, batch_size=16)
    nt.load_network_then_train(train_x, train_y, test_x, test_y, epoch=200, batch_size=16,
                               input_name='first_model.h5', output_name='second_model.h5')
6、项目链接
如果代码跑不通,或者想直接使用训练好的模型,可以去下载项目链接:
https://blog.csdn.net/Twilight737
