ESP32
可以在ubuntu16.04。IDF SDK,类似stm32库开发的方式,将freeRTOS、LWIP、tinyUSB、LVGL等开源库移植到esp32上,配有大量的demos,貌似比stm32开发方便很多
ESP32-CAM
sudo apt-get install git wget flex bison gperf python3 python3-venv python3-setuptools cmake ninja-build ccache libffi-dev libssl-dev dfu-util libusb-1.0-0
git clone --recursive https://github.com/espressif/esp-idf.git
git submodule update --init --recursive
export IDF_PATH=/home/ases/esp/esp-idf
export IDF_GITHUB_ASSETS="dl.espressif.com/github_assets"
./install.sh all
#then tools will be in ~/.espressif/
. ./export.sh #可以 alias get_idf='. /home/fang/Desktop/esp-idf/export.sh' 到.bashrc
mkdir esp-demos && cd esp-demos/
cp -ra ../esp-idf/examples/get-started/blink/ .
cd blink/
idf.py set-target esp32 //要保证当前目录下有 CMakeLists.txt
idf.py menuconfig
idf.py build
ls /dev/ttyUSB0
sudo chmod 777 /dev/ttyUSB0
//不使用底板下载,则:usb转串vcc接到板子5v接口,tx接chip rx,rx接chip tx,IO0与GND短接(boot模式),此状态上电(插上usb转串)
//下载完成后去掉IO0与GND的短接线,并按rst键即可运行模式
idf.py -p /dev/ttyUSB0 flash
idf.py -p /dev/ttyUSB0 monitor //ctrl + ] 退出
后面的学习还是以官网为主,api参考基本都有对应的例子
https://docs.espressif.com/projects/esp-idf/zh_CN/latest/esp32/api-reference/index.html

# git clone https://gitee.com/EspressifSystems/esp-idf.git
# git clone https://gitee.com/esp32_idf_submodule/submodule_config.git
#
# cd esp-idf
# git submodule init
# cp .git/config .git/config.bak
# cp ../submodule_config/config ./.git/
ESP32-CAM,使用micropython
micropython:开发板:esp32-cam:starts
lemariva/micropython-camera-driver: add camera support to MicroPython (github.com)
首先以boot模式插上usb转串口上电(gnd与IO0短接并rst),
sudo chmod 777 /dev/ttyUSB0
esptool.py --chip esp32 --port /dev/ttyUSB0 erase_flash(这一步之前可能需要先get_idf)
esptool.py --chip esp32 --port /dev/ttyUSB0 write_flash -z 0x1000 /home/fang/esp-micropython/micropython_camera_feeeb5ea3_esp32_idf4_4.bin
(这里的固件来自 micropython:开发板:esp32-cam:start,更新的可以用 GitHub - shariltumin/esp32-cam-micropython-2022)
下载完成后,去掉IO0与GND的短接线,按rst,即可115200连接esp-cam进入python交互模式。micropython启动后会优先找boot.py的文件来执行,执行后会转到main.py的文件来执行,我们在编写脚本的时候一定要把脚本的名字命名为这两个,推荐使用main.py
>>> import os
>>> os.listdir()
['boot.py']
>>> file=open("boot.py","r")
>>> file.read()
'# This file is executed on every boot (including wake-boot from deepsleep)\n#import esp\n#esp.osdebug(None)\n#import webrepl\n#webrepl.start()\n'
>>> file.close()
与micropython系统交互貌似用的是https://github.com/scientifichackers/ampy 这个工具,包括上传文件到micropython文件系统、直接本地执行等。一些ide如thonny也有这类功能.
thonny可以在电脑主机运行,自带了python解析器。也可以使用micropython-esp32解析器,在run->select interpreter中选择即可。(注意需要先把putty占用的串口腾出来)另外若拷贝的代码报告。IndentationError: unexpected indent极有可能是文件格式不对(tab键、空格键)
#main.py
import uos
import machine
import os

import time
import camera

#led = machine.Pin(33, machine.Pin.OUT)
#while True:
#    led.value(0)# 点亮LED
#    time.sleep_ms(500)      # 睡眠500毫秒
#    #start = time.ticks_ms() # 获取毫秒计时器开始值
#    #delta = time.ticks_diff(time.ticks_ms(), start) # 计算从开始到当前时间的差值

#    led.value(1)# 熄灭LED
#    time.sleep_ms(500)      # 睡眠500毫秒

#rtc = machine.RTC()
#ts = rtc.datetime()
#time_str = '%4d-%02d-%02d %02d:%02d:%02d' %(ts[0], ts[1], ts[2], ts[4], ts[5], ts[6])

#uos.mount(machine.SDCard(), '/sd') #注意不要是双引号貌似有点问题
#os.listdir('/sd')
#uos.chdir('/sd')

#camera.init(0, format=camera.JPEG)
#camera.init(0, format=camera.JPEG, fb_location=camera.PSRAM)
#camera.framesize(camera.FRAME_240X240)
#buf = camera.capture()
#f = open('a.jpg', 'w')
#f.write(buf)
#time.sleep_ms(100)
#f.close()
#camera.deinit()

#已经连接wifi的前提下,使用udp通信, https://blog.csdn.net/qq_44619703/article/details/122481183
#import socket
#s = socket.socket(socket.AF_INET, socket.SOCK_DGRAM, 0)
#s.bind(('192.168.1.11', 9090))#自己的ip, 作为server

#while True:
#    data, clientip = s.recvfrom(1024)
#    print("{},{}".format(data.decode(), clientip))
#    s.sendto("hi, this is server".encode(), clientip)

#client,我使用了两个esp32
#import socket
#serverip=("192.168.1.11", 9090)
#s = socket.socket(socket.AF_INET, socket.SOCK_DGRAM, 0)
#s.sendto("aaaabbbbcccc".encode(), serverip)


#已经连接wifi的前提下,使用tcp通信
import socket
s = socket.socket(socket.AF_INET, socket.SOCK_STREAM, 0)
s.bind(('192.168.1.11', 9090))#自己的ip, 作为server
s.listen(1)#允许多少个设备接入 , 最大允许128
client_socket, clientAddr = s.accept() #获取连接的客户端

while True:
    data,_ = client_socket.recvfrom(1024) #接收客户端的消息 , 接收1024个 byte
    client_socket.send("您好,我是服务端,内容已收到".encode()) #向客户端发送消息
    print(data.decode())
    if data.decode() == 'bye':
        break

client_socket.close() #关闭某个socket的连接
s.close() #关闭整个Socet

#client
#s = socket.socket(socket.AF_INET, socket.SOCK_STREAM, 0)
#s.connect(('192.168.1.11', 9090))
#s.send('this is client'.encode())
#s.send('bye'.encode())
连接wifi
# wifi.py
import network
import utime
import ntptime

class Wifi():

    def connect(self):
        self.sta_if = network.WLAN(network.STA_IF)
        start = utime.time()
        timed_out = False

        if not self.sta_if.isconnected():
            print('connecting to network...')
            self.sta_if.active(True)
            self.sta_if.connect('CMCC-u3kk', 'b23uyze7')
            while not self.sta_if.isconnected() and \
                not timed_out:
                if utime.time() - start >= 20:
                    timed_out = True
                else:
                    pass

        if self.sta_if.isconnected():
            #ntptime.settime()
            print('network config:', self.sta_if.ifconfig())
        else:
            print('internet not available')

    def disconnect(self):
        if self.sta_if.isconnected():
            self.sta_if.disconnect()
            self.sta_if.active(False)
当有多个项目文件的时候,可以打开本地 files页面全部选中,选择upload to /即可上传到micropython device。
【ESP32,ESP8266】教程汇总 - DF创客社区 - 分享创造的喜悦 (dfrobot.com.cn)
延时函数 - MicroPython-ESP32基础教程 (1zlab.com)
ESP32-cam网络开发(挺有意思)
ESP32-S3 快速参考手册 — MicroPython 1.18 documentation (01studio.cc)
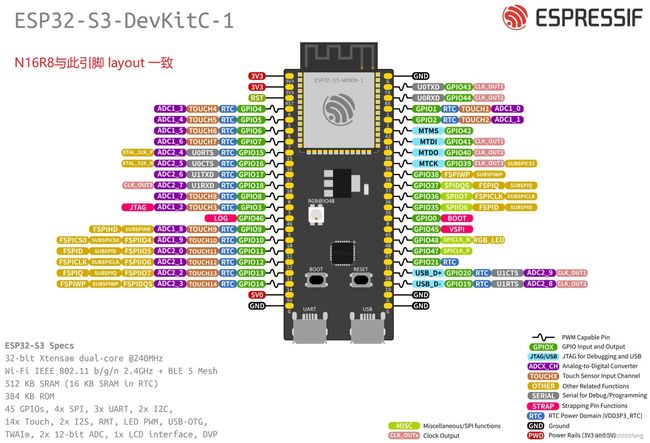
ESP32-S3 N16R8
https://docs.espressif.com/projects/esp-idf/zh_CN/latest/esp32s3/get-started/index.html
https://docs.espressif.com/projects/esp-idf/zh_CN/latest/esp32s3/hw-reference/esp32s3/user-guide-devkitc-1.html
sudo apt-get install git wget flex bison gperf python3 python3-venv python3-setuptools cmake ninja-build ccache libffi-dev libssl-dev dfu-util libusb-1.0-0
git clone --recursive https://github.com/espressif/esp-idf.git
git submodule update --init --recursive
export IDF_PATH=/home/ases/esp/esp-idf
export IDF_GITHUB_ASSETS="dl.espressif.com/github_assets"
./install.sh all
#then tools will be in ~/.espressif/
. ./export.sh #可以 alias get_idf='. /home/fang/Desktop/esp-idf/export.sh' 到.bashrc
mkdir esp-demos && cd esp-demos/
cp -ra ../esp-idf/examples/get-started/blink/ .
cd blink/
idf.py set-target esp32s3 //要保证当前目录下有 CMakeLists.txt,注意这里是eps32s3
idf.py menuconfig
idf.py build
ls /dev/ttyACM0 //不再是 /dev/ttyUSB0,这个可以拔插usb,然后sudo dmesg -c 查看
sudo chmod 777 /dev/ttyACM0
//使用usb接口,内部也是使用usb转串下载的,区别仅仅在于下载完成后,后续一个作为usb接口使用,一个作为串口使用
//usb转串口接口下载电路通过 DTR 和 RTS 控制esp32进入下载模式, 不需要做任何干涉,此外供电稳定很少会出现下载失败的问题
//我使用usb接口没有下载成功...只能通过usb转串口
idf.py -p /dev/ttyACM0 flash
idf.py -p /dev/ttyACM0 monitor //ctrl + ] 退出
后面的学习还是以官网为主,api参考基本都有对应的例子
https://docs.espressif.com/projects/esp-idf/zh_CN/latest/esp32s3/api-reference/index.html
例子几乎都是一样的,前面esp32的demo可以直接拿来用, 只是 set-target esp32s3
ESP32-S3 N16R8,使用micropython
编译micropython依赖esp-idf,idf.py --version查看当前版本,idf.py --list-targets检查当前支持的芯片型号。git clone https://github.com/micropython/micropython
但是貌似当前的mpy不支持idfv5.0的版本(Failed to resolve component 'tcpip_adapter'.)
https://github.com/espressif/esp-idf/issues/8883
https://github.com/micropython/micropython/issues/8607
所以只能直接烧录micropython release的binary。https://micropython.org/download/,我们用这个 https://micropython.org/download/GENERIC_S3/
需要使用esptool烧录,git clone https://github.com/espressif/esptool.git
cd /home/fang/esp-micropython/123/esptool/
sudo chmod 777 /dev/ttyACM0
esptool.py --chip esp32s3 --port /dev/ttyACM0 erase_flash
esptool.py --chip esp32s3 --port /dev/ttyACM0 write_flash -z 0 /home/fang/esp-micropython/GENERIC_S3-20220618-v1.19.1.bin
打开串口,Speed 设置为 115200,即可进入python交互环境。如若没有显示,可以按下rst重启。ctrl + D软件重启micropython
esp-cam可以就用 esp32,
https://micropython.org/download/esp32/
https://docs.01studio.cc/esp32-s3/quickref.html
开发文档,参看 https://docs.micropython.org/en/latest/
https://blog.csdn.net/solar_Lan/article/details/123335279
其他
IDF开发环境参看 https://aithinker.blog.csdn.net/article/details/121565113
ESP编程指南参看 https://docs.espressif.com/projects/esp-idf/zh_CN/latest/esp32/index.html
ESP32-CAM的一个demo参看 https://aithinker.blog.csdn.net/article/details/108000974
上手点亮开发板,https://blog.csdn.net/zhigedali/article/details/122714045
1. win10商店可以搜 Arduino IDE,或者去官网 https://www.arduino.cc/en/software,下载win10版本的话也是推荐你用商店装(linux版本就是直接下载)
2. 打开 Arduino IDE,文件>首先项> 额外开发板过滤器中输入 https://dl.espressif.com/dl/package_esp32_index.json,
其中定义了开发版配置和驱动demos、工具(包括gcc和其他开发用得着的工具),都在github上
3. 工具->开发板->开发板管理器, 搜索 ESP32 并点击安装,这就是下载第二步指定的 demos + tools
4. 工具->开发板->ESP32 Arduino -> AI Thinker ESP32-CAM, 选择刚刚安装的开发板
5. 文件->示例->ESP32->Camera, 选择 CamerWebServer,修改(可能需要另存为),然后验证(就是编译) & 上传(就是编译并通过串口下载到chip)
6. 上传(下载)完毕,工具->串口监视器,115200波特率,chip按rst按键可看到ip信息
10 [submodule "components/bt/controller/lib_esp32"]
11 path = components/bt/controller/lib_esp32
12 url = https://gitee.com/qiangguta/esp32-bt-lib.git
s://gitee.com/qiangguta/asio.git
45
46 [submodule "components/expat/expat"]
47 path = components/expat/expat
48 url = https://gitee.com/qiangguta/libexpat.git
# https://blog.csdn.net/JUST__Tw/article/details/111512725
#
#
# 安装编译工具链
# wget https://dl.espressif.com/dl/xtensa-esp32-elf-linux64-1.22.0-75-gbaf03c2-5.2.0.tar.gz
# 添加环境变量: /home/fang/esp32-cam/xtensa-esp32-elf/bin
#
#
# get esp-idf
# git clone --recursive https://gitee.com/EspressifSystems/esp-idf.git
# git clone --recursive https://github.com/espressif/esp-idf.git
https://blog.csdn.net/qq_24317435/article/details/112466193?spm=1001.2014.3001.5501
https://docs.espressif.com/projects/esp-idf/zh_CN/latest/esp32/get-started/linux-macos-setup.html
https://randomnerdtutorials.com/esp32-cam-ai-thinker-pinout/