记录一次 Github action的使用
0 、前言
这两天想把这个qq机器人再搞起来,这个东西很简单的。就是用别人的框架,但是搞这个玩意就是有一点很麻烦,就是我每次写完代码,就要重新测试、打包、然后上传到服务器、再java -jar 这样跑起来。。
就是感觉很麻烦
1、为啥使用Github Action
一个我觉得github比较熟悉和亲切,然后最主要的是,他可以可以完成我的需求。。。
push代码之后,自动测试、打包构建、部署到远程服务器
还是一样,学习资料如下,
对了,这个是需要科学上网的,
- github action官网首页
- action 仓库,你可以直接抄别人写好的现成的脚本
- github action 中文文档
GitHub Actions借助世界一流的CI / CD,可轻松实现所有软件工作流程的自动化。 直接从GitHub构建,测试和部署代码。 使代码审查,分支机构管理和问题分类工作按您想要的方式进行。
2、快速开始!
如何快速开始?
- 首先你需要创建一个github仓库。
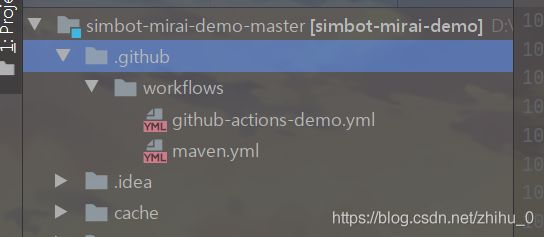
- 在你的代码仓库的根目录中添加
.github\workflows这个文件夹,

就像我这样。 - 然后你可以抄一下官网的例子,创建一个yml文件你可以就取名为
github-actions-demo.yml
name: GitHub Actions Demo
on: [push]
jobs:
  Explore-GitHub-Actions:
    runs-on: ubuntu-latest
    steps:
      - run: echo " The job was automatically triggered by a ${{ github.event_name }} event."
      - run: echo " This job is now running on a ${{ runner.os }} server hosted by GitHub!"
      - run: echo " The name of your branch is ${{ github.ref }} and your repository is ${{ github.repository }}."
      - name: Check out repository code
        uses: actions/checkout@v2
      - run: echo " The ${{ github.repository }} repository has been cloned to the runner."
      - run: echo "️ The workflow is now ready to test your code on the runner."
      - name: List files in the repository
        run: |
          ls ${{ github.workspace }}
      - run: echo " This job's status is ${{ job.status }}."
这个例子就类似于Hello World一样。
name工作流程的名称on什么是否触发这个工作流程 ,这里例子里是push提交代码的时候触发一次jobs多个工作runs-on在什么系统上执行,默认是ubuntusteps接下来要执行的步骤run在本机(ubuntu)执行的命令uses这个是导入的别人的脚本直接使用,从github社区仓库下拉取Explore-GitHub-Actions这个是这次job的名字,如下图

以我的actions 为例
我这里有两个workflow ,其中一个就是官方提供的helloworld的例子

点开可以看到和我们写的这个一样的。

4. 再次之前你应该push一下你的代码,这样 workflow才会执行。
3、如何自定义一个action满足自己的需求
- 首先在
.github\workflows这个目录下面创建一个yml文件 - 复制别人的一个模板,然后改改
name: Java CI with Maven & Deploy

# 在push的时候触发workflow
on:
  push:
    branches: [ master ]
  pull_request:
    branches: [ master ]

jobs:
  build:
    runs-on: ubuntu-latest
    steps:
      - name: 'Checkout GitHub Action'
        uses: actions/checkout@master

		# 配置好java1.8环境
      - name: Set up JDK 1.8
        uses: actions/setup-java@v1
        with:
          java-version: 1.8

		# maven打包构建
      - name: Build with Maven
        run: mvn -B package --file pom.xml

      - name: Deploy to server
        uses: appleboy/scp-action@master
        with:
          host: ${{secrets.VPS_HOST}}
          username: ${{secrets.VPS_USERNAME}}
          port: ${{secrets.VPS_PORT}}
          password: ${{secrets.VPS_PASSWORD}}
          source: "./target/simbot-mirai-demo-2.0.5.jar"
          target: "/simple-robot/"
          strip_components: 2

		# 使用ssh远程连接自己的服务器,并且执行命令
      - name: ssh pipelines
        uses: cross-the-world/ssh-pipeline@master
        env:
          WELCOME: "ssh pipeline"
        with:
          host: ${{ secrets.VPS_HOST }}
          user: ${{ secrets.VPS_USERNAME }}
          pass: ${{ secrets.VPS_PASSWORD }}
          port: ${{ secrets.VPS_PORT }}
          connect_timeout: 10s
          script: |
            cd /simple-robot
            nohup java -jar simbot-mirai-demo-2.0.5.jar > log.file  2>&1 &
我的流程如下
- 安装java1.8环境
- maven打包项目
- 远程连接阿里云的服务器,这里使用ssh
- 执行命令
注意:这里需要配置一下变量,免得自己的ip地址,密码暴露

像这样就可以创建一个变量,让workflow的配置文件可以读取到。

到这里就可以了,在项目写完之后就push一下就ok了
