Win11 RTX 4090显卡深度学习环境配置(Nvidia显卡驱动、CUDA11.7.0)
Win11 RTX 4090显卡深度学习环境配置(Nvidia显卡驱动、CUDA11.7.0)
- 1. 简介
- 2. 安装Anaconda
- 3. 安装Pycharm
- 4. 安装CUDA11.7.0
-
- 4.1 安装
- 4.2 测试
- 4.3 CUDA卸载
- 5. PyTorch安装
-
- 5.1 PyTorch安装
- 5.2 安装CUDA相关软件包
- 5.3 测试
1. 简介
PyTorch分为CPU版本和GPU版本,使用GPU加速深度学习的前提是具备显卡以及安装CUDA。使用PyTorch是不需要单独安装cuDNN的,因为其已经集成了cuDNN,在安装PyTorch时候会自动安装cuDNN。软件版本如下:
python version 3.9.16 (main, Mar  8 2023, 10:39:24) [MSC v.1916 64 bit (AMD64)]
torch version: 2.0.0
torchaudio  version: 2.0.0
torchvision  version:0.15.0
cuda version: 11.7
2. 安装Anaconda
直接官网https://www.anaconda.com/download/下载最新版。普通软件安装方法,安装后就可以用了。可以选择安装到其他盘符。
3. 安装Pycharm
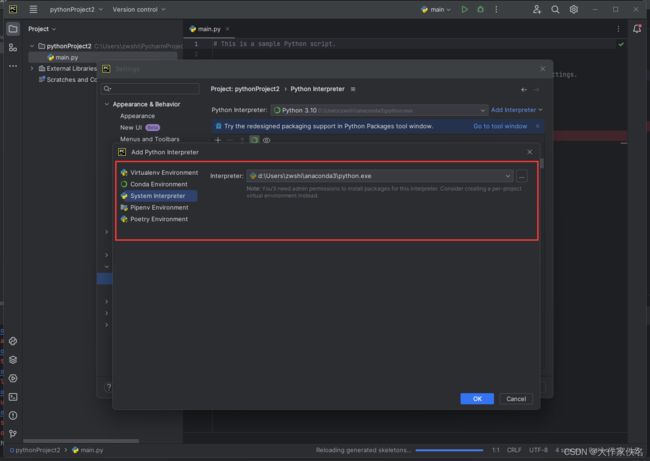
直接官网https://www.jetbrains.com/pycharm/download/#section=windows下载最新版,用社区版就够了。普通软件安装方法,安装后就可以用了。可以选择安装到其他盘符。如何选择安装的conda解释器可见下图:

4. 安装CUDA11.7.0
4.1 安装
官网下载https://developer.nvidia.com/cuda-toolkit-archive,这里我用的是11.8.0版本。

4.2 测试
安装了显卡驱动之后,系统中会有一个强大的命令行管理工具:nvidia-smi

CUDA安装成功后,通过命令查看:nvcc -V

4.3 CUDA卸载
如果安装了不适合的CUDA版本,Windows系统需要在控制面板卸载CUDA。在控制面板中根据安装时间排序,删除下图中的几项。不要把显卡驱动卸载了。

参考:CUDA卸载&&重装
5. PyTorch安装
5.1 PyTorch安装
同时安装CPU和GPU版本。命令如下:
pip install torch torchvision torchaudio
上述命令安装特别的慢,若干个小时(终止安装过程:ctrl+c)。因此可以使用清华源进行安装(一分钟安装结束),命令如下:
pip install torch -i https://pypi.tuna.tsinghua.edu.cn/simple
pip install torch torchvision -i https://pypi.tuna.tsinghua.edu.cn/simple
如果要安装指定版本1.9.0版,格式如下:
pip install torch==2.0.0 -i https://pypi.tuna.tsinghua.edu.cn/simple
pip install torch==2.0.0 torchvision==0.15.0 torchaudio==2.0.0  -i https://pypi.tuna.tsinghua.edu.cn/simple
5.2 安装CUDA相关软件包
如果上述准备在5.3节无法查询到显卡信息,安装如下CUDA相关软件包就可以了。
conda install -c nvidia cuda-cccl cuda-cudart cuda-cudart-dev cuda-cupti cuda-libraries cuda-libraries-dev cuda-nvrtc cuda-nvrtc-dev cuda-nvtx cuda-runtime
5.3 测试
因为根据《动⼿学深度学习》书中进行学习,因此,这里还安装了d2l包,其中包含了学习中会用到的各种包。命令如下:
pip install d2l
import torch
import sys

print("python version", sys.version)

print("torch version:", torch.__version__)
print("cuda version:", torch.version.cuda)

x = torch.rand(5, 3)
print(x)

# gpu
print("gpu:", torch.cuda.is_available())
print(torch.cuda.device_count())
参考:pytorch加速下载——清华镜像源(conda或者pip版本)
