Springcloud----Seata分布式事务
分布式事务的解决办法:
- 使用消息中间件
- 手写代码解决分布式事务
- 使用第三方组件--->Seata阿里巴巴的产品
这里只介绍通过第三方插件----Seata解决分布式事务的问题.
一.什么是Seata?
Seata 是什么Seata 是一款开源的分布式事务解决方案,致力于提供高性能和简单易用的分布式事务服务。Seata 将为用户提供了 AT、TCC、SAGA 和 XA 事务模式,为用户打造一站式的分布式解决方案。 https://seata.io/zh-cn/docs/overview/what-is-seata.html
二.Seata的执行流程
- A服务【订单微服务】的TM[事务发起者]向TC[seata服务端]申请开启一个全局事务,TC就会创建一个全局事务并返回一个唯一的XID
- A服务开始远程调用B服务【账户微服务】,此时XID会在微服务的调用链上传播
- B服务的RM向TC注册分支事务,并将其纳入XID对应的全局事务的管辖
- B服务执行分支事务,向数据库做操作
- 全局事务调用链处理完毕,TM根据有无异常向TC发起全局事务的提交或者回滚
- TC协调其管辖之下的所有分支事务, 决定是否回滚
三.搭建Seata服务器
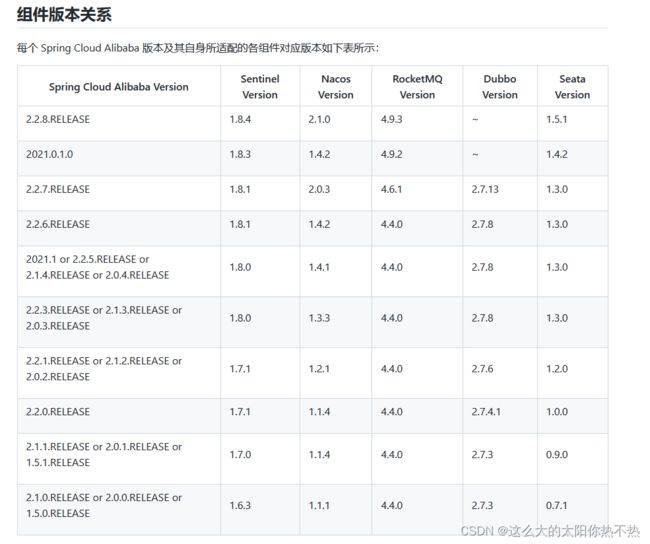
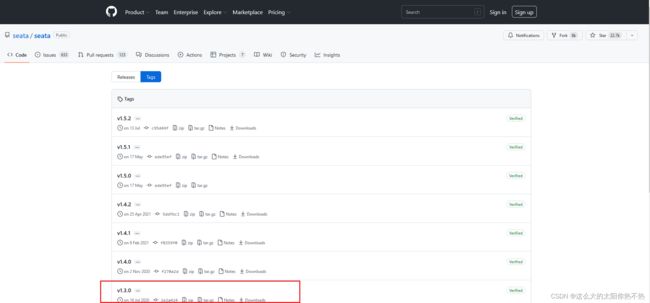
特别注意, SpringCloudAlibaba的版本和Seatad以及其他各版本之间是否是兼容的,不代表最新的版本能在你的项目中.我这里SpringCloud的版本是2.2.3,所以我这里使用的Seata的版本是1.3.0
(1)下载地址:
Tags · seata/seata · GitHu
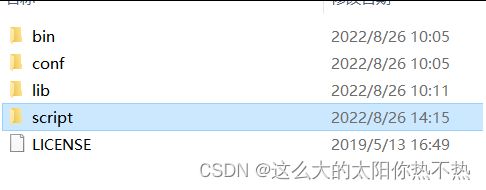
(2) 下载之后将压缩包解压到本地磁盘中.路径最好不要带中文
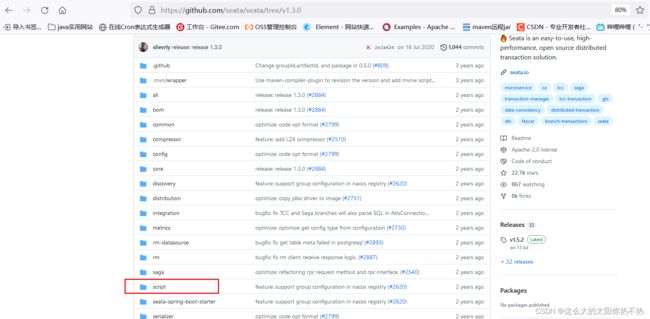
这里只有三个目录.我们可以从官网提供的源码中把源码中的script中的目录也粘贴到我们的seata中.最后目录结构会变成这样:
官网提供的源码地址:
GitHub - seata/seata at v1.3.0
记得下载对应得版本,我这里用的是1.3.0,改成你能用得版本.
这个script文件我们后面会有很大得用处.
(3) 修改conf/file.conf文件的内容
未来我们肯定Seata不会只开单机模式.既然要搭建集群的话,我们就需要给数据持久化到数据库中或者缓存中了.Seata提供了三种持久化方式:file,db,redis.这里我们选择持久化到db中,db选择为mysql.所以我们需要修改这个文件中的mode为db.并且修改后面的db中的信息为你自己的数据库信息.
## transaction log store, only used in seata-server
store {
  ## store mode: file、db、redis
  mode = "db"

  ## file store property
  file {
    ## store location dir
    dir = "sessionStore"
    # branch session size , if exceeded first try compress lockkey, still exceeded throws exceptions
    maxBranchSessionSize = 16384
    # globe session size , if exceeded throws exceptions
    maxGlobalSessionSize = 512
    # file buffer size , if exceeded allocate new buffer
    fileWriteBufferCacheSize = 16384
    # when recover batch read size
    sessionReloadReadSize = 100
    # async, sync
    flushDiskMode = async
  }

  ## database store property
  db {
    ## the implement of javax.sql.DataSource, such as DruidDataSource(druid)/BasicDataSource(dbcp)/HikariDataSource(hikari) etc.
    datasource = "druid"
    ## mysql/oracle/postgresql/h2/oceanbase etc.
    dbType = "mysql"
    driverClassName = "com.mysql.cj.jdbc.Driver"
    url = "jdbc:mysql://127.0.0.1:3306/seata?serverTimezone=Asia/Shanghai"
    user = "root"
    password = "xxxxxxxx"
    minConn = 5
    maxConn = 30
    globalTable = "global_table"
    branchTable = "branch_table"
    lockTable = "lock_table"
    queryLimit = 100
    maxWait = 5000
  }

  ## redis store property
  redis {
    host = "127.0.0.1"
    port = "6379"
    password = ""
    database = "0"
    minConn = 1
    maxConn = 10
    queryLimit = 100
  }

}
注意:mysql5.7以后的版本,driverClassName为"com.mysql.cj.jdbc.Driver",如果是这之前的版本的数据库,不需要修改,默认就为"com.mysql.jdbc.Driver".url这里,我的是mysql8版本以后,url需要加上时区.改完之后保存并退出.
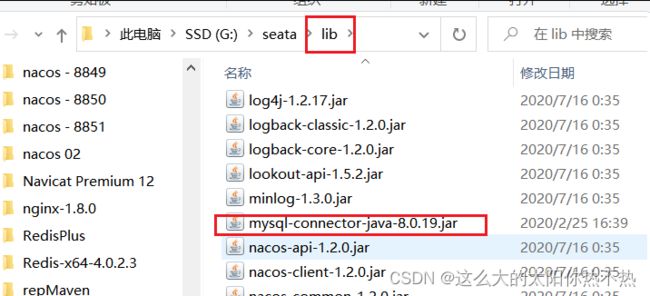
然后将mysql的jar包放入lib目录下.
Seata的lib目录默认是没有mysql的jar包的,但是这个jar包是在lib/jdbc目录下的.因为mysql5.1和mysql8为两个版本,这里Seata两个版本都提供了jar包,按需引入,把需要的jar包复制到lib目录下即可.
(4) 创建数据库并导入表结构
我们file.conf文件中已经在其中的db中写了我们使用的数据库名为seata,如果你改成了别的,对应的数据库名也要改.数据库建好以后,从我们导入的script\server\db目录下,找到我们的sql文件.
把表结构导入到我们刚才创建的数据库中.
再说一遍,源码一定要用对应的版本.在1.5版本,数据库中的表就变成了四张,而我们1.3.0版本只有这三张表.一定要注意!
(5) 指定seata的注册中心地址和配置中心的内容
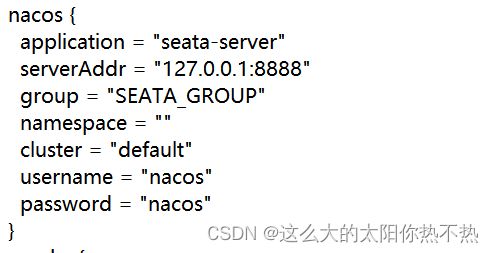
①修改conf目录下的registry.conf文件.将registry和config都改为nacos并且配置nacos的信息
改成你的nacos的配置信息.如果你想将配置文件不放在默认的public环境中,把你想放入的环境的id写到namespace中,如果就放在public中就不用管他. 分组不改默认就是SEATA_GROUP
config:
完整的registry.conf文件:
registry {
  # file 、nacos 、eureka、redis、zk、consul、etcd3、sofa
  type = "nacos"
  nacos {
    application = "seata-server"
    serverAddr = "127.0.0.1:8888"
    group = "SEATA_GROUP"
    namespace = ""
    cluster = "default"
    username = "nacos"
    password = "nacos"
  }
  eureka {
    serviceUrl = "http://localhost:8761/eureka"
    application = "default"
    weight = "1"
  }
  redis {
    serverAddr = "localhost:6379"
    db = 0
    password = ""
    cluster = "default"
    timeout = 0
  }
  zk {
    cluster = "default"
    serverAddr = "127.0.0.1:2181"
    sessionTimeout = 6000
    connectTimeout = 2000
    username = ""
    password = ""
  }
  consul {
    cluster = "default"
    serverAddr = "127.0.0.1:8500"
  }
  etcd3 {
    cluster = "default"
    serverAddr = "http://localhost:2379"
  }
  sofa {
    serverAddr = "127.0.0.1:9603"
    application = "default"
    region = "DEFAULT_ZONE"
    datacenter = "DefaultDataCenter"
    cluster = "default"
    group = "SEATA_GROUP"
    addressWaitTime = "3000"
  }
  file {
    name = "file.conf"
  }
}

config {
  # file、nacos 、apollo、zk、consul、etcd3
  type = "nacos"

  nacos {
    serverAddr = "127.0.0.1:8888"
    namespace = ""
    group = "SEATA_GROUP"
    username = "nacos"
    password = "nacos"
  }
  consul {
    serverAddr = "127.0.0.1:8500"
  }
  apollo {
    appId = "seata-server"
    apolloMeta = "http://192.168.1.204:8801"
    namespace = "application"
  }
  zk {
    serverAddr = "127.0.0.1:2181"
    sessionTimeout = 6000
    connectTimeout = 2000
    username = ""
    password = ""
  }
  etcd3 {
    serverAddr = "http://localhost:2379"
  }
  file {
    name = "file.conf"
  }
}
②修改需要放入配置中心的配置内容
- 修改script\config-center目录下的config.txt文件.
mode改为db,store.file删不删除都可以.留着也没事.虽然我这里给删了.包括下面的store.redis都可以删的,但是这个我没有删
- 特别注意这个设置:
其中这个qy151就是分组名.它是seata的分组不是在nacos中的分组,设置分组的作用是可以选择用哪一组的seata服务,以免你这一组的seata宕机了我还可以用别的分组. 记住这里改的分组名,我们后面配置的时候还会用到它.
完整的config.txt文件:
transport.type=TCP
transport.server=NIO
transport.heartbeat=true
transport.enableClientBatchSendRequest=false
transport.threadFactory.bossThreadPrefix=NettyBoss
transport.threadFactory.workerThreadPrefix=NettyServerNIOWorker
transport.threadFactory.serverExecutorThreadPrefix=NettyServerBizHandler
transport.threadFactory.shareBossWorker=false
transport.threadFactory.clientSelectorThreadPrefix=NettyClientSelector
transport.threadFactory.clientSelectorThreadSize=1
transport.threadFactory.clientWorkerThreadPrefix=NettyClientWorkerThread
transport.threadFactory.bossThreadSize=1
transport.threadFactory.workerThreadSize=default
transport.shutdown.wait=3
service.vgroupMapping.qy151=default
service.default.grouplist=127.0.0.1:8091
service.enableDegrade=false
service.disableGlobalTransaction=false
client.rm.asyncCommitBufferLimit=10000
client.rm.lock.retryInterval=10
client.rm.lock.retryTimes=30
client.rm.lock.retryPolicyBranchRollbackOnConflict=true
client.rm.reportRetryCount=5
client.rm.tableMetaCheckEnable=false
client.rm.sqlParserType=druid
client.rm.reportSuccessEnable=false
client.rm.sagaBranchRegisterEnable=false
client.tm.commitRetryCount=5
client.tm.rollbackRetryCount=5
client.tm.degradeCheck=false
client.tm.degradeCheckAllowTimes=10
client.tm.degradeCheckPeriod=2000
store.mode=db
store.db.datasource=druid
store.db.dbType=mysql
store.db.driverClassName=com.mysql.cj.jdbc.Driver
store.db.url=jdbc:mysql://127.0.0.1:3306/seata?serverTimezone=Asia/Shanghai
store.db.user=root
store.db.password=xxxxxx
store.db.minConn=5
store.db.maxConn=30
store.db.globalTable=global_table
store.db.branchTable=branch_table
store.db.queryLimit=100
store.db.lockTable=lock_table
store.db.maxWait=5000
store.redis.host=127.0.0.1
store.redis.port=6379
store.redis.maxConn=10
store.redis.minConn=1
store.redis.database=0
store.redis.password=null
store.redis.queryLimit=100
server.recovery.committingRetryPeriod=1000
server.recovery.asynCommittingRetryPeriod=1000
server.recovery.rollbackingRetryPeriod=1000
server.recovery.timeoutRetryPeriod=1000
server.maxCommitRetryTimeout=-1
server.maxRollbackRetryTimeout=-1
server.rollbackRetryTimeoutUnlockEnable=false
client.undo.dataValidation=true
client.undo.logSerialization=jackson
client.undo.onlyCareUpdateColumns=true
server.undo.logSaveDays=7
server.undo.logDeletePeriod=86400000
client.undo.logTable=undo_log
client.log.exceptionRate=100
transport.serialization=seata
transport.compressor=none
metrics.enabled=false
metrics.registryType=compact
metrics.exporterList=prometheus
metrics.exporterPrometheusPort=9898
(6)使用脚本自动导入配置文件到nacos配置中心
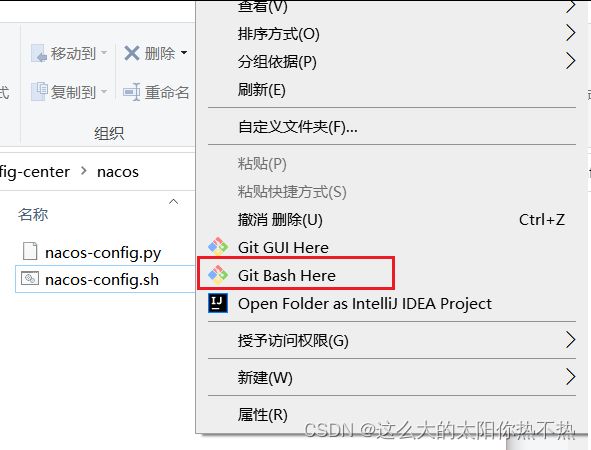
在script\config-center\nacos目录下有一个nacos-config.sh的脚本文件.由于我们目前处于Windows的环境,而.sh文件适合在linux中启动.我们可以用git服务来代替linux.
在nacos-config.sh文件所在目录,点击右键打开Git Bash Here.
如果你的nacos的配置都是默认的配置(localhost:8848),直接用git方式打开文件直接运行也可以.如果你像我一样修改了nacos的端口号,那么就需要打开git bash 输入以下命令指定nacos的地址和端口号以及namespace(默认用的public如果没用自定的环境就不用配)
sh nacos-config.sh -h localhost -p 8888
参数说明:
-h:host 默认值为localhost
-p:port 默认值为8848
-g:配置分组,默认为'SEATA_GROUP'
-t:对应nacos的命名空间ID字段,默认值为空
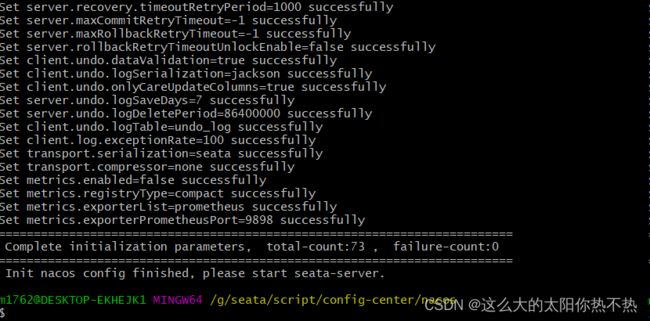
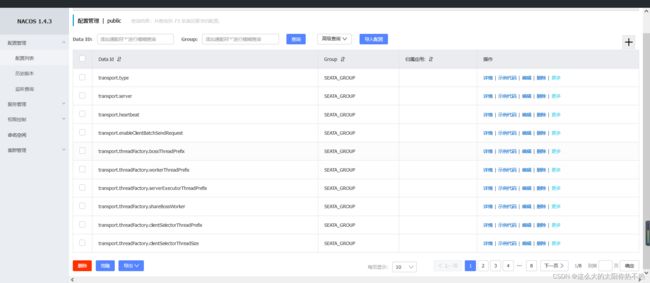
可以看到我们的配置文件都已经导入了.
最后启动seata服务器.
四.配置微服务客户端
(1) 在每个微服务对应的数据库中创建unlog表.如果你就一个数据库,那就引入一个表就行.
这个表不需要手动写,script\client\at\db目录下的mysql.sql文件里面有.
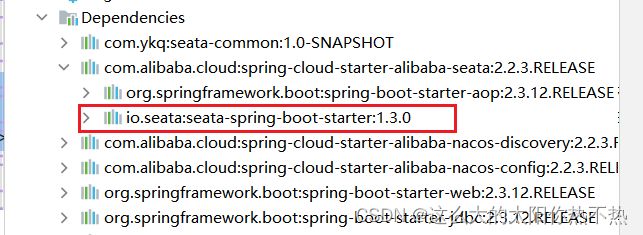
(2) 给需要的微服务(即整个链路上的微服务)都引入seata依赖.这里要注意,你的seata的依赖版本一定要保证是和你用的版本是一致的.就像我用的是1.3.0,项目中引入的依赖也一定要是1.3.0
    com.alibaba.cloud
    spring-cloud-starter-alibaba-seata
(3) 修改每个微服务的配置文件
单个微服务的完整配置:
server:
  port: 8003
spring:
  # 数据源配置
  datasource:
    url: jdbc:mysql://localhost:3306/seata_storage?serverTimezone=Asia/Shanghai
    driver-class-name: com.mysql.cj.jdbc.Driver
    username: root
    password: password
  application:
    name: seata-storage
  cloud:
    nacos:
      discovery:
        server-addr: localhost:8888
    alibaba:
      seata:
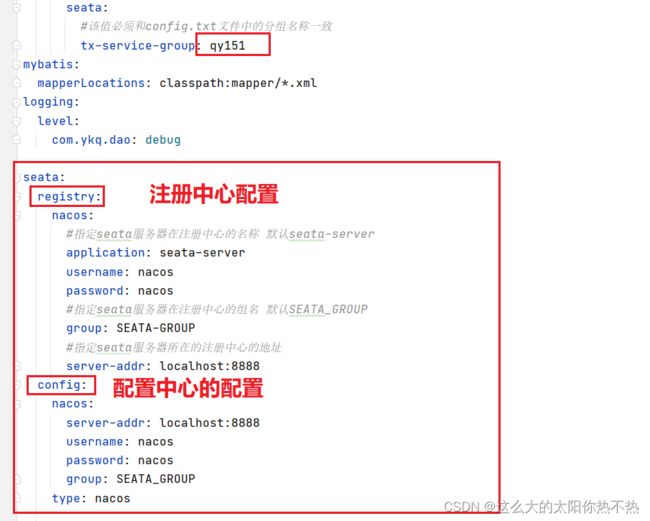
        #该值必须和config.txt文件中的分组名称一致
        tx-service-group: qy151
mybatis:
  mapperLocations: classpath:mapper/*.xml
logging:
  level:
    com.ykq.dao: debug

seata:
  registry:
    nacos:
      #指定seata服务器在注册中心的名称 默认seata-server
      application: seata-server
      username: nacos
      password: nacos
      #指定seata服务器在注册中心的组名 默认SEATA_GROUP
      group: SEATA-GROUP
      #指定seata服务器所在的注册中心的地址
      server-addr: localhost:8888
  config:
    nacos:
      server-addr: localhost:8888
      username: nacos
      password: nacos
      group: SEATA_GROUP
    type: nacos
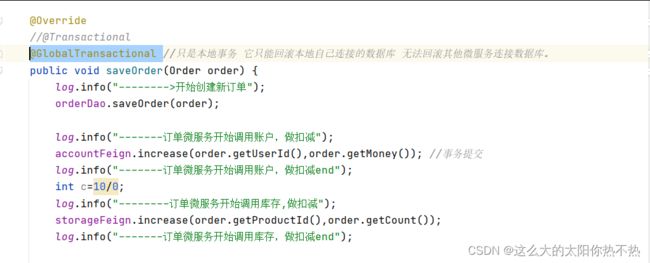
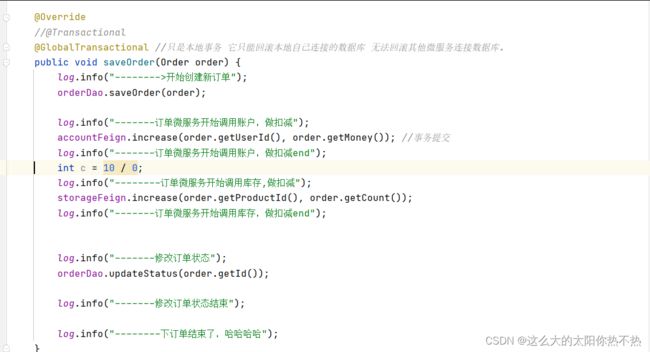
在事务的发起者所在微服务上添加分布式事务的注解
@GlobalTransactional
重启相关的微服务.测试事务是否成功.
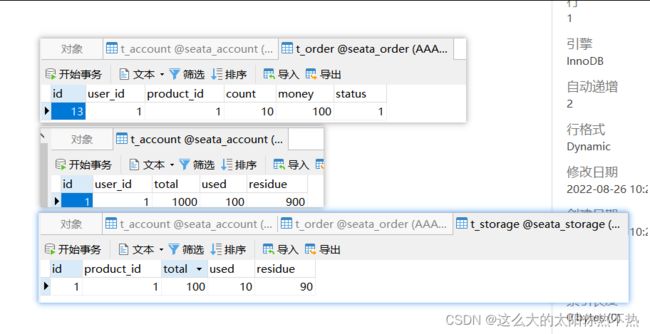
正常下单:
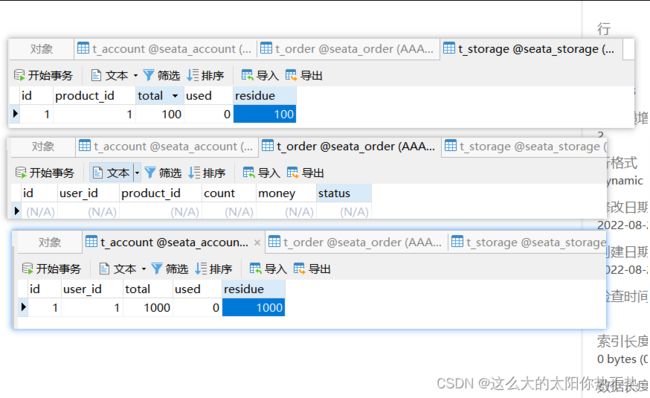
现在我们个表恢复成一开始的样子.
然后在下单的业务逻辑中故意加一个异常.如果分布式事务引入成功,那么会显示下单失败,并且三张表的内容都不会修改.
如果没有加分布式事务,我们的数据库中seata-order的表会修改,其他两个表没有变化.如果加了分布式事务,遇到异常会进行事务回滚,我们三张表都不会有改变.
下单提示下单失败:
数据库中:
证明我们的分布式事务已经配置并使用成功.

