序列标注ner原理,CRF作用以及transformers ner使用
1.参考
Pre-Training with Whole Word Masking for Chinese BERT(中文BERT-wwm系列模型)
https://github.com/ymcui/Chinese-BERT-wwm
Transformers: State-of-the-art Natural Language Processing for TensorFlow 2.0 and PyTorch.
https://github.com/huggingface/transformers
2.ner理解
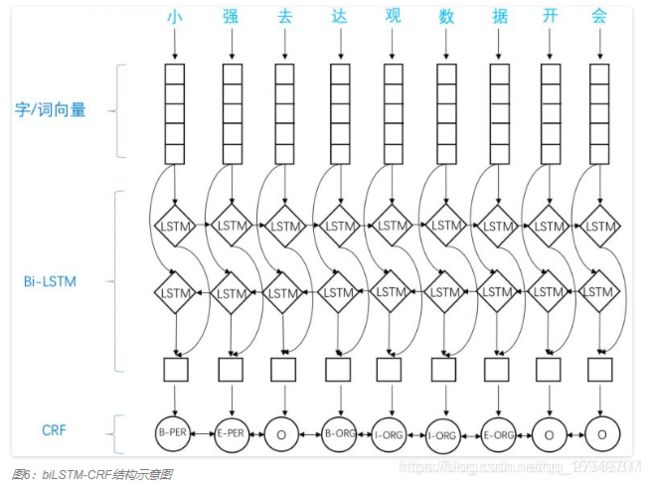
输出的是一个句子的每个字的分类,但是为什么要加crf呢?因为神经网络模型学的是每个字的label,考虑左右两边的结果比较少,例如这里小强是个名词,通过crf可以避免出现小B-PER,强B-PER,两个都是B-PER的情况,因为前面一个已经是B-PER了,后面不可能在出现了。
https://blog.csdn.net/qq_27586341/article/details/103062651
3. CRF实现
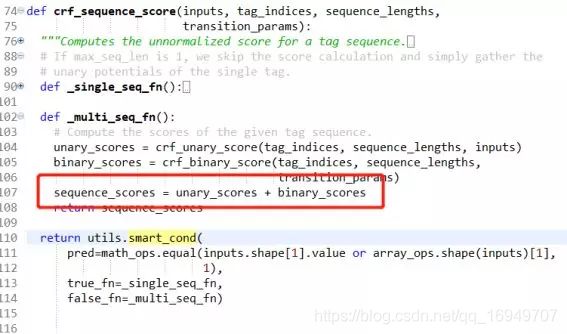
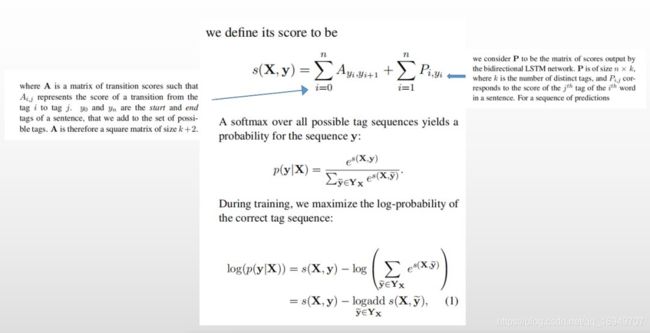
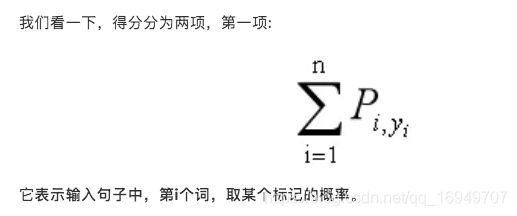

即一个为单个字符的概率的修正因子,另一个为左右关系的修正因子。
【NLP】用于序列标注问题的条件随机场(Conditional Random Field, CRF)
https://mp.weixin.qq.com/s/79M6ehrQTiUc0l_sO9fUqA
ADVANCED: MAKING DYNAMIC DECISIONS AND THE BI-LSTM CR
https://pytorch.org/tutorials/beginner/nlp/advanced_tutorial.html#bi-lstm-conditional-random-field-discussion
Bi-LSTM-CRF for Sequence Labeling
https://zhuanlan.zhihu.com/p/27338210
4.Transformers NER使用
- 下载预训练模型
Pre-Training with Whole Word Masking for Chinese BERT(中文BERT-wwm系列模型)
https://github.com/ymcui/Chinese-BERT-wwm - 利用transfomers库加载使用
Transformers: State-of-the-art Natural Language Processing for TensorFlow 2.0 and PyTorch.
https://github.com/huggingface/transformers
一些代码细节
- bert是啥

- 具体实现
modeling_bert.py
class BertForTokenClassification(BertPreTrainedModel):
    def __init__(self, config):
        super().__init__(config)
        self.num_labels = config.num_labels

        self.bert = BertModel(config)
        self.dropout = nn.Dropout(config.hidden_dropout_prob)
        self.classifier = nn.Linear(config.hidden_size, config.num_labels)

        self.init_weights()

    @add_start_docstrings_to_callable(BERT_INPUTS_DOCSTRING)
    def forward(
        self,
        input_ids=None,
        attention_mask=None,
        token_type_ids=None,
        position_ids=None,
        head_mask=None,
        inputs_embeds=None,
        labels=None,
    ):
        r"""
        labels (:obj:`torch.LongTensor` of shape :obj:`(batch_size, sequence_length)`, `optional`, defaults to :obj:`None`):
            Labels for computing the token classification loss.
            Indices should be in ``[0, ..., config.num_labels - 1]``.

    Returns:
        :obj:`tuple(torch.FloatTensor)` comprising various elements depending on the configuration (:class:`~transformers.BertConfig`) and inputs:
        loss (:obj:`torch.FloatTensor` of shape :obj:`(1,)`, `optional`, returned when ``labels`` is provided) :
            Classification loss.
        scores (:obj:`torch.FloatTensor` of shape :obj:`(batch_size, sequence_length, config.num_labels)`)
            Classification scores (before SoftMax).
        hidden_states (:obj:`tuple(torch.FloatTensor)`, `optional`, returned when ``config.output_hidden_states=True``):
            Tuple of :obj:`torch.FloatTensor` (one for the output of the embeddings + one for the output of each layer)
            of shape :obj:`(batch_size, sequence_length, hidden_size)`.

            Hidden-states of the model at the output of each layer plus the initial embedding outputs.
        attentions (:obj:`tuple(torch.FloatTensor)`, `optional`, returned when ``config.output_attentions=True``):
            Tuple of :obj:`torch.FloatTensor` (one for each layer) of shape
            :obj:`(batch_size, num_heads, sequence_length, sequence_length)`.

            Attentions weights after the attention softmax, used to compute the weighted average in the self-attention
            heads.

    Examples::

        from transformers import BertTokenizer, BertForTokenClassification
        import torch

        tokenizer = BertTokenizer.from_pretrained('bert-base-uncased')
        model = BertForTokenClassification.from_pretrained('bert-base-uncased')

        input_ids = torch.tensor(tokenizer.encode("Hello, my dog is cute", add_special_tokens=True)).unsqueeze(0)  # Batch size 1
        labels = torch.tensor([1] * input_ids.size(1)).unsqueeze(0)  # Batch size 1
        outputs = model(input_ids, labels=labels)

        loss, scores = outputs[:2]

        """

        outputs = self.bert(
            input_ids,
            attention_mask=attention_mask,
            token_type_ids=token_type_ids,
            position_ids=position_ids,
            head_mask=head_mask,
            inputs_embeds=inputs_embeds,
        )

        sequence_output = outputs[0]

        sequence_output = self.dropout(sequence_output)
        logits = self.classifier(sequence_output)

        outputs = (logits,) + outputs[2:]  # add hidden states and attention if they are here
        if labels is not None:
            loss_fct = CrossEntropyLoss()
            # Only keep active parts of the loss
            if attention_mask is not None:
                active_loss = attention_mask.view(-1) == 1
                active_logits = logits.view(-1, self.num_labels)
                active_labels = torch.where(
                    active_loss, labels.view(-1), torch.tensor(loss_fct.ignore_index).type_as(labels)
                )
                loss = loss_fct(active_logits, active_labels)
            else:
                loss = loss_fct(logits.view(-1, self.num_labels), labels.view(-1))
            outputs = (loss,) + outputs

        return outputs  # (loss), scores, (hidden_states), (attentions)
具体使用可以参考
README.md
## Named Entity Recognition

Based on the scripts [`run_ner.py`](https://github.com/huggingface/transformers/blob/master/examples/ner/run_ner.py) for Pytorch and
[`run_tf_ner.py`](https://github.com/huggingface/transformers/blob/master/examples/ner/run_tf_ner.py) for Tensorflow 2.
This example fine-tune Bert Multilingual on GermEval 2014 (German NER).
Details and results for the fine-tuning provided by @stefan-it.

### Data (Download and pre-processing steps)

Data can be obtained from the [GermEval 2014](https://sites.google.com/site/germeval2014ner/data) shared task page.

Here are the commands for downloading and pre-processing train, dev and test datasets. The original data format has four (tab-separated) columns, in a pre-processing step only the two relevant columns (token and outer span NER annotation) are extracted:

```bash
curl -L 'https://sites.google.com/site/germeval2014ner/data/NER-de-train.tsv?attredirects=0&d=1' \
| grep -v "^#" | cut -f 2,3 | tr '\t' ' ' > train.txt.tmp
curl -L 'https://sites.google.com/site/germeval2014ner/data/NER-de-dev.tsv?attredirects=0&d=1' \
| grep -v "^#" | cut -f 2,3 | tr '\t' ' ' > dev.txt.tmp
curl -L 'https://sites.google.com/site/germeval2014ner/data/NER-de-test.tsv?attredirects=0&d=1' \
| grep -v "^#" | cut -f 2,3 | tr '\t' ' ' > test.txt.tmp
The GermEval 2014 dataset contains some strange “control character” tokens like '\x96', '\u200e', '\x95', '\xad' or '\x80'. One problem with these tokens is, that BertTokenizer returns an empty token for them, resulting in misaligned InputExamples. I wrote a script that a) filters these tokens and b) splits longer sentences into smaller ones (once the max. subtoken length is reached).
wget "https://raw.githubusercontent.com/stefan-it/fine-tuned-berts-seq/master/scripts/preprocess.py"
Let’s define some variables that we need for further pre-processing steps and training the model:
export MAX_LENGTH=128
export BERT_MODEL=bert-base-multilingual-cased
Run the pre-processing script on training, dev and test datasets:
python3 preprocess.py train.txt.tmp $BERT_MODEL $MAX_LENGTH > train.txt
python3 preprocess.py dev.txt.tmp $BERT_MODEL $MAX_LENGTH > dev.txt
python3 preprocess.py test.txt.tmp $BERT_MODEL $MAX_LENGTH > test.txt
The GermEval 2014 dataset has much more labels than CoNLL-2002/2003 datasets, so an own set of labels must be used:
cat train.txt dev.txt test.txt | cut -d " " -f 2 | grep -v "^$"| sort | uniq > labels.txt
Prepare the run
Additional environment variables must be set:
export OUTPUT_DIR=germeval-model
export BATCH_SIZE=32
export NUM_EPOCHS=3
export SAVE_STEPS=750
export SEED=1
Run the Pytorch version
To start training, just run:
python3 run_ner.py --data_dir ./ \
--model_type bert \
--labels ./labels.txt \
--model_name_or_path $BERT_MODEL \
--output_dir $OUTPUT_DIR \
--max_seq_length  $MAX_LENGTH \
--num_train_epochs $NUM_EPOCHS \
--per_gpu_train_batch_size $BATCH_SIZE \
--save_steps $SAVE_STEPS \
--seed $SEED \
--do_train \
--do_eval \
--do_predict
If your GPU supports half-precision training, just add the --fp16 flag. After training, the model will be both evaluated on development and test datasets.
Evaluation
Evaluation on development dataset outputs the following for our example:
10/04/2019 00:42:06 - INFO - __main__ -   ***** Eval results  *****
10/04/2019 00:42:06 - INFO - __main__ -     f1 = 0.8623348017621146
10/04/2019 00:42:06 - INFO - __main__ -     loss = 0.07183869666975543
10/04/2019 00:42:06 - INFO - __main__ -     precision = 0.8467916366258111
10/04/2019 00:42:06 - INFO - __main__ -     recall = 0.8784592370979806
On the test dataset the following results could be achieved:
10/04/2019 00:42:42 - INFO - __main__ -   ***** Eval results  *****
10/04/2019 00:42:42 - INFO - __main__ -     f1 = 0.8614389652384803
10/04/2019 00:42:42 - INFO - __main__ -     loss = 0.07064602487454782
10/04/2019 00:42:42 - INFO - __main__ -     precision = 0.8604651162790697
10/04/2019 00:42:42 - INFO - __main__ -     recall = 0.8624150210424085
Comparing BERT (large, cased), RoBERTa (large, cased) and DistilBERT (base, uncased)
Here is a small comparison between BERT (large, cased), RoBERTa (large, cased) and DistilBERT (base, uncased) with the same hyperparameters as specified in the example documentation (one run):
| Model | F-Score Dev | F-Score Test |
|---|---|---|
bert-large-cased |
95.59 | 91.70 |
roberta-large |
95.96 | 91.87 |
distilbert-base-uncased |
94.34 | 90.32 |
Run the Tensorflow 2 version
To start training, just run:
python3 run_tf_ner.py --data_dir ./ \
--model_type bert \
--labels ./labels.txt \
--model_name_or_path $BERT_MODEL \
--output_dir $OUTPUT_DIR \
--max_seq_length  $MAX_LENGTH \
--num_train_epochs $NUM_EPOCHS \
--per_device_train_batch_size $BATCH_SIZE \
--save_steps $SAVE_STEPS \
--seed $SEED \
--do_train \
--do_eval \
--do_predict
Such as the Pytorch version, if your GPU supports half-precision training, just add the --fp16 flag. After training, the model will be both evaluated on development and test datasets.
Evaluation
Evaluation on development dataset outputs the following for our example:
           precision    recall  f1-score   support

 LOCderiv     0.7619    0.6154    0.6809        52
  PERpart     0.8724    0.8997    0.8858      4057
  OTHpart     0.9360    0.9466    0.9413       711
  ORGpart     0.7015    0.6989    0.7002       269
  LOCpart     0.7668    0.8488    0.8057       496
      LOC     0.8745    0.9191    0.8963       235
 ORGderiv     0.7723    0.8571    0.8125        91
 OTHderiv     0.4800    0.6667    0.5581        18
      OTH     0.5789    0.6875    0.6286        16
 PERderiv     0.5385    0.3889    0.4516        18
      PER     0.5000    0.5000    0.5000         2
      ORG     0.0000    0.0000    0.0000         3

micro avg     0.8574    0.8862    0.8715      5968
macro avg     0.8575    0.8862    0.8713      5968
On the test dataset the following results could be achieved:
           precision    recall  f1-score   support

  PERpart     0.8847    0.8944    0.8896      9397
  OTHpart     0.9376    0.9353    0.9365      1639
  ORGpart     0.7307    0.7044    0.7173       697
      LOC     0.9133    0.9394    0.9262       561
  LOCpart     0.8058    0.8157    0.8107      1150
      ORG     0.0000    0.0000    0.0000         8
 OTHderiv     0.5882    0.4762    0.5263        42
 PERderiv     0.6571    0.5227    0.5823        44
      OTH     0.4906    0.6667    0.5652        39
 ORGderiv     0.7016    0.7791    0.7383       172
 LOCderiv     0.8256    0.6514    0.7282       109
      PER     0.0000    0.0000    0.0000        11

micro avg     0.8722    0.8774    0.8748     13869
macro avg     0.8712    0.8774    0.8740     13869