python学习-代码调试器
目录
- 为什么学习调试器
- Pycharm Debugger
-
- 示例所用代码
- 布局
- 调试工具栏 Debug Bar
- 程序控制工具栏
- pdb
-
- 查看源代码 l list
- 查看当前函数源代码 ll longlist
- 打印变量 p
- 查看调用栈w where
- 向上移动当前帧 u up
- 向上移动当前帧 d down
- 运行当前行代码,在第一个可以停止的位置停下 s step
- 继续运行,直到当前函数的下一行或当前函数返回为止 n next
- 运行直到下一个断点 c continue
- 打印函数返回值 retval
- 跳出循环(执行直到比当前行数大) unt until
- 添加断点 b break
- 启用/禁用断点 enable/disable
- 修改代码
- 清除断点 cl clear
- 退出调试器 q quit
- 参考
为什么学习调试器
大家平时是怎么调试代码的呢?我平时是这两种
- 使用print打印变量,发布时再注释掉
- 使用日志,设置控制台为DEBUG模式,发布时设置控制台为更严重级别,就不用一个个注释print
第一个方式需要侵入代码,且调试后需要注释,有的时候忘记注释了一个print,比较繁琐。第二个方式优雅了一些,但有的时候就是写的小脚本,不需要保存日志,比较麻烦。
这两个还有一些缺点,例如,打印的不够多时,还需要添加print或log,然后再次运行。所以,我们来学习一个更优雅的方式:使用调试器。
Pycharm Debugger
示例所用代码
net_tools.py
import aiohttp

async def get_resp(url):
    async with aiohttp.ClientSession() as session:
        async with session.get(url) as response:
            print(response.status)
            return await response.text()
main.py
import asyncio
from net_tools import get_resp

async def print_resp(url):
    res = await get_resp(url)
    print(res)

async def main():
    url_list = ["https://blog.csdn.net/lady_killer9/article/details/128891256","https://blog.csdn.net/lady_killer9/article/details/108763489"]
    for url in url_list:
       await asyncio.create_task(print_resp(url))

if __name__ == '__main__':
    asyncio.run(main())
布局
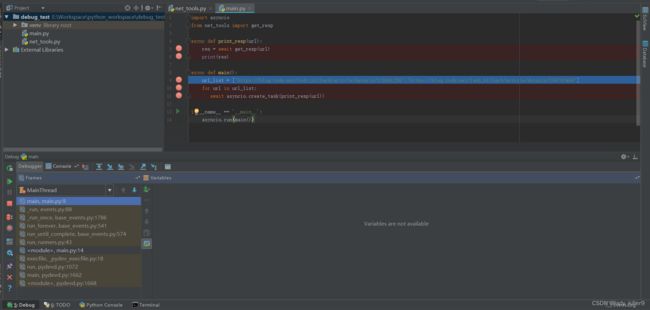
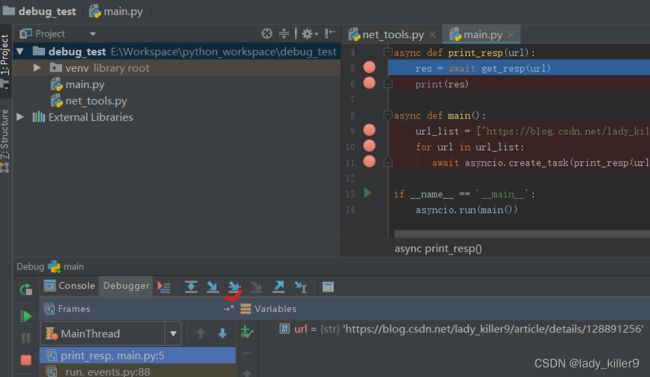
左侧一列为调试工具栏、调试工具栏右侧是帧、再右侧是变量显示区域、上侧是程序控制栏。默认是Debugger标签页,点击Console标签页可以查看程序的输出。

调试工具栏 Debug Bar
按钮 |
提示和快捷键 |
描述 |
|---|---|---|
重新运行 Ctrl+F5 |
单击此按钮可停止当前应用程序并再次运行它。 |
|
继续程序 F9 |
当应用程序暂停时,单击此按钮可继续程序的执行,即运行到下一个断点。 |
|
暂停程序 Ctrl+Pause |
单击此按钮可暂停程序执行。 |
|
停止 Ctrl+F2 |
单击此按钮可通过标准脚本在外部终止当前进程。 |
|
查看断点 Ctrl+Shift+F8 |
单击此按钮可打开“断点”对话框,您可以在其中配置断点行为。 |
|
禁用断点 |
使用此按钮可以切换断点状态。 在“调试”工具窗口的工具栏中按下该按钮时,项目中的所有断点都将禁用,图标将变为灰色: 可以暂时将项目中的所有断点静音以执行程序,而无需在断点处停止。 |
|
设置 |
单击此按钮可打开包含以下选项的菜单:
|
|
Pin Tab |
Click this button to pin or unpin the current tab. You may need to pin a tab to prevent it from closing automatically when the maximum number of tabs is reached in this window. |
单击3次按钮,可以看到ul变量是url_list中的第一个。
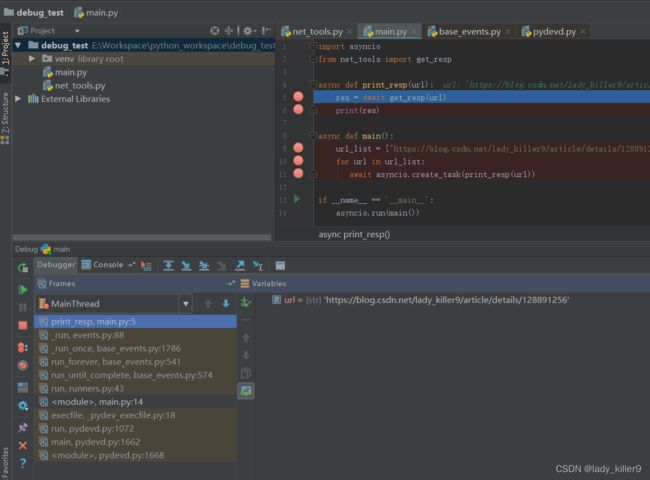
单击按钮可以查看所有断点。可以通过Enabled复选框来禁用/启用某一个断点。

单击禁用所有断点。
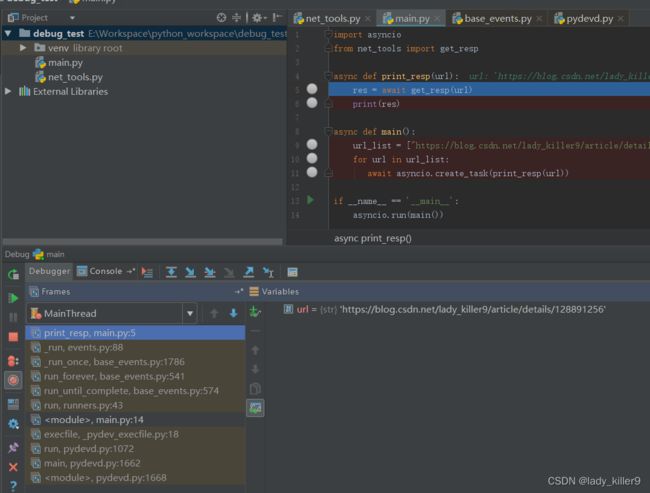
单击继续执行程序,Console标签页可以看到结果。

单击设置按钮,可以看到有几个选项。
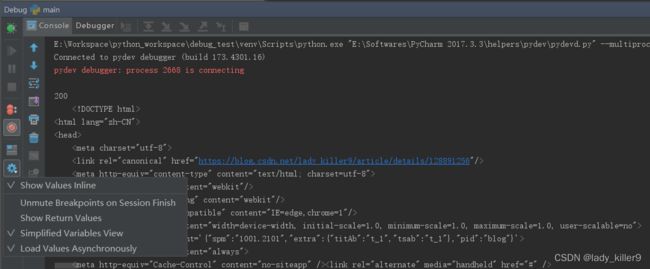
- 内联显示变量值
- 会话结束时取消禁止断点
- 显示返回值
- 简化的变量视图
- 异步加载值
程序控制工具栏
按钮 |
提示和快捷键 |
描述 |
|---|---|---|
显示执行点 Alt+F10 |
单击此按钮可在编辑器中突出显示当前执行点,并在“帧”窗格中显示相应的堆栈帧。 |
|
跨过 F8 |
单击此按钮可执行程序,直到当前方法或文件中的下一行,跳过当前执行点引用的方法(如果有)。如果当前行是方法中的最后一行,则执行步骤将紧跟在此方法之后执行的行。 |
|
步入 F7 |
单击此按钮可让调试器单步执行在当前执行点调用的方法。 |
|
|
强行步入 Alt+Shift+F7 |
单击此按钮可使调试器单步执行当前执行点中调用的方法,即使要跳过此方法也是如此。 |
单步执行代码 Alt+Shift+F7 |
单击此按钮可跳过单步执行库源代码,并专注于您自己的代码。 |
|
步出 Shift+F8 |
单击此按钮可使调试器从当前方法中单步执行,转到紧随其后的行。 |
|
运行到光标 Alt+F9 |
单击此按钮可恢复程序执行并暂停,直到执行点到达编辑器中当前光标位置的行。不需要断点。实际上,插入符号处为当前行设置了一个临时断点,一旦程序执行暂停,该断点就会被删除。因此,如果插入符号位于已执行的行,则程序将恢复以进一步执行,因为无法回滚到以前的断点。当您已深入单步执行方法序列并需要一次单步执行多个方法时,此操作特别有用。 如果为在将您带到指定行之前应执行的行设置了断点,则调试器将在遇到的第一个断点处暂停。
|
|
计算表达式 Alt+F8 |
单击此按钮可 。计算表达式。 |
Pycharm版本不一样,按钮图标可能不同
单击显示执行点按钮可以看到帧显示main.py:9行,代码区域光标也显示在第9行
单击单步执行我的代码按钮,会跳过导入的库,直接进入自己写的函数或者下一行
pdb
有的时候在无界面的服务器上或容器中调试,无法使用Pycharm就可以使用pdb了。
pdb有了两种使用方式,一种是添加断点后直接运行(侵入式)
import pdb
pdb.set_trace()
或
breakpoint()
以下示例使用代码如下
main.py
import asyncio
import pdb
from net_tools import get_resp

async def print_resp(url):
    res = await get_resp(url)
    pdb.set_trace()
    print(res)

async def main():
    url_list = ["https://blog.csdn.net/lady_killer9/article/details/128891256","https://blog.csdn.net/lady_killer9/article/details/108763489"]
    for url in url_list:
       pdb.set_trace()
       await asyncio.create_task(print_resp(url))

if __name__ == '__main__':
    asyncio.run(main())
net_tools.py
import aiohttp

async def get_resp(url):
    async with aiohttp.ClientSession() as session:
        async with session.get(url) as response:
            print(response.status)
            return await response.text()
frame:帧,pdb状态下会使用->代表当前帧
> e:\workspace\python_workspace\debug_test\main.py(13)main()
-> await asyncio.create_task(print_resp(url))
(Pdb)
查看源代码 l list
如果不带参数,则列出当前行周围的 11 行,或继续前一个列表。
如果用 . 作为参数,则列出当前行周围的 11 行。
如果带有一个参数,则列出那一行周围的 11 行。
如果带有两个参数,则列出所给的范围中的代码;
如果第二个参数小于第一个参数,则将其解释为列出行数的计数。
(Pdb) l
  8  	async def main():
  9  	    url_list = ["https://blog.csdn.net/lady_killer9/article/details/128891256","https://blog.csdn.net/lady_killer9/article/details/108763489"]
 10  	    for url in url_list:
 11  	       import pdb
 12  	       pdb.set_trace()
 13  ->	       await asyncio.create_task(print_resp(url))
 14
 15  	if __name__ == '__main__':
 16  	    asyncio.run(main())
[EOF]
查看当前函数源代码 ll longlist
(Pdb) ll
  8  	async def main():
  9  	    url_list = ["https://blog.csdn.net/lady_killer9/article/details/128891256","https://blog.csdn.net/lady_killer9/article/details/108763489"]
 10  	    for url in url_list:
 11  	       import pdb
 12  	       pdb.set_trace()
 13  ->	       await asyncio.create_task(print_resp(url))
打印变量 p
p后面加上变量名即可
(Pdb) p url_list
['https://blog.csdn.net/lady_killer9/article/details/128891256', 'https://blog.csdn.net/lady_killer9/article/details/108763489']
查看调用栈w where
(Pdb) w
  e:\workspace\python_workspace\debug_test\main.py(16)<module>()
-> asyncio.run(main())
  c:\users\dell\appdata\local\programs\python\python37\lib\asyncio\runners.py(43)run()
-> return loop.run_until_complete(main)
  c:\users\dell\appdata\local\programs\python\python37\lib\asyncio\base_events.py(574)run_until_complete()
-> self.run_forever()
  c:\users\dell\appdata\local\programs\python\python37\lib\asyncio\base_events.py(541)run_forever()
-> self._run_once()
  c:\users\dell\appdata\local\programs\python\python37\lib\asyncio\base_events.py(1786)_run_once()
-> handle._run()
  c:\users\dell\appdata\local\programs\python\python37\lib\asyncio\events.py(88)_run()
-> self._context.run(self._callback, *self._args)
> e:\workspace\python_workspace\debug_test\main.py(13)main()
-> await asyncio.create_task(print_resp(url))
可以看到调用栈,接下来运行
await asyncio.create_task(print_resp(url))
向上移动当前帧 u up
后面可加参数count,在堆栈回溯中,将当前帧向上移动 count 级
(Pdb) u
> c:\users\dell\appdata\local\programs\python\python37\lib\asyncio\events.py(88)_run()
-> self._context.run(self._callback, *self._args)
向上移动当前帧 d down
后面可加参数count,在堆栈回溯中,将当前帧向下移动 count 级
(Pdb) d
> e:\workspace\python_workspace\debug_test\main.py(13)main()
-> await asyncio.create_task(print_resp(url))
运行当前行代码,在第一个可以停止的位置停下 s step
step在被调用的函数内部或在当前函数的下一行停下,所以可以用step进入函数
(Pdb) s
--Call--
> c:\users\dell\appdata\local\programs\python\python37\lib\asyncio\tasks.py(345)create_task()
-> def create_task(coro):
继续运行,直到当前函数的下一行或当前函数返回为止 n next
next 和 step 之间的区别在于:step 进入被调用函数内部并停止,而 next (几乎)全速运行被调用函数,仅在当前函数的下一行停止。
(Pdb) n
> c:\users\dell\appdata\local\programs\python\python37\lib\asyncio\tasks.py(350)create_task()
-> loop = events.get_running_loop()
运行直到下一个断点 c continue
(Pdb) c
200
> e:\workspace\python_workspace\debug_test\main.py(8)print_resp()
-> print(res)
打印函数返回值 retval
(Pdb) retval
None
跳出循环(执行直到比当前行数大) unt until
(Pdb) u
> c:\users\dell\appdata\local\programs\python\python37\lib\asyncio\events.py(88)_run()
-> self._context.run(self._callback, *self._args)
(Pdb) u
> c:\users\dell\appdata\local\programs\python\python37\lib\asyncio\base_events.py(1786)_run_once()
-> handle._run()
(Pdb) u
> c:\users\dell\appdata\local\programs\python\python37\lib\asyncio\base_events.py(541)run_forever()
-> self._run_once()
(Pdb) c
接下来使用另外一种方式,去除断点后直接运行(非侵入式)
python3 -m pdb main.py
添加断点 b break
b后可以使用lineno 或function 参数设置断点,一个是行号,一个是函数名。不加参数时列出所有断点。
如果带有 lineno 参数,则在当前文件相应行处设置一个断点。
如果带有 function 参数,则在该函数的第一条可执行语句处设置一个断点。
(venv) E:\Workspace\python_workspace\debug_test>python -m pdb main.py
> e:\workspace\python_workspace\debug_test\main.py(1)<module>()
-> import asyncio
(Pdb) b 9
Breakpoint 1 at e:\workspace\python_workspace\debug_test\main.py:9
(Pdb) b 10
Breakpoint 2 at e:\workspace\python_workspace\debug_test\main.py:10
(Pdb) b
Num Type         Disp Enb   Where
1   breakpoint   keep yes   at e:\workspace\python_workspace\debug_test\main.py:9
2   breakpoint   keep yes   at e:\workspace\python_workspace\debug_test\main.py:10
启用/禁用断点 enable/disable
命令后加断点编号即可
(Pdb) disable 1
Disabled breakpoint 1 at e:\workspace\python_workspace\debug_test\main.py:9
(Pdb) enable 1
Enabled breakpoint 1 at e:\workspace\python_workspace\debug_test\main.py:9
修改代码
(Pdb) c
> e:\workspace\python_workspace\debug_test\main.py(10)main()
-> for url in url_list:
(Pdb) p url_list
['https://blog.csdn.net/lady_killer9/article/details/128891256', 'https://blog.csdn.net/lady_killer9/article/details/108763489']
(Pdb) url_list = ["https://www.baidu.com/s?tn=44004473_30_oem_dg&ie=utf-8&wd=lady_killer9"]
(Pdb) p url_list
['https://www.baidu.com/s?tn=44004473_30_oem_dg&ie=utf-8&wd=lady_killer9']
清除断点 cl clear
如果参数是 filename:lineno,则清除此行上的所有断点。
如果参数是空格分隔的断点编号列表,则清除这些断点。
如果不带参数,则清除所有断点(但会先提示确认),输入y或者n。
(Pdb) clear
Clear all breaks? y
Deleted breakpoint 1 at e:\workspace\python_workspace\debug_test\main.py:9
Deleted breakpoint 2 at e:\workspace\python_workspace\debug_test\main.py:10
(Pdb) c
200
<!DOCTYPE html>
<html lang="zh-CN">
<head>
    <meta charset="utf-8">
    <title>百度安全验证</title>
    <meta http-equiv="Content-Type" content="text/html; charset=utf-8">
    <meta name="apple-mobile-web-app-capable" content="yes">
    <meta name="apple-mobile-web-app-status-bar-style" content="black">
    <meta name="viewport" content="width=device-width, user-scalable=no, initial-scale=1.0, minimum-scale=1.0, maximum-scale=1.0">
    <meta name="format-detection" content="telephone=no, email=no">
    <link rel="shortcut icon" href="https://www.baidu.com/favicon.ico" type="image/x-icon">
    <link rel="icon" sizes="any" mask href="https://www.baidu.com/img/baidu.svg">
    <meta http-equiv="X-UA-Compatible" content="IE=Edge">
    <meta http-equiv="Content-Security-Policy" content="upgrade-insecure-requests">
    <link rel="stylesheet" href="https://ppui-static-wap.cdn.bcebos.com/static/touch/css/api/mkdjump_aac6df1.css" />
</head>
<body>
    <div class="timeout hide-callback">
        <div class="timeout-img"></div>
        <div class="timeout-title">网络不给力,请稍后重试</div>
        <button type="button" class="timeout-button">返回首页</button>
    </div>
    <div class="timeout-feedback hide-callback">
        <div class="timeout-feedback-icon"></div>
        <p class="timeout-feedback-title">问题反馈</p>
    </div>

<script src="https://ppui-static-wap.cdn.bcebos.com/static/touch/js/mkdjump_v2_21d1ae1.js"></script>
</body>
</html>

The program finished and will be restarted
退出调试器 q quit
(Pdb) q
思考题:
查看官方文档,使用第二种方式启用pdb时,如何给net_tools.py文件添加断点?
如何进入net_tools.py文件中的函数内部?
把答案打在评论区。。。
参考
Pycharm-debugtoolbar
python-pdb

