浅谈遮挡物的数据增强方法
浅谈遮挡物的数据增强方法
- 前言
- random-erasing
- Cutout
- CutMix
-
- 什么是bete分布?
- CutMix的原理
前言
随着这几年深度学习的发展,遮挡物一直是目标检测多年以来的难题。在最近几年踊跃出几款好的对遮挡物数据增强。random-erasing->Cutout->CutMix等。
random-erasing
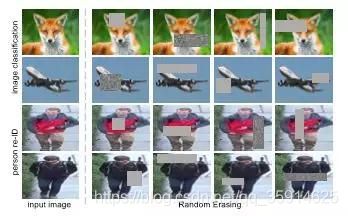
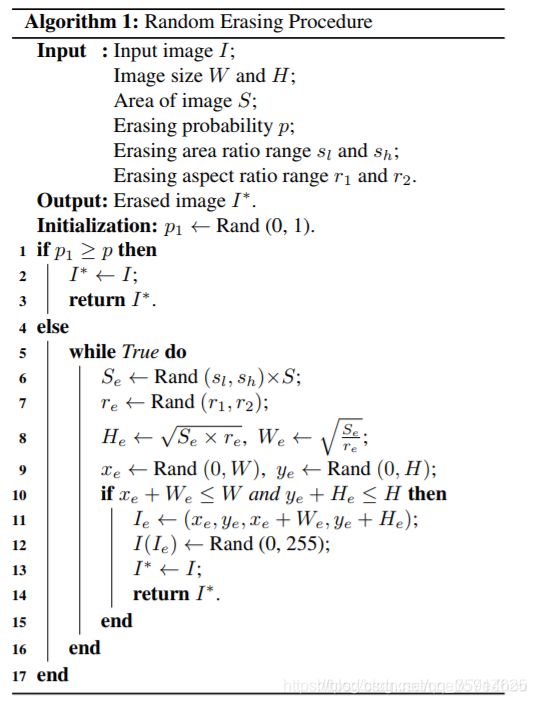
Random Erasing的方式,将原数据集中一部分保持原样,另外一部分随机擦除一个矩形区域。
参数说明:
1.s_l、s_h分别是需要随机擦除的矩形面积大小上下阈值;
2.r_1、r_2分别是矩形长宽比re的上下阈值;
3.矩形的长和宽的设置分别是 算法中h、w,其乘积刚好是矩形面积s,其比值刚好是r。
代码:
import numpy as np


def get_random_eraser(p=0.5, s_l=0.02, s_h=0.4, r_1=0.3, r_2=1/0.3, v_l=0, v_h=255, pixel_level=True):
    def eraser(input_img):
        if input_img.ndim == 3:
            img_h, img_w, img_c = input_img.shape
        elif input_img.ndim == 2:
            img_h, img_w = input_img.shape

        p_1 = np.random.rand()

        if p_1 > p:
            return input_img

        while True:
            print()
            s = np.random.uniform(s_l, s_h) * img_h * img_w
            r = np.random.uniform(r_1, r_2)
            w = int(np.sqrt(s / r))
            h = int(np.sqrt(s * r))
            left = np.random.randint(0, img_w)
            top = np.random.randint(0, img_h)

            if left + w <= img_w and top + h <= img_h:
                break

        if pixel_level:
            if input_img.ndim == 3:
                c = np.random.uniform(v_l, v_h, (h, w, img_c))
            if input_img.ndim == 2:
                c = np.random.uniform(v_l, v_h, (h, w))
        else:
            c = np.random.uniform(v_l, v_h)

        input_img[top:top + h, left:left + w] = c

        return input_img

    return eraser
Cutout
我在网上看Cutout和random-erasing几乎是同一时间提出的,不过两者的区别在随机选择一个固定大小的正方形区域,然后采用全0填充就OK了,当然为了避免填充0值对训练的影响,应该要对数据进行中心归一化操作,norm到0。
Cutout中,擦除矩形区域存在一定概率不完全在原图像中的,Cutout变相的实现了任意大小的擦除,以及保留更多重要区域。而在Random Erasing中,擦除矩形区域一定在原图像内,这点可以从下面random-erasing公式看出来。
代码:
 # cutout
    def _cutout(self, img, bboxes, length=100, n_holes=1, threshold=0.5):
        '''
        原版本:https://github.com/uoguelph-mlrg/Cutout/blob/master/util/cutout.py
        Randomly mask out one or more patches from an image.
        Args:
            img : a 3D numpy array,(h,w,c)
            bboxes : 框的坐标
            n_holes (int): Number of patches to cut out of each image.
            length (int): The length (in pixels) of each square patch.
        '''

        def cal_iou(boxA, boxB):
            '''
            boxA, boxB为两个框,返回iou
            boxB为bouding box
            '''

            # determine the (x, y)-coordinates of the intersection rectangle
            xA = max(boxA[0], boxB[0])
            yA = max(boxA[1], boxB[1])
            xB = min(boxA[2], boxB[2])
            yB = min(boxA[3], boxB[3])

            if xB <= xA or yB <= yA:
                return 0.0

            # compute the area of intersection rectangle
            interArea = (xB - xA + 1) * (yB - yA + 1)

            # compute the area of both the prediction and ground-truth
            # rectangles
            boxAArea = (boxA[2] - boxA[0] + 1) * (boxA[3] - boxA[1] + 1)
            boxBArea = (boxB[2] - boxB[0] + 1) * (boxB[3] - boxB[1] + 1)

            # compute the intersection over union by taking the intersection
            # area and dividing it by the sum of prediction + ground-truth
            # areas - the interesection area
            # iou = interArea / float(boxAArea + boxBArea - interArea)
            iou = interArea / float(boxBArea)

            # return the intersection over union value
            return iou

        # 得到h和w
        if img.ndim == 3:
            h, w, c = img.shape
        else:
            _, h, w, c = img.shape

        mask = np.ones((h, w, c), np.float32)

        for n in range(n_holes):

            chongdie = True  # 看切割的区域是否与box重叠太多

            while chongdie:
                y = np.random.randint(h)
                x = np.random.randint(w)

                y1 = np.clip(y - length // 2, 0,
                             h)  # numpy.clip(a, a_min, a_max, out=None), clip这个函数将将数组中的元素限制在a_min, a_max之间,大于a_max的就使得它等于 a_max,小于a_min,的就使得它等于a_min
                y2 = np.clip(y + length // 2, 0, h)
                x1 = np.clip(x - length // 2, 0, w)
                x2 = np.clip(x + length // 2, 0, w)

                chongdie = False
                for box in bboxes:
                    if cal_iou([x1, y1, x2, y2], box) > threshold:
                        chongdie = True
                        break

            mask[y1: y2, x1: x2, :] = 0.

        # mask = np.expand_dims(mask, axis=0)
        img = img * mask

        return img
CutMix
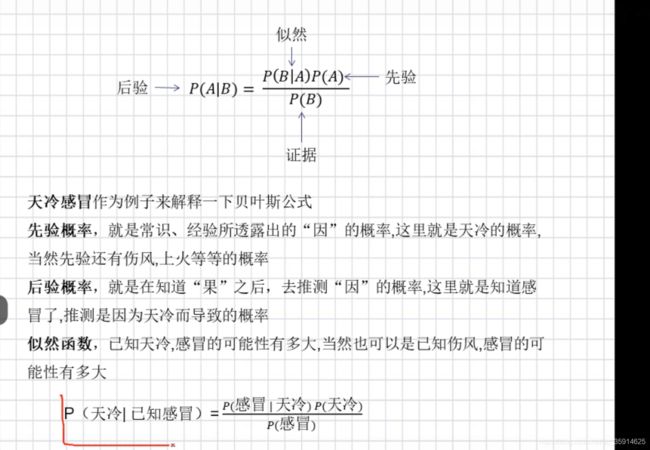
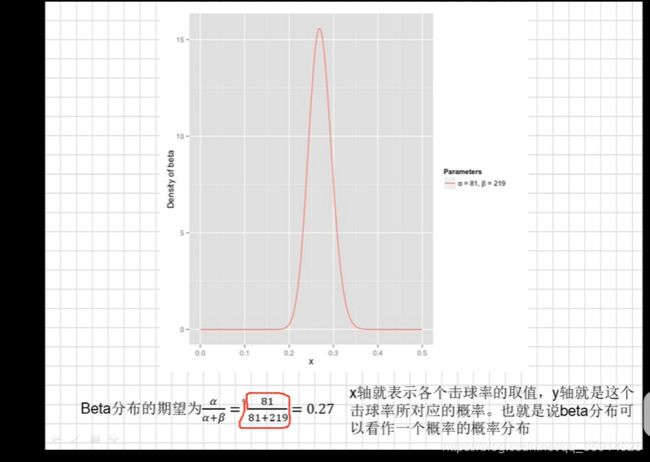
什么是bete分布?
CutMix的原理
XA和XB是两个不同的训练样本,YA和YB是对应的标签值,CutMix需要生成的是新的训练样本和对应标签:x’和y’,具体计算如下:

![]()
其中 λ \lambda λ ,服从bete分布:![]()
令 α \alpha α=1则 λ \lambda λ服从(0,1)的均匀分布。
其中M需要删掉的部分进行填充,其中圆代表是逐像素相乘,所有元素都为1 的二进制掩码。
为了对二进制掩M进行采样,首先要对剪裁区域的边界框XB= (r_x, r_y, r_w, r_h)进行采样,用来对样本x_A和x_B做裁剪区域的指示标定。在论文中对矩形掩码M进行采样(长宽与样本大小成比例)。
裁剪比例为:
![]()
剪裁区域的边界框采样公式如下:

确定好裁剪区域B之后,将制掩M中的裁剪区域B置0,其他区域置1。就完成了掩码的采样,然后将样本A中的剪裁区域B移除,将样本B中的剪裁区域B进行裁剪然后填充到样本A。
总结:CutMix:就是将一部分区域cut掉但不填充0像素而是随机填充训练集中的其他数据的区域像素值,分类结果按一定的比例分配。
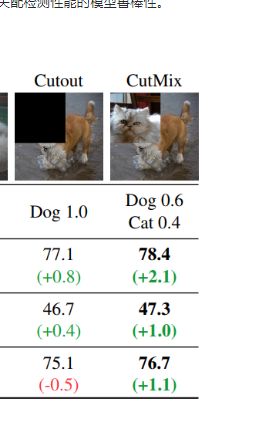
代码:
"""输入为:样本的size和生成的随机lamda值"""
def rand_bbox(size, lam):
    W = size[2]
    H = size[3]
    """1.论文里的公式2,求出B的rw,rh"""
    cut_rat = np.sqrt(1. - lam)
    cut_w = np.int(W * cut_rat)
    cut_h = np.int(H * cut_rat)

    # uniform
    """2.论文里的公式2,求出B的rx,ry(bbox的中心点)"""
    cx = np.random.randint(W)
    cy = np.random.randint(H)
    #限制坐标区域不超过样本大小

    bbx1 = np.clip(cx - cut_w // 2, 0, W)
    bby1 = np.clip(cy - cut_h // 2, 0, H)
    bbx2 = np.clip(cx + cut_w // 2, 0, W)
    bby2 = np.clip(cy + cut_h // 2, 0, H)
    """3.返回剪裁B区域的坐标值"""
    return bbx1, bby1, bbx2, bby
for i, (input, target) in enumerate(train_loader):
    # measure data loading time
    data_time.update(time.time() - end)

    input = input.cuda()
    target = target.cuda()
    r = np.random.rand(1)
    if args.beta > 0 and r < args.cutmix_prob:
        # generate mixed sample
        """1.设定lamda的值,服从beta分布"""
        lam = np.random.beta(args.beta, args.beta)
        """2.找到两个随机样本"""
        rand_index = torch.randperm(input.size()[0]).cuda()
        target_a = target#一个batch
        target_b = target[rand_index] #batch中的某一张
        """3.生成剪裁区域B"""
        bbx1, bby1, bbx2, bby2 = rand_bbox(input.size(), lam)
        """4.将原有的样本A中的B区域,替换成样本B中的B区域"""
        input[:, :, bbx1:bbx2, bby1:bby2] = input[rand_index, :, bbx1:bbx2, bby1:bby2]
        # adjust lambda to exactly match pixel ratio
        """5.根据剪裁区域坐标框的值调整lam的值"""
        lam = 1 - ((bbx2 - bbx1) * (bby2 - bby1) / (input.size()[-1] * input.size()[-2]))
        # compute output
        """6.将生成的新的训练样本丢到模型中进行训练"""
        output = model(input)
        """7.按lamda值分配权重"""
        loss = criterion(output, target_a) * lam + criterion(output, target_b) * (1. - lam)
    else:
        # compute output
        output = model(input)
        loss = criterion(output, target)
