Java程序猿搬砖笔记(十三)
文章目录
-
- MySQL数据库生成自动增长序号
- MySQL修改密码
- SpringBoot定时任务
- 解决Mybatis出现的各种Parameter ' ' not found. Available parameters are [ , ]
- Mybatis的foreach标签遍历map
- SpringBoot项目打包
- SpringBoot @Async使用注意事项
- Spring Cloud Config bootstrap文件(重要)
- Fastjson的JSONObject学习
- Fastjson的parseObject不支持泛型
- RestTemplate 接收泛型化参数
- SpringBoot Maven项目打包报 Error assembling JAR错误解决
- Linux 给文件加可执行权限
- Spring事务报错: org.springframework.transaction.UnexpectedRollbackException
- Mybatis这种方式批量插入list,只返回list第一条数据的主键
- Spring jasypt加密
- MySQL insert语句使用case when
- MySQL now()和sysdate()的区别
- Linux nohup打印日志
- validation的校验顺序
- Red Hat、Centos、Ubuntu之间的关系图解
- CentOS 7 忘记密码解决方法
- CentOS 7 修改密码的方法
- CentOS 7关闭防火墙命令
MySQL数据库生成自动增长序号
变量需要每次初始化为0,否则会自增
参考代码:
SELECT (@i:=@i+1) AS orderNo , p.proposition_code AS propositionCode , p.proposition_name AS propositionName
FROM  t_proposition_collect p,(SELECT @i := 0) AS i
参考链接
MySQL修改密码
alter user 'root'@'localhost' identified by '密码';
// 这种方式可能报语法错误
set password for root@localhost = password('密码');
SpringBoot定时任务
在类上使用@EnableScheduling和@Component注解,在方法中使用@Scheduled注解。
@Scheduled注解支持cron表达式。
参考代码如下:
@Slf4j
@EnableScheduling
@Component
public class AchievementRepetitionJob {

    @Autowired
    private RepetitionStorageService repetitionStorageService;

    @Scheduled(cron = "${com.aspire.achievement.repetition.job.insert-into-task.cron:0/20 * * * * ? }")
    public void insertIntoTaskJob() {
        repetitionStorageService.insertIntoTaskJob();
        log.info("查重任务表插入数据 (定时任务)执行完毕");
    }
}
参考链接
解决Mybatis出现的各种Parameter ’ ’ not found. Available parameters are [ , ]
Mybatis中如果有多个参数,在xml中使用参数名会包错。
示例代码:
int updateStatus(Long id, String status);
方法一:
// 增加@Param注解
int updateStatus(@Param("id") Long id, @Param("status") String status);
方法二(推荐):
MyBatis3.5+, 在JDK8下使用新反射特性,若传递多参数时,不使用@Param标注每个参数名,则需开启javac的-parameters编译参数。
在Maven的pom.xml中增加下面的配置:
<plugins>
	<plugin>
		<groupId>org.apache.maven.pluginsgroupId>
		<artifactId>maven-compiler-pluginartifactId>
		<version>${maven.compiler.plugin.version}version>
		<configuration>
			<source>${java.version}source>
			<target>${java.version}target>
			<compilerArgument>-parameterscompilerArgument>
		configuration>
	plugin>
plugins>
Mybatis 3.5.5正常不会报错 但是某些同事打包还会报错,加上@Param注解双重保险。
参考链接
Mybatis的foreach标签遍历map
遍历map时,index是元素的key,item为元素的value。
示例:
<foreach collection="tagsMap.entrySet()" index="key" item="value">
  and  tags-> #{key} = #{value}
foreach>
SpringBoot项目打包
1、打包方式注意为jar、父项目为pom
<packaging>jarpackaging>
2、需要引入spring-boot-maven-plugin
<plugin>
	<groupId>org.springframework.bootgroupId>
	<artifactId>spring-boot-maven-pluginartifactId>
	<version>${springboot.plugin.version}version>
plugin>
如果打包方式为pom,会少很多文件。
SpringBoot @Async使用注意事项
必须不同类间调用
例如:A类 --> B类的@Async方法,可以异步调用
如果在同一个类中调用,会变同步执行
例如:A类.B()–>A类.@Async C()
原因:
底层实现是代理对注解扫描实现的,B方法上没有注解,没有生成相应的代理类。
当然把@Async加到类上也能解决但所有方法都异步了,一般不这么用。
Spring Cloud Config bootstrap文件(重要)
bootstrap.yml读多个文件时,后面的配置覆盖前面的配置
spring:
  application:
    name: webbas32-manage-v1
  cloud:
    config:
      name: common,webbas32-application-manage-v1
      profile: ${ENV_TYPE:test}
      uri: http://${ENV_CONFIG_IP:10.12.7.124}:${ENV_CONFIG_PORT:8888}
      failFast: true
      enabled: true
  main.allow-bean-definition-overriding: true
webbas32-application-manage-v1-test.yml文件的配置会覆盖common-test.yml文件的配置,所以一般公用配置放在前面。
Fastjson的JSONObject学习


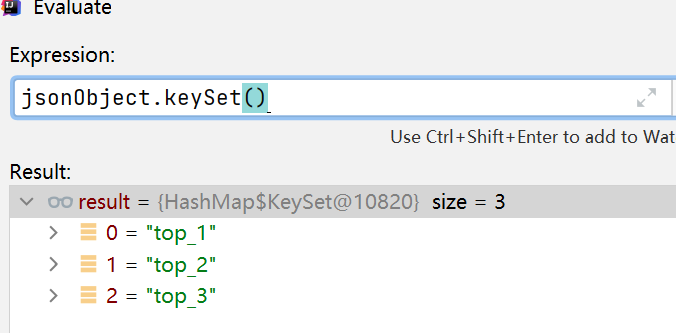
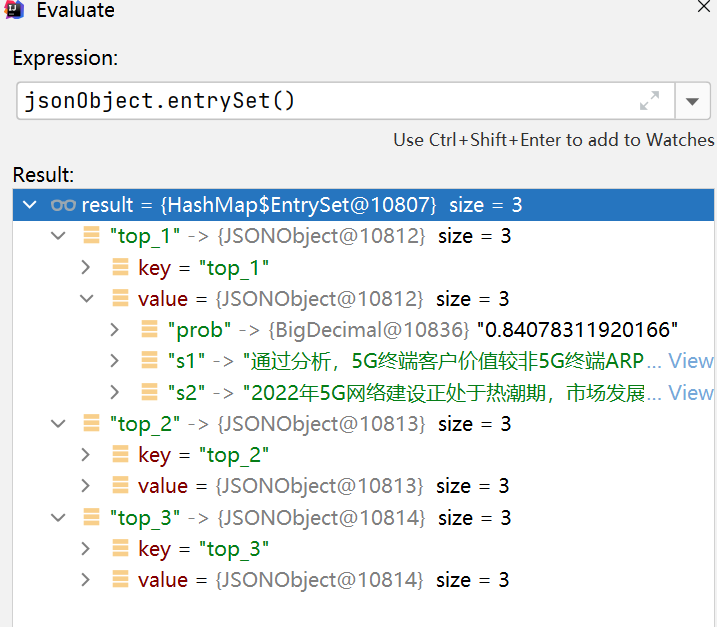
Fastjson 的JSONObject实际类型是Map,可以获取、遍历它的key和value。
public class JSONObject extends JSON implements Map<String, Object>, Cloneable, Serializable, InvocationHandler {
}

JSONObject jsonObject = JSONObject.parseObject(contrastResultVo.getDetail());
for(Map.Entry<String, Object> entry: jsonObject.entrySet()){
	JSONObject jsonObjectValue = (JSONObject)entry.getValue();
	BigDecimal prob = jsonObjectValue.getObject("prob", new TypeReference<BigDecimal>(){});
	if(prob != null && prob.compareTo(configRate) > -1 ){
	   String s1 = jsonObjectValue.getObject("s1", new TypeReference<String>(){});
	   String s2 = jsonObjectValue.getObject("s2", new TypeReference<String>(){});
   }
}
参考链接
Fastjson的parseObject不支持泛型
public class ListResult<T>{
	protected String status;
	protected String message;
	private List<T> data;
}
解决方法一:
// 多转换一次
ListResult rateResult = JSONObject.parseObject(result,ListResult.class);
List<RepetitionRateVo> list =  JSONObject.parseArray(rateResult.getData().toString() ,RepetitionRateVo.class);
解决方法二(推荐):
// 使用泛型化类 TypeReference
ListResult<RepetitionRateVo> list = JSONObject.parseObject(result,new TypeReference<ListResult<RepetitionRateVo>>(){});
参考链接
RestTemplate 接收泛型化参数
示例代码:
ParameterizedTypeReference<ResponseMsg<MemberInfoVo>> typeRef = new ParameterizedTypeReference<ResponseMsg<MemberInfoVo>>() {};
ResponseEntity<ResponseMsg<MemberInfoVo>> result = restTemplate.exchange(findEmployeeUrl, HttpMethod.POST, formEntity, typeRef);
log.info("commonCallUniuser69 接口调用返回数据:{}",result);
if(result != null && result.getBody() != null){
	responseMsg = result.getBody();
}
SpringBoot Maven项目打包报 Error assembling JAR错误解决
需要指定启动类:
<plugins>
	<plugin>
		<groupId>org.springframework.bootgroupId>
		<artifactId>spring-boot-maven-pluginartifactId>
		<version>2.3.2.RELEASEversion>
		<configuration>
			<mainClass>com.aspire.achievement.repetition.AchievementRepetitionApplicationmainClass>
		configuration>
		<executions>
			<execution>
				<goals>
					<goal>repackagegoal>
				goals>
			execution>
		executions>
	plugin>
plugins>
Linux 给文件加可执行权限
// 最高权限
chmod 775 文件名
// 可执行权限
chmod +x 文件名
Spring事务报错: org.springframework.transaction.UnexpectedRollbackException
参考链接、参考链接
Mybatis这种方式批量插入list,只返回list第一条数据的主键
示例代码如下:
<insert id="insertList" useGeneratedKeys="true" keyProperty="id">
	<foreach collection="propositionCollectAddList" item="item" separator=";">
		insert into t_proposition_collect
		<trim prefix="(" suffix=")" suffixOverrides=",">
			<if test="item.propositionCode != null">
				proposition_code,
			if>
			<if test="item.propositionName != null">
				proposition_name,
			if>
		trim>
		<trim prefix="values (" suffix=")" suffixOverrides=",">
			<if test="item.propositionCode != null">
				#{item.propositionCode,jdbcType=VARCHAR},
			if>
			<if test="item.propositionName != null">
				#{item.propositionName,jdbcType=VARCHAR},
			if>
		trim>
	foreach>
insert>
Spring jasypt加密
添加依赖:
<dependency>
	<groupId>com.github.ulisesbocchiogroupId>
	<artifactId>jasypt-spring-boot-starterartifactId>
	<version>2.1.0version>
dependency>
配置文件修改:
// 公钥
jasypt:
  encryptor:
    password: 15d670c2d2be4dba8f8e1596c5bc457e
// 加密示例
ENC(v7hGT7XN3unK9TFOr4/oNaxGnPCpIbr6)
MySQL insert语句使用case when
示例sql:
INSERT INTO table_name(id, code, name)
SELECT id,
       code,
    CASE introduce
        WHEN 1 THEN '2020'
        WHEN 2 THEN 'Black'
        WHEN 3 THEN 'Manuel'
    END
FROM table_name_two
MySQL now()和sysdate()的区别
参考链接
Linux nohup打印日志
nohup java -jar  app_name.jar >  /home/log/app_name.log &
nohup java -jar  app_name.jar >> /home/log/app_name-$(date +%Y-%m-%d).log 2>&1 & 2>&1
参考链接
validation的校验顺序
参考链接
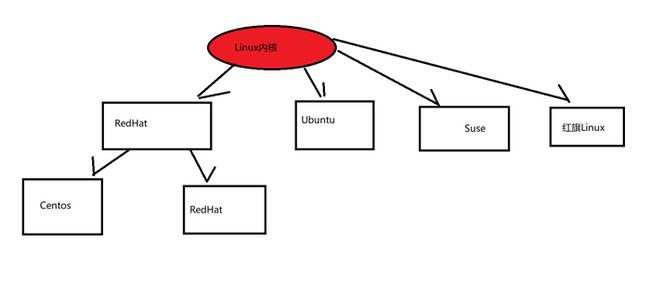
Red Hat、Centos、Ubuntu之间的关系图解
CentOS 7 忘记密码解决方法
注意最后面是执行:exec /sbin/init 命令。
参考链接
CentOS 7 修改密码的方法
修改root密码只需要输入passwd命令,然后输入两遍密码即可。

非root用户密码修改,参考下面链接:
参考链接
CentOS 7关闭防火墙命令
1、命令行界面输入命令systemctl status firewalld.service并按下回车键。
2、然后在下方可以查看得到active(running),此时说明防火墙已经被打开了。
3、在命令行中输入systemctl stop firewalld.service命令,进行关闭防火墙。
4、然后再使用命令systemctl status firewalld.service,在下方出现disavtive(dead),这权样就说明防火墙已经关闭。
5、再在命令行中输入命令systemctl disable firewalld.service命令,即可永久关闭防火墙。
