Spring Security Oauth2.1 最新版 1.1.0 整合 (基于 springboot 3.1.0)gateway 完成授权认证
目录
背景
版本
Spring Boot 3.1
Spring Authorization Server 1.1.0
基础
spring security
OAuth2
模块构成
授权方式
认证方式
集成过程
官方demo
代码集成
依赖
授权服务AuthorizationServerConfig配置
重要组件
测试
查看授权服务配置
访问授权服务
授权
回调
获取 access_token
获取用户信息
个性化改造
目标
改造过程
集成GateWay
代办事项
sql脚本
背景
基于 Spring Cloud Alibaba 架构下,需要一个统一授权中心,与 gateway 配合使用实现微服务的授权与认证,下面主要介绍整个集成过程,基于springboot3.1最新版
版本
Spring Boot 3.1
最新发布的springboot3.1版本对 oauth2 提供了默认的支持,可以引用下面的依赖来快速构建,为了体验新版本特性,我这边切换到了 3.1版本

Spring Boot 3.1 提供了一个 spring-boot-starter-oauth2-authorization-server 启动器,可以支持 Spring Authorization Server 的自动配置,轻松配置基于 Servlet 的 OAuth2 授权服务器,同时@EnableAuthorizationServer这些注解也早已废弃
Spring Authorization Server 1.1.0
官方文档
Spring Authorization Server
基础
spring security
关于springsecurity的基础知识,之前写过一篇 springboot 与 Spring Security 集成的基于 jwt的授权的,可以看下面的
(296条消息) springboot 2.7整合spring security 5.7整合jwt实现用户登录注册与鉴权全记录_ricardo.M.Yu的博客-CSDN博客
OAuth2
OAuth2可以提供一个统一的认证服务。主要模块如下:
模块构成
- Resource owner(资源拥有者):拥有该资源的服务或用户,如我们自己或者资源网站
- Authorization server(认证服务器):即用来认证与颁发令牌(如token)的服务
- Resource server(资源服务器):拥有资源的服务,如我们要访问的网站
- Client(客户端):即访问的客户端,如我们自己用的访问网站
授权方式
- 授权码模式(authorization_code):最正规的模式,客户端先将用户导向认证服务器,登录后获取授权码,然后进行授权,最后根据授权码获取访问令牌
- 刷新模式(refresh_token):用刷新码获取
- 客户端模式(client_credentials):第三方应用自己本身需要获取资源
详见 AuthorizationGrantType 这个类

下面的密码模式已经被废弃
- 密码模式(resource owner password credentials):直接带用户名和密码去向认证服务器申请令牌
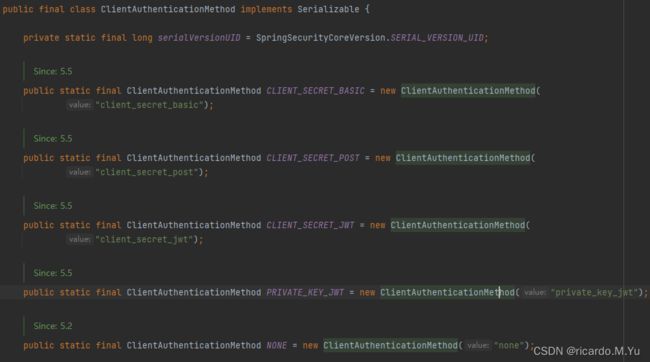
认证方式
client_secret_basic:最常用,客户端的 client_id 和 client_secret,传递给授权服务器
client_secret_post:常用,客户端的 client_id 和 client_secret,传递给授权服务器,参数传递方式不同
client_secret_jwt:利用 JWT 进行认证
private_key_jwt:方式就是利用 JWT 进行认证。请求方拥有自己的公私钥(密钥对)
none
详见 ClientAuthenticationMethod
集成过程
我下面会分为三个阶段逐次递进改造,
- 第一阶段:官方demo演示与组件讲解测试
- 第二阶段:个性化改造
- 第三阶段:集成 springcloud gateway 完成分布式授权改造
官方demo
代码集成
依赖
只需要下面的这一个依赖,springboot 版本为 3.1
    org.springframework.boot
    spring-boot-starter-parent
    3.1.0


    org.springframework.boot
    spring-boot-starter-oauth2-authorization-server
授权服务AuthorizationServerConfig配置
spring 官方在快速开始里面给出了下面的默认最小配置,
Getting Started (spring.io)
我先粘下来再介绍,代码结构大概这样,一共两个配置类

AuthorizationServerConfig
@Configuration
public class AuthorizationServerConfig {

    @Bean
    @Order(1)
    public SecurityFilterChain authorizationServerSecurityFilterChain(HttpSecurity http)
            throws Exception {
        //针对 Spring Authorization Server 最佳实践配置
        OAuth2AuthorizationServerConfiguration.applyDefaultSecurity(http);
        http.getConfigurer(OAuth2AuthorizationServerConfigurer.class)
                .oidc(Customizer.withDefaults());	// Enable OpenID Connect 1.0

        http
                // Redirect to the login page when not authenticated from the
                // authorization endpoint
                .exceptionHandling((exceptions) -> exceptions
                        .defaultAuthenticationEntryPointFor(
                                new LoginUrlAuthenticationEntryPoint("/login"),
                                new MediaTypeRequestMatcher(MediaType.TEXT_HTML)
                        )
                )
                // Accept access tokens for User Info and/or Client Registration
                .oauth2ResourceServer((resourceServer) -> resourceServer
                        .jwt(Customizer.withDefaults()));

        return http.build();
    }

    @Bean
    public RegisteredClientRepository registeredClientRepository() {
        RegisteredClient oidcClient = RegisteredClient.withId(UUID.randomUUID().toString())
                .clientId("oidc-client")
                .clientSecret("{noop}secret")
                .clientAuthenticationMethod(ClientAuthenticationMethod.CLIENT_SECRET_BASIC)
                .authorizationGrantType(AuthorizationGrantType.AUTHORIZATION_CODE)
                .authorizationGrantType(AuthorizationGrantType.REFRESH_TOKEN)
                .authorizationGrantType(AuthorizationGrantType.CLIENT_CREDENTIALS)
                .redirectUri("http://www.baidu.com")
                .redirectUri("http://127.0.0.1:8080/login/oauth2/code/oidc-client")
                .postLogoutRedirectUri("http://127.0.0.1:8080/")
                .scope(OidcScopes.OPENID)
                .scope(OidcScopes.PROFILE)
                .scope("message.read")
                .scope("message.write")
                .scope("all")
                // 设置 Client 需要页面审核授权
                .clientSettings(ClientSettings.builder().requireAuthorizationConsent(true).build())
                .build();

        return new InMemoryRegisteredClientRepository(oidcClient);
    }

    /**
     * 默认发放令牌
     * @return
     */
    @Bean
    public JWKSource jwkSource() {
        KeyPair keyPair = generateRsaKey();
        RSAPublicKey publicKey = (RSAPublicKey) keyPair.getPublic();
        RSAPrivateKey privateKey = (RSAPrivateKey) keyPair.getPrivate();
        RSAKey rsaKey = new RSAKey.Builder(publicKey)
                .privateKey(privateKey)
                .keyID(UUID.randomUUID().toString())
                .build();
        JWKSet jwkSet = new JWKSet(rsaKey);
        return new ImmutableJWKSet<>(jwkSet);
    }

    private static KeyPair generateRsaKey() {
        KeyPair keyPair;
        try {
            KeyPairGenerator keyPairGenerator = KeyPairGenerator.getInstance("RSA");
            keyPairGenerator.initialize(2048);
            keyPair = keyPairGenerator.generateKeyPair();
        }
        catch (Exception ex) {
            throw new IllegalStateException(ex);
        }
        return keyPair;
    }

    @Bean
    public JwtDecoder jwtDecoder(JWKSource jwkSource) {
        return OAuth2AuthorizationServerConfiguration.jwtDecoder(jwkSource);
    }

    @Bean
    public AuthorizationServerSettings authorizationServerSettings() {
        return AuthorizationServerSettings.builder().build();
    }
}
DefaultSecurityConfig
@EnableWebSecurity
@Configuration(proxyBeanMethods = false)
public class DefaultSecurityConfig {


    @Bean
    @Order(2)
    public SecurityFilterChain defaultSecurityFilterChain(HttpSecurity http)
            throws Exception {
        http
                .authorizeHttpRequests((authorize) -> authorize
                        .requestMatchers(new AntPathRequestMatcher("/actuator/**"),
                                new AntPathRequestMatcher("/oauth2/**"),
                                new AntPathRequestMatcher("/**/*.json"),
                                new AntPathRequestMatcher("/**/*.html")).permitAll()
                        .anyRequest().authenticated()
                )
                .cors(Customizer.withDefaults())
                .csrf((csrf) -> csrf.disable())
//                .httpBasic(Customizer.withDefaults())
//				// Form login handles the redirect to the login page from the
//				// authorization server filter chain
                .formLogin(Customizer.withDefaults())
        ;

        return http.build();
    }

    @Bean
    public UserDetailsService userDetailsService() {
        UserDetails userDetails = User.withDefaultPasswordEncoder()
                .username("user")
                .password("password")
                .roles("USER")
                .build();

        return new InMemoryUserDetailsManager(userDetails);
    }

}
分别介绍下这几个@Bean配置,也是 AuthorizationServer 的几个重要概念。
重要组件
SecurityFilterChain -> authorizationServerSecurityFilterChain: Spring Security的过滤器链,用于协议端点的。
SecurityFilterChain -> defaultSecurityFilterChain: Spring Security的过滤器链,用于Spring Security的身份认证
UserDetailsService :主要进行用户身份验证
RegisteredClientRepository:主要用于管理客户端
JWKSource:用于签名访问令牌
KeyPair: 启动时生成的带有密钥的KeyPair实例,用于创建上面的JWKSource
JwtDecoder:JwtDecoder的一个实例,用于解码已签名的访问令牌
AuthorizationServerSettings:用于配置Spring Authorization Server的AuthorizationServerSettings实例。
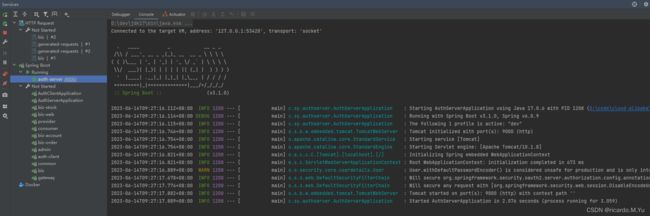
测试
为了方便测试,上面的配置中,客户端的回调地址我已经改成了 百度的,授权方式用授权码模式,认证方式用client_secret_basic
服务启动,端口为9000
查看授权服务配置
地址:
调用 http://127.0.0.1:9000/.well-known/openid-configuration
后,查看地址配置如下:其实就是每个请求的url

详细的是下面
{
"issuer": "http://127.0.0.1:9000",
"authorization_endpoint": "http://127.0.0.1:9000/oauth2/authorize",
"device_authorization_endpoint": "http://127.0.0.1:9000/oauth2/device_authorization",
"token_endpoint": "http://127.0.0.1:9000/oauth2/token",
"token_endpoint_auth_methods_supported": [
"client_secret_basic",
"client_secret_post",
"client_secret_jwt",
"private_key_jwt"
],
"jwks_uri": "http://127.0.0.1:9000/oauth2/jwks",
"userinfo_endpoint": "http://127.0.0.1:9000/userinfo",
"end_session_endpoint": "http://127.0.0.1:9000/connect/logout",
"response_types_supported": [
"code"
],
"grant_types_supported": [
"authorization_code",
"client_credentials",
"refresh_token",
"urn:ietf:params:oauth:grant-type:device_code"
],
"revocation_endpoint": "http://127.0.0.1:9000/oauth2/revoke",
"revocation_endpoint_auth_methods_supported": [
"client_secret_basic",
"client_secret_post",
"client_secret_jwt",
"private_key_jwt"
],
"introspection_endpoint": "http://127.0.0.1:9000/oauth2/introspect",
"introspection_endpoint_auth_methods_supported": [
"client_secret_basic",
"client_secret_post",
"client_secret_jwt",
"private_key_jwt"
],
"subject_types_supported": [
"public"
],
"id_token_signing_alg_values_supported": [
"RS256"
],
"scopes_supported": [
"openid"
]
}
访问授权服务
浏览器地址栏输入
http://localhost:9000/oauth2/authorize?response_type=code&client_id=oidc-client&scope=message.read openid&redirect_uri=http://www.baidu.com
用这个请求来模拟客户端,实际开发中,其实是先访问资源服务,由资源服务来拼接这几个参数来重定向到授权服务的,参数意义如下,这些参数都是需要再上面RegisteredClientRepository配置过的
- response_type:这个意思是相应的方式为code码
- client_id:即客户端的id,即上面配置中在 RegisteredClientRepository 配置的
- scope:请求授权范围,也需要在上面的配置中
- redirect_uri:授权通过后,重定向回来的地址
输入完上面的地址后,会重定向到下面这个登录页面,
我们输入上面配置好的用户名密码:
user
password
点击登录

授权
登录过后,会到下面这个授权页面,点击授权范围,然后点击 submit

回调
授权通过后,授权服务回调到了百度的地址,然后附带这我们的授权码,如下图

获取 access_token
拿到授权码之后,可以用postman测试来获取 access_token
测试接口参数
Header

请求体
http://localhost:9000/oauth2/token?grant_type=authorization_code&code=ajdNNIj8EiLjgw3OS8yu2q8n3XXCAb6cPY5LRsOHyRlAAB1ENKdmy8M4JBkJ8PrU-3K9QdpAZtyKg8QP5q0EHN2mR1k532FQUKz1ObSuH3EuSFy5LVzut9z1QVPuefoA&redirect_uri=http://www.baidu.com
curl命令如下
curl --location --request POST 'http://localhost:9000/oauth2/token?grant_type=authorization_code&code=a_lOQegEwElR09Sj6auVpBdYGgnhhK0uz1Uks286ei_zkbyDFKII2uf7gMIF7CU4cLN8ZEY3EsSq9jMAZ-Rmtmlq5pI6KPB95LMQg9fFirFg2wWjdd5PEwQLMEogY9B6&redirect_uri=http%3A%2F%2Fwww.baidu.com' \
--header 'Authorization: Basic b2lkYy1jbGllbnQ6c2VjcmV0'
参数说明:
- grant_type:即授权方式,authorization_code即授权码模式
- code:即授权码,上面重定向到百度给我们的授权码
- redirect_uri:重定向的url
- header中的 Authorization参数:因为我们用的客户端认证方式 为 client_secret_basic ,这个需要传参,还有一些其他的认证方式,具体参数说明如下
- client_secret_basic: 将 clientId 和 clientSecret 通过 ‘:’ 号拼接,( clientId 和 clientSecret 都在上面配置中,)并使用 Base64 进行编码得到一串字符,再在前面加个 注意有个 Basic 前缀(Basic后有一个空格), 即得到上面参数中的 Basic b2lkYy1jbGllbnQ6c2VjcmV0
- client_secret_post :clientId 和 clientSecret 放到表单去发送请求。如下图:
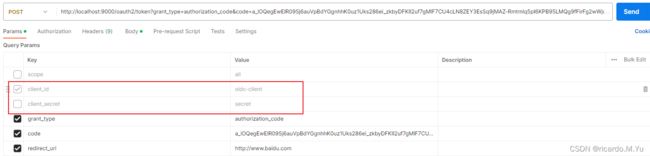
使用我们的 client_secret_basic 方式传参,接口调用结果:

已经正常拿到了 access_token。
完整的过滤器执行顺序,控制台输出

获取用户信息
获取用户信息接口为 /userinfo,注意需要有 opid 的授权范围,需要传参的值为 上面获取到的access_token,并在前面拼上 Bearer
参数说明
Authorization:值格式为 Bearer + ${access_token}, 注意 Bearer 后面附带空格
curl命令
curl --location --request POST 'http://127.0.0.1:9000/userinfo' \
--header 'Authorization: Bearer eyJraWQiOiI4ZDc5YTIwNi1kOWZhLTQ5NWQtODJkMi1iMzk2MjQwNGQ4YmIiLCJhbGciOiJSUzI1NiJ9.eyJzdWIiOiJ1c2VyIiwiYXVkIjoib2lkYy1jbGllbnQiLCJuYmYiOjE2ODY3MzM4MTYsInNjb3BlIjpbIm9wZW5pZCIsIm1lc3NhZ2UucmVhZCJdLCJpc3MiOiJodHRwOi8vbG9jYWxob3N0OjkwMDAiLCJleHAiOjE2ODY3MzQxMTYsImlhdCI6MTY4NjczMzgxNn0.AiGV5LIl8a4_7a7L2gbR61sjvHVLW4dZ6cElAwsWZnp-P7ocQT119KIASTPv138MU6ZK2_aF_-ER5FKaFQVSOj10Fy_Gv9PXa2ExrzTajfkPtA_t63jCcazzllaVWY4QIVD4fU8hPe6zDwjNOOX8R7hJFu2qtZ8V3bhzTlC0M4XWDAQ0goymYrAnVq8BR6hRm5-pY4nMCUZPFCeEFqGnl68EGRzosdSQeuRd-PtzB837i-C7lxqIjs4Y5hZ9mQw3R1zfa0WoP2KeN8K3WjyTIYd9PvrLIFCB5Zhj54sdNpZTy7wwC-oCVzwFFCEkgY-vprfgk4e4sZ10Lx60j--fHA' \
--header 'Cookie: JSESSIONID=7B10DA37A285902E4AEE4586AC181343'
效果如下:
默认返回的只有用户名,其他的数据,需要我们来重写一些东西获取

过滤器执行链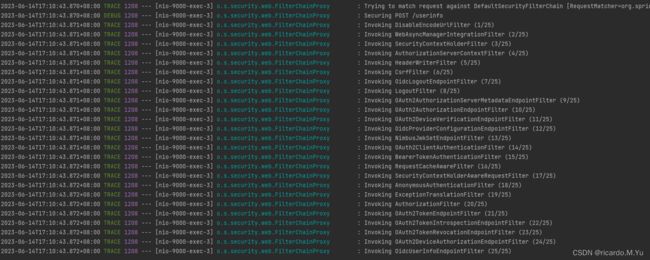
BearerTokenAuthenticationFilter: 检验token
AuthenticationEntryPointFailureHandler
AuthenticationFailureHandler
OidcUserInfoEndpointFilter
个性化改造
目标
- 原有的客户端注册中心是基于内存的InMemoryRegisteredClientRepository,需要改造为基于数据库,可动态注册即修改客户端信息
- 用户信息UserDetailsService也是基于内存,现在需要基于数据库动态添加编辑
- 各种异常的自定义处理与信息返回
- 用户信息的自定义返回
- 过期时间、授权方式
改造过程
正在改造中。。。
集成GateWay
正在集成中。。。
关于 Spring Cloud Alibaba 的基础环境搭建,可以看下面的文章,很详细,本文主要介绍集成OAuth2的过程
Spring Cloud Alibaba 最新版本整合完整使用及与各中间件集成(基于Spring Boot 3.0.x)_ricardo.M.Yu的博客-CSDN博客
代办事项
现在需要做的改造如下:
1、新建授权服务,集成 oauth2-authorization-server ,即auth模块做授权中心
2、修改业务模块,集成 oauth2-client,即做资源中心与客户端
3、修改网关模块,即 gateway 做相关修改
Oauth2主要结构
OAuth2AuthorizationEndpointFilter: 针对 /login 或自行请求 授权码的处理器
OAuth2TokenEndpointFilter:针对获取 token 时的处理器
ProviderManager:
OAuth2ClientAuthenticationFilter
OAuth2TokenEndpointFilter
ClientSecretAuthenticationProvider
DelegatingAuthenticationConverter
OAuth2AuthorizationCodeAuthenticationProvider
OAuth2AuthorizationEndpointFilter
UsernamePasswordAuthenticationFilter
sql脚本
我直接整理好了
/*
IMPORTANT:
    If using PostgreSQL, update ALL columns defined with 'blob' to 'text',
    as PostgreSQL does not support the 'blob' data type.
*/
CREATE TABLE oauth2_authorization (
    id varchar(100) NOT NULL,
    registered_client_id varchar(100) NOT NULL,
    principal_name varchar(200) NOT NULL,
    authorization_grant_type varchar(100) NOT NULL,
    authorized_scopes varchar(1000) DEFAULT NULL,
    attributes blob DEFAULT NULL,
    state varchar(500) DEFAULT NULL,
    authorization_code_value blob DEFAULT NULL,
    authorization_code_issued_at timestamp DEFAULT NULL,
    authorization_code_expires_at timestamp DEFAULT NULL,
    authorization_code_metadata blob DEFAULT NULL,
    access_token_value blob DEFAULT NULL,
    access_token_issued_at timestamp DEFAULT NULL,
    access_token_expires_at timestamp DEFAULT NULL,
    access_token_metadata blob DEFAULT NULL,
    access_token_type varchar(100) DEFAULT NULL,
    access_token_scopes varchar(1000) DEFAULT NULL,
    oidc_id_token_value blob DEFAULT NULL,
    oidc_id_token_issued_at timestamp DEFAULT NULL,
    oidc_id_token_expires_at timestamp DEFAULT NULL,
    oidc_id_token_metadata blob DEFAULT NULL,
    refresh_token_value blob DEFAULT NULL,
    refresh_token_issued_at timestamp DEFAULT NULL,
    refresh_token_expires_at timestamp DEFAULT NULL,
    refresh_token_metadata blob DEFAULT NULL,
    user_code_value blob DEFAULT NULL,
    user_code_issued_at timestamp DEFAULT NULL,
    user_code_expires_at timestamp DEFAULT NULL,
    user_code_metadata blob DEFAULT NULL,
    device_code_value blob DEFAULT NULL,
    device_code_issued_at timestamp DEFAULT NULL,
    device_code_expires_at timestamp DEFAULT NULL,
    device_code_metadata blob DEFAULT NULL,
    PRIMARY KEY (id)
);

CREATE TABLE oauth2_authorization_consent (
    registered_client_id varchar(100) NOT NULL,
    principal_name varchar(200) NOT NULL,
    authorities varchar(1000) NOT NULL,
    PRIMARY KEY (registered_client_id, principal_name)
);

CREATE TABLE oauth2_registered_client (
    id varchar(100) NOT NULL,
    client_id varchar(100) NOT NULL,
    client_id_issued_at timestamp DEFAULT CURRENT_TIMESTAMP NOT NULL,
    client_secret varchar(200) DEFAULT NULL,
    client_secret_expires_at timestamp DEFAULT NULL,
    client_name varchar(200) NOT NULL,
    client_authentication_methods varchar(1000) NOT NULL,
    authorization_grant_types varchar(1000) NOT NULL,
    redirect_uris varchar(1000) DEFAULT NULL,
    post_logout_redirect_uris varchar(1000) DEFAULT NULL,
    scopes varchar(1000) NOT NULL,
    client_settings varchar(2000) NOT NULL,
    token_settings varchar(2000) NOT NULL,
    PRIMARY KEY (id)
);