SpringBoot实现邮箱注册
SpringBoot实现邮箱注册
功能说明
在BuaaMap的产品设计中,综合考虑安全性、易用性等,用户需以自己的邮箱为唯一标识注册账户。因此,后端必须支持邮箱发送、验证功能来实现这一需求。
具体来说,用户在注册我们产品的账号时,需要经过以下流程:
- 输入待注册且未在产品中注册过的账号
- 点击发送验证码按钮,获取系统发送给指定邮箱的验证码
- 输入正确的验证码,点击注册按钮完成注册
在该流程中,后端参与的部分有发送验证码,和处理注册请求时验证码验证。
功能实现
整个邮箱模块实现分为两部分:邮箱Util类、Service类的实现与验证码存储、验证。
我的设计思路是Service提供邮件发送功能,而对于项目本身来说,Util调用Service发送具体场景下的验证码邮件。发送验证码后,后端在Redis缓存中存储<邮箱,验证码>的键值对,便于在注册时获取验证码信息用于验证,且该验证码具有“寿命”,超过一定时间后验证码会失效,需要重新获取验证码。
值得高兴的是,对于SpringBoot这样一个集成度高的框架,有各种工具包来大幅简化项目场景里的实现难度。
- 引入maven依赖
对于邮件发送功能,需要在pom.xml中引入如下依赖:
<dependency>
	<groupId>com.sun.mail</groupId>
	<artifactId>javax.mail</artifactId>
	<version>1.6.2</version>
</dependency>
<dependency>
	<groupId>org.springframework.boot</groupId>
	<artifactId>spring-boot-starter-mail</artifactId>
</dependency>
这里的javax.mail是最新版,可以适配与项目使用的SpringBoot最新版本。其他项目实际使用时需注意选择合适的版本。
- 选择用于发送邮件的邮箱
我们自然需要一个邮箱来给用户发送验证码。综合考虑网易邮箱在国内的普及度(其实是因为可以免费使用SMTP服务),我们决定注册一个网易邮箱账号用于承担此重任。
注册完成后,我们就拥有了一个邮箱账号!(x)
接下来,我们需要考虑如何用这个邮箱在后端自动在请求到来时给用户发送邮件。
一般来说,一台服务器使用邮件发送功能需要使用SMTP。
-
什么是SMTP (Simple Mail Transfer Protocol)?
SMTP (Simple Mail Transfer Protocol) is a TCP/IP protocol used in sending and receiving email. SMTP is used most commonly by email clients.
-
为什么选择SMPT?
直接发送邮件可能会遇到一些问题,例如邮件可能会被拦截或丢失,或者被识别为垃圾邮件。使用SMTP服务来发送邮件可以确保邮件的可靠传输,提高邮件的安全性和隐私性,并避免遇到与直接发送邮件相关的问题。
网易邮箱也提供了SMPT服务,需要手动开启获得使用密码。
首先在主页点击设置:
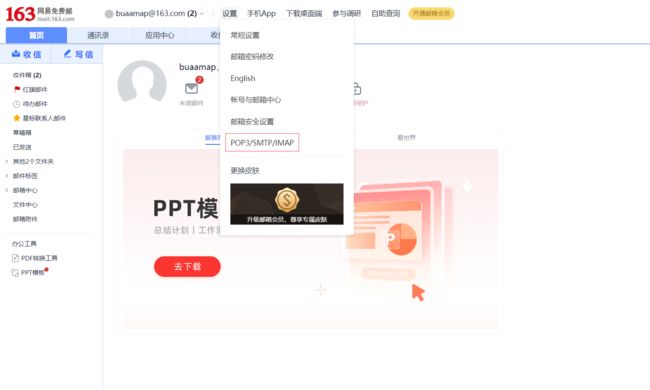
然后开启SMTP服务(IMAP,POP3是客户端收取邮件的协议,对我们的使用来说任选一个即可)
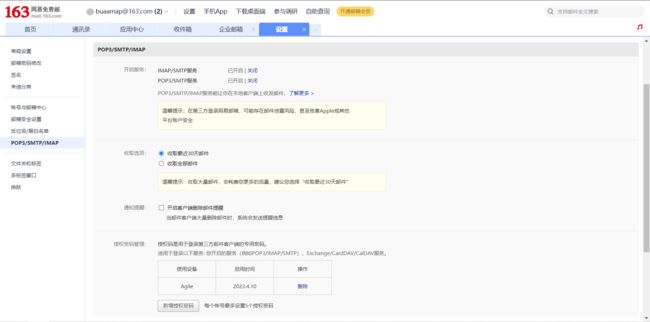
开启服务会展示SMTP服务密码,该密码在后续利用该账号发送邮件授权时需要使用。
注意,密码只会展示一次,之后便无法再在网易邮箱中获得该明文密码,因此需要及时保存。
- SpringBoot中配置相关变量
利用javax.mail工具包发送邮件时可以选择是否开启SSL,若不开启,邮件内容以明文传输,而开启后则会加密。若使用SSL则端口应使用465,否则使用默认的25即可。
spring:
  mail:
    username: buaamap@163.com
    email: buaamap@163.com
    password: xxxxxxxx
    host: smtp.163.com
    port: 465
    properties:
      mail:
        smtp:
          starttls:
            enable: true
          auth: true
          ssl:
            enable: true
          socketFactoryClass: javax.net.ssl.SSLSocketFactory
        debug: true
- 发送邮件代码编写
具体功能代码实现如下,难以理解的部分在代码找中都附有注释:
@Data
@AllArgsConstructor
@NoArgsConstructor
public class Email {
		// 发送对象,可以有多个
    private List<String> tos;
		// 邮件主题
    private String subject;
		// 邮件内容
    private String content;
}
@Service
public class EmailServiceImpl implements EmailService {
		// 获取之前在配置文件里写好的信息
    @Value("${spring.mail.email}")
    private String email;
    @Value("${spring.mail.host}")
    private String host;
    @Value("${spring.mail.port}")
    private String port;
    @Value("${spring.mail.username}")
    private String username;
    @Value("${spring.mail.password}")
    private String password;

    public void send(Email email) {
        if (this.email == null
                || this.host == null
                || this.port == null
                || this.username == null
                || this.password == null) {
            throw new RuntimeException("邮箱配置异常");
        }

        // 设置用于发送邮件的对象的信息
        MailAccount account = new MailAccount();
        account.setHost(this.host);
        account.setPort(Integer.parseInt(this.port));
        // 设置发送人邮箱
        account.setFrom(this.email);
        // 设置发送人名称
        account.setUser(this.username);
        // 设置发送授权码
        account.setPass(this.password);
        account.setAuth(true);
        // ssl方式发送
        account.setSslEnable(true);
        // 使用安全连接
        account.setStarttlsEnable(true);

        try {
            int size = email.getTos().size();
            Mail.create(account)
                    .setTos(email.getTos().toArray(new String[size]))
                    .setTitle(email.getSubject())
                    .setContent(email.getContent())
                    .setHtml(true)
                    //关闭session
                    .setUseGlobalSession(false)
                    .send();
        } catch (Exception e) {
            throw new RuntimeException(e.getMessage());
        }
    }
}
邮件发送的内容自然不能是单纯6个数字组成的验证码,为了美观可以发送“模板”。邮件发送模板需要使用到hutool工具包,但这部分不是本文的重点内容,因此不展开介绍,感兴趣的话可以上网搜索相关内容。
@Component
public class EmailUtil {
    @Autowired
    private EmailService emailService;

    public void sendEmail(String email, String code) {
        // 获取发送邮箱验证码的HTML模板
        TemplateEngine engine = TemplateUtil.createEngine(
                new TemplateConfig("templates", TemplateConfig.ResourceMode.CLASSPATH));
        Template template = engine.getTemplate("emailTemplate.html");

        // 发送验证码
        emailService.send(new Email(Collections.singletonList(email),
                "邮箱验证码", template.render(Dict.create().set("code", code))));
    }
}
- 编写业务层面的验证码发送与验证功能
public void sendMailCode(String email) {
// 首先判断邮箱是否被注册
if (userService.findUserByEmail(email).size() != 0) {
throw new RuntimeException("邮箱已被注册");
}
// 判断之前是否
String code = redisUtil.get(email);
if (code == null) {
// 缓存中不存在验证码,则产生6位随机数作为验证码
code = RandomUtil.randomNumbers(6);
}
// 发送邮件
emailUtil.sendEmail(email, code);
// 将<邮箱,验证码>键值对插入Redis
if (!redisUtil.set(email, code, expiration)) {
throw new RuntimeException("服务器redis缓存异常");
}
}
public boolean register(RegisterInfo info) {
...
// 获取Redis里存储的验证码,与用户填写的验证码对比
String actualCode = redisUtil.get(info.getEmail());
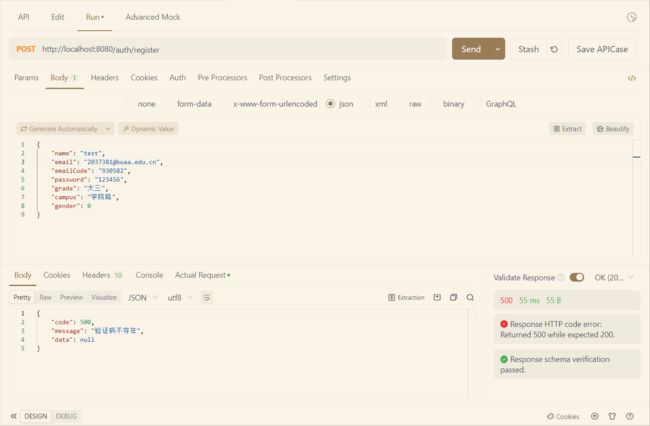
if (actualCode == null) {
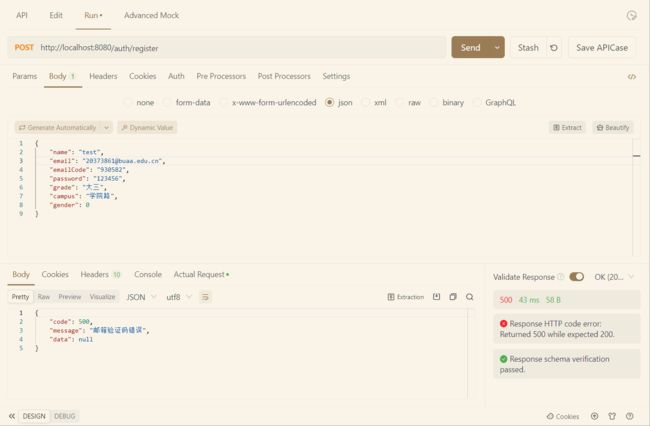
throw new RuntimeException("验证码不存在");
}
if (!actualCode.equals(info.getEmailCode())) {
throw new RuntimeException("邮箱验证码错误");
}
...
}
功能测试
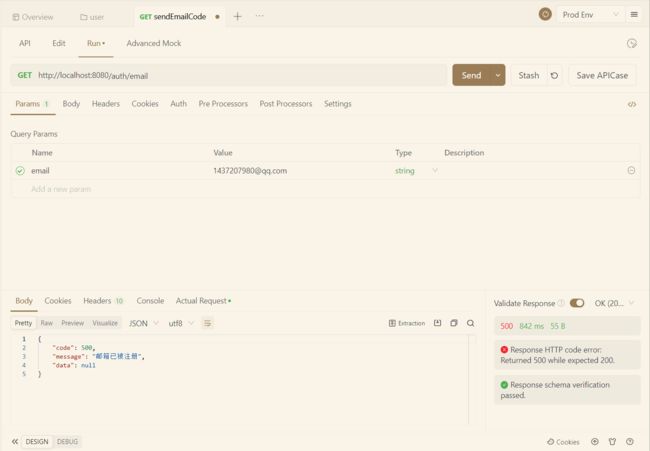
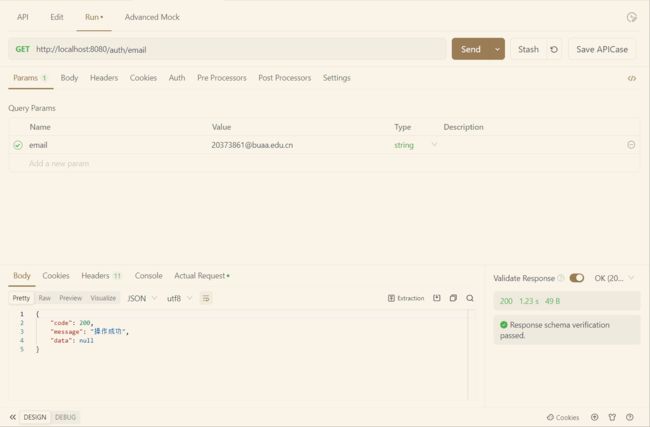
编写发送验证码与注册的路由,在ApiFox里验证以上功能是否能正确执行。
发送邮箱失败—重复注册
发送成功
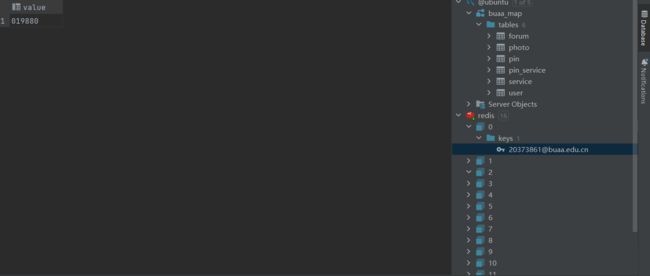
Redis数据库里出现对应键值对:
注册失败—验证码错误
注册失败—未发送验证码
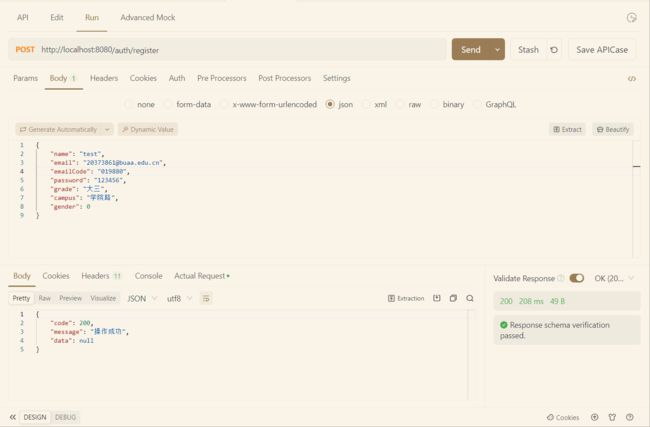
注册成功
贡献者:李治圻-后端