【Jetpack】Navigation 导航组件 ① ( Navigation 引入 | Navigation 特点 | Navigation 重要组件 | Navigation 使用流程 )
文章目录
- 一、Navigation 引入
- 二、Navigation 特点
- 三、Navigation 重要组件
- 四、Navigation 使用流程
-
- 1、创建 Fragment
- 2、创建 Navigation Graph 组件
- 3、处理 Navigation Graph 组件报错信息 " failed to add navigation dependency "
- 4、编辑 Navigation Graph 组件 - 创建 action 跳转
- 5、创建 NavHostFragment 组件
- 6、在 Activity 中获取 NavController
一、Navigation 引入
Android 开发中 , 最常用的 UI 架构 就是 使用一个 Activity 嵌套多个 Fragment , 这就需要 对 Fragment 进行管理 ;
在传统的 Android 开发中 , 使用 FragmentManager 和 FragmentTransaction 管理
- Fragment 的生命周期 ,
- Fragment 页面切换 ,
- Fragment 切换动画设置运行 ,
- Fragment 与 Fragment / Activity 之间的数据传递 ,
- 应用 App Bar 管理
等操作 ;
上述操作都是 使用纯代码方式进行实现 , 在页面和 App Bar 管理过程中使用比较繁琐 , 维护难度较大 ;
Jetpack 提供的 Navigation 组件 , 解决上述 Fragment 页面管理 与 App Bar 管理 问题 ;
Navigation 主要功能就是帮助 Activity 管理 Fragment ;
App Bar 是应用程序顶部的一个可用于导航和操作应用程序的界面元素。App Bar 管理指的是使用 Android 框架提供的 API,对 App Bar 进行创建、设置和管理的过程。
常见的App Bar 管理操作:
- 创建 App Bar:使用 Android 框架提供的 Toolbar 控件创建 App Bar。
- 设置 App Bar 标题:使用 setTitle() 方法设置 App Bar 的标题。
- 设置 App Bar Logo:使用 setLogo() 方法设置 App Bar 的 Logo。
- 添加菜单项:使用 onCreateOptionsMenu() 方法创建 App Bar 中的菜单项。
- 处理菜单项点击事件:使用 onOptionsItemSelected() 方法处理 App Bar 中的菜单项点击事件。
- 关联 App Bar 和布局:使用 setSupportActionBar() 方法将 App Bar 与布局关联起来。
- 启用/禁用 App Bar:使用 setEnabled() 方法启用或禁用 App Bar。
二、Navigation 特点
Navigation 提供了 可视化的 页面导航图 , 与 iOS 开发中的 Xcode 环境中的 StoryBoard 类似 ; 在 布局文件 的 Design 模式下 , 可以看到 Fragment 之间的跳转关系 ;
在 Xml 布局文件中 , 通过在 Fragment 标签中 , 添加 action 标签 , 设置该标签 app:destination 属性 , 完成 Fragment 之间的导航 ;
如果要 为 Fragment 跳转设置动画 , 可以直接在 Navigation 图形化界面中选中某个跳转 , 然后直接在 布局文件的 Design 图形化界面中 , 设置跳转的动画 ;
通过 safe args 可以实现 Fragment 页面之间的参数安全传递 , 传统方式是使用 Intent 进行数据传递 ;
通过该 Design 模式下的 Navigation 管理 , 可以对 菜单 , 底部导航栏 , 抽屉菜单 的页面及跳转逻辑 , 进行统一管理 ;
支持 DeepLink 深层链接 , 可以直接跳转到指定的 Fragment 中 ;
三、Navigation 重要组件
Navigation 重要组件 :
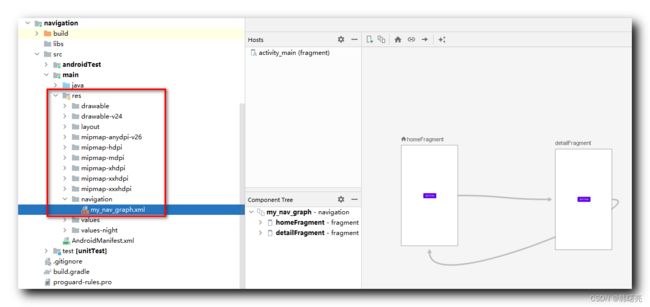
- Navigation Graph 组件 : 是 Navigation 组件中的 Xml 文件 , 这是新加入的 Xml 文件类型 , 该文件定义在 res 资源目录下的 navigation 目录下 , 该文件中包含了 应用程序 中的所有界面 , 以及界面之间的跳转关系 ;
- NavHostFragment 组件 : 该组件是 Navigation 组件的核心组成部分 , 它可以看做为一个空的 Fragment 容器 , 用于在应用中显示目的地 , NavHostFragment 会自动处理目的地之间的转换和回退操作 ; Navigation Graph 中定义的 Fragment 页面 需要通过 NavHostFragment 进行展示 ;
- NavController 组件 : 该组件是 NavHostFragment 中的管理对象 , 用于管理应用中的导航操作 , 主要是完成在 Navigation Graph 中定义的页面切换操作 ; 通过 NavController 可以轻松地跳转到不同的目的地 , 并处理回退操作 ;
切换 Fragment 显示流程 :
- 使用 NavController 组件 切换 Fragment , 设置 要跳转的 定义在 Navigation Graph 中定义的 Fragment ;
- NavController 组件 会将 指定的 Fragment 显示到 NavHostFragment 组件中 ;
四、Navigation 使用流程
Navigation 使用流程 :
- 创建若干 Fragment 页面
- 创建 Navigation Graph , 并指定要跳转的 destination 页面
- 创建 NavHostFragment 组件
- 执行 Fragment 页面跳转 , 并添加动画效果
- 使用 NavController 组件实现页面导航
- 使用 Safe Args 插件安全传递数据
创建 Navigation Graph 组件有一个前提 , 那就是 Fragment 已经创建完毕 ;
创建 NavHostFragment 组件有一个前提 , 那就是 Navigation Graph 已经创建完毕 ;
1、创建 Fragment
右键点击 代码 包名 , 在弹出的右侧菜单中 , 选择 " New / Fragment / Fragment (Blank) " 选项 ,
输入 Fragment 名称 " FragmentA " , 然后点击 " Finish " 按钮 , 创建完毕 ;
package kim.hsl.nav

import android.os.Bundle
import androidx.fragment.app.Fragment
import android.view.LayoutInflater
import android.view.View
import android.view.ViewGroup

// TODO: Rename parameter arguments, choose names that match
// the fragment initialization parameters, e.g. ARG_ITEM_NUMBER
private const val ARG_PARAM1 = "param1"
private const val ARG_PARAM2 = "param2"

/**
 * A simple [Fragment] subclass.
 * Use the [FragmentA.newInstance] factory method to
 * create an instance of this fragment.
 */
class FragmentA : Fragment() {
    // TODO: Rename and change types of parameters
    private var param1: String? = null
    private var param2: String? = null

    override fun onCreate(savedInstanceState: Bundle?) {
        super.onCreate(savedInstanceState)
        arguments?.let {
            param1 = it.getString(ARG_PARAM1)
            param2 = it.getString(ARG_PARAM2)
        }
    }

    override fun onCreateView(
        inflater: LayoutInflater, container: ViewGroup?,
        savedInstanceState: Bundle?
    ): View? {
        // Inflate the layout for this fragment
        return inflater.inflate(R.layout.fragment_a, container, false)
    }

    companion object {
        /**
         * Use this factory method to create a new instance of
         * this fragment using the provided parameters.
         *
         * @param param1 Parameter 1.
         * @param param2 Parameter 2.
         * @return A new instance of fragment FragmentA.
         */
        // TODO: Rename and change types and number of parameters
        @JvmStatic
        fun newInstance(param1: String, param2: String) =
            FragmentA().apply {
                arguments = Bundle().apply {
                    putString(ARG_PARAM1, param1)
                    putString(ARG_PARAM2, param2)
                }
            }
    }
}
同时还会在 " res/layout " 目录中 , 自动生成 FragmentA 对应的布局文件 " fragment_a.xml " ,
<FrameLayout xmlns:android="http://schemas.android.com/apk/res/android"
    xmlns:tools="http://schemas.android.com/tools"
    android:layout_width="match_parent"
    android:layout_height="match_parent"
    tools:context=".FragmentA">


    <TextView
        android:layout_width="match_parent"
        android:layout_height="match_parent"
        android:text="@string/hello_blank_fragment" />

FrameLayout>
2、创建 Navigation Graph 组件
创建 Navigation Graph 组件有一个前提 , 那就是 Fragment 已经创建完毕 ;
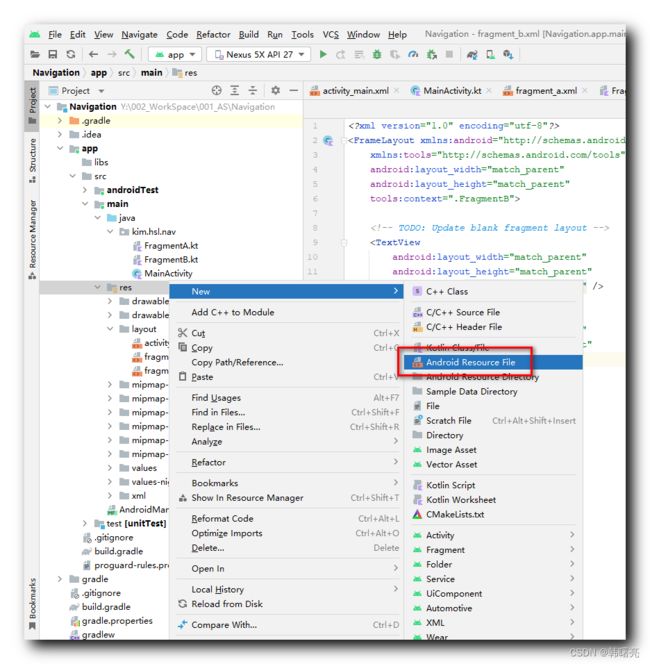
右键点击 res 资源目录 , 选择 " New / Android Resource File " 选项 ,
在弹出的对话框中 , 选择 Resource Type 为 Navigation , 其 Directory name 会被自动设置为 navigation , 需要自定义设置的是 File name , 输入文件名称即可 , 这里命名为 navigation_graph.xml ;
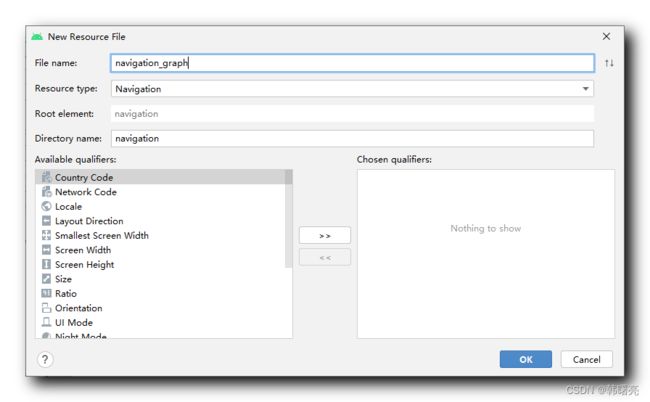
生成的 " res/navigation/navigation_graph.xml " 文件如下 :
<navigation xmlns:android="http://schemas.android.com/apk/res/android"
    xmlns:app="http://schemas.android.com/apk/res-auto"
    android:id="@+id/navigation_graph">

navigation>
3、处理 Navigation Graph 组件报错信息 " failed to add navigation dependency "
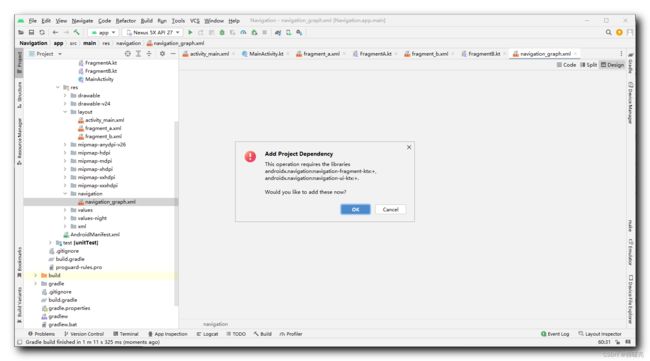
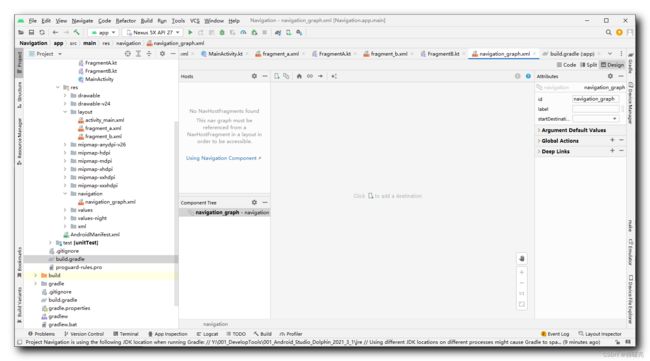
创建完成后 , 出现如下报错信息 " failed to add navigation dependency " ;

点击该界面 , 会弹出如下对话框 , 点击 OK , 会自动向 build.gradle 构建脚本中添加依赖 ;
被添加的依赖如下 :
    implementation 'androidx.navigation:navigation-fragment-ktx:2.4.1'
    implementation 'androidx.navigation:navigation-ui-ktx:2.4.1'
添加完依赖后 , 重新 Build 一下应用 , Navigation 功能正常使用 ;
4、编辑 Navigation Graph 组件 - 创建 action 跳转
点击 Navigation Graph 中 Design 模式下 的 " New Destination " 按钮 ,
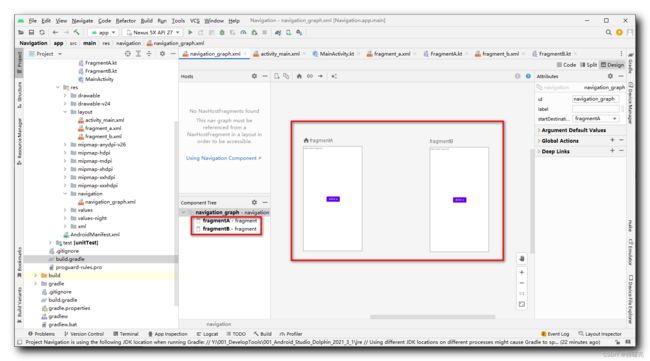
在弹出的下拉菜单中 , 可以选择之前创建的两个 Fragment , 分别是 FragmentA 和 FragmentB , 对应的 xml 布局文件是 fragment_a.xml 和 fragment_b.xml ;
在上述下拉菜单中 , 点击 fragment_a , 即可将该 FragmentA 设置到面板中 , 点击 fragment_b 即可将 FragmentB 设置到面板中 ;
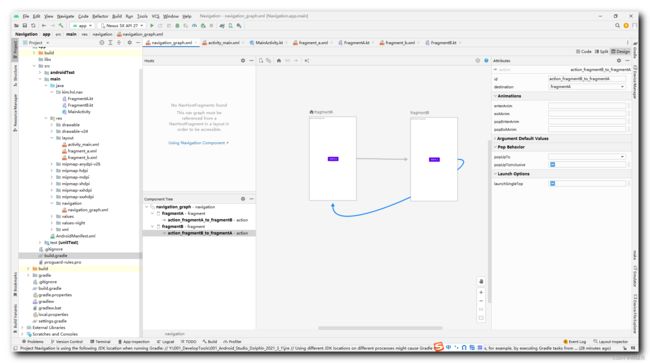
设置完毕后 , 将 鼠标移动到 fragmentA 上 , 可以看到右侧的 圆圈 ,
在 圆圈 上 , 按住鼠标左键 , 拖动到 fragmentB 上 , 会自动生成一个箭头 , 这个箭头就是 action , 代表了一次跳转 ;
也可以设置一个从 fragmentB 到 fragmentA 的 action 箭头 ;
5、创建 NavHostFragment 组件
创建 Navigation Graph 组件有一个前提 , 那就是 Fragment 已经创建完毕 ;
创建 NavHostFragment 组件有一个前提 , 那就是 Navigation Graph 已经创建完毕 ;
NavHostFragment 组件 需要设置在 Activity 中 , 具体是在 Activity 的布局文件中设置 NavHostFragment 容器组件 , 这是一个 UI 布局组件 ;
拖动 Container 下的 NavHostFragment 组件 到 Activity 布局中 ,
拖动后 , 需要选择对应的 Navigation Graph , 因此创建 NavHostFragment 组件有一个前提 , 那就是 Navigation Graph 已经创建完毕 ;
然后设置该 NavHostFragment 组件 的约束布局选项 , 充满全屏 ;
生成的完整 Activity 布局文件代码如下 :
<androidx.constraintlayout.widget.ConstraintLayout xmlns:android="http://schemas.android.com/apk/res/android"
    xmlns:app="http://schemas.android.com/apk/res-auto"
    xmlns:tools="http://schemas.android.com/tools"
    android:layout_width="match_parent"
    android:layout_height="match_parent"
    tools:context=".MainActivity">

    <TextView
        android:id="@+id/textView"
        android:layout_width="wrap_content"
        android:layout_height="wrap_content"
        android:text="Hello World!"
        app:layout_constraintBottom_toBottomOf="parent"
        app:layout_constraintEnd_toEndOf="parent"
        app:layout_constraintStart_toStartOf="parent"
        app:layout_constraintTop_toTopOf="parent" />

    <androidx.fragment.app.FragmentContainerView
        android:id="@+id/fragmentContainerView"
        android:name="androidx.navigation.fragment.NavHostFragment"
        android:layout_width="0dp"
        android:layout_height="0dp"
        app:defaultNavHost="true"
        app:layout_constraintBottom_toBottomOf="parent"
        app:layout_constraintEnd_toEndOf="parent"
        app:layout_constraintStart_toStartOf="parent"
        app:layout_constraintTop_toTopOf="parent"
        app:navGraph="@navigation/navigation_graph" />

androidx.constraintlayout.widget.ConstraintLayout>
核心的 NavHostFragment 组件如下 :
    <androidx.fragment.app.FragmentContainerView
        android:id="@+id/fragmentContainerView"
        android:name="androidx.navigation.fragment.NavHostFragment"
        android:layout_width="0dp"
        android:layout_height="0dp"
        app:defaultNavHost="true"
        app:layout_constraintBottom_toBottomOf="parent"
        app:layout_constraintEnd_toEndOf="parent"
        app:layout_constraintStart_toStartOf="parent"
        app:layout_constraintTop_toTopOf="parent"
        app:navGraph="@navigation/navigation_graph" />
6、在 Activity 中获取 NavController
通过 调用 findNavController 函数 , 获取 NavController , 然后通过该 NavController 变量进行导航 ;
        // fragmentContainerView 组件的 管理 操作通过 NavController 完成
        // 对应的就是 navController 实例变量
        val navController = findNavController(this, R.id.fragment)
        NavigationUI.setupActionBarWithNavController(this, navController)

