ElasticSearch学习并使用
文章目录
- 前言
- 介绍
- 概念
- 安装(非docker)
-
- ElasticSearch
- API
-
- _cat
- 新增/创建索引
- 插入数据
- 查询索引配置
-
- 映射
- 查看指定字段的映射
- 配置
- 别名
- 设置映射
- 修改
-
- 局部更新
- 删除
-
- 根据ID删除
- 根据条件删除
- 删除索引
- 根据id查询
- 搜索
-
- 关键字搜索(match)
- 高亮显示
- 结构化查询
-
- term(精确匹配)
- terms(允许多个值的精确匹配)
- range(范围查询)
- exists(是否包含字段,或没有字段)
- match(分词匹配搜索)
- match_phrase
- bool
- filter(过滤)
- prefix(前缀匹配)
- 聚合
-
- 平均(avg)/最大值(max)/最小值(min)
- 去重统计
- extended_stats(扩展统计)
- value_count(value值计数统计)
- terms(词聚合)
- top_hits(最高匹配权值聚合)
- range(范围统计)
- 响应格式化
- 指定响应字段
- 批量查询
- 分页
-
- 浅分页
- 深分页(scroll)
-
- 删除scroll_id
- 深分页2(search_after)
- 添加别名
-
- 特别注意:查询最大返回数
- 分析器
-
- 字符过滤器(Character Filters)
-
- html元素过滤器(html_strip)
- 字符映射过滤器(mapping)
- 正则表达式过滤器(pattern_replace)
- 组合使用
- 分词器(Tokenizer)
-
- 内置分词器
-
- standard (按词分类,小写处理)
- simple(非字母为分隔符拆分,转小写)
- stop(默认和simple一样)
-
- 自定义停止词
- whitespace (空白符分隔)
- patter (默认`\W+`分词)
-
- 自定义表达式为`\W+|_`(非单词字符)
- language
- ik分词器
-
- 安装
- 自定义词典
- 拼音分词器
- 分词过滤器(Token Filter)
-
- 长度过滤器(length Filter)
- 自定义分析器
- reindex
- 集群
-
- 最后检验集群
- SpringBoot
-
- 创建索引
-
- XContentBuilder方式构建参数
- json方式构建参数
- 获取映射信息
- 删除索引
- reindex
- 新增数据(es7)
- 新增数据(es8)
- 添加别名
- getById
- 查询
- 地理信息位置查询
-
- 定义geo点和geoShape
- 范围查询
- 高亮查询
前言
本文以能在项目中应用为目的,介绍es的基本知识、注意点和基本操作。
介绍
中文教程:基础概念 · Elasticsearch 中文文档 (kilvn.com)https://docs.kilvn.com/elasticsearch/docs/192.html)
Elasticsearch 用java开发的, 近实时搜索引擎,一般的数据库搜索只能做到全词的匹配,比如“kafka分区副本”这个词,只会去匹配这个词,想“kafka里的分区副本”这样的语句就匹配不多,但ES可以做到,就像在使用百度搜索一样,可以进行关键词搜索。
概念
索引(index):类似mysql中的表名,必须小写;每个索引有一个mapping,用于定义文档字段名和字段类型;
类型(type):6.0之后被废弃了,它表示一个索引的类型。7.0后只能创建一个类型(_doc);
文档(document):文档,索引里数据的基本单位,以json格式存储,每个字段都有自己的类型(text、double、date、geo_point等),如果在创建文档时不指定其字段类型,它会自动生成,但如果一个字段的类型不同相差太多也会报错,当然也可以自己指定,就像geo_point类型(空间坐标类型),需要提前指定,不然会被翻译成double数组类型,并且每个文档都会生成一个唯一ID;
节点:每个Elasticsearch实例就是一个节点,分3中类型:
- master eligible - 每个节点启动就是master eligible节点,可以参加主节点选举,不需要作为主节点,可以通过node.master:false禁止
- data - 保存数据的节点,负责保存分片数据
- coordinating - 负责接收客户端请求,然后将请求发送到合适的节点上,最终把结果汇集到一起,每个节点都是coordinating节点
分片(shards):索引的数据会被分成多个数据片段,保存在其他节点上,每个分片也可以看做独立的“索引”,水平拆分的模式使得ES可以分布和并行操作,提供性能;主分片数在创建后就不允许修改,reindex时可以修改;
副本(replicas):提高容灾能力,每个分片会备份副本保存在其他节点,副本不会保存在原始分片所在的节点和主分片上,并且它运行在所以副本上进行并行搜索;副本的数量在创建后也仍然可以修改的;
安装(非docker)
ElasticSearch
-
下载下载中心 - Elastic 中文社区 (elasticsearch.cn)
-
上传到服务器,然后解压(我这里下载的是8.0.0)
-
配置(这里不能用root用户启动)
-
将解压后的文件路径权限修改为普通用户(版本不能有root用户启动)
设置文件夹及以下子文件夹为用户组ali,下的用户ali所有
chown -R ali:ali elasticsearch
-
修改config/elasticsearch.yml
集群名称
cluster.name: ali-es
节点名称,对应下面的集群node
node.name: node-1
服务ip
network.host: 0.0.0.0
暴露的端口
http.port: 9200
集群节点
cluster.initial_master_nodes: [“node-1”]
-
vim /etc/sysctl.conf
vm.max_map_count=655360
修改完后
sysctl -p使之生效 -
vim /etc/security/limits.conf
修改
* soft nproc 2048为* soft nproc 4096* soft nofile 65536 * hard nofile 131072 * soft nproc 4096 * hard nproc 4096*所有用户soft:指的是当前系统生效的设置值
hard:表明系统中所能设定的最大值nofile:打开文件的最大数目
noproc:进程的最大数目
-
-
启动,记住不能用root启动
切换普通用户
su ali
./bin/elasticsearch
#后台启动
./bin/elasticsearch -d
启动报错1:
Skipping security auto configuration because the node keystore file [/data/elasticsearc/elasticsearch-8.0.0/config/elasticsearch.keystore] is not a readable regular file
Exception in thread "main" org.elasticsearch.bootstrap.BootstrapException: java.nio.file.AccessDeniedException: /data/elasticsearc/elasticsearch-8.0.0/config/elasticsearch.keystore
Likely root cause: java.nio.file.AccessDeniedException: /data/elasticsearc/elasticsearch-8.0.0/config/elasticsearch.keystore
        at java.base/sun.nio.fs.UnixException.translateToIOException(UnixException.java:90
是因为这个文件
elasticsearch.keystore是在root用户权限下不能被读取[外链图片转存失败,源站可能有防盗链机制,建议将图片保存下来直接上传(img-NmMCuHfE-1678515293253)(E:/ALI/Documents/%E5%BE%85%E5%8F%91%E5%B8%83%E6%96%87%E7%AB%A0/Typora/typora/images/image-20230212161221952.png)]
在设置一次
chown -R ali:ali config/elasticsearch.keystore启动报错2:
 ERROR Could not create plugin of type class org.apache.logging.log4j.core.appender.RollingFileAppender for element RollingFile: java.lang.IllegalStateException: ManagerFactory [org.apache.logging.log4j.core.appender.rolling.RollingFileManager$RollingFileManagerFactory@27d5a580] unable to create manager for [/data/elasticsearc/elasticsearch-8.0.0/logs/ali-es_index_search_slowlog.json] with data [org.apache.logging.log4j.core.appender.rolling.RollingFileManager$FactoryData@52851b44[pattern=/data/elasticsearc/elasticsearch-8.0.0/logs/ali-es_index_search_slowlog-%i.json.gz, append=true, bufferedIO=true, bufferSize=8192, policy=CompositeTriggeringPolicy(policies=[SizeBasedTriggeringPolicy(size=1073741824)]), strategy=DefaultRolloverStrategy(min=1, max=4, useMax=true), advertiseURI=null, layout=co.elastic.logging.log4j2.EcsLayout@550a1967, filePermissions=null, fileOwner=null]] java.lang.IllegalStateException: ManagerFactory [org.apache.logging.log4j.core.appender.rolling.RollingFileManager$RollingFileManagerFactory@27d5a580] unable to create manager for [/data/elasticsearc/elasticsearch-8.0.0/logs/ali-es_index_search_slowlog.json] with data [org.apache.logging.log4j.core.appender.rolling.RollingFileManager$FactoryData@52851b44[pattern=/data/elasticsearc/elasticsearch-8.0.0/logs/ali-es_index_search_slowlog-%i.json.gz, append=true, bufferedIO=true, bufferSize=8192, policy=CompositeTriggeringPolicy(policies=[SizeBasedTriggeringPolicy(size=1073741824)]), strategy=DefaultRolloverStrategy(min=1, max=4, useMax=true), advertiseURI=null, layout=co.elastic.logging.log4j2.EcsLayout@550a1967, filePermissions=null, fileOwner=null]]
        at org.apache.logging.log4j.core.appender.AbstractManager.getManager(AbstractManager.java:116)
        at org.apache.logging.log4j.core.appender.OutputStreamManager.getManager(OutputStreamManager.java:100)
        at org.apache.logging.log4j.core.appender.rolling.RollingFileManager.getFileManager(RollingFileManager.java:217)
        at org.apache.logging.log4j.core.appender.RollingFileAppender$Builder.build(RollingFileAppender.java:146)
        at org.apache.logging.log4j.core.appender.RollingFileAppender$Builder.build(RollingFileAppender.java:62)
        at org.apache.logging.log4j.core.config.plugins.util.PluginBuilder.build(PluginBuilder.java:122)
        at org.apache.logging.log4j.core.config.AbstractConfiguration.createPluginObject(AbstractConfiguration.java:1120)
        at org.apache.logging.log4j.core.config.AbstractConfiguration.createConfiguration(AbstractConfiguration.java:1045)
        at org.apache.logging.log4j.core.config.AbstractConfiguration.createConfiguration(AbstractConfiguration.java:1037)
        at org.apache.logging.log4j.core.config.AbstractConfiguration.doConfigure(AbstractConfiguration.java:651)
        at org.apache.logging.log4j.core.config.AbstractConfiguration.initialize(AbstractConfiguration.java:247)
        at org.apache.logging.log4j.core.config.AbstractConfiguration.start(AbstractConfiguration.java:293)
        at org.apache.logging.log4j.core.LoggerContext.setConfiguration(LoggerContext.java:626)
        at org.apache.logging.log4j.core.LoggerContext.start(LoggerContext.java:302)
        at org.elasticsearch.common.logging.LogConfigurator.configure(LogConfigurator.java:222)
        at org.elasticsearch.common.logging.LogConfigurator.configure(LogConfigurator.java:118)
        at org.elasticsearch.bootstrap.Bootstrap.init(Bootstrap.java:313)
        at org.elasticsearch.bootstrap.Elasticsearch.init(Elasticsearch.java:166)
        at org.elasticsearch.bootstrap.Elasticsearch.execute(Elasticsearch.java:157)
        at org.elasticsearch.cli.EnvironmentAwareCommand.execute(EnvironmentAwareCommand.java:77)
        at org.elasticsearch.cli.Command.mainWithoutErrorHandling(Command.java:112)
        at org.elasticsearch.cli.Command.main(Command.java:77)
        at org.elasticsearch.bootstrap.Elasticsearch.main(Elasticsearch.java:122)
        at org.elasticsearch.bootstrap.Elasticsearch.main(Elasticsearch.java:80)

2023-02-12 03:15:28,044 main ERROR Unable to invoke factory method in class org.apache.logging.log4j.core.appender.RollingFileAppender for element RollingFile: java.lang.IllegalStateException: No factory method found for class org.apache.logging.log4j.core.appender.RollingFileAppender java.lang.IllegalStateException: No factory method found for class org.apache.logging.log4j.core.appender.RollingFileAppender
这个是因为日志文件也是在root权限下,应该是我第一次启动时用的root账户,导致初始化时在root账户下创建了这些文件,切换到非root用户后反而异常了
[外链图片转存失败,源站可能有防盗链机制,建议将图片保存下来直接上传(img-UIC0vJMg-1678515293254)(E:/ALI/Documents/%E5%BE%85%E5%8F%91%E5%B8%83%E6%96%87%E7%AB%A0/Typora/typora/images/image-20230212162305207.png)]
启动报错3:max virtual memory areas vm.max_map_count [65530] is too low, increase to at least [262144]
这个是第三和第四步没有配置或没生效
启动报错4:
Java HotSpot(TM) 64-Bit Server VM warning: Option UseConcMarkSweepGC was deprecated in version 9.0 and will likely be removed in a future release.这是JVM的参数过时了,我们要改一下es目录下的
config/jvm.options
vi config/jvm.options
将-XX:+UseConcMarkSweepGC改为-XX:+UseG1GC -
开放端口
firewall-cmd --add-port=9200/tcp --permanent
firewall-cmd --reload
-
ip访问:http://192.168.17.128:9200 失败
[WARN ][o.e.x.s.t.n.SecurityNetty4HttpServerTransport] [node-1] received plaintext http traffic on an https channel, closing connection Netty4HttpChannel{localAddress=/192.168.17.128:9200, remoteAddress=/192.168.17.1:60067} -
关闭ssl(vim config/elasticsearch.yml)
这个配置是在启动后才有的,解压后没有
xpack.security.enabled: false
-
然后通过ip:9200查看了,出现JSON就是成功的。
[外链图片转存失败,源站可能有防盗链机制,建议将图片保存下来直接上传(img-DSV9l8kL-1678515293254)(E:/ALI/Documents/%E5%BE%85%E5%8F%91%E5%B8%83%E6%96%87%E7%AB%A0/Typora/typora/images/image-20230212163531591.png)]
API
_cat
cat:查看命令参数
一般记不清,可以通过http://192.168.17.128:9200/_cat便可查看es的api命令
新增/创建索引
【put】http://ip:port/{索引名称}
这种方式,可以直接创建一个索引,如果没有对字段有其他要求,这种方式也是最简单的
插入数据
【post】http://ip:port/{索引名称}/_doc/[id]
id可以为空,为空则由es生成
参数:
{
    "id":"1",
    "name":"搜索",
    "age":1
}
查询索引配置
【get】http://ip:port/{索引名称}
这个返回的由alias,mappings,settings,当然也可以单独查询
如果创建索引时,没有设置字段属性类型,es会自定匹配并设定;
{
    "t_biz_test": {
        "aliases": {},
        "mappings": {
            "properties": {
                "age": {
                    "type": "long"
                },
                "id": {
                    "type": "text",
                    "fields": {
                        "keyword": {
                            "type": "keyword",
                            "ignore_above": 256
                        }
                    }
                },
                "name": {
                    "type": "text",
                    "fields": {
                        "keyword": {
                            "type": "keyword",
                            "ignore_above": 256
                        }
                    }
                }
            }
        },
        "settings": {
            "index": {
                "routing": {
                    "allocation": {
                        "include": {
                            "_tier_preference": "data_content"
                        }
                    }
                },
                "number_of_shards": "1",
                "provided_name": "t_biz_test",
                "creation_date": "1676192760043",
                "number_of_replicas": "1",
                "uuid": "g0b6I59oR1a8pT0VIAQ3FA",
                "version": {
                    "created": "8000099"
                }
            }
        }
    }
}
映射
【get】http://ip:port/{索引名称}/_mappings
查看指定字段的映射
【get】http://ip:port/{索引名称}/_mapping/field/name
配置
【get】http://ip:port/{索引名称}/_settings
别名
【get】http://ip:port/{索引名称}/_alias
设置映射
【put】http://ip:port/{索引名称}/_mapping
对已经存在的所有进行映射修改,只能进行添加,如果要修改,只能重新创建;
-
对已经存在的索引,增加字段映射
{ "properties": { // 这个字段可以存在,但要和旧的一样 "t_name": { "type": "text" } } } -
【put】http://ip:port/{索引名称}
这个是创建索引一样的,需要要设置的索引不存在才能成功
修改
根据id替换
【put】http://ip:port/{索引名称}/_doc/{id}
参数:json对象
注意:
使用新增的方式修个,会增加版本,但修改不会,而且使用新增的方式,效率没有局部的高,他们都是一样的步骤,但是多了版本好的更新
局部更新
【post】http://ip:port/{索引名称}/_update/{id}
这种方式是针对被字段被修改时用的,即字段没有被修改时,不会做更新,有更新时,只是针对我们给的字段和值更新;
注意:局部更新的新能要比替换要好
参数格式:
doc表示文档对象,age为字段名
{
    "doc":{
        "age":11
    }
}
删除
根据ID删除
【delete】http://ip:port/{索引名称}/_doc/{id}
根据条件删除
【post】http://ip:port/{索引名称}/_delete_by_query
{
    "query":{
        "term":{
            "id":1
        }
    }
}
删除全部
{
    "query":{
        "match_all": {}
    }
}
删除索引
【delete】http://ip:port/{索引名称}
根据id查询
【get】http://ip:port/{索引名称}/_doc/{id}
结果
{
    "_index": "t_biz_test",
    "_id": "dUodRYYB4WypEctHyN4J",
    "_version": 1,
    "_seq_no": 8,
    "_primary_term": 1,
    "found": true,
    "_source": {
        "id": "",
        "name": "xx",
        "age": x
    }
}
搜索
搜索响应格式
{
    "took": 1,
    "timed_out": false,
    "_shards": {
        "total": 1,
        "successful": 1,
        "skipped": 0,
        "failed": 0
    },
    "hits": {
        "total": {
            "value": 0,
            "relation": "eq"
        },
        "max_score": null,
        "hits": []
    }
}
took - Elasticsearch运行查询需要多长时间(以毫秒为单位)
timed_out - 搜索请求是否超时
_shards - 搜索了多少碎片,并对多少碎片成功、失败或跳过进行了细分。
max_score - 找到最相关的文档的得分
hits.total.value - 找到了多少匹配的文档
hits.sort - 文档的排序位置(当不根据相关性得分排序时)
hits._score - 文档的相关性评分(在使用match_all时不适用)
查询以_search后缀结尾,默认返回10条
【get/post】 http://ip:port/{索引}/_search
查询参数格式如下面格式,以query开头,term,检索类型,id表示字段名
{
    "query":{
        "term":{
            "name":"xxx"
        }
    }
}
关键字搜索(match)
【get】http://ip:port/{索引名称}/_search?q=age:11
这里使用了get请求,参数时通过q=*的格式取传递的,注意,是q=字段名:值
高亮显示
【post】http://ip:port/{索引名称}/_search
参数
{
    "query":{
        // 模糊匹配
        "match":{
            "name":"搜"
        }
    },
    "highlight":{
        "fields":{
            "name":{}
        }
    }
}
这里需要多传一个highlight的参数
结果如下,搜索的字会被打上标签
      "hits": [
            {
                "_index": "t_biz_test",
                "_id": "dEoARYYB4WypEctHFt5e",
                "_score": 0.2876821,
                "_source": {
                    "id": "1",
                    "name": "搜索",
                    "age": 1
                },
                "highlight": {
                    "name": [
                        "搜索"
                    ]
                }
            }
        ]
结构化查询
term(精确匹配)
【post】http://ip:port/{索引名称}/_search
参数
{
    "query":{
        "term":{
            "name":"搜索"
        }
    }
}
terms(允许多个值的精确匹配)
【post】http://ip:port/{索引名称}/_search
参数
{
    "query":{
        "terms":{
             "name":["ds","dd"]
        }
    }
}
terms可以匹配多个值,类似mysql里的in
range(范围查询)
【post】http://ip:port/{索引名称}/_search
- gt - 大于
- gte - 大于等于
- lt - 小于
- lte - 小于等于
参数
{
    "query":{
        "range":{
             "age": {
                 "gte":3
             }
        }
    }
}
这里age是字段名
exists(是否包含字段,或没有字段)
【post】http://ip:port/{索引名称}/_search
参数
{
    "query":{
        "exists":{
             "field": "name"
        }
    }
}
只要包含了name字段的文档都会被查询出来
match(分词匹配搜索)
【post】http://ip:port/{索引名称}/_search
参数
{
    "query":{
        "match":{
             "name": "搜"
        }
    }
}
当match一个全文本字段时,在真正查询前,它会用分析器对搜索的值进行分词,分词完后在逐个对分词结果进行匹配,但如果match的字段时一个确切的值,如数字,日期,布尔,或者not_analyzed的字符串时,会给你搜索指定的值;
**注意:**如果match的值有空格,会被人为时两个单词,只要包含任意一个单词都会被查询出来
示例
{
    "query":{
        "match":{
             "name": "搜 掉"
        }
    }
}
结果:
{
    "took": 2,
    "timed_out": false,
    "_shards": {
        "total": 1,
        "successful": 1,
        "skipped": 0,
        "failed": 0
    },
    "hits": {
        "total": {
            "value": 2,
            "relation": "eq"
        },
        "max_score": 1.0417082,
        "hits": [
            {
                "_index": "t_biz_test",
                "_id": "dEoARYYB4WypEctHFt5e",
                "_score": 1.0417082,
                "_source": {
                    "id": "1",
                    "name": "搜索",
                    "age": 1
                }
            },
            {
                "_index": "t_biz_test",
                "_id": "dUodRYYB4WypEctHyN4J",
                "_score": 0.8781843,
                "_source": {
                    "id": "2",
                    "name": "会锁掉",
                    "age": 2
                }
            }
        ]
    }
}
match_phrase
和match很想,但是他会忽略match字段的空格,进行全词匹配
如
{
    "query":{
        "match_phrase":{
             "name": "搜 掉"
        }
    }
}
它匹配的时【搜掉】而不是【搜】【掉】
bool
【post】http://ip:port/{索引名称}/_search
用于处理多条件时用到的
{
    "query":{
        "bool":{
             "must": {
                 "term":{
                     "age":1
                 }
             },
             "must_not":{
                 "match":{
                    "name":"掉"
                 }
             },
             "should":{
                 "term":{
                     "age":2
                 }
             }

        }
    }
}
bool - 用户合并多个条件结果的布尔逻辑
-
must - 多个条件完全匹配,相当于mysql 里的 and
-
must_not - 多个条件匹配取反,相当于mysql not
-
should - 相当于mysql or,
-
和must并列,它可以理解为score匹配计算,即must条件匹配上后,还会进行should条件匹配,和should条件匹配的就排在前面
-
在must里,如下,就是在must匹配上后,同时也要满足should条件了任意一个,比方数说,查询年龄在10岁到20谁的,男生,must条件就是男生条件,should就是年龄范围
{
    "query": {
        "bool": {
            "must": [
                {
                    "term": {
                        "name": "搜"
                    }
                },
                {
                    "bool": {
                        "should": [
                            {
                                "term": {
                                    "age": 2
                                }
                            }
                        ]
                    }
                }
            ]
        }
    }
}
-
filter(过滤)
【post】http://ip:port/{索引名称}/_search
{
    "query": {
        "bool": {
           "filter":{
               "range":{
                   "age":{
                       "gte":2
                   }
               }
           }
        }
    }
}
prefix(前缀匹配)
只适用于keyword,大小写敏感
【post】http://ip:port/{索引名称}/_search
{
    "query":{
        "prefix":{
            "name.keyword":"搜"
        }
    }
}
聚合
平均(avg)/最大值(max)/最小值(min)
【post】http://ip:port/{索引名称}/_search
{
   "aggs":{
       "pinjunzhi":{  // 自定义平均值字段名
           "avg":{  // 平均值(avg),最大值(max),最小值(min)
               "field": "age"
           }
       }
   }
}
{
    "took": 84,
    "timed_out": false,
    "_shards": {
        "total": 1,
        "successful": 1,
        "skipped": 0,
        "failed": 0
    },
    "hits": {
        "total": {
            "value": 4,
            "relation": "eq"
        },
        "max_score": 1.0,
        "hits": [...]
    },
    "aggregations": {
        "pinjunzhi": {  // 计算值
            "value": 2.5
        }
    }
}
去重统计
【post】http://ip:port/{索引名称}/_search
{
    "aggs": {
        "pinjunzhi": {
            "cardinality": { // 去重
                "field":  "age"
            }
        }
    }
}
比如商品订购记录表,就可以用这个查询出有多少家企业订购
extended_stats(扩展统计)
【post】http://ip:port/{索引名称}/_search
{
    "aggs": {
        "pinjunzhi": {
            "extended_stats": {
                "field":  "age"
            }
        }
    }
}
{
    "took": 2,
    "timed_out": false,
    "_shards": {
        "total": 1,
        "successful": 1,
        "skipped": 0,
        "failed": 0
    },
    "hits": {
        "total": {
            "value": 4,
            "relation": "eq"
        },
        "max_score": 1.0,
        "hits": [
        ...
        ]
    },
    "aggregations": {
        "pinjunzhi": {
            "count": 4, // 计数
            "min": 1.0, // 最小值
            "max": 4.0, // 最大值
            "avg": 2.5, // 平均值
            "sum": 10.0,
            "sum_of_squares": 30.0,
            "variance": 1.25,
            "variance_population": 1.25,
            "variance_sampling": 1.6666666666666667,
            "std_deviation": 1.118033988749895,
            "std_deviation_population": 1.118033988749895,
            "std_deviation_sampling": 1.2909944487358056,
            "std_deviation_bounds": {
                "upper": 4.73606797749979,
                "lower": 0.2639320225002102,
                "upper_population": 4.73606797749979,
                "lower_population": 0.2639320225002102,
                "upper_sampling": 5.081988897471611,
                "lower_sampling": -0.0819888974716112
            }
        }
    }
}
value_count(value值计数统计)
【post】http://ip:port/{索引名称}/_search
{
    "aggs": {
        "pinjunzhi": {
            "value_count": {
                "field":  "age"
            }
        }
    }
}
字段固定时数值型的字段
terms(词聚合)
【post】http://ip:port/{索引名称}/_search
{
    "aggs": {
        "pinjunzhi": {
            "terms": {
                "field":  "age"
            }
        }
    }
}
类似MySQL里的(分完组后,再count个数)
select count(*) from t_biz_test group by age
top_hits(最高匹配权值聚合)
【post】http://ip:port/{索引名称}/_search
{
    "aggs": {
        "pinjunzhi": {
            "terms": {
                "field": "age"
            },
            "aggs": {
                "count": {
                    "top_hits": {
                        "size": 2
                    }
                }
            }
        }
    }
}
{
    "took": 16,
    "timed_out": false,
    "_shards": {
        "total": 1,
        "successful": 1,
        "skipped": 0,
        "failed": 0
    },
    "hits": {
        "total": {
            "value": 5,
            "relation": "eq"
        },
        "max_score": 1.0,
        "hits": [
      ...
        ]
    },
    "aggregations": {
        "pinjunzhi": {
            "doc_count_error_upper_bound": 0,
            "sum_other_doc_count": 0,
            "buckets": [
                {
                    "key": 4,
                    "doc_count": 2,
                    "count": {
                        "hits": {
                            "total": {
                                "value": 2,
                                "relation": "eq"
                            },
                            "max_score": 1.0,
                            "hits": [
                                {
                                    "_index": "t_biz_test",
                                    "_id": "d0qzRYYB4WypEctHad4n",
                                    "_score": 1.0,
                                    "_source": {
                                        "id": "4",
                                        "name": "搜天",
                                        "age": 4
                                    }
                                },
                                {
                                    "_index": "t_biz_test",
                                    "_id": "eErORYYB4WypEctH0N4r",
                                    "_score": 1.0,
                                    "_source": {
                                        "id": "5",
                                        "name": "搜天2",
                                        "age": 4
                                    }
                                }
                            ]
                        }
                    }
                },
                {
                    "key": 1,
                    "doc_count": 1,
                    "count": {
                        "hits": {
                            "total": {
                                "value": 1,
                                "relation": "eq"
                            },
                            "max_score": 1.0,
                            "hits": [
                                {
                                    "_index": "t_biz_test",
                                    "_id": "dEoARYYB4WypEctHFt5e",
                                    "_score": 1.0,
                                    "_source": {
                                        "id": "1",
                                        "name": "搜索",
                                        "age": 1
                                    }
                                }
                            ]
                        }
                    }
                },
                {
                    "key": 2,
                    "doc_count": 1,
                    "count": {
                        "hits": {
                            "total": {
                                "value": 1,
                                "relation": "eq"
                            },
                            "max_score": 1.0,
                            "hits": [
                                {
                                    "_index": "t_biz_test",
                                    "_id": "dUodRYYB4WypEctHyN4J",
                                    "_score": 1.0,
                                    "_source": {
                                        "id": "2",
                                        "name": "会锁掉",
                                        "age": 2
                                    }
                                }
                            ]
                        }
                    }
                },
                {
                    "key": 3,
                    "doc_count": 1,
                    "count": {
                        "hits": {
                            "total": {
                                "value": 1,
                                "relation": "eq"
                            },
                            "max_score": 1.0,
                            "hits": [
                                {
                                    "_index": "t_biz_test",
                                    "_id": "dkofRYYB4WypEctHKt7H",
                                    "_score": 1.0,
                                    "_source": {
                                        "id": "3",
                                        "name": [
                                            "ds",
                                            "dd"
                                        ],
                                        "age": 3
                                    }
                                }
                            ]
                        }
                    }
                }
            ]
        }
    }
}
它时取了数据前面几条,通过size控制
range(范围统计)
【post】http://ip:port/{索引名称}/_search
{
    "aggs": {
        "pinjunzhi": {
           "range":{
               "field":"age",
               "ranges":[
                   {
                       "from":1,
                       "to":2
                   },
                     {
                       "from":3,
                       "to":6
                   }
               ]
           }
        }
    }
}
    "aggregations": {
        "pinjunzhi": {
            "buckets": [
                {
                    "key": "1.0-2.0",
                    "from": 1.0,
                    "to": 2.0,
                    "doc_count": 1
                },
                {
                    "key": "3.0-6.0",
                    "from": 3.0,
                    "to": 6.0,
                    "doc_count": 3
                }
            ]
        }
    }
响应格式化
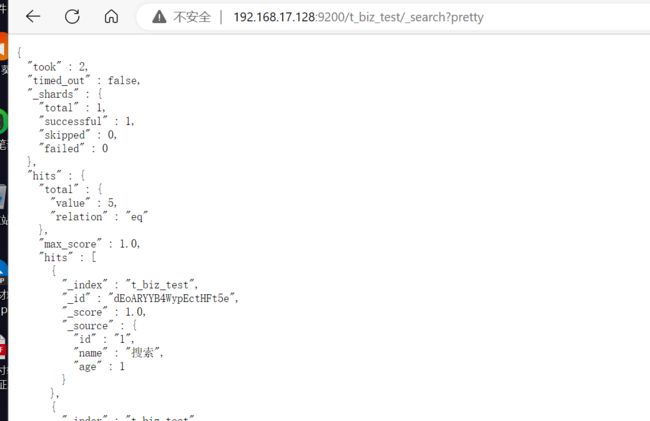
如果使用浏览器工具查询,响应没有json格式化,可以在url后增加参数pretty
示例:
增加pretty后
指定响应字段
_search可以用在get和post,所有基本一样,这里用post示例
{
    "_source":["id", "name"]
}
只展示id,name两个字段
批量查询
【post】http://ip:port/{索引名称}/_mget
{
"ids":["dEoARYYB4WypEctHFt5e", "dUodRYYB4WypEctHyN4J"]
}
分页
浅分页
【get】http://ip:port/{索引名称}/_search?size=1&from=2
- size - 每页多少数据量
- from - 跳过多少条
或者
【post】http://ip:port/{索引名称}/_search
{
    "size":1,
    "from":2
}
注:_search的get请求支持请求体的
比如10条数据,id按0到9编排,size=1&from=2,就是返回id=3的数据(跳过0,1,返回1条数据);
弊端就是,比如有100页数据,查询第50页数据,相当于把第0页到50页的数据都查出来,然后扔掉0-49页,那么查询最后一页就相当于全表查询
深分页(scroll)
【post】http://ip:port/{索引名称}/_search?scroll=5m
{
    "size":1,
    "from":0
}
这种分页方式ishi通过scroll_id获取下一页内容,并且from必须设置为0
响应:
{
    "_scroll_id": "FGluY2x1ZGVfY29udGV4dF91dWlkDXF1ZXJ5QW5kRmV0Y2gBFmpIMk5tOEs2Umx5SndQQ08yMTNmRGcAAAAAAAAAkRZTT3UzVXR2VlNjcWZ4anhhdWNKdlZ3",
    "took": 2,
    "timed_out": false,
    "_shards": {
        ...
    }
        ...
}
之后的分页,就请求不同的接口
【post】http://ip:port/_search/scroll
{
    "scroll_id": "FGluY2x1ZGVfY29udGV4dF91dWlkDXF1ZXJ5QW5kRmV0Y2gBFmpIMk5tOEs2Umx5SndQQ08yMTNmRGcAAAAAAAAAkRZTT3UzVXR2VlNjcWZ4anhhdWNKdlZ3",
    "scroll": "5m"
}
注意:
- 之后的分页url,没有索引名称
- scroll非常消耗资源,并且会生成历史快照,所以不用时,需要显示删除
删除scroll_id
【delete】http://ip:port/_search/scroll/{scroll_id}
删除所有scroll_id
【delete】http://ip:port/_search/scroll/_all
深分页2(search_after)
【post】http://ip:port/{索引名称}/_search
{

    "size": 2,
    "from": 0,
    "query": {
        "match_all":{}
    },
    "sort": [
        {
            "id.keyword": {
                "order": "desc"
            }
        },
        {
            "name.keyword": {
                "order": "desc"
            }
        }
    ],
    "search_after": [
          "6",
           "阿萨德"
    ]
}
注意点:
- search_after 是以设定的值作为游标进行分页,如上的查询,先通过sort拍好序后,通过search_after作为游标进行分页
- from值只能为0
- search_after的值是上一页结果中的最后一个结果里的sort值,即search_after里的值和sort值要相同
添加别名
【post】http://ip:port/_alias
{
    "actions": [
        {
            "add": {
                "index": "t_biz_test",
                "alias": "t_biz_test_alias"
            }
        }
    ]
}
在添加同时也可以删除
{
    "actions": [
        {
            "add": {
                "index": "t_biz_test",
                "alias": "t_biz_test_alias"
            }
        },
        {
            "remove": {
                "index": "t_biz_test",
                "alias": "t_biz_test_alias"
            }
        }
    ]
}
特别注意:查询最大返回数
es默认返回10000条数据,超过的不会返回
【put】http://ip:port/{索引名称}/_settings
{
  "max_result_window":100000
}
也或者是在创建索引时设置
【put】http://ip:port/{索引名称}
{
    "settings": {
        "max_result_window": 100000
    },
    "aliases": {},
    "mappings": {
        "properties": {
            "id": {
                "type": "text"
            },
            "name": {
                "type": "text"
            },
            "age": {
                "type": "long"
            }
        }
    }
}
然后在查询时带上参数就可以了
{
    "track_total_hits": true,
    "query":{
    	"term":{
    		"dataId":"1623260762069680129"
    	}
    }
}
分析器
分析器主要3部分组成:
- Character Filters 字符过滤器,字符流传递到分词器之前的预处理,可以处理特殊字符、做映射等待(0个或多个);
- Tokenizer 分词器,把语句分解成多个单词,并记录单词的位置及偏移量(只能存在一个);
- Token Filter token过滤器,对词进行加工过滤,比如,转小写等(0个或多个);
字符过滤器(Character Filters)
在字符流到达分词器前的预处理步骤,它可以存在多个,有点像kafka的流处理。
内置的几个字符过滤器:
- html_strip - (是strip,不是script)针对html脚本的字符过滤器,可以清楚html字符,或者是html字符解码;
- mapping - 字符映射过滤器,可以将指定的字符替换成特定的字符串;
- pattern_replace - 正则表达式过滤器,将正则表达式匹配到的字符串替换成特定的字符串;
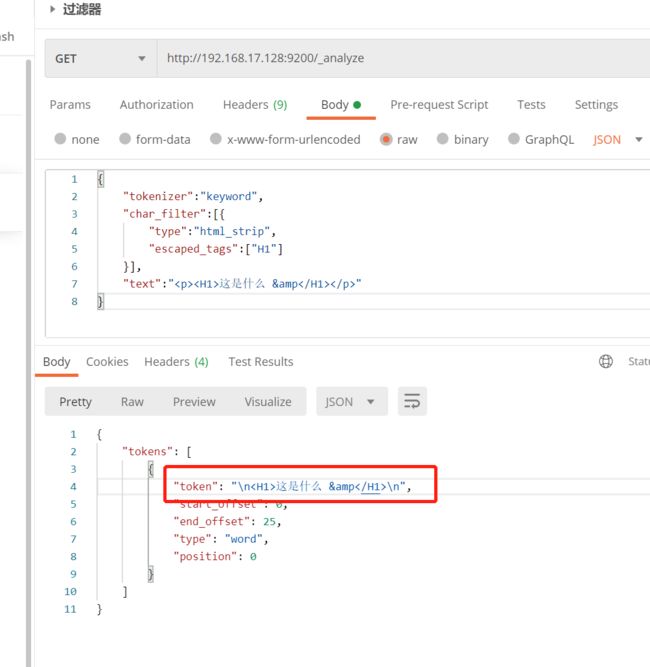
html元素过滤器(html_strip)
【get/post】http://ip:port/_analyze
{
"tokenizer":"keyword",
"char_filter":[{
"type":"html_strip", // 使用html过滤器,会过滤相关的html元素
"escaped_tags":["H1"] // 需要保留的html标签
}],
"text":"这是什么 &
"
}
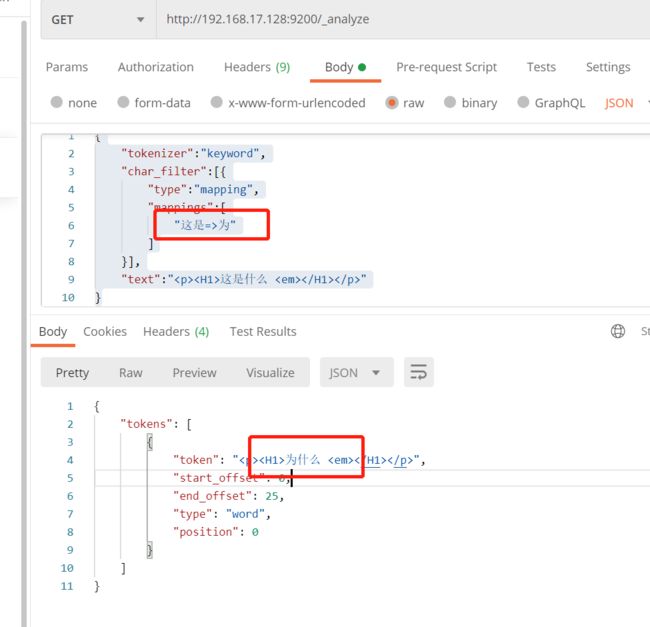
字符映射过滤器(mapping)
替换的格式xx=>xx
【get/post】http://ip:port/_analyze
{
    "tokenizer":"keyword",
    "char_filter":[{
        "type":"mapping",
        "mappings":[
            "这是=>为"
        ]
    }],
    "text":"这是什么 "
}
正则表达式过滤器(pattern_replace)
【get/post】http://ip:port/_analyze
{
    "tokenizer":"keyword",
    "char_filter":[{
        "type":"pattern_replace",
        "pattern":"(http://){1,}",
        "replacement":"http://"
    }],
    "text":"http://http://http://localhost:8080?token=xxx"
}
组合使用
{
    "tokenizer": "keyword",
    "char_filter": [
        // 去除html
        {
            "type": "html_strip"
        },
        // 替换ip
        {
            "type": "mapping",
            "mappings": [
                "localhost=>192.168.17.128"
            ]
        },
        // 去除错误的地址
        {
            "type": "pattern_replace",
            "pattern": "(http://){1,}",
            "replacement": "http://"
        },
        // 去掉token参数
        {
            "type": "pattern_replace",
            "pattern": "token.+&",
            "replacement": ""
        }
    ],
    "text": "http://http://http://localhost:8080?token=xxx&name=ali"
}
分词器(Tokenizer)
内置分词器
- standard - 按词分类,小写处理
- simple - 非字母为分隔符拆分,转小写
- stop - 和simple一样
- whitespace - 空白符分隔
- patter - 通过正则表达式分词,以
\W+匹配 - language - 提供30多种场景语音分词器
内置分词器
standard (按词分类,小写处理)
【get/post】http://ip:port/_analyze
参数
{
    "analyzer": "pinyin",
    "text":"I'M HAPPY with you"
}
响应:
simple(非字母为分隔符拆分,转小写)
默认是非字母,比如逗号、空格、下划线等
【get/post】http://ip:port/_analyze
参数
{
    "analyzer": "simple",
    "text":"I'm happy tomorrow"
}
stop(默认和simple一样)
停止词默认是非字母,比如逗号、空格、下划线等
【get/post】http://ip:port/_analyze
{
    "analyzer": "stop",
    "text":"I'm happy tomorrow"
}
自定义停止词
【put】http://ip:port/filter_stop_index
{
  "settings": {
    "analysis": {
      "analyzer": {
        "cus_stop":{
          "type":"stop",
           "stopwords":["end","结束"]
        }
      }
    }
  }
}
【post】http://ip:port/filter_stop_index/_analyze
{
    "analyzer":"cus_stop",
    "text":"I'M HAPPY_with you 结束 and end"
}
whitespace (空白符分隔)
【get/post】http://ip:port/_analyze
{
    "analyzer": "whitespace",
    "text":"I'm happy tomorrow"
}
patter (默认\W+分词)
【get/post】http://ip:port/_analyze
{
    "analyzer": "pattern",
    "text":"I'm happy tomorrow"
}
自定义表达式为\W+|_(非单词字符)
【put】http://ip:port/filter_pattern_index
{
  "settings": {
    "analysis": {
      "analyzer": {
        "cus_pattern":{
          "type":"pattern",
          "pattern":"\\W+|_",
          "lowercase":true
        }
      }
    }
  }
}
language
【get/post】http://ip:port/_analyze
{
    "analyzer": "chinese",
    "text":"I'm happy tomorrow"
}
ik分词器
安装
下载地址Releases · medcl/elasticsearch-analysis-ik · GitHub
对应es 8.0.0Releases · medcl/elasticsearch-analysis-ik · GitHub
- 在
elasticsearch-8.0.0/plugin下创建ik文件夹 - 将解压后的内容cp到ik文件夹
- 重启
【get/post】http://ip:port/_analyze
{
    "analyzer": "ik_max_word", // 还可以使用 ik_smart,ik_max_word的拆分更细,能拆除更多单词
    "text":"我明天很开心"
}
可以看到,“明天”,“开心”已经正确分词
自定义词典
出现可以作为一个词分的情况时,可以自定义配置词典
-
进入到插件的目录
elasticsearch-8.0.0/plugins/ik/config -
创建自定义词典(以.dic结尾,比如
cus.dic),每行一个词,这里我添加很开心为一个词 -
IKAnalyzer.cfg.xml文件里添加字典 -
重启
重试请求
拼音分词器
对应es 8.0.0 Release v8.0.0 · medcl/elasticsearch-analysis-pinyin · GitHub
- 在
elasticsearch-8.0.0/plugin下创建pinyin文件夹 - 将解压后的内容cp到pinyin文件夹
- 重启
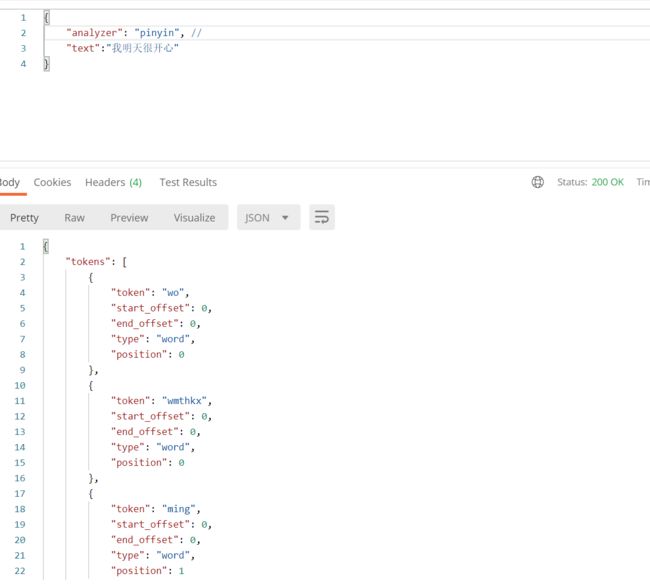
首先拼音分词器有两种规则:
- pinyin - 把汉字转换成拼音
- pinyin_first_letter - 提取汉字拼音首字母
{
    "analyzer": "pinyin",
    "text":"我明天很开心"
}
它可以实现什么,可以实现存的汉字,支出拼音搜索,但是在创建索引时需要对指定分词器为pinyin
我们创建一个索引测试
-
创建索引
http://192.168.17.128:9200/t_biz_test_pinyin{ "mappings": { "properties": { "id": { "type": "text" }, "name": { "type": "text", "analyzer": "ik_max_word", "search_analyzer":"ik_smart" }, "age":{ "type": "long" } } } } -
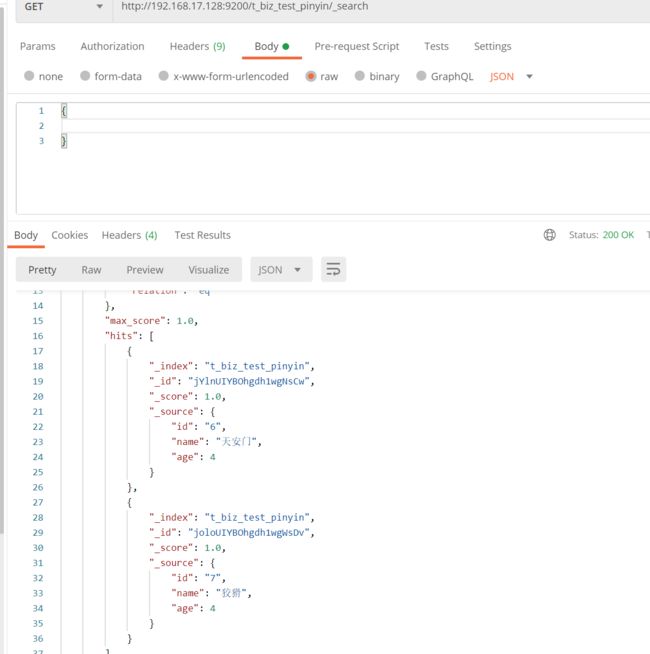
插入数据
分词过滤器(Token Filter)
token过滤器是在分词器之后的处理,它可设置多个,也内置了很多,大部分场景都能在字符过滤器中处理掉,这个分词过滤器可以作为一个技能提升的扩张内容,需要深入的看:Token Filters(词元过滤器) · Elasticsearch 中文文档 (kilvn.com)
长度过滤器(length Filter)
【post】http://ip:port/_analyze
{
    "tokenizer": "pattern",
    "filter": [
        {
            "type": "length",
            "min": 2,
            "max": 3
        }
    ],
    "text": "I'M HAPPY_with you 结束 and end"
}
自定义分析器
分词器有三种设置方式
- 在创建索引时,在
settings里设置全局分词器 - 在字段里指定分词器
- api settings修改
- 创建时指定
【put】http://ip:port/{索引名称}
下面设置了字符过滤器,分词器,和分词过滤器;字符过滤器和分词过滤都需要在analyzer同级下定义;
设置完后,数据通过被过滤的词就差不多数据了。
{
    "settings": {
        // 分析
        "analysis": {
            // 分析器
            "analyzer": {
                // 自定义分词器名称
                "ik": {
                    // 字符过滤器
                    "char_filter": [
                        "html_strip",
                        "cus_mapping",
                        "cus_pattern_replace"
                    ],
                    // 分词器
                    "tokenizer": "ik_max_word",
                    // 添加自定义的分词过滤器length
                    "filter": [
                        "cus_length"
                    ]
                },
                "pinyin": {
                    "tokenizer": "pinyin"
                }
            },
            // 定义字符过滤器
            "char_filter": {
                // 自定义映射过滤器
                "cus_mapping": {
                    "type": "mapping",
                    "mappings": [
                        "这是=>为"
                    ]
                },
                // 自定义正则过滤器
                "cus_pattern_replace": {
                    "type": "pattern_replace",
                    "pattern": "(http://){1,}",
                    "replacement": "http://"
                }
            },
            //定义长度分词过滤器
            "filter": {
                // 自定义长度过滤器
                "cus_length": {
                    "type": "length",
                    "min": 2,
                    "max": 3
                }
            }
        }
    },
    "aliases": {},
    "mappings": {
        "properties": {
            "id": {
                "type": "text"
            },
            "name": {
                "type": "text",
                "analyzer": "ik",
                "search_analyzer": "ik"
            },
            "age": {
                "type": "long"
            }
        }
    }
}
-
已存在索引,只能为新添加的字段指定
【put】http://ip:port/{索引名称}/_mapping
{ "properties": { // 这个字段可以存在,但要和旧的一样 "name": { "type": "text", "analyzer": "ik_max_word", // 入数据时,尽量分词 "search_analyzer": "ik_smart" // 查询时不过多分词处理 } } } -
settings修改(修改,不支持动态修改,所以需要关闭索引)
-
【post】http://ip:port/{索引名称}/_close
-
【put】http://ip:port/{索引名称}/_settings
{ "analysis": { "analyzer": { "ik": { "tokenizer": "pinyin" } } } } -
【post】http://ip:port/{索引名称}/_open
-
测试
通过词www,baidu都查询不到
reindex
类似拷贝复制,如果目标索引存在数据,那么会覆盖
【post】http://ip:port/_reindex
{
  "source": {
    "index": "t_biz_test"
  },
  "dest": {
    "index": "t_biz_data_write"
  }
}
这个可以用来进行数据迁移,它可以做到将查询到的数据复制到目标索引中,要求源索引名称和目标索引名称不一样;
{
  "source": {
    "index": "t_biz_test"
  },
  "dest": {
    "index": "t_biz_data_write",
      // internal:强制覆盖数据,external:创建缺失的文档
    "version_type": "internal",
      // 创建缺失的文档,已存在的文档会出现版本冲突
     "op_type":"create"
  }
}
复制,也可以只复制部分数据到目标表中,通过query查询出源数据
{
  "source": {
    "index": "t_biz_data_write",
    "query":{
        "match":{
            "name":"=2"
        }
    }
  },
  "dest": {
    "index": "t_biz_test2"
    //"version_type": "external"
    //"op_type":"create"
  }
}
如果,reindex很慢,导致超时(默认30秒),尝试以下处理
- 设置批量的数据量大小,
{
  "source": {
    "index": "t_biz_data_write",
    // 批量大小,最大10000
    "size":4000
  },
  "dest": {
    "index": "t_biz_test2"
    //"version_type": "external"
    //"op_type":"create"
  }
}
- 设置slices大小
注意:slices 的数量 = 分片数时,性能最高,所以source只有一个索引时,slices=分片数,多个索引时,slices=分片最小数;
不过对于这个分片的设置我这边没有得到我想要的答案
我测试了40万的数据(测试不准确,多次取中间值)
- 源索引和目标索引都是9分片,reindex 1分片和9分片的用时基本一样,8秒差不多
- 源索引和目标索引都是1分片,reindex 1分配,10秒上下一点
- 源索引9分配,目标索引1分片,reindex 9分片,14左右
- 源索引9分配,目标索引1分片,reindex 1分片,20秒左右,偶尔出现40秒
- 源索引1分配,目标索引9分片,reindex 9分片,20秒左右
- 源索引1分配,目标索引9分片,reindex 1分片,18秒左右
-
副本数改为0
【get】http://ip:port/{索引名称}
// 响应里有这个两个东西,分片数据和副本数
"number_of_shards": "1",
// 创建索引时,可以指定该值为0
"number_of_replicas": "1",
集群
准备两台机器,和当前台组集群,下面这个是原配置,
# 集群名称
cluster.name: ali-es
# 节点名称
node.name: node-1
# 保留地址到网络,可以被其他服务器发现
network.host: 0.0.0.0
# 端口
http.port: 9200
# 以master启动的节点
cluster.initial_master_nodes: ["node-1"]

# 安全认证(这里我关闭了)
xpack.security.enabled: false
xpack.security.enrollment.enabled: true
xpack.security.http.ssl:
  enabled: true
  keystore.path: certs/http.p12
xpack.security.transport.ssl:
  enabled: true
  verification_mode: certificate
  keystore.path: certs/transport.p12
  truststore.path: certs/transport.p12
Elasticsearch 技术分析(六): 自动发现机制 - Zen Discoveryedit - JaJian - 博客园 (cnblogs.com)
集群配置如下,修改每个配置的
- 修改节点名称:node.name=xxx
- 添加通信端口:transport.port: 9300
- 添加可发现的主机列表:discovery.seed_hosts: [“192.168.17.128:9300”,“192.168.17.129:9300”,“192.168.17.130:9300”]
- 添加节点的角色(master:可为主节点,data:数据备份节点):node.roles: [master,data]
# 集群名称
cluster.name: ali-es
# 节点名称
node.name: node-1
node.roles: [master,data]
# 保留地址到网络,可以被其他服务器发现
network.host: 0.0.0.0
# 端口
http.port: 9200
# 节点间通信端口
transport.port: 9300
# 以master启动的节点,如果这里设置的节点都挂了,那么,该节点就无法组成集群(处于异常不可以状态)
cluster.initial_master_nodes: ["node-1","node-2","node-3"]
# 能够可发现节点主机列表,9300是通信端口,不是9200,不写,就默认通信端口
discovery.seed_hosts: ["192.168.17.128:9300","192.168.17.129:9300","192.168.17.130:9300"]
# 备选主节点最小个数,一般设置为备选主节点数/2+1
discovery.zen.minimum_master_nodes: 2
# 解决跨域问题配置
http.cors.enabled: true
http.cors.allow-origin: "*"

# 安全认证(这里我关闭了)
xpack.security.enabled: false
xpack.security.enrollment.enabled: true
xpack.security.http.ssl:
  enabled: true
  keystore.path: certs/http.p12
xpack.security.transport.ssl:
  enabled: true
  verification_mode: certificate
  keystore.path: certs/transport.p12
  truststore.path: certs/transport.p12
确保一次成功,还需要几个步骤:
-
将解压后的文件路径权限修改为普通用户(版本不能有root用户启动)
设置文件夹及以下子文件夹为用户组ali,下的用户ali所有
chown -R ali:ali elasticsearch
-
修改config/elasticsearch.yml
集群名称
cluster.name: ali-es
节点名称,对应下面的集群node
node.name: node-1
服务ip
network.host: 0.0.0.0
暴露的端口
http.port: 9200
集群节点
cluster.initial_master_nodes: [“node-1”]
-
vim /etc/sysctl.conf
vm.max_map_count=655360
修改完后
sysctl -p使之生效 -
vim /etc/security/limits.conf
修改
* soft nproc 2048为* soft nproc 4096* soft nofile 65536 * hard nofile 131072 * soft nproc 4096 * hard nproc 4096*所有用户soft:指的是当前系统生效的设置值
hard:表明系统中所能设定的最大值nofile:打开文件的最大数目
noproc:进程的最大数目 -
启动,记住不能用root启动
切换普通用户
su ali
./bin/elasticsearch
#后台启动
./bin/elasticsearch -d
启动报错1:
Skipping security auto configuration because the node keystore file [/data/elasticsearc/elasticsearch-8.0.0/config/elasticsearch.keystore] is not a readable regular file
Exception in thread "main" org.elasticsearch.bootstrap.BootstrapException: java.nio.file.AccessDeniedException: /data/elasticsearc/elasticsearch-8.0.0/config/elasticsearch.keystore
Likely root cause: java.nio.file.AccessDeniedException: /data/elasticsearc/elasticsearch-8.0.0/config/elasticsearch.keystore
        at java.base/sun.nio.fs.UnixException.translateToIOException(UnixException.java:90
是因为这个文件
elasticsearch.keystore是在root用户权限下不能被读取[外链图片转存失败,源站可能有防盗链机制,建议将图片保存下来直接上传(img-NmMCuHfE-1678515293253)(E:/ALI/Documents/%E5%BE%85%E5%8F%91%E5%B8%83%E6%96%87%E7%AB%A0/Typora/typora/images/image-20230212161221952.png)]
在设置一次
chown -R ali:ali config/elasticsearch.keystore启动报错2:
 ERROR Could not create plugin of type class org.apache.logging.log4j.core.appender.RollingFileAppender for element RollingFile: java.lang.IllegalStateException: ManagerFactory [org.apache.logging.log4j.core.appender.rolling.RollingFileManager$RollingFileManagerFactory@27d5a580] unable to create manager for [/data/elasticsearc/elasticsearch-8.0.0/logs/ali-es_index_search_slowlog.json] with data [org.apache.logging.log4j.core.appender.rolling.RollingFileManager$FactoryData@52851b44[pattern=/data/elasticsearc/elasticsearch-8.0.0/logs/ali-es_index_search_slowlog-%i.json.gz, append=true, bufferedIO=true, bufferSize=8192, policy=CompositeTriggeringPolicy(policies=[SizeBasedTriggeringPolicy(size=1073741824)]), strategy=DefaultRolloverStrategy(min=1, max=4, useMax=true), advertiseURI=null, layout=co.elastic.logging.log4j2.EcsLayout@550a1967, filePermissions=null, fileOwner=null]] java.lang.IllegalStateException: ManagerFactory [org.apache.logging.log4j.core.appender.rolling.RollingFileManager$RollingFileManagerFactory@27d5a580] unable to create manager for [/data/elasticsearc/elasticsearch-8.0.0/logs/ali-es_index_search_slowlog.json] with data [org.apache.logging.log4j.core.appender.rolling.RollingFileManager$FactoryData@52851b44[pattern=/data/elasticsearc/elasticsearch-8.0.0/logs/ali-es_index_search_slowlog-%i.json.gz, append=true, bufferedIO=true, bufferSize=8192, policy=CompositeTriggeringPolicy(policies=[SizeBasedTriggeringPolicy(size=1073741824)]), strategy=DefaultRolloverStrategy(min=1, max=4, useMax=true), advertiseURI=null, layout=co.elastic.logging.log4j2.EcsLayout@550a1967, filePermissions=null, fileOwner=null]]
        at org.apache.logging.log4j.core.appender.AbstractManager.getManager(AbstractManager.java:116)
        at org.apache.logging.log4j.core.appender.OutputStreamManager.getManager(OutputStreamManager.java:100)
        at org.apache.logging.log4j.core.appender.rolling.RollingFileManager.getFileManager(RollingFileManager.java:217)
        at org.apache.logging.log4j.core.appender.RollingFileAppender$Builder.build(RollingFileAppender.java:146)
        at org.apache.logging.log4j.core.appender.RollingFileAppender$Builder.build(RollingFileAppender.java:62)
        at org.apache.logging.log4j.core.config.plugins.util.PluginBuilder.build(PluginBuilder.java:122)
        at org.apache.logging.log4j.core.config.AbstractConfiguration.createPluginObject(AbstractConfiguration.java:1120)
        at org.apache.logging.log4j.core.config.AbstractConfiguration.createConfiguration(AbstractConfiguration.java:1045)
        at org.apache.logging.log4j.core.config.AbstractConfiguration.createConfiguration(AbstractConfiguration.java:1037)
        at org.apache.logging.log4j.core.config.AbstractConfiguration.doConfigure(AbstractConfiguration.java:651)
        at org.apache.logging.log4j.core.config.AbstractConfiguration.initialize(AbstractConfiguration.java:247)
        at org.apache.logging.log4j.core.config.AbstractConfiguration.start(AbstractConfiguration.java:293)
        at org.apache.logging.log4j.core.LoggerContext.setConfiguration(LoggerContext.java:626)
        at org.apache.logging.log4j.core.LoggerContext.start(LoggerContext.java:302)
        at org.elasticsearch.common.logging.LogConfigurator.configure(LogConfigurator.java:222)
        at org.elasticsearch.common.logging.LogConfigurator.configure(LogConfigurator.java:118)
        at org.elasticsearch.bootstrap.Bootstrap.init(Bootstrap.java:313)
        at org.elasticsearch.bootstrap.Elasticsearch.init(Elasticsearch.java:166)
        at org.elasticsearch.bootstrap.Elasticsearch.execute(Elasticsearch.java:157)
        at org.elasticsearch.cli.EnvironmentAwareCommand.execute(EnvironmentAwareCommand.java:77)
        at org.elasticsearch.cli.Command.mainWithoutErrorHandling(Command.java:112)
        at org.elasticsearch.cli.Command.main(Command.java:77)
        at org.elasticsearch.bootstrap.Elasticsearch.main(Elasticsearch.java:122)
        at org.elasticsearch.bootstrap.Elasticsearch.main(Elasticsearch.java:80)

2023-02-12 03:15:28,044 main ERROR Unable to invoke factory method in class org.apache.logging.log4j.core.appender.RollingFileAppender for element RollingFile: java.lang.IllegalStateException: No factory method found for class org.apache.logging.log4j.core.appender.RollingFileAppender java.lang.IllegalStateException: No factory method found for class org.apache.logging.log4j.core.appender.RollingFileAppender
这个是因为日志文件也是在root权限下,应该是我第一次启动时用的root账户,导致初始化时在root账户下创建了这些文件,切换到非root用户后反而异常了
[外链图片转存失败,源站可能有防盗链机制,建议将图片保存下来直接上传(img-UIC0vJMg-1678515293254)(E:/ALI/Documents/%E5%BE%85%E5%8F%91%E5%B8%83%E6%96%87%E7%AB%A0/Typora/typora/images/image-20230212162305207.png)]
启动报错3:max virtual memory areas vm.max_map_count [65530] is too low, increase to at least [262144]
这个是第三和第四步没有配置或没生效
启动报错4:
Java HotSpot(TM) 64-Bit Server VM warning: Option UseConcMarkSweepGC was deprecated in version 9.0 and will likely be removed in a future release.这是JVM的参数过时了,我们要改一下es目录下的
config/jvm.options
vi config/jvm.options
将-XX:+UseConcMarkSweepGC改为-XX:+UseG1GC -
开放端口
firewall-cmd --add-port=9200/tcp --permanent
firewall-cmd --reload
-
关闭ssl(vim config/elasticsearch.yml)
这个配置是在启动后才有的,解压后没有
xpack.security.enabled: false
-
删除之前单节点运行生成的
data文件下的所有东西:rm -rf data/* -
非root用户启动3个节点
-
为每个服务器打开9200 9300端口
最后检验集群
查看集群状态
【get】http://ip:port/_cluster/health
{
    "cluster_name": "ali-es", // 集群名称
    "status": "green",  //3种:red(没有主分片),yellow(主分片成功,没有分片副本),green(分配所有分片,正常状态)
    "timed_out": false, // 如果fasle,则响应在timeout参数指定的时间段内返回(默认30s)
    "number_of_nodes": 3, // 总节点数
    "number_of_data_nodes": 3, // 数据节点数
    "active_primary_shards": 1, //  存活的主分片数
    "active_shards": 2, // 存活的分片数,一般是primary_shards的2倍
    "relocating_shards": 0, // 迁移中的分片数
    "initializing_shards": 0, // 初始化的分片数
    "unassigned_shards": 0, // 未分配的分片数
    "delayed_unassigned_shards": 0, // 延迟未分配的分片数
    "number_of_pending_tasks": 0, // 等待处理的任务数
    "number_of_in_flight_fetch": 0,
    "task_max_waiting_in_queue_millis": 0,
    "active_shards_percent_as_number": 100.0  // 集群中可用分片的百分比
}
【get】http://ip:port/_cat/nodes
node.role : dm 值data, master
master : * 表示为主节点
SpringBoot
        <dependency>
            <groupId>org.springframework.boot</groupId>
            <artifactId>spring-boot-starter-data-elasticsearch</artifactId>
        </dependency>
    private final ElasticsearchOperations operations;
    private final RestHighLevelClient highLevelClient;
下面的例子我都不是用JPA的,不是说JPA不好,根据情况使用就行。
如果使用JPA的话,它会自动为你创建索引这些,但是和原生api一样,特殊字段的特殊要求还是需要自己去设置。
创建索引
这里工具已经将api进行了封装,分别对应mapping,settings的对象,所以这里我们只需要动检mappings和settings里的对象就可以了,而这里也提供了2种构建方式:XcontentBuilder``json
这是创建一个索引的参数
{
    "settings": {
        // 分析
        "analysis": {
          ...
        }
    },
    "aliases": {},
    "mappings": {
        "properties": {
            ...
        }
    }
}
XContentBuilder方式构建参数
这种类似json,startObject() 为开始,endObject()为结尾,形成一个闭包的对象;
这里我创建了2个特殊对象geo_point,geo_shape这两个对象需要在创建索引时直接指定。
 // 创建索引,这里使用builder构建方式
        XContentBuilder builder = XContentFactory.jsonBuilder();
        builder.startObject();
// Mappings参数对象下的properties属性
        builder.startObject("properties");
        builder.startObject("pro");
        builder.field("type", "object");
        builder.endObject();
        builder.startObject("geoPoint");
        builder.field("type", "geo_point");
        builder.endObject();
        builder.startObject("geoJson");
        builder.field("type", "geo_shape");
        builder.endObject();
        builder.startObject("name");
        builder.field("type", "text");
        builder.field("analyzer", "ik_max_word");
        builder.field("search_analyzer", "ik_smart");
        builder.endObject();
        builder.endObject();
        builder.endObject();
        CreateIndexRequest request = new CreateIndexRequest(index);
        request.mapping(builder);
        highLevelClient.indices().create(request, RequestOptions.DEFAULT);
上面的描述的其实是这样的;
{
    "mappings": {
        "properties": {
            "pro":{
                "type":"object"
            },
            "geoPoint":{
                "type":"geo_point"
            },
            "geoJson":{
                "type":"geo_shape"
            },
            "name":{
                "type":"text",
				"analyzer":"ik_max_word",
				"search_analyzer":"ik_smart"
            }
        }
    }
}
json方式构建参数
        String param = "{\n"
            + "    \"mappings\": {\n"
            + "        \"properties\": {\n"
            + "            \"pro\":{\n"
            + "                \"type\":\"object\"\n"
            + "            },\n"
            + "            \"geoPoint\":{\n"
            + "                \"type\":\"geo_point\"\n"
            + "            },\n"
            + "            \"name\":{\n"
            + "                \"type\":\"text\",\n"
            + "                \"analyzer\":\"ik_max_word\",\n"
            + "                \"search_analyzer\":\"ik_smart\"\n"
            + "            }\n"
            + "        }\n"
            + "    }\n"
            + "}";

        JSONObject paramJson = JSON.parseObject(param);
        CreateIndexRequest request = new CreateIndexRequest(index);
        request.mapping(paramJson.getJSONObject("mappings"));
        return highLevelClient.indices().create(request, RequestOptions.DEFAULT);
获取映射信息
return operations.indexOps(IndexCoordinates.of(index)).getMapping();
删除索引
GetIndexRequest get = new GetIndexRequest(index);
if (highLevelClient.indices().exists(get, RequestOptions.DEFAULT)) {
    DeleteIndexRequest request = new DeleteIndexRequest(index);
    return highLevelClient.indices().delete(request, RequestOptions.DEFAULT);
}
return false;
reindex
ReindexRequest reindexRequest = new ReindexRequest();
reindexRequest.setDestIndex(destIndex);
reindexRequest.setSourceIndices(sourceIndex);
return highLevelClient.reindex(reindexRequest, RequestOptions.DEFAULT);
新增数据(es7)
注意:如果录入了geoPoint,这个只是一个点,如果需要查询面或线,它查不出了,但是如果,你的点也录入到geoShape里,就可以查询点、线、面;还有就是,如果是半径查询,它只能查询geoPoint,查询不到面和线。
    public Object addTestData(String index) {
        List<DataAll> list = new ArrayList<>();
        for (int i = 0; i < 100000; i++) {
            DataAll temp = new DataAll();
            temp.setName("name-" + i);
            temp.setDataName("dataname-" + i);
            temp.setDataId("dataid=2-" + i);
            temp.setGeoPoint(randomGeoPoint());
            GeoPoint point = temp.getGeoPoint();
            GeometryEntity geometryEntity = new GeometryEntity(new Double[]{point.getLon(), point.getLat()});
            temp.setGeoJson(geometryEntity);
            list.add(temp);
        }
        return esService.saveAll(list, index);
    }

    private GeoPoint randomGeoPoint() {
        return  new GeoPoint(RandomUtil.randomDouble(18.1, 30.0), RandomUtil.randomDouble(101.0, 120.1));
    }
新增数据(es8)
es8需要使用java客户端进行操作,这里只有在新增数据时我用java客户端呢?因为其他操作用现有的api操作时可以的,我暂时没有发现什么异常,只有新增时会出现异常,只对es8新增时进行修改。
先配置es客户端,这里我直接沿用了spring的配置,不做更改,为什么这样做可以思考一下。
        <dependency>
            <groupId>co.elastic.clientsgroupId>
            <artifactId>elasticsearch-javaartifactId>
            <version>8.4.1version>
        dependency>

        <dependency>
            <groupId>org.elasticsearch.clientgroupId>
            <artifactId>elasticsearch-rest-clientartifactId>
            <version>8.4.1version>
        dependency>
        <dependency>
            <groupId>org.glassfishgroupId>
            <artifactId>jakarta.jsonartifactId>
            <version>2.0.1version>
        dependency>
@Configuration
public class Es8Config {

    @Value("${spring.elasticsearch.rest.uris}")
    private String uris;

    @Bean
    public ElasticsearchClient elasticsearchClient() {
        Assert.notBlank(uris, "es配置无效");
        int i = uris.indexOf(":");
        int i2 = uris.lastIndexOf(":");
        String http = uris.substring(0, i);
        String ip = StringUtils.removeStart(uris.substring(i + 1, i2), "//");
        int port = Integer.parseInt(uris.substring(i2 + 1));
        System.out.println();
        RestClient client = RestClient.builder(new HttpHost(ip, port, http)).build();
        ElasticsearchTransport transport = new RestClientTransport(client, new JacksonJsonpMapper());
        return new ElasticsearchClient(transport);
    }
}
    public Object addTestData2(String index) throws IOException {
        List<DataAll> list = new ArrayList<>();
        DataAll temp = new DataAll();
        temp.setName("name-1000001");
        temp.setDataName("dataname-1000001");
        temp.setDataId("dataid=2-1000001");
        GeometryEntity geometryEntity = new GeometryEntity();
        geometryEntity.setGeometryEntity(getGeometry());
        temp.setGeoJson(geometryEntity);
        list.add(temp);
        return esService.saveAll(list, index);
    }

    /**
     * 这里我直接通过网络下载,是熟悉一下知识,不是一定要获取网络文件
     */
    private JSONObject getGeometry() throws IOException {
        URL url = new URL("https://geo.datav.aliyun.com/areas_v3/bound/510104.json");
        HttpURLConnection urlConnection = (HttpURLConnection) url.openConnection();
        urlConnection.setConnectTimeout(10000);
        urlConnection.setRequestProperty("Content-Type", "application/octet-stream");
        urlConnection.setRequestMethod(HttpMethod.GET.name());
        urlConnection.setDoInput(true);
        urlConnection.setDoOutput(true);
        urlConnection.connect();
        if (urlConnection.getResponseCode() != 200) {
            throw new RuntimeException("下载geoJson失败");
        }
        try (BufferedReader br = new BufferedReader(new InputStreamReader(urlConnection.getInputStream()))) {
            int b = 0;
            String s = null;
            StringBuilder sb = new StringBuilder();
            while ((s = br.readLine()) != null) {
                sb.append(s);
            }
            JSONObject jsonObject = JSON.parseObject(sb.toString());
            JSONArray features = jsonObject.getJSONArray("features");
            JSONObject jsonObject1 = features.getJSONObject(0);
            return jsonObject1.getJSONObject("geometry");
        } catch (IOException e) {
            throw new RuntimeException(e);
        }
    }
添加别名
  public Object reAlias(String oldIndex, String newIndex) throws IOException {
        // 添加别名映射关系
        IndicesAliasesRequest.AliasActions addAction = buildAliasAction(EsIndexProperties.getAlias().getIndexName(),
                                                                        newIndex,
                                                                        IndicesAliasesRequest.AliasActions.Type.ADD);

        IndicesAliasesRequest request = new IndicesAliasesRequest();
        request.addAliasAction(addAction);

        // 判断是有要移除的索引,有则添加到action
        GetIndexRequest get = new GetIndexRequest(oldIndex);
        if (highLevelClient.indices().exists(get, RequestOptions.DEFAULT)) {
            IndicesAliasesRequest.AliasActions removeAction = buildAliasAction(
                EsIndexProperties.getAlias().getIndexName(), oldIndex, IndicesAliasesRequest.AliasActions.Type.REMOVE);
            request.addAliasAction(removeAction);
        }

        return highLevelClient.indices().updateAliases(request, RequestOptions.DEFAULT);
    }

    /**
     * 构建action对象
     * @param alias 别名
     * @param index 索引
     * @param type action类型
     */
    private IndicesAliasesRequest.AliasActions buildAliasAction(String alias, String index,
                                                                IndicesAliasesRequest.AliasActions.Type type) {
        IndicesAliasesRequest.AliasActions action = new IndicesAliasesRequest.AliasActions(type);
        action.index(index);
        action.alias(alias);
        return action;
    }
getById
return operations.get(id, DataAll.class, EsIndexProperties.getAlias());
查询
一般查询应该就是这样
NativeSearchQueryBuilder builder = new NativeSearchQueryBuilder();
builder.withQuery(QueryBuilders.termQuery("name", "d"));
operations.search(builder.build(), DataAll.class, IndexCoordinates.of(index));
这里name这个字段的type我设置为keyword,可以直接查询,如果不是,而且其他想text这些的,这里最好是写成这样
builder.withQuery(QueryBuilders.termQuery("name.keyword", "d"));
如果要查询name的值是数组中的一个(mysql里的in)
builder.withQuery(QueryBuilders.termQuery("name.keyword", Arrays.asList("d", "ddd")));
模糊查询match如下:
builder.withQuery(QueryBuilders.matchQuery("name.keyword", Arrays.asList("d", "ddd")));
通配符查询
builder.withQuery(QueryBuilders.wildcardQuery("name.keyword", "510*"));
前缀查询
builder.withQuery(QueryBuilders.prefixQuery("name.keyword", "51"));
所以,做查询的话直接用NativeSearchQueryBuilder去构建参数就行了,都支持的。
注意:es默认查询10000条数据,超过不会返回,这时需要设置es的max_resource_window,然后同时查询时需要带上参数build.setTrackTotalHits(true);
NativeSearchQueryBuilder builder = new NativeSearchQueryBuilder();

builder.withQuery(QueryBuilders.prefixQuery("name.keyword", "51"));

NativeSearchQuery build = builder.build();
build.setTrackTotalHits(true);

return operations.search(build, DataAll.class, EsIndexProperties.getIndex());
地理信息位置查询
之前有定义了geo_point和geo_shape这两个类型,它们就是用来查询地理位置的,geo_point表示一个点,geo_shape表示一个形状
geo_point对应的类型有官方确定GeoPoint,并且在数据存入时会进行经纬度的校验,官方也提供了一个org.elasticsearch.common.geo.GeoUtils,可以让我们自己去校验经纬度。
    public static boolean isValidLatitude(double latitude) {
        return !Double.isNaN(latitude) && !Double.isInfinite(latitude) && !(latitude < -90.0) && !(latitude > 90.0);
    }

    public static boolean isValidLongitude(double longitude) {
        return !Double.isNaN(longitude) && !Double.isInfinite(longitude) && !(longitude < -180.0) && !(longitude > 180.0);
    }
然后就是geo_shape,这个类型对应类型我们需要自己创建,它支持两种格式,一个是GeoJson格式的,一个是WKT的格式
先说geojson,下面是一个标准的geoJson,而es保存的就是geometry这部分
{
    "type": "FeatureCollection",
    "features": [
        {
            "type": "Feature",
            "geometry": {
                "type": "Point",
                "coordinates": [102.0, 0.5]
            },
            "properties": {
                "prop0": "value0"
            }
        }
    ]
}
所以只要我们定义一个对象包含type和coordinates两个属性就可以了。
代码示例:
public class GeometryEntity implements Serializable {
    private static final long serialVersionUID = -112510376095434074L;

    private String type = "Polygon";

    private Object coordinates;
}
再者WKT它的格式,如下,一个坐标由空格分隔,多个坐标由逗号分隔,坐标描述的对象有括号包裹,开头的类型定义了坐标的形状
POINT(107.2 23.5)
LINESTRING(107.2 23.5,108.6 22.6)
POLYGON((1 1,5 1,5 5,1 5,1 1),(2 2,2 3,3 3,3 2,2 2))
MULTIPOINT(3.5 5.6, 4.8 10.5)
官方也提供了统计让我们进行转换的org.elasticsearch.geometry.utils.WellKnownText
GeographyValidator geographyValidator = new GeographyValidator(true);
// 这里true:强制类型转换(对坐标数据),geographyValidator:geo验证器
WellKnownText wellKnownText = new WellKnownText(true, geographyValidator);
wellKnownText.toWKT(geo对象)
代码示例
        double[] x = new double[5];
        double[] y = new double[5];
        for (int i = 0; i < 4; i++) {
            x[i] = 101 + i;
            y[i] = 21 + i;
        }
        // 面 首尾左边相同,即保证闭环
        x[4] = x[0];
        y[4] = y[0];

        Polygon p = new Polygon(new LinearRing(x, y));

        GeographyValidator geographyValidator = new GeographyValidator(true);
        // 这里true:强制类型转换(对坐标数据),geographyValidator:geo验证器
        WellKnownText wellKnownText = new WellKnownText(true, geographyValidator);
        String s = wellKnownText.toWKT(p);
        System.out.println(s);
定义geo点和geoShape
public class DataAll implements Serializable {
    private static final long serialVersionUID = -59319460795559295L;
    /** 资源主键 */
    @Field
    private String dataId;
    /** 资源名称 */
    @Field
    private String dataName;
    /** 名称 */
    @Field
    private String name;
    // geoShape字段,
    @Field
    private GeometryEntity geoJson;
    @GeoPointField
    @Field
    private GeoPoint geoPoint;
    /** 创建时间 */
    @Field
    private Long createTime;
}
@Data
public class GeometryEntity implements Serializable {
    private static final long serialVersionUID = -112510376095434074L;

    private String type = "Polygon";

    private Object coordinates;

    public GeometryEntity() {
    }

    public GeometryEntity(Double[] point) {
        this.type = GeoShapeType.POINT.shapeName();
        this.coordinates = Arrays.asList(point[0], point[1]);
    }

    public GeometryEntity(List<Double[]> coordinates) {
        this.coordinates = Collections.singletonList(coordinates);
    }

    public void setPoint(Double[] point) {
        this.type = GeoShapeType.POINT.shapeName();
        coordinates = point;
    }

    public final void setLineString(List<List<Double[]>> line) {
        if (line.size() > 1) {
            // 多线
            this.type = GeoShapeType.MULTILINESTRING.shapeName();
            //            coordinates = line;
        } else {
            // 单线
            this.type = GeoShapeType.LINESTRING.shapeName();
        }
        coordinates = line;
    }

    public void setPolygon(List<List<Double[]>> polygon) {
        if (polygon.size() > 1) {
            // 多面
            this.type = GeoShapeType.MULTIPOLYGON.shapeName();
            List<List<List<Double[]>>> cor = new ArrayList<>();
            for (List<Double[]> doubles : polygon) {
                List<List<Double[]>> temp = new ArrayList<>();
                temp.add(doubles);
                cor.add(temp);
            }
            coordinates = cor;
        } else {
            this.type = GeoShapeType.POLYGON.shapeName();
            List<List<Double[]>> cor = new ArrayList<>();
            cor.add(polygon.get(0));
            coordinates = cor;
        }
    }

    public void setGeometry(List<List<Double[]>> geometry) {
        boolean single = false;
        for (List<Double[]> pol : geometry) {
            if (isLineString(pol)) {
                single = true;
                break;
            }
        }
        if (single) {
            setLineString(geometry);
        } else {
            setPolygon(geometry);
        }
    }

    public static boolean isLineString(List<Double[]> pol) {
        Double[] first = pol.get(0);
        Double[] last = pol.get(pol.size() - 1);
        return !first[0].equals(last[0]) || !first[1].equals(last[1]);
    }
}
范围查询
请求参数
@Data
public class DataAllScopeSearchRequest implements Serializable {
    private static final long serialVersionUID = -1330158592736514960L;

    private String index;

    private Circle circle;

    private List<Point> points;

    private Line line;

    @Data
    public static class Line implements Serializable {

        private static final long serialVersionUID = -4321687487898249724L;

		/** 线缓存宽度 */
        private Double radi;

        private List<Point> points;
    }

    @Data
    public static class Circle implements Serializable {

        private static final long serialVersionUID = 4878467793495368658L;

        /** 半径(单位米) */
        private String radi;

        /** 经度 */
        private Double lon;

        /** 维度 */
        private Double lat;
    }

    @Data
    @NoArgsConstructor
    @AllArgsConstructor
    public static class Point implements Serializable {

        private static final long serialVersionUID = 8329115569185013087L;

        private Double lat;

        private Double lon;
    }

}
实现
    public SearchHits<DataAll> searchForScope(DataAllScopeSearchRequest request) {
        String geoField = DataAll.getGeoPointField();
        String geoJson = DataAll.getGeoJsonField();
        NativeSearchQueryBuilder builder = new NativeSearchQueryBuilder();
        BoolQueryBuilder boolquery = new BoolQueryBuilder();
        // 半径范围查询,不能查询到面
        if (request.getCircle() != null) {
            DataAllScopeSearchRequest.Circle ci = request.getCircle();
            boolquery.filter(QueryBuilders.geoDistanceQuery(geoField)
                                          .distance(ci.getRadi())
                                          .geoDistance(GeoDistance.PLANE)
                                          .point(new GeoPoint(ci.getLat(), ci.getLon())));
        }
        // 多边形查询,可以查询到点和面
        if (CollectionUtils.isNotEmpty(request.getPoints())) {
            List<DataAllScopeSearchRequest.Point> points = delRepeatPoint(request.getPoints());
            if (points.size() < 4) {
                throw new RuntimeException("面积查询最少3个不同的点");
            }
            Polygon p = buildPolygon(points);
            GeoShapeQueryBuilder b = new GeoShapeQueryBuilder(geoJson, p);
            b.relation(ShapeRelation.INTERSECTS);

            boolquery.filter(b);
        }
        // 线查询
        if (request.getLine() != null && CollectionUtils.isNotEmpty(request.getLine().getPoints())) {
            Polygon p = buildLineBufferArea(request);
            GeoShapeQueryBuilder b = new GeoShapeQueryBuilder(geoJson, p);
            b.relation(ShapeRelation.INTERSECTS);
            boolquery.filter(b);
        }
        builder.withQuery(boolquery);
        NativeSearchQuery build = builder.build();
        // 全部查询
        build.setTrackTotalHits(true);
        return operations.search(build, DataAll.class, IndexCoordinates.of(request.getIndex()));
    }

    /**
     * 去除 首尾之前重复的点,防止连续重复的点出现
     */
    private List<DataAllScopeSearchRequest.Point> delRepeatPoint(List<DataAllScopeSearchRequest.Point> points) {
        if (points.size() < 3) {
            return points;
        }
        DataAllScopeSearchRequest.Point first = points.get(0);
        DataAllScopeSearchRequest.Point last = points.get(points.size() - 1);
        double lastX = 0;
        double lastY = 0;
        ArrayList<DataAllScopeSearchRequest.Point> p = new ArrayList<>();
        for (DataAllScopeSearchRequest.Point point : points.subList(1, points.size() - 1)) {
            if (point.getLon() == lastX && point.getLat() == lastY) {
                log.warn("不允许连续的相同的点");
                continue;
            }
            lastX = point.getLon();
            lastY = point.getLat();
            p.add(new DataAllScopeSearchRequest.Point(point.getLat(), point.getLon()));
        }
        p.add(0, first);
        p.add(p.size(), last);
        return p;
    }

    /**
     * 构建多边形
     */
    private static Polygon buildPolygon(List<DataAllScopeSearchRequest.Point> points) {
        double[] x = new double[points.size()];
        double[] y = new double[points.size()];
        int i = 0;
        for (DataAllScopeSearchRequest.Point point : points) {
            x[i] = point.getLon();
            y[i] = point.getLat();
            ++i;
        }
        // 面
        LinearRing linearRing = new LinearRing(x, y);
        return new Polygon(linearRing);
    }

    /**
     * 构建线缓存面
     */
    private static Polygon buildLineBufferArea(DataAllScopeSearchRequest request) {
        Coordinate[] coordinates = new Coordinate[request.getLine().getPoints().size()];
        List<DataAllScopeSearchRequest.Point> linePoints = request.getLine().getPoints();
        for (int i = 0; i < linePoints.size(); i++) {
            coordinates[i] = new Coordinate(linePoints.get(i).getLon(), linePoints.get(i).getLat());
        }

        CoordinateSequence coordinateSequence = new CoordinateArraySequence(coordinates);
        LineString lineString = new LineString(coordinateSequence, new GeometryFactory());
        BufferOp bufferOp = new BufferOp(lineString);
        double distance = request.getLine().getRadi() / LINE_BUFFER_SCA * 360;
        com.vividsolutions.jts.geom.Geometry geometry = bufferOp.getResultGeometry(distance);

        Coordinate[] cor = geometry.getCoordinates();
        double[] x = new double[cor.length];
        double[] y = new double[cor.length];
        for (int i = 0; i < cor.length; i++) {
            x[i] = cor[i].x;
            y[i] = cor[i].y;
        }
        LinearRing linearRing = new LinearRing(x, y);
        return new Polygon(linearRing);
    }
高亮查询
    public Object highlight(String index, String keyword) {

        NativeSearchQueryBuilder builder = new NativeSearchQueryBuilder();
        // 方法一:自定义高亮
        HighlightBuilder highBuilder = new HighlightBuilder();
        highBuilder.field("dataName");
        highBuilder.preTags("");
        highBuilder.postTags("");
        builder.withHighlightBuilder(highBuilder);
        // 方法二:默认高亮
        // builder.withHighlightFields(new HighlightBuilder.Field("dataName"));

        builder.withQuery(QueryBuilders.matchQuery("dataName", keyword));
        NativeSearchQuery build1 = builder.build();
        build1.setTrackTotalHits(true);
        return restTemplate.search(build1, DataAll.class, IndexCoordinates.of(index));
    }

