Greenplum6.x新加节点
一. 互信配置
- 已经互信的集群exists_hosts
dw1
dw2
dw3
- 新增机器dw4,dw5
new_hosts文件中配置
dw4
dw5
- 配置1-n互信
ssh-copy-id dw4
ssh-copy-id dw5
若使用ssh-copy-id 失败则可以将master的公钥复制到其他新服务器的authorized_keys中
# 方式一:登录master操作
cat ~/.ssh/id_rsa.pub |ssh dw4 "cat>> ~/.ssh/authorized_keys"
cat ~/.ssh/id_rsa.pub |ssh dw5 "cat>> ~/.ssh/authorized_keys"
# 方式二:复制master的id_rsa.pub内容,登录各个新机器添加到~/.ssh/authorized_keys文件中
若报错Failed Permission Denied (publickey,gssapi-keyex,gssapi-with-mic)
则检查 .ssh目录权限和authorized_keys文件权限
chmod 700 .ssh
chmod 600 authorized_keys
- 配置n-n互信
# 登录 master
# 执行 gpssh-exkeys -e /tmp/exists_hosts -x /tmp/new_hosts

[gpadmin@dw1 ~]$ gpssh-exkeys -e /tmp/all_hosts -x /tmp/new_hosts
[STEP 1 of 5] create local ID and authorize on local host
  ... /home/gpadmin/.ssh/id_rsa file exists ... key generation skipped

[STEP 2 of 5] keyscan all hosts and update known_hosts file

[STEP 3 of 5] retrieving credentials from remote hosts
  ... send to dw4
  ... send to dw5
  ... send to dw2
  ... send to dw3

[STEP 4 of 5] determine common authentication file content

[STEP 5 of 5] copy authentication files to all remote hosts
  ... finished key exchange with dw4
  ... finished key exchange with dw5
  ... finished key exchange with dw2
  ... finished key exchange with dw3

[INFO] completed successfully
[gpadmin@dw1 ~]$
执行完成后,会在新服务器.ssh目录生成如下文件
authorized_keys
config
iddummy.pub
id_rsa
id_rsa.pub
known_hosts
- 验证
# 登录master
ssh dw4 date
ssh dw5 date
# 登录dw4
ssh dw5 date
ssh dw1 date
ssh dw2 date
ssh dw3 date
官网GPDB-wiki
expand_workflow
二. 扩展流程
场景
GPDB6 实例,在 4 个分段节点上具有 2 个分段。它只有一个数据库和下表:
- T1:随机分布,
- T2:哈希分布式,堆
- T3:哈希分布式、AO、分区
- T4:复制
现在,DBA 希望再添加两个段节点,并将其扩展到总共 8 个段。如何做以及集群中会发生什么?
扩展群集
正如官方文档中所分享的 扩展集群 ,总共有 4 个重要阶段:
1. 准备和添加节点
在这个阶段,DBA需要安装Greenplum二进制文件,在新主机上创建gpadmin os用户,交换ssh密钥,并运行一些验证测试。在此阶段之后,新节点已准备好进行集成。
GP 6 在此阶段与 GP 5 相同。
2. 初始化新段
DBA 需要创建一个用于扩展的输入文件。可以使用以下命令以交互方式创建输入文件:
> gpexpand -D gpadmin
系统将询问主机和段计数,以下是示例输入:
# hosts to add 2
# segments to add 4
然后 DBA 将运行以下命令来初始化段并将段添加到集群中:
> gpexpand -i input_file -D db1
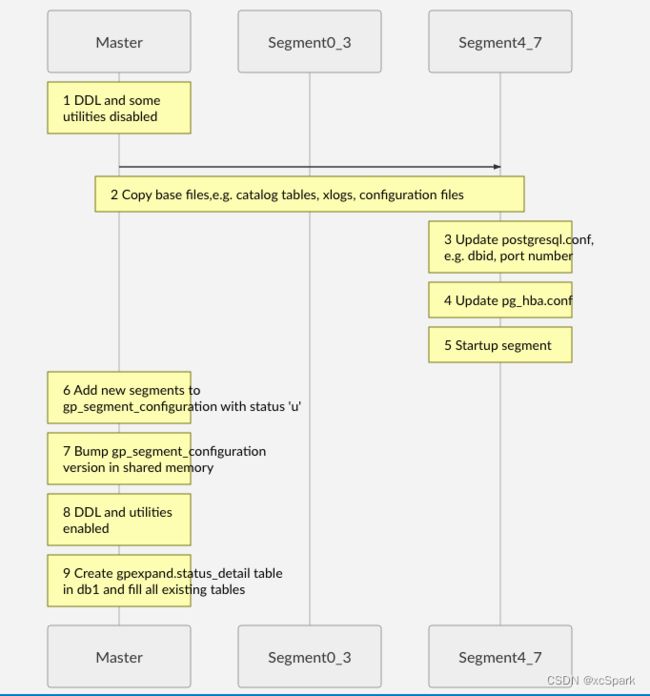
命令运行时,主段、旧段(段 0-3)和新段上将发生以下事件。(第 4-7 段):
在上述步骤中,1 和 6-9 是 GP 6 中的新功能,其他所有内容都与 GP 5 相同。
关于上述步骤 7 的更多说明:我们在共享内存中有一个用于gp_segment_configuration的版本号。当QD访问gp_segment_configuratioin时,它将首先将其本地缓存版本号与共享内存版本进行比较。如果存在差异,它将更新版本和gp_segment_configuration的本地缓存,以便新查询和事务可以使用最新的段。
有关上述步骤 9 的更多说明:GP 5 仅将哈希分布式表放入gpexpand.status_detail因此 GP 5 仅扩展哈希分布式表。GP 6 会将随机表和复制表放到gpexpand.status_detail,并重新分发它们以在整个群集中均匀分布数据。对于分区表,在 GP 6 中,我们在此表中只有一条父分区记录。因此,给定我们的示例,我们将有以下记录:
T1
T2
T3
T4
3. 重新分发表
3.1 重新分发的排名表
此时,DBA 有机会调整扩展架构中表的排名值,gpexpand.status_detail以优先处理频繁使用的表并最大程度地降低性能影响。例如
UPDATE gpexpand.status_detail SET rank=10;
UPDATE gpexpand.status_detail SET rank=1 WHERE fq_name = 'public.T1';
UPDATE gpexpand.status_detail SET rank=2 WHERE fq_name = 'public.T2';
当 3.2 部分中的表重新分发开始时,首先重新分发 T1,然后是 T2 和所有其他表 in_gpexpand.status_detail。
3.2 使用 gpexpand 重新分发表
现在,DBA 可以运行 gpexpand 来重新分发表,还可以使用 -d 或 -e 选项来定义扩展会话时间段。例如,要连续运行该实用程序长达 60 小时:
gpexpand -d 60:00:00
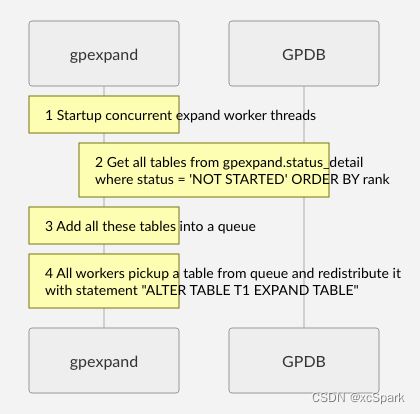
当命令运行时,gpexpand 就像一个 GPDB 客户端,将与 GPDB 进行以下交互:
上述所有步骤在 GP5 和 GP6 中都是相同的,除了步骤 4 中的轻微重新分发语句差异。
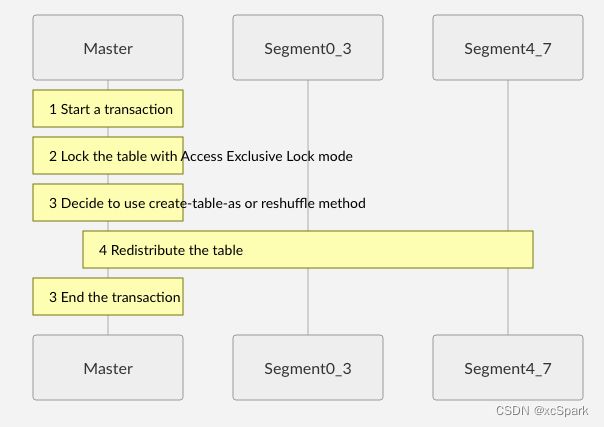
对于上述步骤 4 中的每个表重新分发语句,将在主段、旧段(段 0-3)和新段(段 4-7)上发生以下事件:
关于第 3 步的更多说明:在当前的代码库中,我们使用硬编码的移动元组计数或百分比来决定是否使用 reshuffle。我们将根据我们的性能测试结果对其进行改进,以使用可配置的 GUC。
步骤 3 和 4 是 GP 6 中的不同之处,因为我们有两种方法来重新分发表。有关 reshuffle 如何针对不同表类型工作的详细信息,请参阅 PR gpexpand 自述文件。
4. 删除扩展架构
要在扩展 Greenplum 集群后进行清理,DBA 需要使用以下命令删除扩展架构:
gpexpand -c
这在 GP5 和 GP6 中是相同的。


