Vue-数据驱动的渐进式前端框架
第五天、VueJs
一、VueJs的概述
1.1、什么是VueJs?
VueJs是【数据驱动】的【渐进式】前端框架。
渐进式:1、可以只使用部分功能,而不用全部实现
2、与第三方很好的兼容
1.2、VueJs的模型 : MVVM 模型
M model 模型 (数据)
V view 视图 (页面)
VM controller 控制 (控制数据到页面的流程)
本质上就是【MVC】,分离数据与视图
二、VueJs的入门
2.0、引入vuejs对象
引入上面两个标签,或者去标签上的网站上下载vue代码
2.1、创建vue对象
new Vue({
		//挂载,相当于Jquery的选择器 $("#app")
		el:"#app",
		//数据
		data:{},
		//自定义方法
		methods:{}
	});
2.2、插值表达式
在页面上显示data中的数据,可以用插值表达式 {{message}}。
插值表达式中可以是: 三元表达式,基本运算符,函数,正则表达式
如:{{istrue?"ok":"not ok"}} {{message+1}}
不是表达式如:if 、var n = 1
注意:插值表达式不能写在html的属性中
<html lang="en">
<head>
    <meta charset="UTF-8">
    <title>Titletitle>

    <script type="text/javascript" src="vue2.6.10.js">script>
head>
<body>
<div id="app">

    {{message}}
    {{8+8}}
    {{isOK?1:2}}
    {{mystr.replace(/,/g,'')}}
    {{fun1()}}
div>
body>
html>
<script>
    new Vue({

        //挂在,相当于jq的选择器
        el: "#app",

        data: {

            //存放变量
            message:"hello world",

            isOK:true,

            mystr:"789,456,123"
        },

        methods:{

            //自定义方法
            fun1:function() {
                alert("你好阿柴!!!")
            }
        }

    });
script>
三、VueJs的指令集
3.1、v-on : 监听DOM事件
3.1.1、v-on:click 鼠标点击事件
<html lang="en">
<head>
    <meta charset="UTF-8">
    <title>Titletitle>

    <script type="text/javascript" src="vue2.6.10.js">script>
head>
<body>
<div id="app">

    {{message}}
    <input type="button" value="阿柴转换器" v-on:click="Atlantis();">
div>
body>
html>
<script>
    new Vue({

        //挂在,相当于jq的选择器
        el: "#app",

        data: {

            //存放变量
            message: "阿柴!!!",
        },

        methods: {

            //自定义方法
            Atlantis: function () {
                this.message = "黑柴!!!";
            }
        }

    });
script>
3.1.2、v-on:keydown 键盘按下事件
<html lang="en">
<head>
    <meta charset="UTF-8">
    <title>Titletitle>

    <script type="text/javascript" src="vue2.6.10.js">script>
head>
<body>
<div id="app">
    <input type="text" v-on:keydown="Atlantis();">
div>
body>
html>
<script>
    new Vue({

        //挂在,相当于jq的选择器
        el: "#app",
        data: {
            //存放变量
            message: "hello world",
        },
        methods: {

            //自定义方法
            Atlantis: function () {

                //设置键入的值为变量code
                var code = event.keyCode;

                if (!(code >= 48 && code <= 57)) {

                    //输出当前键入的值
                    console.info("code =" + code);

                    //不能显示在输出框中,阻断默认事件(小键盘的数字键不行)
                    event.preventDefault();
                }
            }
        }

    });
script>
3.1.3、v-on:mouseover 鼠标悬浮事件
<html lang="en">
<head>
    <meta charset="UTF-8">
    <title>Titletitle>

    <script type="text/javascript" src="vue2.6.10.js">script>
head>
<body>
<div id="app">
    <div v-on:mouseover="fun2()" style="border:1px solid red">
        <textarea v-on:mouseover="fun1()">这是文本域textarea>
    div>
div>
body>
html>
<script>
    new Vue({

        //挂在,相当于jq的选择器
        el: "#app",
        data: {
            //存放变量
            message: "hello world",
        },
        methods: {
                //自定义方法
                fun1:function () {
                    alert("这是文本域!");
                    //停止事件的传播
                    //事件传播是由内到外
                    event.stopPropagation();
                },
                fun2:function () {
                    alert("这是div!");
                }
        }
    });
script>
3.1.4、事件修饰符
使用.prevent 来代替 event.preventDefault()
使用 .stop 来代替event.stopPropagation();
还可以使用@来代替 v-on:
<html lang="en">
<head>
<meta charset="UTF-8">
<title>Titletitle>
<script type="text/javascript" src="vue2.6.10.js">script>
head>
<body>
<div id="app">
<form @submit.prevent action="http://www.baidu.com">
<input type="submit" value="提交">
form>
百度a>
div>
<input type="text" @keydown.enter="fun3();">+
div>
body>
html>
<script>
new Vue({
//挂在,相当于jq的选择器
el: "#app",
data: {
//存放变量
message: "hello world",
},
methods: {
//自定义方法
fun1: function () {
alert("div被点了")
},
fun2: function () {
alert("a被点了")
},
fun3: function () {
alert("回车被点了")
}
}
});
script>
3.1.5、按键修饰符
Vue 允许为 v-on 在监听键盘事件时添加按键修饰符
全部的按键别名:
.enter
.tab
.delete (捕获 "删除" 和 "退格" 键)
.esc
.space
.up
.down
.left
.right
.ctrl
.alt
.shift
.meta
3.2、v-text 、v-html
v-text 以文本方式显示
v-html 以html方式显示,会解析标签
<html lang="en">
<head>
<meta charset="UTF-8">
<title>Titletitle>
<script type="text/javascript" src="vue2.6.10.js">script>
head>
<body>
<div id="app">
div>
div>
div>
body>
html>
<script>
new Vue({
//挂在,相当于jq的选择器
el: "#app",
data: {
message:"阿柴
",
},
methods:{
}
});
script>
3.3、v-bind
因为插值表达式不能作用于html属性,所以需要时用v-bind 来渲染数据
<html lang="en">
<head>
<meta charset="UTF-8">
<title>Titletitle>
<script type="text/javascript" src="vue2.6.10.js">script>
head>
<body>
<div id="app">
div>
body>
html>
<script>
new Vue({
//挂在,相当于jq的选择器
el: "#app",
data: {
//存放变量
message:"hello world",
isOK:true,
mystr:"789,456,123"
},
methods:{
//自定义方法
fun1:function() {
alert("阿柴")
}
}
});
script>
3.4、v-model
双向绑定。可以给html赋值,也可以用html的值来修改vue的数据
<html lang="en">
<head>
<meta charset="UTF-8">
<title>Titletitle>
<script type="text/javascript" src="vue2.6.10.js">script>
head>
<body>
<div id="app">
用户名:<input type="text" v-model="username">
密码:<input type="text" v-model="pwd">
<input type="button" @click="fun1()">
用户名:<input type="text" v-model="user.name">
密码:<input type="text" v-model="user.pwd">
<input type="button" @click="fun2()">
div>
body>
html>
<script>
new Vue({
//挂在,相当于jq的选择器
el: "#app",
data: {
//存放变量
username: "阿柴",
pwd: "123",
user: {"name": "黑柴", "pwd": "123456"}
},
methods: {
fun1: function () {
alert(this.username + "," + this.pwd);
},
fun2: function () {
alert(this.user.name)
}
}
});
script>
3.5、v-for
循环。要循环谁,就写在那个标签里
<html lang="en">
<head>
<meta charset="UTF-8">
<title>Titletitle>
<script type="text/javascript" src="vue2.6.10.js">script>
head>
<body>
<div id="app">
<ul>
<li v-for="v in array">{{v}}li>
ul>
<ul>
<li v-for="(v,i) in user">{{v+","+i}}li>
ul>
<table>
<tr v-for="p in people">
<td >{{p.name}}td>
<td >{{p.pwd}}td>
<td >{{p.age}}td>
tr>
table>
<table>
<tr v-for="p in people">
<td v-for="v in p">{{v}}td>
tr>
table>
div>
body>
html>
<script>
new Vue({
//挂在,相当于jq的选择器
el: "#app",
data: {
array:["aa","bb","cc","dd"],
user:{name:"rose",pwd:"123456",age:20},
people:[{name:"jack",pwd:"1456",age:20},{name:"rose",pwd:"45",age:23},{name:"tom",pwd:"1236",age:22}]
},
methods:{
}
});
script>
3.6、v-if 、v-show
v-if 如果是false,标签都不会出现在dom里
v-show css的显示与否 ,dom中有标签
<html lang="en">
<head>
<meta charset="UTF-8">
<title>Titletitle>
<script type="text/javascript" src="vue2.6.10.js">script>
head>
<body>
<div id="app">
<div v-if="flag">黑柴div>
<div v-show="flag">阿柴div>
div>
body>
html>
<script>
new Vue({
//挂在,相当于jq的选择器
el: "#app",
data: {
flag: false
},
methods:{
}
});
script>
四、Vue的生命周期
框架提供的钩子方法(回调函数)
4.1、beforeCreate
beforeCreate 创建vue实例前,数据还没有监听,没有绑定到vue对象实例,同时也没有挂载对象
4.2、created
created 创建vue实例后,数据已经绑定到了对象实例,但是还没有挂载对象
4.3、beforeMount
beforeMount 挂载到dom前,模板已经编译好了,根据数据和模板已经生成了对应的元素对象,将数据对象关联到了对象的el属性,el属性是一个HTMLElement对象,也就是这个阶段,vue实例通过原生的createElement等方法来创建这个html片段,准备注入到我们vue实例指明的el属性所对应的挂载点
4.4、mounted
mounted:将el的内容挂载到了el,相当于我们在jquery执行了(el).html(el),生成页面上真正的dom,上面我们就会发现dom的元素和我们el的元素是一致的。在此之后,我们能够用方法来获取到el元素下的dom对象,并进行各种操作
4.5、beforeUpdate,当data发生改变时,会调用
beforeUpdate :数据更新到dom之前,我们可以看到$el对象已经修改,但是我们页面上dom的数据还没有发生改变
4.6、upated,当我们的data发生改变时,会调用
updated: dom结构会通过虚拟dom的原则,找到需要更新页面dom结构的最小路径,将改变更新到dom上面,完成更新
4.7、beforeDestroy, vue实例销毁前
4.8、destroyed,vue实例销毁后
实例的销毁,vue实例还是存在的,只是解绑了事件的监听还有watcher对象数据
与view的绑定,即数据驱动
五、VueJs的ajax插件
Axios 是一个基于 promise 的 HTTP 库,可以用在浏览器和 node.js 中
axios插件
地址: https://github.com/axios/axios
用script引入
5.1、get请求
//通过给定的ID来发送请求
axios.get('/user?ID=12345')
.then(function(response){
console.log(response);
})
.catch(function(err){
console.log(err);
});
//以上请求也可以通过这种方式来发送
axios.get('/user',{
params:{
ID:12345
}
})
.then(function(response){
console.log(response);
})
.catch(function(err){
console.log(err);
});
5.2、post请求
axios.post('/user',{
firstName:'Fred',
lastName:'Flintstone'
})
.then(function(res){
console.log(res);
})
.catch(function(err){
console.log(err);
});
5.3、axios的其他方法别名,类似restful
axios.request(config)
axios.get(url[, config])
axios.delete(url[, config])
axios.head(url[, config])
axios.post(url[, data[, config]])
axios.put(url[, data[, config]])
axios.patch(url[, data[, config]]
六、综合案例
6.1、需求:用户信息的增删改查
6.2、技术栈:
开发层面: 数据库、持久层、业务层、controller层、前端
技术栈: Mysql、MyBatis、SpringBoot、Vuejs
6.3、创建数据库和表
CREATE TABLE `user_info` (
`id` int(11) NOT NULL AUTO_INCREMENT,
`age` int(11) DEFAULT NULL,
`user_name` varchar(20) COLLATE utf8_bin DEFAULT NULL,
`pass_word` varchar(50) COLLATE utf8_bin DEFAULT NULL,
`email` varchar(50) COLLATE utf8_bin DEFAULT NULL,
`sex` varchar(20) COLLATE utf8_bin DEFAULT NULL,
PRIMARY KEY (`id`)
) ENGINE=InnoDB AUTO_INCREMENT=1 DEFAULT CHARSET=utf8 COLLATE=utf8_bin;
insert into `user_info`(`id`,`age`,`user_name`,`pass_word`,`email`,`sex`) values
(1,19,'tom','123456','[email protected]','男'),
(2,20,'jerry','abcdef','[email protected]','女');
6.4、后端开发
6.4.1 创建工程,引入依赖
<project xmlns="http://maven.apache.org/POM/4.0.0"
xmlns:xsi="http://www.w3.org/2001/XMLSchema-instance"
xsi:schemaLocation="http://maven.apache.org/POM/4.0.0 http://maven.apache.org/xsd/maven-4.0.0.xsd">
<modelVersion>4.0.0modelVersion>
<groupId>com.EleganisegroupId>
<artifactId>Spring_DemoartifactId>
<version>1.0-SNAPSHOTversion>
<parent>
<groupId>org.springframework.bootgroupId>
<artifactId>spring-boot-starter-parentartifactId>
<version>2.1.3.RELEASEversion>
parent>
<dependencies>
<dependency>
<groupId>org.springframework.bootgroupId>
<artifactId>spring-boot-starter-webartifactId>
dependency>
<dependency>
<groupId>mysqlgroupId>
<artifactId>mysql-connector-javaartifactId>
dependency>
<dependency>
<groupId>org.springframework.bootgroupId>
<artifactId>spring-boot-starter-testartifactId>
dependency>
<dependency>
<groupId>org.mybatis.spring.bootgroupId>
<artifactId>mybatis-spring-boot-starterartifactId>
<version>2.0.0version>
dependency>
<dependency>
<groupId>org.projectlombokgroupId>
<artifactId>lombokartifactId>
dependency>
<dependency>
<groupId>junitgroupId>
<artifactId>junitartifactId>
dependency>
dependencies>
project>
6.4.2、配置yml文件,数据库信息
spring:
datasource:
driver-class-name: com.mysql.jdbc.Driver
url: jdbc:mysql:///test
username: root
password: root
mybatis:
mapper-locations: classpath:xml\**Mapper.xml #xml的文件路径
type-aliases-package: com.Eleganise.Demo.pojo #pojo的别名
6.4.3、创建启动类,配置注解
package com.Eleganise;
import org.mybatis.spring.annotation.MapperScan;
import org.springframework.boot.SpringApplication;
import org.springframework.boot.autoconfigure.SpringBootApplication;
@SpringBootApplication
@MapperScan("com.Eleganise.Demo.mapper")
public class RunApplication {
public static void main(String[] args) {
SpringApplication.run(RunApplication.class, args);
}
}
6.4.4、测试环境
6.4.5、创建User类
package com.Eleganise.Demo.pojo;
import lombok.AllArgsConstructor;
import lombok.Data;
import lombok.NoArgsConstructor;
@Data
@NoArgsConstructor
@AllArgsConstructor
public class User {
private Integer id;
private Integer age;
private String userName;
private String passWord;
private String email;
private String sex;
}
6.4.6.0、创建Mapper
package com.Eleganise.Demo.mapper;
import com.Eleganise.Demo.pojo.User;
import java.util.List;
public interface UserMapper {
List<User> selectAll();
User selectById(Long id);
void updateUser(User user);
}
6.4.6.1、创建Mapper.xml
<mapper namespace="com.Eleganise.Demo.mapper.UserMapper" >
<resultMap id="BaseMap" type="com.Eleganise.Demo.pojo.User">
<id column="id" property="id"/>
<result column="user_name" property="userName"/>
<result column="pass_word" property="passWord"/>
resultMap>
<select id="selectAll" resultMap="BaseMap">
select * from user_info
select>
<select id="selectById" resultMap="BaseMap">
select * from user_info where id = #{id}
select>
<update id="updateUser">
update user_info set user_name = #{userName},age = #{age} where id = #{id}
update>
mapper>
6.4.7、创建Service
package com.Eleganise.Demo.service.impl;
import com.Eleganise.Demo.mapper.UserMapper;
import com.Eleganise.Demo.pojo.User;
import org.springframework.beans.factory.annotation.Autowired;
import org.springframework.stereotype.Service;
import java.util.List;
@Service
public class UserServiceImpl {
@Autowired
private UserMapper userMapper;
public List<User> findAll() {
return userMapper.selectAll();
}
public User findById(Long id) {
return userMapper.selectById(id);
}
public void updateUser(User user) {
userMapper.updateUser(user);
}
}
6.4.8、创建Controller
package com.Eleganise.Demo.controller;
import com.Eleganise.Demo.pojo.User;
import com.Eleganise.Demo.service.impl.UserServiceImpl;
import org.springframework.beans.factory.annotation.Autowired;
import org.springframework.web.bind.annotation.*;
import java.util.List;
@RestController
@RequestMapping("/user")
public class controller {
@Autowired
private UserServiceImpl userService;
@GetMapping("/findAll")
public List<User> findAll() {
return userService.findAll();
}
@GetMapping("/{id}")
public User findByid(@PathVariable(name = "id") Long id) {
return userService.findById(id);
}
@PutMapping("/updateUser")
public void updateUser(@RequestBody User user) {
userService.updateUser(user);
}
}
6.5、前端开发
6.5.1、把页面放入工程,resource/static
6.5.2、在页面引入 vuejs 、 axiosjs、user.js
6.5.3、创建本功能JS,user.js
new Vue({
el: "#app",
data: {
userList: [],
userInfo: {}
},
created: function () {
//页面初始化的时候调用方法请求后端
this.findAll();
},
methods: {
//获取用户列表
findAll: function () {
axios.get("/user/findAll").then(
resp => {
this.userList = resp.data;
console.info(this.userList);
}
)
},
//根据id查询一条数据
findById: function (id) {
axios.get("/user/" + id).then(
resp => {
this.userInfo = resp.data;
//显示编辑页面
$('#myModal').modal("show");
console.info(resp);
}
)
},
//修改用户
updateUser: function () {
axios.put("/user/updateUser", this.userInfo).then(
resp => {
this.findAll();
}
)
}
},
})
6.5.4、查询列表,见user.js
6.5.5、查询单条,处理回显,见user.js
6.5.6、提交修改数据,见user.js
补充:
1、计算属性
在插值表达式中使用js表达式是非常方便的,而且也经常被用到。
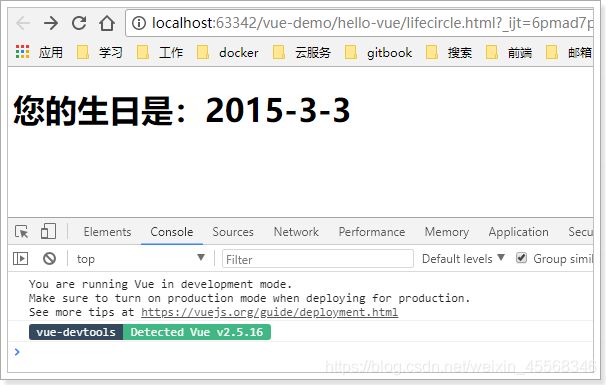
但是如果表达式的内容很长,就会显得不够优雅,而且后期维护起来也不方便,例如下面的场景,我们有一个日期的数据,但是是毫秒值:
data:{
birthday:1529032123201 // 毫秒值
}
我们在页面渲染,希望得到yyyy-MM-dd的样式:
<h1>您的生日是:{{
new Date(birthday).getFullYear() + '-'+ new Date(birthday).getMonth()+ '-' + new Date(birthday).getDay()
}}
h1>
虽然能得到结果,但是非常麻烦。
Vue中提供了计算属性,来替代复杂的表达式:
var vm = new Vue({
el:"#app",
data:{
birthday:1429032123201 // 毫秒值
},
computed:{
birth(){// 计算属性本质是一个方法,但是必须返回结果
const d = new Date(this.birthday);
return d.getFullYear() + "-" + d.getMonth() + "-" + d.getDay();
}
}
})
- 计算属性本质就是方法,但是一定要返回数据。然后页面渲染时,可以把这个方法当成一个变量来使用。
页面使用:
<div id="app">
<h1>您的生日是:{{birth}} h1>
div>
效果:
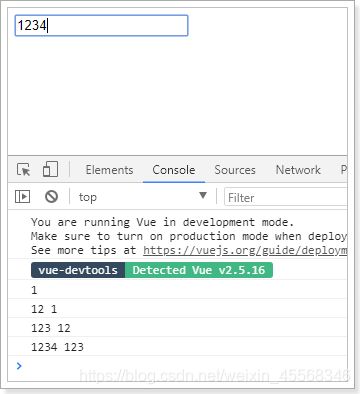
2、watch 监控
监控
watch可以让我们监控一个值的变化。从而做出相应的反应。
示例:
<div id="app">
<input type="text" v-model="message">
div>
<script type="text/javascript" src="js/vuejs_v2.5.21.js" >script>
<script type="text/javascript">
var vm = new Vue({
el:"#app",
data:{
message:""
},
watch:{
message(newVal, oldVal){
console.log(newVal, oldVal);
}
}
})
script>
效果:
深度监控
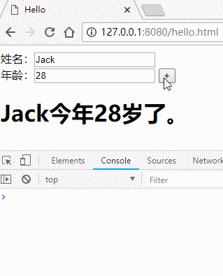
如果监控的是一个对象,需要进行深度监控,才能监控到对象中属性的变化,例如:
<div id="app">
姓名:<input type="text" v-model="person.name"> <br>
年龄:<input type="text" v-model="person.age"> <button @click="person.age++">+button> <br>
<h1>
{{person.name}}今年{{person.age}}岁了。
h1>
div>
<script type="text/javascript" src="js/vuejs_v2.5.21.js" >script>
<script type="text/javascript">
var vm = new Vue({
el: "#app",
data: {
person:{
name:"Jack",
age:21
},
sex:1
},
watch:{
person:{
deep: true, // 开启深度监控,可以监控到对象中属性变化
handler(val){ // 定义监控到以后的处理方法
console.log(val.name + ": " + val.age);
}
}
sex:{
}
}
})
script>
变化:
- 以前定义监控时,person是一个函数,现在改成了对象,并且要指定两个属性:
- deep:代表深度监控,不仅监控person变化,也监控person中属性变化
- handler:就是以前的监控处理函数
效果: