组件的插槽以及组件通信
组件的插槽以及组件通信
- 1. 插槽
-
- 1.1. 单个插槽
- 1.2. 多个插槽
- 2. 组件通信
-
- 2.1. 属性绑定
- 2.2. 事件绑定(重点)
- 2.3. 获取组件实例
1. 插槽
在自定义组件的 wxml 结构中,可以提供一个 节点(插槽),用于承载组件使用者提供的 wxml 结构。
1.1. 单个插槽
在小程序中,默认每个自定义组件中只允许使用一个 进行占位,这种个数上的限制叫做单个插槽
组件(子组件):
<view>
    组件自定义文字(由组件自己提供)
    <slot>slot>
view>
页面(父组件)
<my-test4>
    <view>插槽内容(使用者提供)view>
my-test4>
1.2. 多个插槽
使用多个插槽,需要在组件的.j配置文件中options开启配置项(multipleSlots:true)。
- 开启多个插槽:
// components/test4/test4.js
Component({
    options:{
        // 开启多个插槽
        multipleSlots:true
    },
  //...
})
- 定义多个插槽和使用多个插槽
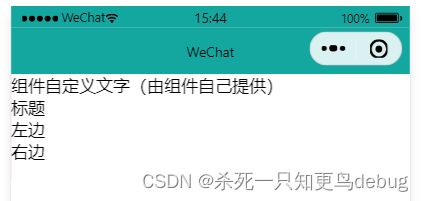
组件拥有多个插槽时,可以在slot标签上使用name属性来进行区分不同的插槽。
<view>
  组件自定义文字(由组件自己提供)
  <slot name="title">slot>
  <slot name="left">slot>
  <slot name="right">slot>
view>
使用组件时,需要通过标签的slot属性指定对应插槽的name值。
<my-test4>

  <view slot="title">标题view>
  <view slot="left">左边view>
  <view slot="right">右边view>
my-test4>
2. 组件通信
组件之间通信的三种方式:属性绑定(父->子),事件绑定(子->父),获取组件实例(父组件获取子组件的实例对象)
- 属性绑定
用于父组件向子组件的指定属性设置数据,仅能设置 JSON 兼容的数据 - 事件绑定
用于子组件向父组件传递数据,可以传递任意数据 - 获取组件实例
父组件还可以通过 this.selectComponent() 获取子组件实例对象这样就可以直接访问子组件的任意数据和方法
2.1. 属性绑定
属性绑定用于父向子传值,而且只能传递普通类型的数据,无法将方法传递给子组件。
简单理解,属性绑定就是将父组件的data中的值,直接绑定到使用的标签上。
- 父组件的属性绑定
父组件的.js文件
data:{
  count:0
}
父组件的.wxml文件------对子组件进行属性绑定
<my-component1 count="{{count}}">my-component1>
- 子组件获取父组件的属性
子组件要想获得父组件通过属性绑定的值的话,首先得在子组件的properties节点中声明同名的属性,然后才能使用。
子组件的.js文件
Component({
  properties:{
    count: Number
  },
  methods: {
      // 按钮触摸事件,对count加一操作
      addCount(){
          this.setData({
              count:this.properties.count+1
          })
      }
    }
  //....
})
子组件的.wxml结构
<view>子组件获取到父组件的count值:{{count}}view>
<button bindtap="addCount">+1button>
2.2. 事件绑定(重点)
事件绑定用于实现子向父传值,可以传递任何类型的数据。
事件绑定步骤如下:
- 在父组件的 js 中,定义一个函数,这个函数将通过自定义事件的形式,传递给子组件。
- 在父组件的 wxml 中,通过自定义事件的形式,将步骤1中定义的函数引用,传递给子组件。
- 在子组件的 js 中,通过调用
this.triggerEvent('自定义事件类型名称',{/*参数对象*/}),将数据发送到父组件- 在父组件的 js 中,通过
e.detail获取到子组件传递过去的数据。
示例如下:
- 在父组件的js中,定义一个函数,用于一会儿的自定义事件
Page({
    // 属性绑定
    data: {
      count:0
    },
    // 定义函数----用于自定义事件
    syncCount(){}
})
- 给组件标签绑定设定自定义事件
<my-test5 count="{{count}}" bind:sync="syncCount" >my-test5>
<view>======================view>
<view>(页面中)count的值是{{count}}view>
- 调用子组件的 this.triggerEvent() 然后发送数据到父组件
// components/test5/test5.js
Component({
    /**
     * 组件的属性列表
     */
    properties: {
        count:Number
    },

    /**
     * 组件的方法列表
     */
    methods: {
        addCount(){
            this.setData({
                count:this.properties.count+1
            })
            // 触发自定义事件,将数据同步给父组件
            this.triggerEvent('sync',{
                value:this.properties.count
            })
        }
    }
})
- 通过 e.detail 获取子组件传递过去的数据
Page({
    // 属性绑定
    data: {
      count:0
    },
    // 定义函数----用于自定义事件
    syncCount(e){
    	console.log(e)
      this.setData({
          count:e.detail.value
    	})
    }
})
2.3. 获取组件实例
可在父组件里调用 this.selectComponent(“id或class选择器”) ,获取子组件的实例对象,从而直接访问子组件的任意数据和方法。
调用时需要传入一个选择器,this.selectComponent(“.my-component”)。
父组件的.wxml
<my-test5 count="{{count}}" bind:sync="syncCount" class="my-test5" id="t5">my-test5>
<view>======================view>
<view>(页面中)count的值是{{count}}view>
<button bindtap="getChild">获取组件实例button>
父组件的.js
// pages/home/home.js
Page({

  /**
   * 页面的初始数据
   */
  data: {
    count:0
  },

  syncCount(e){
    console.log(e)
    this.setData({
        count:e.detail.value
    })
  },
   // 获取组件实例函数
  getChild(){
      // 只能是id 选择器或者类选择器
      const child = this.selectComponent('.my-test5')
      console.log(child)
    	// 调用子组件的addCount方法
      child.addCount()
  },

})
