::before和::after是什么?
本文从最简单的开始,解释如何理解和使用::before和::after。然后再在实际使用场景中去应用它。
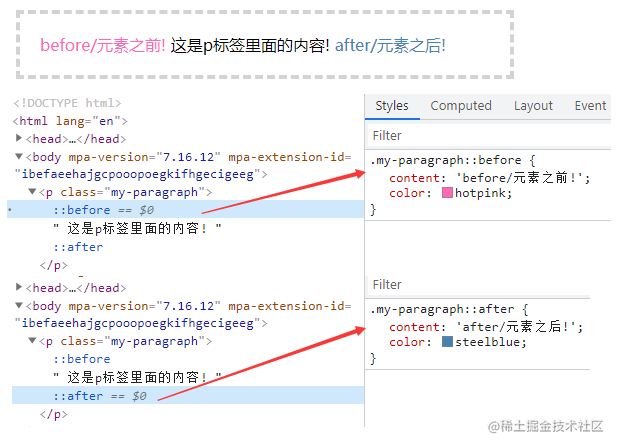
::before和::after可以添加到选择器以创建伪元素的关键字。伪元素被插入到与选择器匹配的元素内容之前或之后。
content属性
1)::before和::after下特有的content,用于在css渲染中向元素逻辑上的头部或尾部添加内容。
2)::before和::after必须配合content属性来使用,content用来定义插入的内容,content必须有值,至少是空
3)这些添加不会出现在DOM中,不会改变文档内容,不可复制,仅仅是在css渲染层加入。所以不要用:before或:after展示有实际意义的内容,尽量使用它们显示修饰性内容
content可取以下值:
string
使用引号包一段字符串,将会向元素内容中添加字符串
 p::before{
    content: "《";
    color: #000000;
}
p::after{
    content: "》";
    color:#000000;
}

JavaScript高级程序设计
attr()
通过attr()调用当前元素的属性,比如将图片alt提示文字或者链接的href地址显示出来。 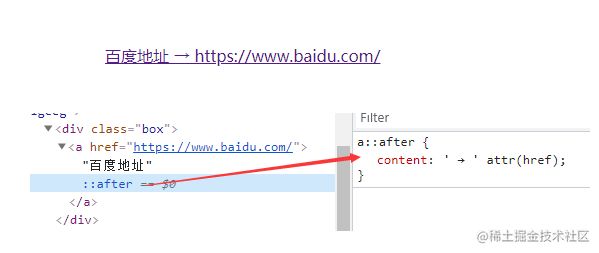
a::after {
    content: ' → ' attr(href); /* 在 href 前显示一个箭头 */
}

 百度地址
 a::after{
    content: "【" attr(href) "】";
}

百度地址
url()/uri()
用于引用媒体文件。比如:“百度”前面给出一张图片,后面给出href属性。 
a::before{
    content: url("img/baidu_jgylogo3.gif");
}
a::after{
    content:"("attr(href)")";
}

百度地址
注意
1)URL不能使用引号。如果你将URL用引号括起来,那么它会变成一个字符串和插入文本“url(image.jpg)”作为其内容,插入的而不是图像本身。
2)content属性,直接使用图片,即使写width,height也无法改变图片大小;
解决方案:如果要解决这个问题,可以把content:''写成空,使用background:url()来添加图片
/*伪元素添加图片:*/
.wrap:after{
    /*内容置为空*/
    content:"";
    /*设置背景图,并拉伸*/
    background:url("img/06.png") no-repeat center;
    /*必须设置此伪元素display*/
    display:inline-block;
    /*必须设置此伪元素大小(不会被图片撑开)*/
    background-size:100%;
    width:100px;
    height:100px;
}
3)苹果端伪元素不生效,img、input和其他的单标签是没有:after和:before伪元素的(在部分浏览器中没有,如:苹果端会发现无效),因为单标签本身不能有子元素。
解决方案:给img包一个div可以解决
4)想要动态改变伪元素的图片,可以给当前元素添加伪元素图片的基础样式,再动态class来写伪元素的图片。
::before和::after的应用
配合quotes 属性使用
 h1{
    quotes:"(" ")";  /*利用元素的quotes属性指定文字符号*/
}
h1::before{
    content:open-quote;
}
h1::after{
    content:close-quote;
}

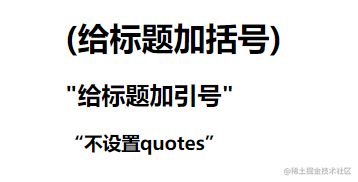
给标题加括号
加引号
 h2{
    quotes:"\"" "\"";  /*添加双引号要转义*/
}
h2::before{
    content:open-quote;
}
h2::after{
    content:close-quote;
}

给标题加引号
不指定,默认
 h3::before{
    content:open-quote;
}
h3::after{
    content:close-quote;
}

不设置quotes
装饰标题
h1 {
    display: grid;
    grid-template-columns: minmax(50px, 1fr) auto minmax(50px, 1fr);
    align-items: center;
    text-align: center;
    gap: 40px;
}

h1::before, h1::after {
    content: '';
    border-top: 6px double;
}

标题
布局是通过将
元素变成 3 列来实现的。左列和右列是双线,宽度均为minmax(50px, 1fr),这意味着它们的匹配宽度始终不小于50px。标题文本整齐地居中居中。
彩带标题
 h1 {
    position: relative;
    margin: 0 auto 20px;
    padding: 10px 40px;
    text-align: center;
    background-color: #875e46;
}

h1::before, h1::after {
    content: '';
    width: 80px;
    height: 100%;
    background-color: #724b34;

    /* 定位彩带两端形状的位置,并且放在最底层 */
    position: absolute;
    z-index: -1;
    top: 20px;

    /* 彩带两端的形状 */
    clip-path: polygon(0 0, 100% 0, 100% 100%, 0 100%, 25% 50%);

    /* 绘制并定位彩带的阴影三角形 */
    background-image: linear-gradient(45deg, transparent 50%, #5d3922 50%);
    background-size: 20px 20px;
    background-repeat: no-repeat;
    background-position: bottom right;
}

h1::before {
    left: -60px;
}

h1::after {
    right: -60px;
    transform: scaleX(-1); /* 水平翻转 */
}
---------------------------
 标题
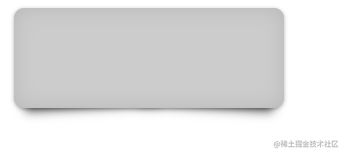
实现更逼真的阴影
.box{margin:10px;width:300px;height:100px;border-radius:10px;background:#ccc}
.shadow{position:relative;max-width:270px;box-shadow:0 1px 4px rgba(0,0,0,.3),0 0 20px rgba(0,0,0,.1) inset}
.shadow::after,.shadow::before{position:absolute;z-index:-1;content:""}
.shadow::after,.shadow::before{position:absolute;bottom:15px;left:10px;z-index:-1;width:50%;height:20%;content:""}
.shadow::after,.shadow::before{position:absolute;bottom:15px;left:10px;z-index:-1;width:50%;height:20%;box-shadow:0 15px 10px rgba(0,0,0,.7);content:"";transform:rotate(-3deg)}
.shadow::after{right:10px;left:auto;transform:rotate(3deg)}
替换内容
有些情况下content可以不使用::before或::after。如果content设置为单个图像,那么你可以直接在元素上使用它来替换该元素的 HTML 内容。
如页面上分别有以下三个内容:
加了replace类之后
.replace {
    content: url(img/replace.png);
}
1)具有简单文本的元素。它会被取代。
2)一个包含在其中的元素。它也会被取代。
3)直接一个元素。Firefox不会取代它,但其他浏览器会。
清除浮动
方式一:
.classic-clearfix::after {
    content: '';
    display: block;
    clear: both;
}
方式二:
.modern-clearfix {
    display: flow-root;
}
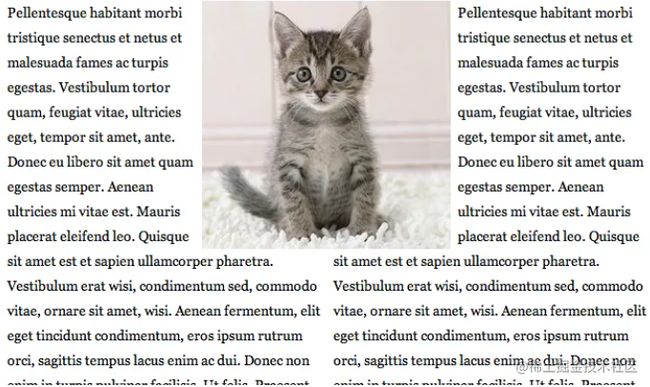
模拟float:center的效果
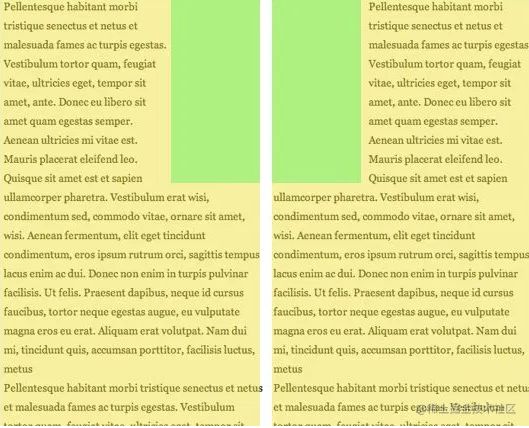
float没有center这个取值,但是可以通过伪类来模拟实现。
原理:左右通过::before float各自留出一半图片的位置,再把图片绝对定位上去。
body { font: 14px/1.8 Georgia, serif;}
#page-wrap { width: 60%; margin: 40px auto; position: relative; }
#logo { position: absolute; top: 0; left: 50%; margin-left: -125px; }
#l, #r { width: 49%; }
#l { float: left; }
#r { float: right; }
#l:before, #r:before { content: ""; width: 125px; height: 250px; }
#l:before { float: right; }
#r:before { float: left; }


            Pellentesque habitant morbi tristique senectus et netus et malesuada fames ac turpis egestas. Vestibulum tortor quam, feugiat vitae, ultricies eget, tempor sit amet, ante. Donec eu libero sit amet quam egestas semper. Aenean ultricies mi vitae est. Mauris placerat eleifend leo. Quisque sit amet est et sapien ullamcorper pharetra. Vestibulum erat wisi, condimentum sed, commodo vitae, ornare sit amet, wisi. Aenean fermentum, elit eget tincidunt condimentum, eros ipsum rutrum orci, sagittis tempus lacus enim ac dui. Donec non enim in turpis pulvinar facilisis. Ut felis. Praesent dapibus, neque id cursus faucibus, tortor neque egestas augue, eu vulputate magna eros eu erat. Aliquam erat volutpat. Nam dui mi, tincidunt quis, accumsan porttitor, facilisis luctus, metus


            Pellentesque habitant morbi tristique senectus et netus et malesuada fames ac turpis egestas. Vestibulum tortor quam, feugiat vitae, ultricies eget, tempor sit amet, ante. Donec eu libero sit amet quam egestas semper. Aenean ultricies mi vitae est. Mauris placerat eleifend leo. Quisque sit amet est et sapien ullamcorper pharetra. Vestibulum erat wisi, condimentum sed, commodo vitae, ornare sit amet, wisi. Aenean fermentum, elit eget tincidunt condimentum, eros ipsum rutrum orci, sagittis tempus lacus enim ac dui. Donec non enim in turpis pulvinar facilisis. Ut felis. Praesent dapibus, neque id cursus faucibus, tortor neque egestas augue, eu vulputate magna eros eu erat. Aliquam erat volutpat. Nam dui mi, tincidunt quis, accumsan porttitor, facilisis luctus, metus
引用参考:
W3C官方文档
Diving into the ::before and ::after Pseudo-Elements
Faking ‘float: center’ with Pseudo Elements
小可爱看完就点个赞再走吧!
