从零开始实现YOLO V3——day3损失函数与模型训练
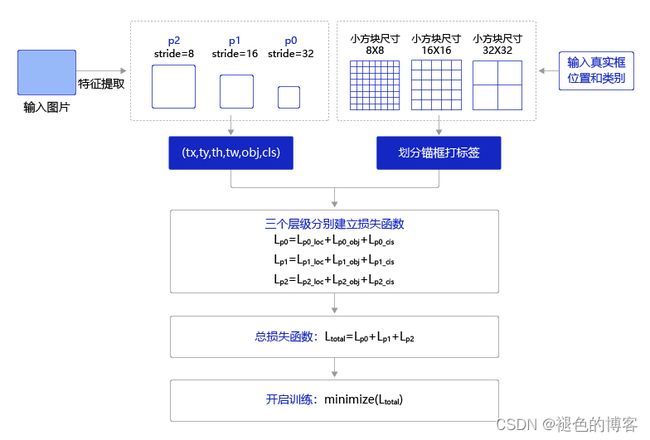
在Day2的内容中提到目标检测算法实际上需要完成3个机器学习的子任务,这三个任务分别是1)判断候选框内是否包含物体的2分类任务;2)识别候选框中图像类别的图片分类任务;3)预测框位置和大小的回归任务。所以一般目标检测任务都需要对这3个任务分布计算损失。
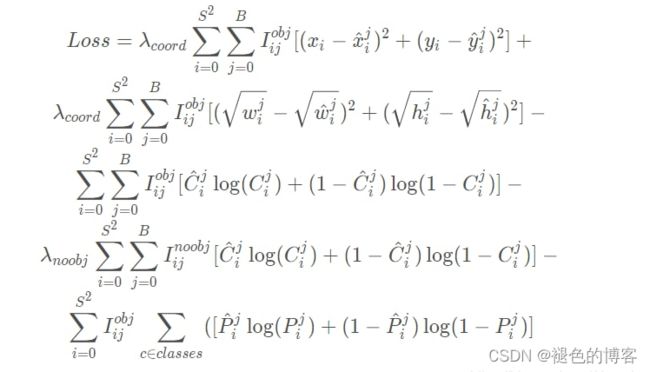
YOLO V3的损失函数
对掌握YOLO V3的论文里没有明确提所用的损失函数,确切地说,yolo系列论文里面只有yolo v1明确提了损失函数的公式。
对于每个预测框,Yolov3的损失函数主要包括3个部分:
- 对于正例,bounding box和ground true之间的位置坐标(x,y)和大小(w,h)的差异,采用MSE损失函数 『对应损失函数图中的1,2两行』
- 对于正例和负例,计算置信度和真实之间的交叉熵 『对应损失函数图中的3,4两行』
- 对于正例,计算80个类别维度与target的one-hot向量间的交叉熵损失 『对应损失函数图中的第5行』

对于计算预测框的位置和大小的损失(损失1),和计算图片分类的损失(损失3),这两个损失都比较容易计算,因为我们在Day2中已经知道了如何生成预测框,目标对应的图像类别也是事先知道的,对于之部分的损失可以直接计算。
但是现在有个问题,对于候选框中是否存在物体要如何实现呢?候选框的大小和数量都不是固定的,属于正例还是负例样本也是预先不可知的。只有先解决这个问题,才能计算其损失。

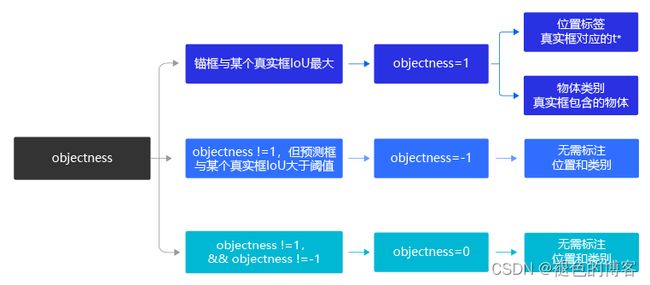
记得这张图吗?在Day2中我们了解了如何去标注信息。我们需要计算出所有候选框跟真实框之间的IoU,然后把那些IoU大于阈值的候选框挑选出来。将IoU阈值最大的候选框被标记为正例(1),其余样本标记为负例(0)。这是最直接的方法,但是存在一些问题,一些IoU很大但不是最大的候选框直接被判负例似乎不合理,你可以说说我不是最合适的,但不能说我不是。所以通常的做法是将哪些IoU大于阈值,但是又不是最大值的框置为-1,即表示不参与损失计算,小于阈值的标记为负例。
例如将阈值设置为0.7,此时有一个候选框于真实框的IoU为0.9,还有三个IoU为0.8,0.5,0.1的候选框。毫无疑问0.9的框被标记为正例(即包含物体),但是0.8的就不包含物体了吗?显然它也包含了大部分物体,只是他不是最合适的一个,此时如果将其设置为负例,会影响损失的计算。所以应该将0.8标记为不参与损失计算,其余小于阈值的标记为负例。
挑选出跟真实框IoU大于阈值的预测框
# 挑选出跟真实框IoU大于阈值的预测框
def get_iou_above_thresh_inds(pred_box, gt_boxes, iou_threshold):
    batchsize = pred_box.shape[0]
    num_rows = pred_box.shape[1]
    num_cols = pred_box.shape[2]
    num_anchors = pred_box.shape[3]
    ret_inds = np.zeros([batchsize, num_rows, num_cols, num_anchors])
    for i in range(batchsize):
        pred_box_i = pred_box[i]
        gt_boxes_i = gt_boxes[i]
        for k in range(len(gt_boxes_i)): #gt in gt_boxes_i:
            gt = gt_boxes_i[k]
            gtx_min = gt[0] - gt[2] / 2.
            gty_min = gt[1] - gt[3] / 2.
            gtx_max = gt[0] + gt[2] / 2.
            gty_max = gt[1] + gt[3] / 2.
            if (gtx_max - gtx_min < 1e-3) or (gty_max - gty_min < 1e-3):
                continue
            x1 = np.maximum(pred_box_i[:, :, :, 0], gtx_min)
            y1 = np.maximum(pred_box_i[:, :, :, 1], gty_min)
            x2 = np.minimum(pred_box_i[:, :, :, 2], gtx_max)
            y2 = np.minimum(pred_box_i[:, :, :, 3], gty_max)
            intersection = np.maximum(x2 - x1, 0.) * np.maximum(y2 - y1, 0.)
            s1 = (gty_max - gty_min) * (gtx_max - gtx_min)
            s2 = (pred_box_i[:, :, :, 2] - pred_box_i[:, :, :, 0]) * (pred_box_i[:, :, :, 3] - pred_box_i[:, :, :, 1])
            union = s2 + s1 - intersection
            iou = intersection / union
            above_inds = np.where(iou > iou_threshold)
            ret_inds[i][above_inds] = 1
    ret_inds = np.transpose(ret_inds, (0,3,1,2))
    return ret_inds.astype('bool')
上面的函数可以得到哪些锚框的objectness需要被标注为-1,通过下面的程序,对label_objectness进行处理,将IoU大于阈值,但又不是正样本的锚框标注为-1。
def label_objectness_ignore(label_objectness, iou_above_thresh_indices):
    # 注意:这里不能简单的使用 label_objectness[iou_above_thresh_indices] = -1,
    #         这样可能会造成label_objectness为1的点被设置为-1了
    #         只有将那些被标注为0,且与真实框IoU超过阈值的预测框才被标注为-1
    negative_indices = (label_objectness < 0.5)
    ignore_indices = negative_indices * iou_above_thresh_indices
    label_objectness[ignore_indices] = -1
    return label_objectness
通过调用这两个函数,即可实现将IoU最大的标记为正样本,将IoU小于阈值的标记为负样本,将IoU大于阈值但又不是最大的部分预测框的label_objectness设置为-1。
损失函数的定义
# 读取数据
def get_loss(output, label_objectness, label_location, label_classification, scales, num_anchors=3, num_classes=7):
    # 将output从[N, C, H, W]变形为[N, NUM_ANCHORS, NUM_CLASSES + 5, H, W]
    reshaped_output = paddle.reshape(output, [-1, num_anchors, num_classes + 5, output.shape[2], output.shape[3]])
    # 从output中取出跟objectness相关的预测值
    pred_objectness = reshaped_output[:, :, 4, :, :]
    loss_objectness = F.binary_cross_entropy_with_logits(pred_objectness, label_objectness, reduction="none")
    # pos_samples 只有在正样本的地方取值为1.,其它地方取值全为0.
    pos_objectness = label_objectness > 0
    pos_samples = paddle.cast(pos_objectness, 'float32')
    pos_samples.stop_gradient=True
    # 从output中取出所有跟位置相关的预测值
    tx = reshaped_output[:, :, 0, :, :]
    ty = reshaped_output[:, :, 1, :, :]
    tw = reshaped_output[:, :, 2, :, :]
    th = reshaped_output[:, :, 3, :, :]
    # 从label_location中取出各个位置坐标的标签
    dx_label = label_location[:, :, 0, :, :]
    dy_label = label_location[:, :, 1, :, :]
    tw_label = label_location[:, :, 2, :, :]
    th_label = label_location[:, :, 3, :, :]
    # 构建预测框位置与大小的损失函数
    loss_location_x = F.binary_cross_entropy_with_logits(tx, dx_label, reduction="none")
    loss_location_y = F.binary_cross_entropy_with_logits(ty, dy_label, reduction="none")
    loss_location_w = paddle.abs(tw - tw_label)
    loss_location_h = paddle.abs(th - th_label)
    # 计算总的位置损失函数
    loss_location = loss_location_x + loss_location_y + loss_location_h + loss_location_w
    # 乘以scales
    loss_location = loss_location * scales
    # 只计算正样本的位置损失函数
    loss_location = loss_location * pos_samples
    # 从output取出所有跟物体类别相关的像素点
    pred_classification = reshaped_output[:, :, 5:5+num_classes, :, :]
    # 计算分类相关的损失函数
    loss_classification = F.binary_cross_entropy_with_logits(pred_classification, label_classification, reduction="none")
    # 将第2维求和
    loss_classification = paddle.sum(loss_classification, axis=2)
    # 只计算objectness为正的样本的分类损失函数
    loss_classification = loss_classification * pos_samples
    total_loss = loss_objectness + loss_location + loss_classification
    # 对所有预测框的loss进行求和
    total_loss = paddle.sum(total_loss, axis=[1,2,3])
    # 对所有样本求平均
    total_loss = paddle.mean(total_loss)

    return total_loss
测试代码
from paddle.nn import Conv2D

# 计算出锚框对应的标签
label_objectness, label_location, label_classification, scale_location = get_objectness_label(img, gt_boxes, gt_labels, iou_threshold = 0.7, anchors = [116, 90, 156, 198, 373, 326], num_classes=7, downsample=32)

NUM_ANCHORS = 3
NUM_CLASSES = 7
num_filters=NUM_ANCHORS * (NUM_CLASSES + 5)

backbone = DarkNet53_conv_body()
detection = YoloDetectionBlock(ch_in=1024, ch_out=512)
conv2d_pred = Conv2D(in_channels=1024, out_channels=num_filters,  kernel_size=1)

x = paddle.to_tensor(img)
C0, C1, C2 = backbone(x)
route, tip = detection(C0)
P0 = conv2d_pred(tip)
# anchors包含了预先设定好的锚框尺寸
anchors = [116, 90, 156, 198, 373, 326]
# downsample是特征图P0的步幅
pred_boxes = get_yolo_box_xxyy(P0.numpy(), anchors, num_classes=7, downsample=32)
iou_above_thresh_indices = get_iou_above_thresh_inds(pred_boxes, gt_boxes, iou_threshold=0.7)
label_objectness = label_objectness_ignore(label_objectness, iou_above_thresh_indices)

label_objectness = paddle.to_tensor(label_objectness)
label_location = paddle.to_tensor(label_location)
label_classification = paddle.to_tensor(label_classification)
scales = paddle.to_tensor(scale_location)
label_objectness.stop_gradient=True
label_location.stop_gradient=True
label_classification.stop_gradient=True
scales.stop_gradient=True

total_loss = get_loss(P0, label_objectness, label_location, label_classification, scales,
                          num_anchors=NUM_ANCHORS, num_classes=NUM_CLASSES)
total_loss_data = total_loss.numpy()
print(total_loss_data)
#程序会输出Loss值
paddle框架对YOLO算法进行了封装,可以直接使用YOLO提供的损失函数计算损失(paddle.vision.ops.yolo_loss),下面是基于paddle框架提供的损失函数和Day2中实现的模块搭建一个YOLO V3
# 定义上采样模块
class YOLOv3(paddle.nn.Layer):
    def __init__(self, num_classes=7):
        super(YOLOv3,self).__init__()
        self.num_classes = num_classes
        # 提取图像特征的骨干代码
        self.block = DarkNet53_conv_body()
        self.block_outputs = []
        self.yolo_blocks = []
        self.route_blocks_2 = []
        # 生成3个层级的特征图P0, P1, P2
        for i in range(3):
            # 添加从ci生成ri和ti的模块
            yolo_block = self.add_sublayer(
                "yolo_detecton_block_%d" % (i),
                YoloDetectionBlock(
                                   ch_in=512//(2**i)*2 if i==0 else 512//(2**i)*2 + 512//(2**i),
                                   ch_out = 512//(2**i)))
            self.yolo_blocks.append(yolo_block)

            num_filters = 3 * (self.num_classes + 5)

            # 添加从ti生成pi的模块,这是一个Conv2D操作,输出通道数为3 * (num_classes + 5)
            block_out = self.add_sublayer(
                "block_out_%d" % (i),
                paddle.nn.Conv2D(in_channels=512//(2**i)*2,
                       out_channels=num_filters,
                       kernel_size=1,
                       stride=1,
                       padding=0,
                       weight_attr=paddle.ParamAttr(
                           initializer=paddle.nn.initializer.Normal(0., 0.02)),
                       bias_attr=paddle.ParamAttr(
                           initializer=paddle.nn.initializer.Constant(0.0),
                           regularizer=paddle.regularizer.L2Decay(0.))))
            self.block_outputs.append(block_out)
            if i < 2:
                # 对ri进行卷积
                route = self.add_sublayer("route2_%d"%i,
                                          ConvBNLayer(ch_in=512//(2**i),
                                                      ch_out=256//(2**i),
                                                      kernel_size=1,
                                                      stride=1,
                                                      padding=0))
                self.route_blocks_2.append(route)
            # 将ri放大以便跟c_{i+1}保持同样的尺寸
            self.upsample = Upsample()
    def forward(self, inputs):
        outputs = []
        blocks = self.block(inputs)
        for i, block in enumerate(blocks):
            if i > 0:
                # 将r_{i-1}经过卷积和上采样之后得到特征图,与这一级的ci进行拼接
                block = paddle.concat([route, block], axis=1)
            # 从ci生成ti和ri
            route, tip = self.yolo_blocks[i](block)
            # 从ti生成pi
            block_out = self.block_outputs[i](tip)
            # 将pi放入列表
            outputs.append(block_out)

            if i < 2:
                # 对ri进行卷积调整通道数
                route = self.route_blocks_2[i](route)
                # 对ri进行放大,使其尺寸和c_{i+1}保持一致
                route = self.upsample(route)

        return outputs

    def get_loss(self, outputs, gtbox, gtlabel, gtscore=None,
                 anchors = [10, 13, 16, 30, 33, 23, 30, 61, 62, 45, 59, 119, 116, 90, 156, 198, 373, 326],
                 anchor_masks = [[6, 7, 8], [3, 4, 5], [0, 1, 2]],
                 ignore_thresh=0.7,
                 use_label_smooth=False):
        """
        使用paddle.vision.ops.yolo_loss,直接计算损失函数,过程更简洁,速度也更快
        """
        self.losses = []
        downsample = 32
        for i, out in enumerate(outputs): # 对三个层级分别求损失函数
            anchor_mask_i = anchor_masks[i]
            loss = paddle.vision.ops.yolo_loss(
                    x=out,  # out是P0, P1, P2中的一个
                    gt_box=gtbox,  # 真实框坐标
                    gt_label=gtlabel,  # 真实框类别
                    gt_score=gtscore,  # 真实框得分,使用mixup训练技巧时需要,不使用该技巧时直接设置为1,形状与gtlabel相同
                    anchors=anchors,   # 锚框尺寸,包含[w0, h0, w1, h1, ..., w8, h8]共9个锚框的尺寸
                    anchor_mask=anchor_mask_i, # 筛选锚框的mask,例如anchor_mask_i=[3, 4, 5],将anchors中第3、4、5个锚框挑选出来给该层级使用
                    class_num=self.num_classes, # 分类类别数
                    ignore_thresh=ignore_thresh, # 当预测框与真实框IoU > ignore_thresh,标注objectness = -1
                    downsample_ratio=downsample, # 特征图相对于原图缩小的倍数,例如P0是32, P1是16,P2是8
                    use_label_smooth=False)      # 使用label_smooth训练技巧时会用到,这里没用此技巧,直接设置为False
            self.losses.append(paddle.mean(loss))  #mean对每张图片求和
            downsample = downsample // 2 # 下一级特征图的缩放倍数会减半
        return sum(self.losses) # 对每个层级求和
如果不想使用paddle,那么可以把(loss = paddle.vision.ops.yolo_loss(…))换成上面自己实现的损失函数。
模型的训练

目标检测数据的格式一般为COCO或者VOC,这里不作过多说明,不懂可以自己搜索,下面给出训练代码
import time
import os
import paddle

ANCHORS = [10, 13, 16, 30, 33, 23, 30, 61, 62, 45, 59, 119, 116, 90, 156, 198, 373, 326]

ANCHOR_MASKS = [[6, 7, 8], [3, 4, 5], [0, 1, 2]]

IGNORE_THRESH = .7
NUM_CLASSES = 7

def get_lr(base_lr = 0.0001, lr_decay = 0.1):
    bd = [10000, 20000]
    lr = [base_lr, base_lr * lr_decay, base_lr * lr_decay * lr_decay]
    learning_rate = paddle.optimizer.lr.PiecewiseDecay(boundaries=bd, values=lr)
    return learning_rate


if __name__ == '__main__':
	#数据路径
    TRAINDIR = '/home/aistudio/work/insects/train'
    TESTDIR = '/home/aistudio/work/insects/test'
    VALIDDIR = '/home/aistudio/work/insects/val'
    # paddle.device.set_device("gpu:0")
    # 创建数据读取类
    train_dataset = TrainDataset(TRAINDIR, mode='train')
    valid_dataset = TrainDataset(VALIDDIR, mode='valid')
    test_dataset = TrainDataset(VALIDDIR, mode='valid')
    # 使用paddle.io.DataLoader创建数据读取器,并设置batchsize,进程数量num_workers等参数
    train_loader = paddle.io.DataLoader(train_dataset, batch_size=10, shuffle=True, num_workers=0, drop_last=True, use_shared_memory=False)
    valid_loader = paddle.io.DataLoader(valid_dataset, batch_size=10, shuffle=False, num_workers=0, drop_last=False, use_shared_memory=False)
    model = YOLOv3(num_classes = NUM_CLASSES)  #创建模型
    learning_rate = get_lr()
    opt = paddle.optimizer.Momentum(
                 learning_rate=learning_rate,
                 momentum=0.9,
                 weight_decay=paddle.regularizer.L2Decay(0.0005),
                 parameters=model.parameters())  #创建优化器
    # opt = paddle.optimizer.Adam(learning_rate=learning_rate, weight_decay=paddle.regularizer.L2Decay(0.0005), parameters=model.parameters())

    MAX_EPOCH = 200
    for epoch in range(MAX_EPOCH):
        for i, data in enumerate(train_loader()):
            img, gt_boxes, gt_labels, img_scale = data
            gt_scores = np.ones(gt_labels.shape).astype('float32')
            gt_scores = paddle.to_tensor(gt_scores)
            img = paddle.to_tensor(img)
            gt_boxes = paddle.to_tensor(gt_boxes)
            gt_labels = paddle.to_tensor(gt_labels)
            outputs = model(img)  #前向传播,输出[P0, P1, P2]
            loss = model.get_loss(outputs, gt_boxes, gt_labels, gtscore=gt_scores,
                                  anchors = ANCHORS,
                                  anchor_masks = ANCHOR_MASKS,
                                  ignore_thresh=IGNORE_THRESH,
                                  use_label_smooth=False)        # 计算损失函数

            loss.backward()    # 反向传播计算梯度
            opt.step()  # 更新参数
            opt.clear_grad()
            if i % 10 == 0:
                timestring = time.strftime("%Y-%m-%d %H:%M:%S",time.localtime(time.time()))
                print('{}[TRAIN]epoch {}, iter {}, output loss: {}'.format(timestring, epoch, i, loss.numpy()))

        # save params of model
        if (epoch % 5 == 0) or (epoch == MAX_EPOCH -1):
            paddle.save(model.state_dict(), 'yolo_epoch{}'.format(epoch))

        # 每个epoch结束之后在验证集上进行测试
        model.eval()
        for i, data in enumerate(valid_loader()):
            img, gt_boxes, gt_labels, img_scale = data
            gt_scores = np.ones(gt_labels.shape).astype('float32')
            gt_scores = paddle.to_tensor(gt_scores)
            img = paddle.to_tensor(img)
            gt_boxes = paddle.to_tensor(gt_boxes)
            gt_labels = paddle.to_tensor(gt_labels)
            outputs = model(img)
            loss = model.get_loss(outputs, gt_boxes, gt_labels, gtscore=gt_scores,
                                  anchors = ANCHORS,
                                  anchor_masks = ANCHOR_MASKS,
                                  ignore_thresh=IGNORE_THRESH,
                                  use_label_smooth=False)
            if i % 1 == 0:
                timestring = time.strftime("%Y-%m-%d %H:%M:%S",time.localtime(time.time()))
                print('{}[VALID]epoch {}, iter {}, output loss: {}'.format(timestring, epoch, i, loss.numpy()))
        model.train()
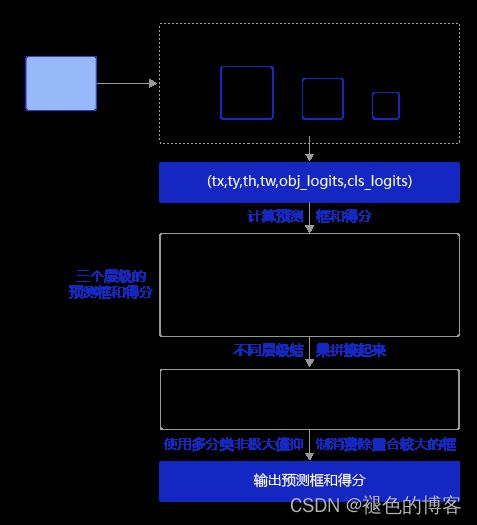
- 通过网络输出计算出预测框位置和所属类别的得分。
- 使用非极大值抑制来消除重叠较大的预测框。
def get_pred(self,
                 outputs,
                 im_shape=None,
                 anchors = [10, 13, 16, 30, 33, 23, 30, 61, 62, 45, 59, 119, 116, 90, 156, 198, 373, 326],
                 anchor_masks = [[6, 7, 8], [3, 4, 5], [0, 1, 2]],
                 valid_thresh = 0.01):
        downsample = 32
        total_boxes = []
        total_scores = []
        for i, out in enumerate(outputs):
            anchor_mask = anchor_masks[i]
            anchors_this_level = []
            for m in anchor_mask:
                anchors_this_level.append(anchors[2 * m])
                anchors_this_level.append(anchors[2 * m + 1])

            boxes, scores = paddle.vision.ops.yolo_box(
                   x=out,
                   img_size=im_shape,
                   anchors=anchors_this_level,
                   class_num=self.num_classes,
                   conf_thresh=valid_thresh,
                   downsample_ratio=downsample,
                   name="yolo_box" + str(i))
            total_boxes.append(boxes)
            total_scores.append(
                        paddle.transpose(
                        scores, perm=[0, 2, 1]))
            downsample = downsample // 2

        yolo_boxes = paddle.concat(total_boxes, axis=1)
        yolo_scores = paddle.concat(total_scores, axis=2)
        return yolo_boxes, yolo_scores
第1步的计算结果会在每个小方块区域上生成多个预测框,而这些预测框中很多都有较大的重合度,因此需要消除重叠较大的冗余检测框。
非极大值抑制(non-maximum suppression, nms)用来消除冗余框。基本思想是,如果有多个预测框都对应同一个物体,则只选出得分最高的那个预测框,剩下的预测框被丢弃掉。
如何判断两个预测框对应的是同一个物体呢,标准该怎么设置?
如果两个预测框的类别一样,而且他们的位置重合度比较大,则可以认为他们是在预测同一个目标。非极大值抑制的做法是,选出某个类别得分最高的预测框,然后看哪些预测框跟它的IoU大于阈值,就把这些预测框给丢弃掉。这里IoU的阈值是超参数,需要提前设置,YOLOv3模型里面设置的是0.5。
非极大值抑制的具体实现代码如下面的nms函数的定义,需要说明的是数据集中含有多个类别的物体,所以这里需要做多分类非极大值抑制,其实现原理与非极大值抑制相同,区别在于需要对每个类别都做非极大值抑制,实现代码如下面的multiclass_nms所示。
# 非极大值抑制
def nms(bboxes, scores, score_thresh, nms_thresh, pre_nms_topk, i=0, c=0):
    """
    nms
    """
    inds = np.argsort(scores)
    inds = inds[::-1]
    keep_inds = []
    while(len(inds) > 0):
        cur_ind = inds[0]
        cur_score = scores[cur_ind]
        # if score of the box is less than score_thresh, just drop it
        if cur_score < score_thresh:
            break

        keep = True
        for ind in keep_inds:
            current_box = bboxes[cur_ind]
            remain_box = bboxes[ind]
            iou = box_iou_xyxy(current_box, remain_box)
            if iou > nms_thresh:
                keep = False
                break
        if i == 0 and c == 4 and cur_ind == 951:
            print('suppressed, ', keep, i, c, cur_ind, ind, iou)
        if keep:
            keep_inds.append(cur_ind)
        inds = inds[1:]

    return np.array(keep_inds)

# 多分类非极大值抑制
def multiclass_nms(bboxes, scores, score_thresh=0.01, nms_thresh=0.45, pre_nms_topk=1000, pos_nms_topk=100):
    """
    This is for multiclass_nms
    """
    batch_size = bboxes.shape[0]
    class_num = scores.shape[1]
    rets = []
    for i in range(batch_size):
        bboxes_i = bboxes[i]
        scores_i = scores[i]
        ret = []
        for c in range(class_num):
            scores_i_c = scores_i[c]
            keep_inds = nms(bboxes_i, scores_i_c, score_thresh, nms_thresh, pre_nms_topk, i=i, c=c)
            if len(keep_inds) < 1:
                continue
            keep_bboxes = bboxes_i[keep_inds]
            keep_scores = scores_i_c[keep_inds]
            keep_results = np.zeros([keep_scores.shape[0], 6])
            keep_results[:, 0] = c
            keep_results[:, 1] = keep_scores[:]
            keep_results[:, 2:6] = keep_bboxes[:, :]
            ret.append(keep_results)
        if len(ret) < 1:
            rets.append(ret)
            continue
        ret_i = np.concatenate(ret, axis=0)
        scores_i = ret_i[:, 1]
        if len(scores_i) > pos_nms_topk:
            inds = np.argsort(scores_i)[::-1]
            inds = inds[:pos_nms_topk]
            ret_i = ret_i[inds]

        rets.append(ret_i)

    return rets
以上已经是一个完整的YOLO V3的模型了。下面是做一些可视化和加载预训练权重。
模型效果及可视化展示
创建数据读取器以读取单张图片的数据
# 读取单张测试图片
def single_image_data_loader(filename, test_image_size=608, mode='test'):
    """
    加载测试用的图片,测试数据没有groundtruth标签
    """
    batch_size= 1
    def reader():
        batch_data = []
        img_size = test_image_size
        file_path = os.path.join(filename)
        img = cv2.imread(file_path)
        img = cv2.cvtColor(img, cv2.COLOR_BGR2RGB)
        H = img.shape[0]
        W = img.shape[1]
        img = cv2.resize(img, (img_size, img_size))

        mean = [0.485, 0.456, 0.406]
        std = [0.229, 0.224, 0.225]
        mean = np.array(mean).reshape((1, 1, -1))
        std = np.array(std).reshape((1, 1, -1))
        out_img = (img / 255.0 - mean) / std
        out_img = out_img.astype('float32').transpose((2, 0, 1))
        img = out_img #np.transpose(out_img, (2,0,1))
        im_shape = [H, W]

        batch_data.append((image_name.split('.')[0], img, im_shape))
        if len(batch_data) == batch_size:
            yield make_test_array(batch_data)
            batch_data = []

    return reader
定义绘制预测框的画图函数
# 定义画图函数
INSECT_NAMES = ['Boerner', 'Leconte', 'Linnaeus',
                'acuminatus', 'armandi', 'coleoptera', 'linnaeus']

# 定义画矩形框的函数
def draw_rectangle(currentAxis, bbox, edgecolor = 'k', facecolor = 'y', fill=False, linestyle='-'):
    # currentAxis,坐标轴,通过plt.gca()获取
    # bbox,边界框,包含四个数值的list, [x1, y1, x2, y2]
    # edgecolor,边框线条颜色
    # facecolor,填充颜色
    # fill, 是否填充
    # linestype,边框线型
    # patches.Rectangle需要传入左上角坐标、矩形区域的宽度、高度等参数
    rect=patches.Rectangle((bbox[0], bbox[1]), bbox[2]-bbox[0]+1, bbox[3]-bbox[1]+1, linewidth=1,
                           edgecolor=edgecolor,facecolor=facecolor,fill=fill, linestyle=linestyle)
    currentAxis.add_patch(rect)

# 定义绘制预测结果的函数
def draw_results(result, filename, draw_thresh=0.5):
    plt.figure(figsize=(10, 10))
    im = imread(filename)
    plt.imshow(im)
    currentAxis=plt.gca()
    colors = ['r', 'g', 'b', 'k', 'y', 'c', 'purple']
    for item in result:
        box = item[2:6]
        label = int(item[0])
        name = INSECT_NAMES[label]
        if item[1] > draw_thresh:
            draw_rectangle(currentAxis, box, edgecolor = colors[label])
            plt.text(box[0], box[1], name, fontsize=12, color=colors[label])
使用上面定义的single_image_data_loader函数读取指定的图片,输入网络并计算出预测框和得分,然后使用多分类非极大值抑制消除冗余的框。将最终结果画图展示出来
import json

import paddle

ANCHORS = [10, 13, 16, 30, 33, 23, 30, 61, 62, 45, 59, 119, 116, 90, 156, 198, 373, 326]
ANCHOR_MASKS = [[6, 7, 8], [3, 4, 5], [0, 1, 2]]
VALID_THRESH = 0.01
NMS_TOPK = 400
NMS_POSK = 100
NMS_THRESH = 0.45

NUM_CLASSES = 7
if __name__ == '__main__':
    image_name = '/home/aistudio/work/insects/test/images/2599.jpeg'
    #预训练权重
    params_file_path = '/home/aistudio/yolo_epoch50.pdparams'

    model = YOLOv3(num_classes=NUM_CLASSES)
    model_state_dict = paddle.load(params_file_path)
    model.load_dict(model_state_dict)
    model.eval()

    total_results = []
    test_loader = single_image_data_loader(image_name, mode='test')
    for i, data in enumerate(test_loader()):
        img_name, img_data, img_scale_data = data
        img = paddle.to_tensor(img_data)
        img_scale = paddle.to_tensor(img_scale_data)

        outputs = model.forward(img)
        bboxes, scores = model.get_pred(outputs,
                                 im_shape=img_scale,
                                 anchors=ANCHORS,
                                 anchor_masks=ANCHOR_MASKS,
                                 valid_thresh = VALID_THRESH)

        bboxes_data = bboxes.numpy()
        scores_data = scores.numpy()
        results = multiclass_nms(bboxes_data, scores_data,
                      score_thresh=VALID_THRESH,
                      nms_thresh=NMS_THRESH,
                      pre_nms_topk=NMS_TOPK,
                      pos_nms_topk=NMS_POSK)

result = results[0]
draw_results(result, image_name, draw_thresh=0.5)
