安卓APP使用CH340进行串口通信
大纲
-
- 缘由
- 解读安卓串口通信流程
-
- 1. 下载lib库
- 2. 初始化流程
- 3. 收发流程
- 编写串口通信APP
-
- 1. 导入lib库
- 2. 布局
- 3. 编写java代码
- 4. 测试
- 5. USB插拔检测
- 附代码
缘由
毕业设计要求使用手机APP与单片机硬件进行有线通信,至于为什么不用蓝牙、无线,我也不知道 。有线通信,无非就是USB或者串口,USB不是所有的单片机都有,但是几乎所有的单片机都带有串口,而且USB协议比较复杂,最终决定采用串口通信。
安卓手机只有一个USB接口,要想与硬件(如单片机)进行有线的串口通信,就需要用到USB转串口芯片,将USB协议转为串口协议。

CH340系列芯片是南京沁恒微公司的系列USB转串口芯片,广泛应用,官网还有已经做好的Jar库,对于我这样的Android小白,直接拿来用不是很舒服?。
本篇博客就用来记录一下这个串口通信APP的实现过程。
解读安卓串口通信流程
1. 下载lib库
先去官网下载CH340/CH341的USB转串口安卓免驱应用库:
http://www.wch.cn/downloads/CH341SER_ANDROID_ZIP.html
- apk目录里是示例APP的安装包,可以安装到手机上进行测试;
- 在Demo目录中是示例App的Eclipse安卓工程,可以用Android Studio导入简单的看下;
- lib里就是我们需要用到的jar lib库,带no_toast版本的是没有默认toast提示信息的库;
- pdf是使用引导;

2. 初始化流程
PDF中介绍了使用CH34x系列芯片进行串口通信的基本流程:

通过Demo的安卓工程也可以确认各个函数的调用过程:
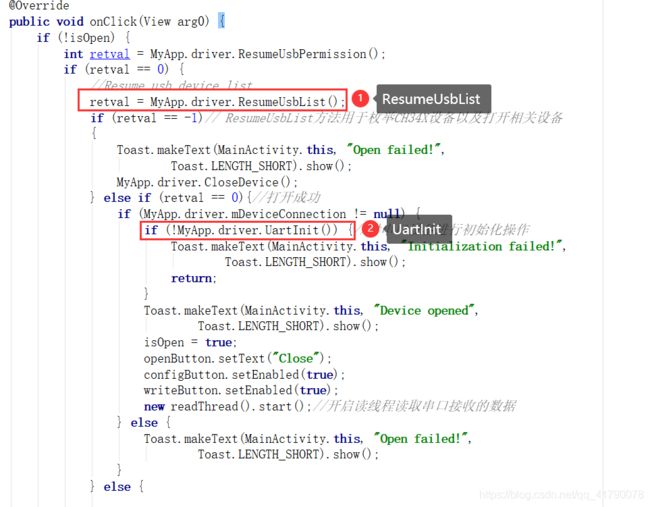
SetConfig在config Button点击事件中调用
- 三个函数的介绍:
3. 收发流程
串口收发调用下面的函数即可:
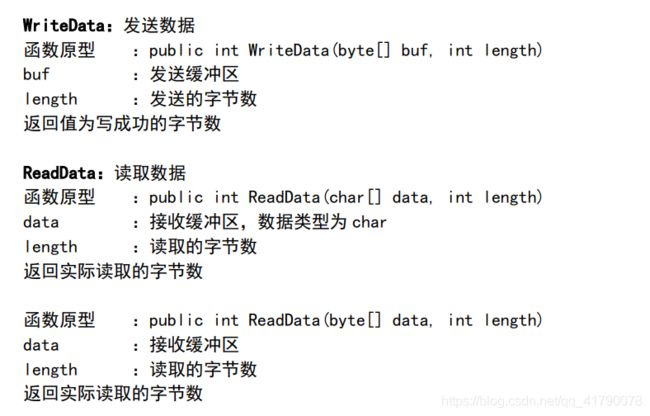
注意:
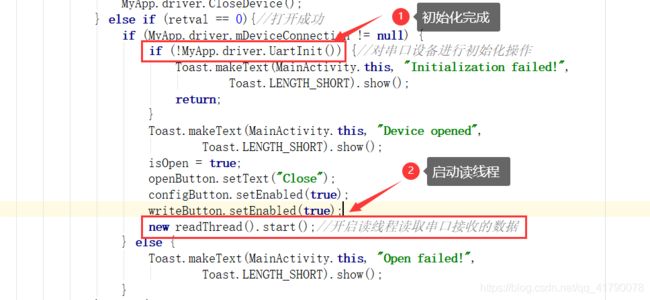
当我们需要发送数据时,直接调用WriteData函数即可,但是接收数据就需要用到多线程的方法。我们需要开启一个读数据的线程,在后台一直循环等待数据到来,如果不这样做,接收数据的实时性就会比较差。
示例的Demo中写了一个readThread 类,在初始化完成后随即实例化一个readThread 对象,创建读线程。
private class readThread extends Thread {

	public void run() {

		byte[] buffer = new byte[4096];

		while (true) {

			Message msg = Message.obtain();
			if (!isOpen) {
				break;
			}
			int length = MyApp.driver.ReadData(buffer, 4096);
			if (length > 0) {
				String recv = toHexString(buffer, length);	//以16进制形式输出
//					String recv = new String(buffer, 0, length);//以字符串形式输出
				msg.obj = recv;
				handler.sendMessage(msg);
			}
		}
	}
}
读线程中一直在循环中等待数据,一旦收到数据便通过Handler发送出去,在主线程中Handler将接收到的数据更新到控件上或打印出来即可。Handler是Android中一种处理消息的机制。

编写串口通信APP
思路已经理清了,下面就可以自己写一个APP进行串口收发测试了。
1. 导入lib库
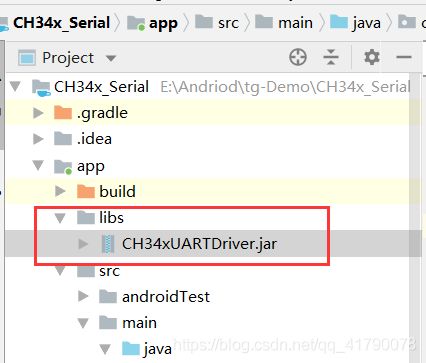
把jar中的其中一个库,这里使用带Toast提示信息的库,复制到工程libs目录下,然后右键选择Add As Library…
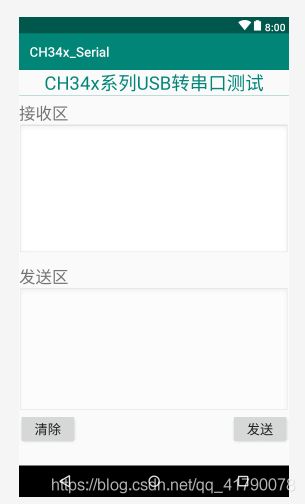
2. 布局
3. 编写java代码
在MainActivity中编写主要代码,先讲一下我的代码思路:
- App启动后直接进行获取USB设备列表,进行串口初始化、配置参数
- 发送按钮的点击事件中发送数据,将EditText中文本发送出去
- 接收数据使用一个独立线程,循环等待,读取后通过handler发送给主线程
OnCreate主线程中代码:
    protected void onCreate(Bundle savedInstanceState) {
        super.onCreate(savedInstanceState);
        setContentView(R.layout.activity_main);

        InitUI();//初始化页面控件
        InitCH34xUART();//初始化串口
		//发送按钮
        Btn_Send.setOnClickListener(new View.OnClickListener() {
            @Override
            public void onClick(View v) {
//                Toast.makeText(getApplicationContext(),Et_Send.getText().toString(),Toast.LENGTH_SHORT).show();
				//发送数据
                CH34xWriteData();
            }
        });
		//清除按钮
        Btn_clear.setOnClickListener(new View.OnClickListener() {
            @Override
            public void onClick(View v) {
//                Toast.makeText(getApplicationContext(),"clear",Toast.LENGTH_SHORT).show();
                Et_Send.setText("");
                Tv_Read.setText("");
            }
        });
        //创建handler对象,用于接收读线程收到的数据
        handler = new Handler(){
            @Override
            public void handleMessage(@NonNull Message msg) {
                super.handleMessage(msg);
                Tv_Read.append(msg.obj.toString());
                Toast.makeText(getApplicationContext(),msg.obj.toString(),Toast.LENGTH_SHORT).show();
            }
        };
}
InitCH34xUART初始化串口:
private void InitCH34xUART(){
    //创建CH34x设备对象
    CH34x_Driver = new CH34xUARTDriver(
            (UsbManager) getSystemService(Context.USB_SERVICE), this,
            ACTION_USB_PERMISSION);
    //判断是否支持SB HOSTU
    if(!CH34x_Driver.UsbFeatureSupported()){//不支持,弹出提示窗口
        Dialog dialog = new AlertDialog.Builder(MainActivity.this)
                .setTitle("提示")
                .setMessage("您的手机不支持USB HOST,请更换其他手机再试!")
                .setPositiveButton("确认",
                        new DialogInterface.OnClickListener() {

                            @Override
                            public void onClick(DialogInterface arg0, int arg1) {
                                System.exit(0);
                            }
                        }).create();
        dialog.setCanceledOnTouchOutside(false);
        dialog.show();
    }else{
        //1、ResumeUsbList 获取USB设备列表
        int retval = CH34x_Driver.ResumeUsbList();
        if(retval == -1){//打开失败,关闭设备
            Toast.makeText(MainActivity.this, "打开USB设备失败!", Toast.LENGTH_SHORT).show();
            CH34x_Driver.CloseDevice();
        }else if(retval == 0){//打开成功
            //2、UartInit初始化串口
            if(!CH34x_Driver.UartInit()){//初始化失败
                Toast.makeText(MainActivity.this, "初始化失败!", Toast.LENGTH_SHORT).show();
                return;
            }else{
//                    Toast.makeText(MainActivity.this, "打开并初始化成功!", Toast.LENGTH_SHORT).show();
				//3、SetConfig配置串口参数
                if (CH34x_Driver.SetConfig(baudRate,dataBit,stopBit,parity,flowControl)){
                    Toast.makeText(getApplicationContext(),"串口已连接",Toast.LENGTH_SHORT).show();
                    Et_Send.setEnabled(true);
                    //4、启动读线程
                    CH34xReadData();//配置成功后读数据
                }else{
//                        Toast.makeText(getApplicationContext(),"串口配置失败!",Toast.LENGTH_SHORT).show();
                }
            }
        }else{
            Dialog dialog = new AlertDialog.Builder(MainActivity.this)
                    .setTitle("提示")
                    .setMessage("未授予USB权限")
                    .setPositiveButton("确认",
                            new DialogInterface.OnClickListener() {

                                @Override
                                public void onClick(DialogInterface arg0, int arg1) {
                                    System.exit(0);
                                }
                            }).create();
            dialog.setCanceledOnTouchOutside(false);
            dialog.show();
        }
    }
}
初始化完成后CH34xReadData进行读取数据:
//读数据
private void CH34xReadData(){
    //创建一个新的线程来读取数据,将读取的数据通过handler发送出去进行处理
    new Thread() {
        @Override
        public void run() {
//                super.run();
            byte[] buffer = new byte[4096];
            while (true){ //一直循环读取数据
                Message message = new Message();
                int len =CH34x_Driver.ReadData(buffer, 4096);
                if(len>0){
//                        String recv = toHexString(buffer, len);	//以16进制形式输出
                    String recv = new String(buffer, 0, len);//以字符串形式输出
                    message.obj = recv;
                    handler.sendMessage(message);
                }
            }
        }
    }.start();
}
4. 测试
安装到手机上之后,使用USB OTG转接线连接手机和USB转串口TTL模块,并且使用杜邦线连接模块的TXD和RXD,这样就可以接收到发送出去的数据。
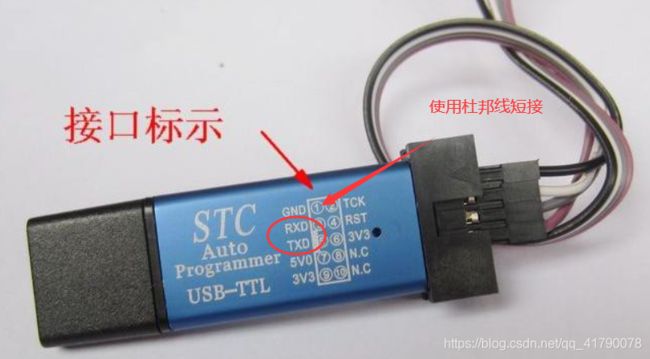
打开App之前,先连接好硬件:
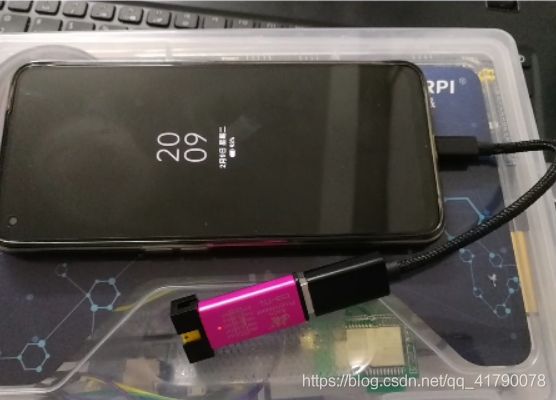
然后打开APP,等待初始化完成,就可以进行收发测试:

5. USB插拔检测
更进一步,可以在Android App中监控USB设备的插拔,当USB插入时对串口进行初始化,之后进行串口通信。
网上检测USB插拔的代码花里胡哨,下面这个我试过是有效的,而且不需要再去AndroidManifest.xml中配置。
代码如下:
BroadcastReceiver mUsbReceiver = new BroadcastReceiver() {
    public void onReceive(Context context, Intent intent) {
        String action = intent.getAction();
        if (UsbManager.ACTION_USB_DEVICE_DETACHED.equals(action)) {
            Toast.makeText(getApplicationContext(),"USB已移除",Toast.LENGTH_SHORT).show();

            UsbDevice device = (UsbDevice)intent.getParcelableExtra(UsbManager.EXTRA_DEVICE);
            if (device != null) {
                //init_CH34xSerial();//初始化串口
            }
        }else if(UsbManager.ACTION_USB_DEVICE_ATTACHED.equals(action)){
            Toast.makeText(getApplicationContext(),"USB已连接",Toast.LENGTH_SHORT).show();
            InitCH34xUART();
        }
    }
};

IntentFilter usbDeviceStateFilter = new IntentFilter();
usbDeviceStateFilter.addAction(UsbManager.ACTION_USB_DEVICE_ATTACHED);
usbDeviceStateFilter.addAction(UsbManager.ACTION_USB_DEVICE_DETACHED);
registerReceiver(mUsbReceiver, usbDeviceStateFilter);
怎么实现的就不说了,毕竟这种东西我也不会:)。但是这里有个问题,每次接入USB串口设备之后,会弹出一个窗口:
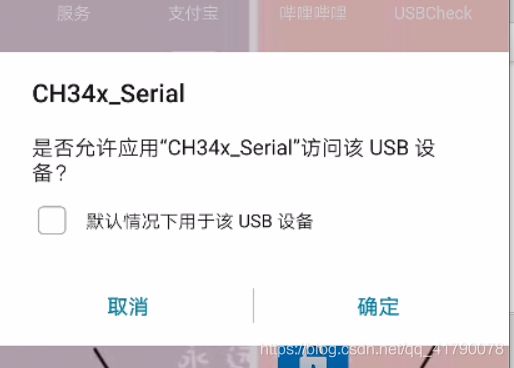
这个窗口弹出后还会退出当前App,可以参考官方的Demo再AndroidManifest中配置一些东西,然后将USB插入后就会自动打开App。
这里还有有点小问题的,我想实现的是,已经打开App的情况下,插入usb自动识别进行初始化,先插个眼,以后会弄再回来完善。
附代码
代码留着以后参考:
package com.example.ch34x_serial;

import androidx.annotation.NonNull;
import androidx.appcompat.app.AppCompatActivity;

import android.app.AlertDialog;
import android.app.Dialog;
import android.content.BroadcastReceiver;
import android.content.Context;
import android.content.DialogInterface;
import android.content.Intent;
import android.content.IntentFilter;
import android.hardware.usb.UsbDevice;
import android.hardware.usb.UsbManager;
import android.media.MediaPlayer;
import android.os.Bundle;
import android.os.Handler;
import android.os.Message;
import android.util.Log;
import android.view.View;
import android.widget.Button;
import android.widget.EditText;
import android.widget.TextView;
import android.widget.Toast;

import java.sql.Driver;

import cn.wch.ch34xuartdriver.CH34xUARTDriver;

public class MainActivity extends AppCompatActivity   {

    private static final String ACTION_USB_PERMISSION = "cn.wch.wchusbdriver.USB_PERMISSION";
    private CH34xUARTDriver CH34x_Driver;
    private Handler handler;

    private Button Btn_Send;
    private Button Btn_clear;
    private TextView Tv_Read;
    private EditText Et_Send;

    private static int baudRate=115200;       //波特率
    private static byte dataBit=8;           //数据位
    private static byte stopBit=1;           //停止位
    private static byte parity=0;            //校验
    private static byte flowControl=0;       //流控

//    private boolean ReadFlag = false;

    @Override
    protected void onCreate(Bundle savedInstanceState) {
        super.onCreate(savedInstanceState);
        setContentView(R.layout.activity_main);

        InitUI();//初始化页面控件
        InitCH34xUART();//初始化串口

        Btn_Send.setOnClickListener(new View.OnClickListener() {
            @Override
            public void onClick(View v) {
//                Toast.makeText(getApplicationContext(),Et_Send.getText().toString(),Toast.LENGTH_SHORT).show();
                CH34xWriteData();
            }
        });

        Btn_clear.setOnClickListener(new View.OnClickListener() {
            @Override
            public void onClick(View v) {
//                Toast.makeText(getApplicationContext(),"clear",Toast.LENGTH_SHORT).show();
                Et_Send.setText("");
                Tv_Read.setText("");
            }
        });

        BroadcastReceiver mUsbReceiver = new BroadcastReceiver() {
            public void onReceive(Context context, Intent intent) {
                String action = intent.getAction();
                if (UsbManager.ACTION_USB_DEVICE_DETACHED.equals(action)) {
                    Toast.makeText(getApplicationContext(),"USB已移除",Toast.LENGTH_SHORT).show();

                    UsbDevice device = (UsbDevice)intent.getParcelableExtra(UsbManager.EXTRA_DEVICE);
                    if (device != null) {
                        //init_CH34xSerial();//初始化串口
                    }
                }else if(UsbManager.ACTION_USB_DEVICE_ATTACHED.equals(action)){
                    Toast.makeText(getApplicationContext(),"USB已连接",Toast.LENGTH_SHORT).show();
                    InitCH34xUART();
                }
            }
        };

        IntentFilter usbDeviceStateFilter = new IntentFilter();
        usbDeviceStateFilter.addAction(UsbManager.ACTION_USB_DEVICE_ATTACHED);
        usbDeviceStateFilter.addAction(UsbManager.ACTION_USB_DEVICE_DETACHED);
        registerReceiver(mUsbReceiver, usbDeviceStateFilter);

        handler = new Handler(){
            @Override
            public void handleMessage(@NonNull Message msg) {
                super.handleMessage(msg);
                Tv_Read.append(msg.obj.toString());
                Toast.makeText(getApplicationContext(),msg.obj.toString(),Toast.LENGTH_SHORT).show();
            }
        };
    }

//    @Override
//    protected void onResume() {
//        super.onResume();
//        Toast.makeText(getApplicationContext(),"onResume被执行",Toast.LENGTH_SHORT).show();
//
//    }
//
//    @Override
//    protected void onPause() {
//        super.onPause();
//        Toast.makeText(getApplicationContext(),"onPause被执行",Toast.LENGTH_SHORT).show();
//    }

    private void InitUI(){
        Tv_Read = (TextView) findViewById(R.id.tv_rx);
        Et_Send = (EditText) findViewById(R.id.et_tx);
        Btn_clear = (Button) findViewById(R.id.btn_clear);
        Btn_Send = (Button) findViewById(R.id.btn_send);
    }

    private void InitCH34xUART(){
        //创建CH34x设备对象
        CH34x_Driver = new CH34xUARTDriver(
                (UsbManager) getSystemService(Context.USB_SERVICE), this,
                ACTION_USB_PERMISSION);
        //判断是否支持SB HOSTU
        if(!CH34x_Driver.UsbFeatureSupported()){//不支持,弹出提示窗口
            Dialog dialog = new AlertDialog.Builder(MainActivity.this)
                    .setTitle("提示")
                    .setMessage("您的手机不支持USB HOST,请更换其他手机再试!")
                    .setPositiveButton("确认",
                            new DialogInterface.OnClickListener() {

                                @Override
                                public void onClick(DialogInterface arg0, int arg1) {
                                    System.exit(0);
                                }
                            }).create();
            dialog.setCanceledOnTouchOutside(false);
            dialog.show();
        }else{
            //打开USB设备
            int retval = CH34x_Driver.ResumeUsbList();
            if(retval == -1){//打开失败,关闭设备
                Toast.makeText(MainActivity.this, "打开USB设备失败!", Toast.LENGTH_SHORT).show();
                CH34x_Driver.CloseDevice();
            }else if(retval == 0){//打开成功
                //初始化CH34x串口
                if(!CH34x_Driver.UartInit()){//初始化失败
                    Toast.makeText(MainActivity.this, "初始化失败!", Toast.LENGTH_SHORT).show();
                    return;
                }else{
//                    Toast.makeText(MainActivity.this, "打开并初始化成功!", Toast.LENGTH_SHORT).show();
                    if (CH34x_Driver.SetConfig(baudRate,dataBit,stopBit,parity,flowControl)){
                        Toast.makeText(getApplicationContext(),"串口已连接",Toast.LENGTH_SHORT).show();
                        Et_Send.setEnabled(true);
                        CH34xReadData();//配置成功后读数据
                    }else{
//                        Toast.makeText(getApplicationContext(),"串口配置失败!",Toast.LENGTH_SHORT).show();
                    }
                }
            }else{
                Dialog dialog = new AlertDialog.Builder(MainActivity.this)
                        .setTitle("提示")
                        .setMessage("未授予USB权限")
                        .setPositiveButton("确认",
                                new DialogInterface.OnClickListener() {

                                    @Override
                                    public void onClick(DialogInterface arg0, int arg1) {
                                        System.exit(0);
                                    }
                                }).create();
                dialog.setCanceledOnTouchOutside(false);
                dialog.show();
            }
        }
    }

    //发送数据
    private void CH34xWriteData(){
        byte[] to_send = toByteArray2(Et_Send.getText().toString());		//以字符串方式发送
        int retval = CH34x_Driver.WriteData(to_send, to_send.length);//写数据,第一个参数为需要发送的字节数组,第二个参数为需要发送的字节长度,返回实际发送的字节长度
        if (retval < 0) {
            Toast.makeText(MainActivity.this, "发送失败!", Toast.LENGTH_SHORT).show();
        }else{
            Toast.makeText(MainActivity.this, "发送成功!", Toast.LENGTH_SHORT).show();
        }
    }

    //读数据
    private void CH34xReadData(){
        //创建一个新的线程来读取数据,将读取的数据通过handler发送出去进行处理
        new Thread() {
            @Override
            public void run() {
//                super.run();
                byte[] buffer = new byte[4096];
                while (true){ //一直循环读取数据
                    Message message = new Message();
                    int len =CH34x_Driver.ReadData(buffer, 4096);
                    if(len>0){
//                        String recv = toHexString(buffer, len);	//以16进制形式输出
                        String recv = new String(buffer, 0, len);//以字符串形式输出
                        message.obj = recv;
                        handler.sendMessage(message);
                    }
                }
            }
        }.start();
    }

    //数据转换
    /**
     * 将String转化为byte[]数组
     * @param arg
     *            需要转换的String对象
     * @return 转换后的byte[]数组
     */
    private byte[] toByteArray2(String arg) {
        if (arg != null) {
            /* 1.先去除String中的' ',然后将String转换为char数组 */
            char[] NewArray = new char[1000];
            char[] array = arg.toCharArray();
            int length = 0;
            for (int i = 0; i < array.length; i++) {
                if (array[i] != ' ') {
                    NewArray[length] = array[i];
                    length++;
                }
            }

            byte[] byteArray = new byte[length];
            for (int i = 0; i < length; i++) {
                byteArray[i] = (byte)NewArray[i];
            }
            return byteArray;

        }
        return new byte[] {};
    }

    /**
     * 将byte[]数组转化为String类型
     * @param arg
     *            需要转换的byte[]数组
     * @param length
     *            需要转换的数组长度
     * @return 转换后的String队形
     */
    private String toHexString(byte[] arg, int length) {
        String result = new String();
        if (arg != null) {
            for (int i = 0; i < length; i++) {
                result = result
                        + (Integer.toHexString(
                        arg[i] < 0 ? arg[i] + 256 : arg[i]).length() == 1 ? "0"
                        + Integer.toHexString(arg[i] < 0 ? arg[i] + 256
                        : arg[i])
                        : Integer.toHexString(arg[i] < 0 ? arg[i] + 256
                        : arg[i])) + " ";
            }
            return result;
        }
        return "";
    }
}


