vue2学习笔记
文章目录
- 组件化开发
-
- 父子组件通信
-
- 组件通信场景
- 如何进行父子组件通信 ?
- 双向修改父子组件的值分析
- 父访问子-children -refs
- 子访问父 -parent -root
- 插槽
-
- slot-插槽的基本使用
- slot-具名插槽
- 作用域插槽
- 模块化开发
-
- ES6模块化的导入与导出
- ES6箭头函数
-
- 参数和返回值
- 箭头函数的this
- vue-router 路由
-
- 1. 概念
- 2.路由发展过程
-
- 后端路由阶段
- 前后端分离阶段
- SPA单页面富应用阶段
- 3. url的hash和HTML5的history
- 4. vue-router的安装和配置
-
- 路由重定向
- 修改路由模式
- router-link其他属性补充
- 5.通过代码跳转路由
- 6.动态路由的使用
- 7.路由懒加载
-
- 懒加载方式
- 8.嵌套路由
-
- 路由嵌套实现方式
- 9.参数传递
-
- URL组成部分
- query传值方式
- 10. r o u t e 和 route和 route和router的区别
- 11.导航守卫
-
- 全局导航守卫
- 路由独享守卫
- 12.keep-alive及其他问题
-
- keep-alive属性的介绍
- TabBar实现思路
- Promise
-
- 1.Promise的基本介绍于使用
-
- 1.1什么情况下会用到Promise
- 2.Promise的三种状态和另外处理方式
- 3.Promise的链式调用
- 4.Promise的all方法使用
- Vuex
-
- 1.概念和作用
- 2.单界面到多界面状态管理切换
-
- 单界面到状态管理
- 多页面管理
- 3.devtool和mutations
- 4.state单一状态树的理解
- 5.getters的使用详解
- 6.mutations的携带参数
-
- Mutations状态更新
- 7.Mutations的提交风格
- 8.数据的响应式原理
-
- Mutations的响应规则
- 9.mutations的类型常量
- 10.actions的使用详解
- 11.modules的使用详解
- 12.store文件夹的目录组织
- axios
-
- 1.网络请求模块的选择
- 2.axios框架的基本使用
- 3.axios发送并发请求
- 4.axios的配置相关信息
- 5.axios的实例和模块封装
-
- 1.创建axios 的实例
- 2.axios的模块封装
- 6.axios的拦截器的使用
-
- 1.请求拦截
- 2.响应拦截
组件化开发
父子组件通信
组件通信场景
子组件是不能直接访问父组件或vue实例里面的数据的。
但是实际开发中,有一些数据是要通过上层传到下层:
比如在一个页面,从服务器请求到了很多数据,其中部分数据是需要通过子组件来展示。
这时候,避免子组件再向服务器发送一次请求,直接让父组件将数据传递给子组件。
如何进行父子组件通信 ?
- 父组件通过
props(properties:属性)向子组件传递数据(父传子) - 子组件通过自定义事件$emit向父组件传值。
具体代码:
父传子
案例1:传入数组和字符串
<body>
    <div id="app"><cpn :cmovies="movies" :cmessage="message">cpn>div>
    <template id="cpn">
      <div>
        <p>{{cmovies}}p>
        <h2>{{cmessage}}h2>
      div>
    template>
  body>
  <script src="../js/vue.js">script>
  <script type="text/javascript">
    // 父传子: props
    const cpn = {
      template: '#cpn',
      props: ['cmovies', 'cmessage'],
      data() {
        return {}
      }
    }
    const app = new Vue({
      el: '#app',
      data: {
        message: '你好',
        movies: ['1', '2', '3']
      },
      components: {
        cpn
      }
    })
  script>
注意这里的template里面要加个div,不然显示不出来h2.
props里面加''。
记住这里要用v-bind(语法糖:)
<div id="app"><cpn :cmovies="movies" :cmessage="message">cpn>div>//这一步是在父组件里定义props的变量
特别是传data里面数据是变量的时候,要用v-bind。加入:就看成是一个变量。
这里面props使用的是数组形式,还有很多种形式,包括可以给他进行类型限制。
支持的类型:
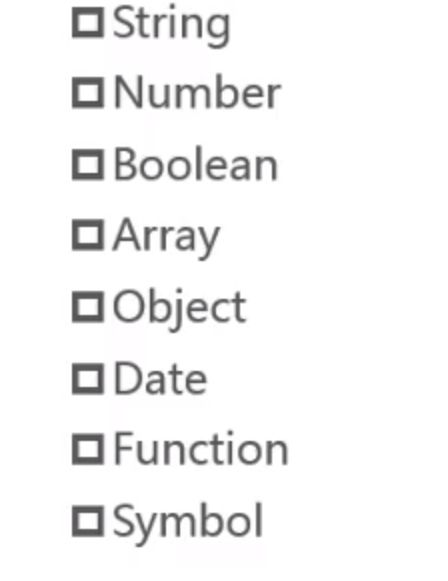
类型限制:
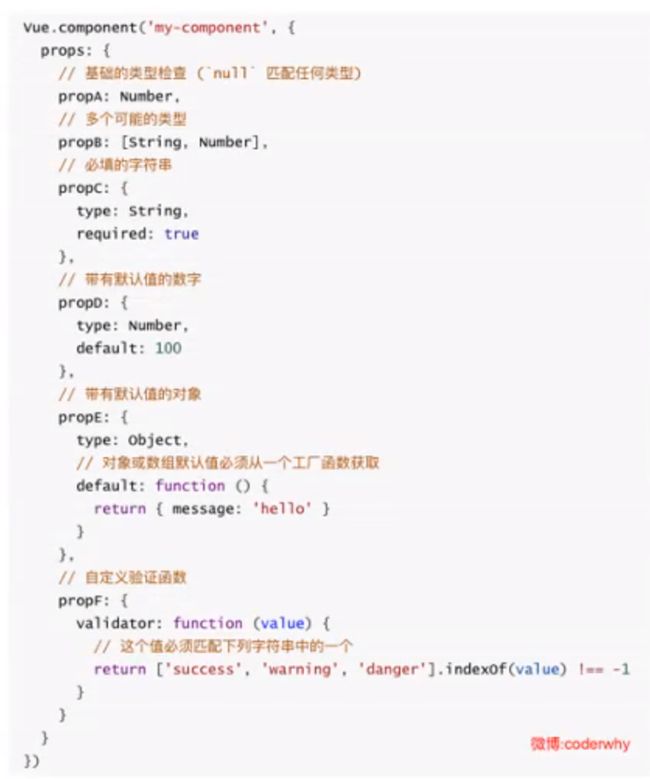
props: {
 cmovies:Array,
 cmessage:String,
}
提供一些默认值:
props:{

cmessage:{
    type:String,
    default:'aaa'
}
}
默认值是在什么情况下会显示,在传值之前。
<div id="app">
      <cpn :cmessage='message'>cpn>
    div>

    <template id="cpn">
      <div>
        <h2>{{cmessage}}h2>
      div>
    template>
const cpn = {
template: '#cpn',
props: {
cmessage: {
type: String,
default: 'aaaa', //默认值
//加上这个,别人在用我这个东西的时候,必须给我传cmessage变量
//例如:类型为数组和对象时,默认值是一个函数
    <div id="app">
      <cpn :cmovies="movies">cpn>
    div>

    <template id="cpn">
      <div>
        <ul>
          <li v-for="item in cmovies">{{item}}li>
        ul>
      div>
    template>
const cpn = {
      template: '#cpn',
      props: {

        // 类型是对象或者数组时,默认值必须是一个函数
       	 cmovies: {
          type: Array,
          default() {
            return []
          }
        }
      },
      data() {
        return {}
      }
    }
双向修改父子组件的值分析
画图分析:
父访问子-children -refs
通过this.$children[index]. 来访问,但是一般开发,不会这样拿东西。因为随时可能增加子组件。然后下标值就会发生改变。
一般开发中,都是通过refs来拿
只需要在一个子组件中注册一个ref:"abc",然后父组件就可以通过this.$ref.abc.数据,来拿到数据。
子访问父 -parent -root
开发用的很少,不建议。
通过this.$parent.data可以访问到父组件里面的data数据,但是实际开发中不建议使用这个。耦合度太高了
this.$root.data可以访问根组件vue实例里面的data数据。这个实力开发也用的很少,因为一般vue实例里面要用的数据也是很少的。主要包含一些最重要的东西,比如路由,vuex基本的属性不会放在vue实例里面
插槽
slot-插槽的基本使用
slot插槽就是给组件一个预留的空间。
你想让父级里面的子组件显示什么东西,都由自己决定。这样让封装的组件,就有很强的扩展性。
真实开发的时候,很多封装的时候,都要给它预备插槽。
如何封装组件:抽取共性,预留插槽来保留不同。
如果给封装的组件预留一个插槽里面放一个默认标签,使用这个组件的标签里面如果没有插槽内容,就会默认显示默认标签
slot-具名插槽
多个插槽的时候,需要在slot里面写name=''来区分修改哪一个插槽,这样slot里面的内容就不会被替换。
作用域插槽
编译作用域:
组件模板只会在自己作用域里面去查找相关的一些变量。
作用域插槽:
一句话:父组件替换插槽的标签,但是内容由子组件提供。

就是子组件负责提供数据和内容。父组件提供如何展示的方式。

模块化开发
核心:
-
导入
-
导出
commonjs 的导出导入

ES6模块化的导入与导出
export(导出) / import(导入)
ES6箭头函数
也是一种定义函数的方式,
最基本写法:
const aaa = ()=>{

}
参数和返回值
当有一个参数的时候,可以省略括号
//不省略
const power = (num)=>{
  return num * num
}
//省略
const power = num=>{
  return num * num
}
函数代码块中只有一行,可以简写
//不简写
const sum = (n1,n2) = >{
  return n1 + n2
}
//简写
const sum = (n1, n2) => n1 + n2
//只有一行打印
const test = () => console.log('hello')//函数返回值是undefined
箭头函数的this
箭头函数的使用场景
将函数作为参数传到另外一个函数里面。
例如:
setTimeout(() = >{

},30000)
结论:箭头函数的this, 引用的是最近作用域的this
vue-router 路由
1. 概念
- 路由是网络工程的一个术语。
- 路由(routing):通过互联的网络,将信息从原地址传递到目的地址的活动。
2.路由发展过程
后端路由阶段
1.后端渲染:
jsp(java server page) /php
后端处理url与页面之间的映射关系。
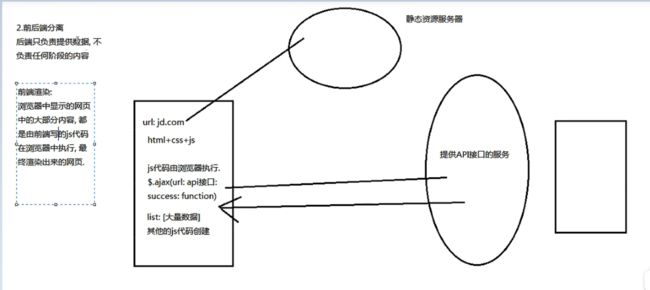
前后端分离阶段
后端只负责提供数据,不负责任何界面的内容。
SPA单页面富应用阶段
就是在前后端分离的基础上,加了一层前端路由
也就是前端前端来维护一套路由规则。
spa页面(simple page web application):单页面富应用
整个网页就只有一个html页面。
spa页面必须要有前端路由来作支撑,
前端路由就是用于映射 浏览器上面 url和大的js资源里面到底要渲染哪个组建的
就是url和页面的映射关系。
前端路由的核心:
改变url的时候,整个页面不刷新。
3. url的hash和HTML5的history
如何改变url,但是让页面不要发生刷新。
第一种方式:
通过location.hash修改url 的hash
location.hash='fool'
浏览器里面的Network里面并没有发生请求资源。
第二种方式:
通过history.pushState(),也可以修改url
histroy.pushState({},'','homes')
histroy.pushState({},'','users')
histroy.pushState({},'','goods')
histroy.pushState({},'','about')
push的是栈结构,先进后出。url永远显示的是栈顶的东西。
如果想移除最顶层让url显示下面一层的,就可以用history.back()
pushState和back这两个就相当于入栈和出栈 的操作。
还有一个history.replaceState()来改变url地址,但是它是替换,所以无法点击浏览器左右箭头返回和下一页面。
history.replaceState({},'','home')
除了back还可以通过go方法来返回对应的url
history.go(-1) == history.back()//显示goods
history.go(-2)//一次性弹出两个,最终显示homes
history.go(2)//将users和goods压进去,最终显示goods
//history.go(1)=history.forward()
4. vue-router的安装和配置
安装命令
npm install vue-router --save
配置:
目录:src/router/index.js
//  配置路由相关的信息
import VueRouter from 'vue-router'
import Vue from 'vue'
// 1.通过vue.use(插件),安装插件
Vue.use(VueRouter)

// 2.创建路由对象
const routes = []

const router = new VueRouter({
  routes
})
// 3.将router对象传入vue实例中,在这导出
export default router
目录:src/main.js
import Vue from 'vue'
import App from './App.vue'
import router from './router'
Vue.config.productionTip = false
Vue.use(router)
new Vue({
  render: h => h(App),
  router
}).$mount('#app')
不过目前为止还没有配置路由的映射关系。还不知道url对应哪一个组件。
第一步:先创建路由组建
myHome.vue
我是首页
myAbout.vue
我是about
第二步:配置映射关系
目录:src/router/index.js
import myHome from '../components/myHome'
import myAbout from '../components/myAbout'

const routes = [
  {
    path: '/home',
    component: myHome
  },
  {
    path: '/about',
    component: myAbout
  }
]
第三步:使用路由:
使用
目录:src/App.vue
首页
关于
路由重定向
路由的默认路径
 {
    path: '/',
    //路由重定向
    redirect: '/home'
  }
修改路由模式
const router = new VueRouter({
  routes,
  mode: 'history'
})
router-link其他属性补充
1.如果不强调它的属性,默认是a标签
如果想改变它的类型,实用tag属性
<router-link to="/home" tag="button">首页router-link>
//vue-router4 版本已经将tag属性移除了,会有警告
2.这里面用的是html5的history模式,如果想要用history.replaceState()
<router-link to="/home" replace>首页router-link>
<router-link to="/about" replace>关于router-link>
这样浏览器的左右前进后退按钮就不能点击了
- 如果想改变点击类名
<router-link to="/home" active-class='active'>首页router-link>
<router-link to="/about" active-class='active'>关于router-link>
//实际开发中一般很少改类名,除非单独给首页改样式
如果需要批量改
router/index.js
const router = new VueRouter({
  routes,
  mode: 'history',
  linkActiveClass: 'active'
})
5.通过代码跳转路由
<template>
  <div id="app">

    <button @click="homeClick">首页button>
    <button @click="aboutClick">关于button>
    <router-view>router-view>
  div>
template>

<script>
export default {
  name: 'App',
  methods: {
    homeClick () {
      // 通过代码的方式修改路由
      this.$router.push('/home').catch(err => { err })
      // 也可以通过replace
      //this.$router.replace('/home')
      console.log('home');
    },
    aboutClick () {
      this.$router.push('/about').catch(err => { err })
      console.log('about');
    }
  }

}
script>

<style  scoped>
.active {
  color: red;
}
style>
6.动态路由的使用
动态拼接路由路径
 data () {
    return {
      userid: 'sz'
    }
  },
    usersClick () {
      this.$router.push('/users/' + this.userid).catch(err => { err })
    }
如何将路由路径后面的参数渲染到users组件下
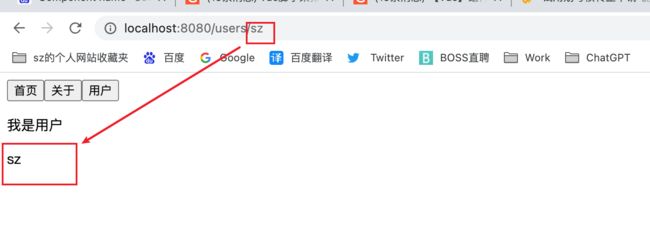
router/index.js
{
    path: '/users/:abc',
    component: myUsers
  }
myUser.vue
<div>
    <p>我是用户p>
    <p>{{ userId }}p>
  div>
 computed: {
    userId () {
      return this.$route.params.abc
    }
  },
相当于这里的abc已经动态的被App.vue文件里的data值给覆盖了
总结: r o u t e r 和 router和 router和route的使用
7.路由懒加载
懒加载:用到时,再加载。
比如一个按钮,点击的时候才从服务器将这个js加载到本地。这样就可以用它做一些分离。
官方解释:
- 当打包构建应用时,javascript包会变的非常大,影响页面的加载。
- 如果能将不同的路由 对应的组件 分割成不同的代码块,当路由被访问的时候,才加载对应组件,这样就很高效。
**总结:**就是将不同的路由对应的不同的组件打包到不同的js文件里面,这就是路由懒加载作用。
写法:
公司项目里面用的require,遵循的是commonjs模块规范。
import遵循的事es6模块规范。
上面0和1的js文件不会一开始就从服务器请求下来。它会等到我们,真正需要用它的时候,再把js文件请求下来。
懒加载方式
方式一(最早期):结合vue的异步组件和webpack的代码分析。
方式二:AMD写法
![]()
方式三:在ES6中,有更简单的方法来组织vue的异步组件和webpack 的代码分割。
const Home = () => import('../components/Home.vue')
也可以直接将导入写在component这边。
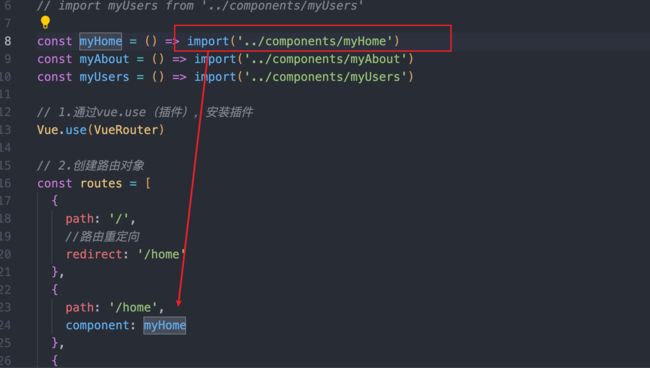
component:() => import('../components/myHome')
不过还是推荐上面那样写,这样可以对所有动态导入的组件,统一放在一起,方便一起管理。
以后路由都要写成懒加载方式,这样才能让我们之后打包出来的js文件变得更小,用户请求的时候,效率会更高一点。
8.嵌套路由
比如home页面中,在/home路径的基础上再细分一些类似/home/message /home/news来访问不同的内容
一个路径映射一个组件,访问这两个路径也会分别渲染这两个组件。
想在这个大路径里面嵌套一些子路径,就要用路由的嵌套

路由嵌套实现方式
1.创建对应的子组件,并在路由映射中配置对应的子路由
- 在组件内部使用
具体操作:
先创建两个home 的子组件
myHomeNews和myHomeMessage
文件路径:/router/index.js
const myHome = () => import('../components/myHome')
const myHomeNews = () => import('../components/myHomeNews')
const myHomeMessage = () => import('../components/myHomeMessage')


{
    path: '/home',
    component: myHome,

      //通过children来映射子路由
    children: [
      {
        path: 'news',
        component: myHomeNews
      },
      {
        path: 'message',
        component: myHomeMessage
      },
      //默认路径
       {
        path: '/',
        redirect: 'news'
      }
    ]
  },
文件路径:myHome.vue文件
<div>
    <h2>1首页h2>
   /*注意这边的路径要写完成的*/
    <router-link to="/home/news">新闻router-link>
    <router-link to="/home/message">消息router-link>
    <router-view>router-view>
  div>
9.参数传递
传递参数的两种方式:params和query
- 动态路由

- query类型

URL组成部分

协议://主机:端口/路径?查询
scheme://host:port//path?query#fragment
query传值方式
App.vue文件
  <router-link
      :to="{ path: '/profile', query: { name: 'sz', age: 18, height: 1.88 } }"
      >档案router-link
    >
myProfile.vue文件
<div>
    <p>我是profile页面p>
    <p>{{ $route.query }}p>
    <p>{{ $route.query.name }}p>
  div>
10. r o u t e 和 route和 route和router的区别
$route是当前处于活跃的路由
弹幕说:
r o u t e r 是路由, router是路由, router是路由,route是路由节点。
$route用来映射地址, r o u t e r 用来跳转, router用来跳转, router用来跳转,route用来拿路由的值
所有的组件都会继承vue 的原型
Main.js
vue.prototype.test= function(){
  console.log('test')
}
vue.prototype.name='sz'
User.vue
这里可以直接调用vue原型上的方法和数据
this.test()//test
console.log(this.name)//sz
11.导航守卫
全局导航守卫
router/index.js
{
    path: '/profile',
    component: myProfile,
    meta: {
      title: '档案'
    }
  }


// 路由导航守卫
//前置守卫/钩子(guard/hook)
//跳转前回调
router.beforeEach((to, from, next) => {
  // 从from跳转到to
  document.title = to.matched[0].meta.title
  next()
})
//后置守卫
//跳转后回调
//只有to和from参数
router.afterEach()
afterEach不需要主动调用next()函数
路由独享守卫
只有进到某个路由里面,才会进行回调这个函数
比如说什么时候想进入这个/about路由里面。
就要单独的给它写给守卫了。
包括组件内的守卫
12.keep-alive及其他问题
keep-alive是vue内置的一个组件,可以使被包含的组件保留状态,或避免重新渲染。
router-view也是一个组件,如果直接被包在keep-alive里面,所有路径匹配到的视图组件都会被缓存。
**被keep-alive包裹之后,生命周期函数只执行一次。**就是保证组件不会频繁被销毁和创建。
记录路由上次路径
data () {
    return {
      path: '/home/news'
    }
  },
     activated () {
    //组件活跃的时候进行操作
    this.$router.push(this.path)
  },
  beforeRouteLeave (to, from, next) {
    //将上次路由路径存在全局变量path中
    this.path = this.$route.path
    next()
  }
activated()和deactivated()这两个回调函数,只有该组件被保持了状态使用了keep-alive时,才有效。
keep-alive属性的介绍
- include -字符串或正则表达式,只有匹配的组件会被缓存。
- exclude- 字符串或正则表达式,只有匹配的组件会被缓存
例如,如果想排出档案和用户组件
App.vue
//这里面拿的是档案和用户组件的name来排除
//注意,两个组件name不要加空格
<keep-alive exclude="myProfile,user">
      <router-view />
    keep-alive>
这样档案和用户组件,切换其他页面的时候,就会被销毁,切回来的时候就会重新创建。
一般跟正则有关系的,里面不要随便加空格。
TabBar实现思路
封装两个组件
- TabBar
定义插槽
通过flex布局,将item布局好

- TabBarItem:定义图片和文字的插槽
里面还定义一个props属性,传过来props{link: },点击小的item里面,连接到对应的某个路由。
然后动态的进行相关的跳转。
一般移动端 tabBar的高度是49px
注意tabbar只关注自己样式和dom内容,其他具体的封装在item组件中
所以tabbar里面搞一个插槽。
TabBar.vue
<template>
  <div id="tabBar">
    //这边搞一个插槽
    <slot>slot>
  div>
template>
<style>
#tabBar {
  display: flex;

  background: #f6f6f6;
  position: fixed;
  left: 0;
  right: 0;
  bottom: 0;
  box-shadow: 0px -1px 1px rgba(100, 100, 100, 0.2);
}
  style>
只需要关注本身的样式。里面内容写在
App.vue文件
  <tab-bar>
      <div class="tabBarItem">
        <i class="iconfont icon-home" />
        <div>首页div>
      div>
      <div class="tabBarItem">
        <i class="iconfont icon-fenlei" />
        <div>分类div>
      div>
      <div class="tabBarItem">
        <i class="iconfont icon-gouwuche" />
        <div>购物车div>
      div>
      <div class="tabBarItem">
        <i class="iconfont icon-wode" />
        <div>我的div>
      div>
    tab-bar>
但是这样,app.vue文件里面就会变的很冗余。所以要把item内容也抽离出来,将它变成通用组件。
tabBarItem.vue
<template>
  <div class="tabBarItem" @click="itemClick">
    <div :class="{ active: isActive }"><slot name="itemIcon">slot>div>


    <div :class="{ active: isActive }">
      <slot name="itemText">slot>
    div>
  div>
template>

<script>
export default {
  name: "TabBarItem",
  props: {
    path: String
  },
  data () {
    return {
      // isActive: false
    }
  },
  computed: {
    isActive () {
      //当前活跃的路由是否有这个路径,有的话就不等于-1返回true
      //这样可以动态的决定isActive是true还是false
      return this.$route.path.indexOf(this.path) !== -1
    }
  },
  methods: {
    itemClick () {
      this.$router.push(this.path)
    }
  }
}
script>

<style>
.tabBarItem {
  flex: 1;
  text-align: center;
  height: 49px;
}
.active {
  color: red;
}
style>
App.vue
<template>
  <div id="app">
    <tab-bar>
      <tab-bar-item>
        <i slot="itemIcon" class="iconfont icon-home" />
        <i slot="itemIconActive" class="iconfont icon-home1" />
        <div class="sz" style="margin-top: -4px" slot="itemText">首页div>
      tab-bar-item>
      <tab-bar-item>
        <i slot="itemIcon" class="iconfont icon-fenlei" />
        <i slot="itemIconActive" class="iconfont icon-fenlei1" />
        <div style="margin-top: -4px" slot="itemText">分类div>
      tab-bar-item>
      <tab-bar-item>
        <i slot="itemIcon" class="iconfont icon-gouwuche" />
        <i slot="itemIconActive" class="iconfont icon-gouwuche1" />
        <div style="margin-top: -4px" slot="itemText">购物车div>
      tab-bar-item>
      <tab-bar-item>
        <i slot="itemIcon" class="iconfont icon-wode" />
        <i slot="itemIconActive" class="iconfont icon-wode1" />
        <div style="margin-top: -4px" slot="itemText">我的div>
      tab-bar-item>
    tab-bar>
  div>
template>
<script>
import TabBar from './components/TabBar/tabBar.vue';
import TabBarItem from './components/TabBar/tabBarItem.vue'
export default {
  name: 'App',
  components: {
    TabBar,
    TabBarItem
  }
}
script>

<style>
style>
封装好这两个,下次页面在用的时候,只需要考虑tabbar里面的图片和文字。直接导入这两个文件,然后
在里面些不同的内容,不需要考虑样式等。而且封装好的文件,可以在多个项目里面使用。
后面就是将这四个item通过路由来跟每个页面文件对应起来

Components文件夹只放公共的抽离出来的组件。
router/indexjs
import Vue from 'vue'
import VueRouter from 'vue-router'
Vue.use(VueRouter)
const Home = () => import('../views/home/Home')
const Category = () => import('../views/category/Category')
const Profile = () => import('../views/profile/Profile')
const Cart = () => import('../views/cart/Cart')
const routes = [
  {
    path: '',
    redirect: '/home'
  },
  {
    path: '/home',
    component: Home
  },
  {
    path: '/category',
    component: Category
  },
  {
    path: '/profile',
    component: Profile
  },
  {
    path: '/cart',
    component: Cart
  }
]

const router = new VueRouter({
  routes,
  mode: 'history'
})
export default router
注意:封装好的文件,不需要别人复用的时候改任何代码。比如点击的活跃的颜色是动态的。
tabBarItem.vue
  props: {
    path: String,
      activeColor: {
      type: String,
      default: 'red'
    }
  },
  computed: {
    isActive () {
      //当前活跃的路由是否有这个路径,有的话就不等于-1返回true
      //这样可以动态的决定isActive是true还是false
      return this.$route.path.indexOf(this.path) !== -1
    },
       activeStyle () {
      // 判断是否处于活跃状态,如果活跃就显示动态颜色,如过不是活跃状态就空对象
      return this.isActive ? { color: this.activeColor } : {}
    }
  },
然后修改一下dom里面的动态样式
 <div class="tabBarItem" @click="itemClick">
    <div :style="activeStyle"><slot name="itemIcon">slot>div>
    <div :style="activeStyle">
      <slot name="itemText">slot>
    div>
  div>
上面App.vue文件不该写那么多代码,还是需要抽离出来。
新建一个 MainTabBar.vue文件,将app.vue文件里面代码copy过来
<template>
  <tab-bar>
    <tab-bar-item path="/home" activeColor="blue">
      <i slot="itemIcon" class="iconfont icon-home" />
      <i slot="itemIconActive" class="iconfont icon-home1" />
      <div class="sz" style="margin-top: -4px" slot="itemText">首页div>
    tab-bar-item>
    <tab-bar-item path="/category">
      <i slot="itemIcon" class="iconfont icon-fenlei" />
      <i slot="itemIconActive" class="iconfont icon-fenlei1" />
      <div style="margin-top: -4px" slot="itemText">分类div>
    tab-bar-item>
    <tab-bar-item path="/cart">
      <i slot="itemIcon" class="iconfont icon-gouwuche" />
      <i slot="itemIconActive" class="iconfont icon-gouwuche1" />
      <div style="margin-top: -4px" slot="itemText">购物车div>
    tab-bar-item>
    <tab-bar-item path="/profile">
      <i slot="itemIcon" class="iconfont icon-wode" />
      <i slot="itemIconActive" class="iconfont icon-wode1" />
      <div style="margin-top: -4px" slot="itemText">我的div>
    tab-bar-item>
  tab-bar>
template>

<script>
import TabBar from './TabBar/tabBar.vue';
import TabBarItem from './TabBar/tabBarItem.vue'
export default {
  name: 'MainTabBar',
  components: {
    TabBar,
    TabBarItem
  }
}
script>

<style>
style>
然乎在App.vue文件引入并注册这个文件就可以了。
将代码抽离出来的时候,注意路径和变量,方法,样式等是否也需要修改
路径也可以写成这样
import TabBar from '@/components/TabBar/tabBar.vue';
import TabBarItem from '@/components/TabBar/tabBarItem.vue'
这里的@相当于src路径
Promise
1.Promise的基本介绍于使用
promise是异步编程的解决方案。
一般发送网络请求的时候,发进行异步操作。因为如果进行同步请求,就会发生阻塞。
案例:setTimeout异步操作
 //1.使用seTimeout
      setTimeout(() => {
        console.log('hello')
      }, 1000)
一旦以后有这样的异步操作,可以对这样的异步操作进行Promise封装。
//参数 -> 函数
new Promise(参数)
传入的参数(函数),它也有两个参数resolve,reject
//resolve,reject本身也是函数
new Promise((resolve,reject)=>{
  //任何异步相关的操作,都可以直接封装到这里
     setTimeout(() => {
        console.log('hello')
      }, 1000)
})
但是这样写不好,比如,这样的一个需求:
延迟一秒钟打印a,然后再延迟一秒钟打印b。就会发生嵌套,会产生回调地狱
new Promise((resolve,reject)=>{

     setTimeout(() => {
        console.log('a')
        setTimeout(() => {
        console.log('b')
      }, 1000)
      }, 1000)
})
只需要在这调用一下resolve,一旦调用resolve,就会==.then()调用下一步,.then()==里面参数也是一个函数
//链式编程
new Promise((resolve,reject)=>{
  //第一次网络请求的代码
     setTimeout(() => {
        resolve()
      }, 1000)
}).then(()=>{
  //第一次拿到结果的处理代码
  console.log('a')
 return new Promise((resolve,reject)=>{
   //第二次网络请求的代码
       setTimeout(() => {
       resolve()
      }, 1000)
 })
})
   .then(()=>{
   //第二次处理的代码
   console.log('b')
})
只要是网络请求相关的代码,都放到Promise对象里面,相关的处理代码,都是在上一次Promise之后对应的.then()里面来处理。
1.1什么情况下会用到Promise
当我们进行一些异步操作的时候,使用这个promise对这个异步操作进行封装,把异步操作的代码往Promise里面一塞。
//new -> 构造函数(1.保存一些状态信息 2.执行传入的函数)
//在执行传入的回调函数时,会传入两个参数,resolve,reject。本身又是函数
new Promise((resolve,reject)=>{
  setTimeout(()=>{
    //不希望在这里处理data,去后面.then()处理
    //网络请求成功的时候调用resolve()
    resolve('hello')

    //失败的时候调用reject函数
    reject('error message')
  },1000)
}).then((data)=>{   //网络请求成功的时候调用.then()
  console.log(data)//hello
}).catch(err=>{
  console.log(err)//error message
})
以后只要是成功,就调用resolve,只要是失败就调用reject
2.Promise的三种状态和另外处理方式
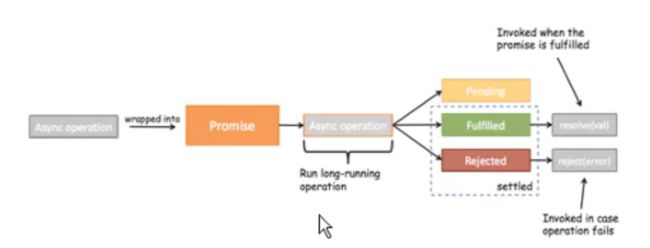
sync -> 同步
async -> 异步
三种状态:等待,满足(成功),失败。
也可以只写.then()
new Promise((resolve,reject)=>{
  setTimeout(()=>{
    resolve('hello')
    reject('erro message')
  },1000)
}).then(函数1,函数2)//如果调用resolve就会执行函数1,如果调用reject就会执行函数2
所以可以这样做
new Promise((resolve,reject)=>{
  setTimeout(()=>{
    resolve('hello')
    reject('erro message')
  },1000)
}).then(data=>{
  console.log(data)//hello
} ,err=>{
  console.log(err)//error message
})
3.Promise的链式调用
现在提一个需求:进行了一次网络请求,结果是:aaa,然后对这个aaa数据进行一个处理得到一个结果
把这个结果进行下一个处理:拼接上一个111,以此类推。拼接完的结果在进行一个数据处理。
然后在给新结果拼接一个222。这样类似的代码
new Promise((resolve,reject)=>{
  setTimeout(()=>{
    resolve('aaa')
  },1000)
}).then(res=>{
  console.log(res,'第一层的十行处理代码')
  //对结果进行第一次的处理
 return new Promise((resolve)=>{
    resolve(res + '111')
  })

}).then(res=>{
    console.log(res,'第二层的十行处理代码')

    return new Promise(resolve=>{
      resolve(res+'222')
    })

}).then(res=>{
      console.log(res,'第三层的十行代码处理')
    })
但是上面这样的代码有一个问题,就是只有第一层进行了异步操作,第二第三层都没有进行异步操作。
可以化简一下
new Promise((resolve,reject)=>{
  setTimeout(()=>{
    resolve('aaa')
  },1000)
}).then(res=>{
  console.log(res,'第一层的十行处理代码')
  //对结果进行第一次的处理
 return  Promise.resolve(res + '111')
}).then(res=>{
    console.log(res,'第二层的十行处理代码')
    return  Promise.resolve(res+'222')

}).then(res=>{
      console.log(res,'第三层的十行代码处理')
    })
但是还不够简介,还可以写成这样,直接return,因为内部会进行一层Promise包装。并自己调用resolve。
new Promise((resolve,reject)=>{
  setTimeout(()=>{
    resolve('aaa')
  },1000)
}).then(res=>{
  console.log(res,'第一层的十行处理代码')
  //对结果进行第一次的处理
 return  res + '111'
}).then(res=>{
    console.log(res,'第二层的十行处理代码')
    return  res+'222'

}).then(res=>{
      console.log(res,'第三层的十行代码处理')
    })
现在考虑,链式调用,如果某一层失败,那后面的都不会执行.then()了,会执行.catch
new Promise((resolve,reject)=>{
  setTimeout(()=>{
    resolve('aaa')
  },1000)
}).then(res=>{
  console.log(res,'第一层的十行处理代码')
  //对结果进行第一次的处理
 return  Promise.reject('error message')
  //也可以手动抛异常
  //throw 'err message'
}).then(res=>{
    console.log(res,'第二层的十行处理代码')
    return  res+'222'

}).then(res=>{
      console.log(res,'第三层的十行代码处理')
    }).catch(err=>{
  console.log(err)
})
//打印结果:
//aaa,'第一层的十行处理代码'
//err message
4.Promise的all方法使用
现在有一个需求,是要两个网络请求都过来,才能完成这个需求。
把两个结果合在一起,放到一个数组里面来。
在开发中,如果遇到,某一次请求需要发送两次请求才能完成的话,就用Promise.all对它做一个包装就可以了。
Vuex
1.概念和作用
1.概念
1.vuex是专为vue.js应用程序开发的状态管理模式
状态管理:
需要多个组件共享的变量全部存在一个对象里面。
vuex还是响应式的。
2.什么时候会使用到vuex?
vuex提供了一个在多组件间共享状态的的插件。
3.什么东西会放到vuex里面管理
在多个组件需要共享,并且层级关系比较多的时候。
一般都是放一些 多个页面需要共享的一种状态
例:
- 用户登陆状态token,用户名称,头像,地理位置等
- 商品的收藏,购物车的物品等等
这些都东西都可以放一个统一的地方,对它进行保存和管理,而且还是响应式的。
2.单界面到多界面状态管理切换
单界面到状态管理

弹幕:State在View上显示,View上产生的Actions会改变State。
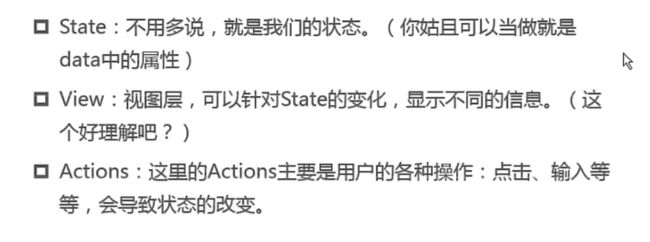
多页面管理
当两个文件不是父子组件关系的时候,需要进行传值,就可以使用vuex
vuex是插件,需要下载。
npm install [email protected] --save
store/index.js
import Vue from 'vue'
import Vuex from 'vuex'
//1.安装插件
Vue.use(Vuex)

//2.创建对象
const store = new Vuex.Store({
  state: {
    counter: 1000
  }
})

// 3.导出store对象
export default store
main.js
// 小提示:这里的store必须是小写,不能大写为Store,不然会报错取不到state
import store from './store'
new Vue({
  store,
  render: h => h(App)
}).$mount('#app')
HelloVuex.vue
<h2>{{ $store.state.counter }}h2>
vuex官方图:
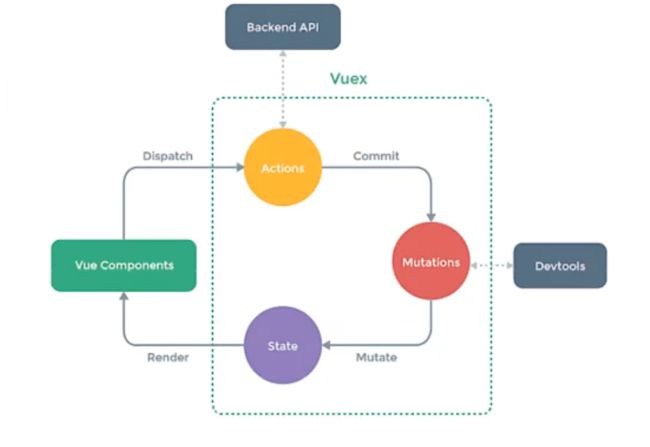
图中的Devtools是vue开发的浏览器的一个插件
作用:可以帮你记录每次修改State的状态。
比如,当你改错的了时候,就可以定位到是哪个组件页面修改错了。
注意:只要是修改State里面的状态,最好都要通过Mutations来修改。这样Devtools才能帮你记录,
才能跟踪每一步修改状态。
如果有异步操作,不要在Mutations里面来做。
Mutations和Devtools都是同步操作。
如果需要异步操作,要在Actions里面来做,做完之后再提交到Mutations
一般发送网络请求的时候会进行异步操作。
3.devtool和mutations
store/index.js
const store = new Vuex.Store({
  state: {
    counter: 1000
  },
  mutations: {
    increment(state) {
      state.counter++
    },
    decrement(state) {
      state.counter--
    }
  }
})
App.vue
{{ $store.state.counter }}
add () {
this.$store.commit('increment')
},
sub () {
this.$store.commit('decrement')
}
4.state单一状态树的理解
vuex几个核心的概念:
- State
- Getters (类似于计算属性)
- Mutation
- Action
- Module
单一状态数:单一数据源

5.getters的使用详解
类似于计算属性。
什么时候会使用计算属性:
当数据需要经过一系列变化之后,在dom上展示,就需要计算属性。
getters基本使用,获取到counter的平方
store/index.js
getters: {
    powerCounter(state) {
      return state.counter * state.counter
    }
  }
HelloVuex.vue
<h2>{{ $store.getters.powerCounter }}h2>
2.获取年龄小于20的对象
store/index.js
  state: {
    counter: 1000,
    students: [
      { id: 1, name: 'wa', age: 10 },
      { id: 2, name: 'wq', age: 11 },
      { id: 3, name: 'we', age: 24 },
      { id: 4, name: 'wt', age: 20 }
    ]
  },
     getters: {

   more20(state) {
    //过滤掉age大于20的对象
      return state.students.filter(s => s.age < 20)
    }
  }
})
然后在Hellovuex.vue组件中直接调用
<h2>{{ $store.getters.more20 }}h2>
现在想获取年龄小于20岁的个数
store/index.js
getters: {
  more20(state) {
      return state.students.filter(s => s.age < 20)
    },
    more20len(state, getters) {
      return getters.more20.length
    }
  }
Hellovuex.vue
<h2>{{$store.getters.more20len}}h2>
打印2
现在的需求是,答应年龄小于age 的,这个age是变量,需要传进来告诉我年龄小于多少岁
getters: {
lessAge(state) {
      return function (age) {
        return state.students.filter(s => s.age < age)
      }
    }
}
<h2>{{ $store.getters.lessAge(30) }}h2>
![]()
6.mutations的携带参数
Mutations状态更新
Vuex的store状态更新的唯一方式:提交Mutations。
Mutations主要包括两部分:
- 字符串的事件类型(type)
- 一个回调函数(handler),改回调函的第一个参数是
state
案例:点击事件 传参num,num参数就是counter增加和减少的数。
App.vue
 <button @click="addNum(5)">+5button>
    <button @click="subNum(10)">-10button>
   addNum (num) {
      this.$store.commit('incrementNum', num)
    },
    subNum (num) {
      this.$store.commit('decrementNum', num)
    }
Store/index.js
mutations: {
   incrementNum(state, num) {
      state.counter += num
    },
    decrementNum(state, num) {
      state.counter -= num
    }
  },
如果是传入参数obj对象,比如按钮绑定点击时间,然后增加一个学生
App.vue
<button @click="studentsAdd">+学生button>
  studentsAdd () {
      const stu = { id: 5, name: 'sz', age: 8 }
      this.$store.commit('incrementStu', stu)
    }
Store/index.js
 decrementNum(state, num) {
      state.counter -= num
    },
    incrementStu(state, stu) {
      state.students.push(stu)
    }
参数被称为mutations的载荷(Payload)
7.Mutations的提交风格
- commit提交是一种普通的方式。
- Vue还提供了另外一种风格,是一个包含type属性的对象。
案例
App.vue
  addNum (num) {
      //1.普通的提交封装
      // this.$store.commit('incrementNum', num)
      //2.特殊的提交封装
      this.$store.commit({
        type: 'incrementNum',
        num
      })
    },
Store/index.js
 incrementNum(state, num) {
      console.log(num)
      // state.counter += num
    },
这里的num就打印成一个对象了
所以之前增加操作可以写成这样
store/index.js
 incrementNum(state, payload) {
       state.counter += payload.num
    },
这就是第二种提交风格。
8.数据的响应式原理
Mutations的响应规则

案例:
修改state里面的对象里的一个属性,看是否为响应式
store/index.js
 state: {
    info: {
      name: 'rt123',
      age: 18,
      height: 180
    }
  },
 mutations: {
    updateInfo(state) {
      state.info.name = 'sz123'
    }
  },
App.vue
<button @click="updateInfo">更新infobutton>
  updateInfo () {
      this.$store.commit('updateInfo')
    },
Hellovuex.vue
   <h2>显示info对象h2>
    <h2>{{ $store.state.info }}h2>
后加入的属性是不会添加到响应式系统里面的,只有一开始在store里面定义好的才可以。
state.info[address] = '苏州'
如果需要往对象里面添加一个属性,并且是响应式的,可以这样写
Vue.set(state.info,'address','苏州')
如果需要删除对象其中一个属性,就可以用Vue.delete()方法来删除
Vue.delete(state.info,'age')
//js方法delete state.info.age,不是响应式的
9.mutations的类型常量
新建一个文件mutations
store/mutations-types.js
export const INCREMENT = 'increment'
store/index.js
import {INCREMENT} from './mutations-types'

mutations: {
	[INCREMENT](state) {
      state.counter++
    },
  },
App.vue
  import {INCREMENT} from './store/mutations-types'

add () {
      this.$store.commit(INCREMENT)
    },
官方推荐用这种常量代替字符串的方式来写。
10.actions的使用详解
一般情况下,Mutations里面的方式都是同步的,方便使用devtools工具。
如果一定要使用异步操作,就用actions来替代mutations。
案例:
  actions: {
    //context是上下文,理解成store对象
    aUpdateInfo (context) {

    }
  },
修改state的唯一的途径就是通过mutations
store/index.js
  mutations: {
    updateInfo(state) {
      state.info.name = 'sz123'
      Vue.set(state.info, 'address', '苏州')
      // delete state.info.age
      // Vue.delete(state.info, 'age')
    }
  },
actions: {
    aUpdateInfo(context) {
      setTimeout(() => {
        context.commit('updateInfo')
      }, 3000)
    }
  },
App.vue
 updateInfo () {
      this.$store.dispatch('aUpdateInfo')
    },
写一个回调函数,当完成的时间,打印一个信息告诉别人已经完成
store/index.js
 actions: {
    aUpdateInfo(context, payload) {
      setTimeout(() => {
        context.commit('updateInfo')
        payload()
      }, 3000)
    }
  },
App.vue
 updateInfo () {
      this.$store.dispatch('aUpdateInfo', () => {
        console.log('里面已经完成了');
      })

    },
但是这样会有一个弊端,就是同时还要传入其他参数。
App.vue
  updateInfo () {
      this.$store.dispatch('aUpdateInfo', {
        message: '我是携带的信息',
        success: () => {
          console.log('里面已经完成了');
        }
      })

    },
store/index.js
  actions: {
    aUpdateInfo(context, payload) {
      setTimeout(() => {
        context.commit('updateInfo')
        console.log(payload.message)//我是携带的信息
        payload.success()//里面已经完成了
      }, 3000)
    }
  },
但是这种方式不够优雅。
store/index.js
    aUpdateInfo(context, payload) {
      return new Promise((resolve, reject) => {
        setTimeout(() => {
          context.commit('updateInfo')
          console.log(payload)
          resolve('111111')
        }, 3000)
      })
    }
App.vue
   updateInfo () {
      this.$store.dispatch('aUpdateInfo', '我是携带的信息').then(res => {
        console.log('里面完成了提交');
        console.log(res);
      })
    },

dispatch可以返回一个Promise。
11.modules的使用详解
案例
store/index.js
const moduleA = {
  state:{
    name:'zhangshan'
  },
  mutations:{},
  getters:{},
  actions:{}
}
const store = new Vuex.Store({
modules:{
  a:moduleA
}
})
如何去拿
HelloVuex.vue
<h2>
  {{$store.state.a.name}}
h2>
目的:为了防止state过于臃肿
store/index.js
const moduleA = {
  state:{
    name:'zhangshan'
  },
  mutations:{
    updateName(state,payload){
      state.name=payload
    }
  },
  getters:{},
  actions:{}
}
const store = new Vuex.Store({
modules:{
  a:moduleA
}
})
App.vue
updateName () {
      this.$store.commit('updateName', 'lisi')
    }
然后是moduleA里面的getters的使用,也是直接调用
store/index.js
  getters: {
    fullname(state) {
      return state.name + '111111'
    }
  },
Hellovuex
<h2>{{ $store.getters.fullname }}h2>
如果在里面再传入一个getters
store/index.js
  getters: {
    fullname(state) {
      return state.name + '111111'
    },
       fullname2(state,getters){
      return getters.fullname +'22222'
    }
  },
Hellovuex.vue
<h2>{{ $store.getters.fullname2 }}h2>
现在想讲模块外面state参数 传到 模块A里面的getters里面的函数
getters:{
     fullname3(state,getters,rootState){
      return getters.fullname2 +rootState.counter
    }
}
<h2>{{ $store.getters.fullname3 }}h2>
然后就是moduleA里面的actions
index.js
const moduleA = {
  actions:{
    setTimeout(() => {
        context.commit('updateName', 'xiaohong')
      }, 3000)
  }
}
.vue
asyncUpdateName () {
this.$store.dispatch('aUpdateName')
}
打印moduleA里面的context

12.store文件夹的目录组织
什么是对象的解构
案例:
const obj = {
  name:'sz',
  age:18,
  height:188
}
//这里的顺序打乱也没关系。
const {name,height,age}=obj
console.log(name)//sz
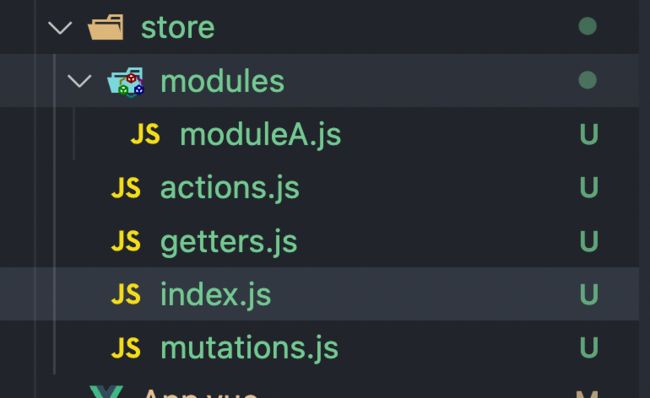
store文件下面的目录结构
mutations最好专门放在一个文件中mutations.js
import Vue from 'vue'

export default {
  increment() {
    this.state.counter++
  },
  decrement() {
    this.state.counter--
  },
  incrementNum(state, payload) {
    state.counter += payload.num
  },
  decrementNum(state, num) {
    state.counter -= num
  },
  incrementStu(state, stu) {
    state.students.push(stu)
  },
  updateInfo(state) {
    state.info.name = 'sz123'
    Vue.set(state.info, 'address', '苏州')
    // delete state.info.age
    // Vue.delete(state.info, 'age')
  }
}
然后再index.js文件中导入mutations
import mutations from './mutations'
同理,actions也可以这样。
然后modules可以建一个modules文件夹,里面可以放多个模块
store/modules/moduleA.js,将上门的moduleA里面的代码放到这个文件里。
最终抽离的index.js文件
// import { reject, resolve } from 'core-js/fn/promise'
import Vue from 'vue'
import Vuex from 'vuex'
import mutations from './mutations'
import actions from './actions'
import getters from './getters'
import moduleA from './modules/moduleA'
//1.安装插件
Vue.use(Vuex)

const state = {
  counter: 1000,
  students: [
    { id: 1, name: 'wa', age: 10 },
    { id: 2, name: 'wq', age: 11 },
    { id: 3, name: 'we', age: 24 },
    { id: 4, name: 'wt', age: 20 }
  ],
  info: {
    name: 'rt123',
    age: 18,
    height: 180
  }
}
//2.创建对象
const store = new Vuex.Store({
  state,
  mutations,
  actions,
  getters,
  modules: {
    a: moduleA
  }
})
// 3.导出store对象
export default store
然后store文件下面的目录结构
axios
1.网络请求模块的选择


功能特点:
-
在浏览器中发送XMLHttpRequests请求
-
在node.js中发送http请求
-
支持Promise API
-
拦截请求和响应
-
转换请求和响应数据
-
等等
2.axios框架的基本使用
先安装
npm install axios --save
main.js
import axios from 'axios'
axios({
  url: 'http://123.207.32.32:8000/home/multidata'
}).then(res => {
  console.log(res)
})
打印结果:

默认情况下,只传一个url的话,就会发生get请求。
其实等同于这个
import axios from 'axios'
axios({
  url: 'http://123.207.32.32:8000/home/multidata',
  method:'get'
}).then(res => {
  console.log(res)
})
params
import axios from 'axios'
axios({
  url: 'http://123.207.32.32:8000/home/data',
  method:'get'
  //专门针对get请求的参数拼接
  params:{
  type:'pop',
  page:1
}
}).then(res => {
  console.log(res)
})
里面的params参数到时候会自动拼接到url后面。
3.axios发送并发请求
axios.all([axios({
  url:'http://123.207.32.32:8000/home/multidata',

}),axios({
  url:'http://123.207.32.32:8000/home/data',
  params:{
    type:'sell',
    page:5
  }
})]).then(result=>{
   //在两个网络请求都完成之后,来到这。
  console.log(result)
})

数组的解构赋值
const names =['aa','bb','cc']
const [name1,name2,name3]=names;
console.log(name1,name2,name3)//aa bb cc
但是数组解构赋值的比较少,一般都是通过遍历的方式去拿里面元素。
4.axios的配置相关信息
因为上面的BaseUrl都是固定的。
- 开发中很多参数都是固定的。
- 这时候可以对重复的进行一些抽取,也可以离用axios全局配置
- main.js
import axios from 'axios'
axios.defaults.baseURL = 'http://123.207.32.32:8000'
//设置超时时间
axios.defaults.timeout=5000
axios.all([axios({
  url:'/home/multidata'
}),axios({
  url:'/home/data'
  params:{
    type:'sell',
    page:5
  }
})]).then(result=>{
   //在两个网络请求都完成之后,来到这。
  console.log(result)
})
在开发中,都有哪些配置信息可以传到axios({})里面呢?
==params:{id:2}==针对对是get请求,如果是post的请求,就的把请求参数放在请求体里面。
request body
data:{
key:'aa'
}
配置信息只需要记常用到的就可以,遇到接口文档里面有些信息不是很了解,到时候具体去查询。
5.axios的实例和模块封装
案例
import axios from 'axios'
axios.defaults.baseURL = 'http://123.207.32.32:8000'
//设置超时时间
axios.defaults.timeout=5000
axios.all([axios({
  url:'/home/multidata'
}),axios({
  url:'/home/data'
  params:{
    type:'sell',
    page:5
  }
})]).then(axios.spread((res1,res2)=>{
     //在两个网络请求都完成之后,来到这。
  console.log(res1)
  console.log(res2)

}))
//如果遇到分布式场景,就是url不是上面那个了,然后设置超时时间也不一样
//就需要nginx做一层反向代理。
axios({
  url:'/category'
})
注:什么叫分布式?
当服务器在部署的时候,当它的并发量非常高的时候,一个服务器就不能满足整个的业务需求了。
如果只有一个服务器,同时有很多用户向这台服务器发送请求的话,很有可能服务器根本就处理不过来。
同样的,多个服务器的ip地址也不一样。
一把来说,他会再搞一个服务器(反向代理nginx服务器),前端发送请求的时候,面向的都是这个反向代理服务器。
所以上面的如果分类的数据在另一个服务器中,就不能用全局url配置了。
1.创建axios 的实例
//创建对应的实力对象
const instance1 = axios.create({
  baseURL:'http://123.207.32.32:8000',
  timeout:5000
})
instance1({
  url:'/home/multidata'
}).then(res=>{
  console.log(res)
})

instance1({
  url:'/home/data',
  params:{
    type:'pop',
    page:1
  }
}).then(res=>{
  console.log(res)
})


const instance2 =axios.create({
  baseURL:'http://123.11.33.33:8000',
  timeout:8000,
  headers:{

  }
})
2.axios的模块封装
最好有一个意识:
只要引用了第三方的东西,千万不要在每一个.vue文件里面都对这个第三方库有依赖。
新建一个network/reqeust.js
import axios from 'axios'
export function request(config, success, failure) {
  //1.创建axios实例
  const instance1 = axios.create({
    baseURL: 'http://123.207.32.32:8000',
    timeout: 5000
  })
  //发送真正的网络请求
  instance1(config)
    .then(res => {
      success(res)
    })
    .catch(res => {
      failure(res)
    })
}
现在如果想用上面的东西
main.js
封装request模块
import { request } from './network/request'
request(
  {
    url: '/home/multidata'
  },
  res => {
    console.log(res)
  },
  err => {
    console.log(err)
  }
)
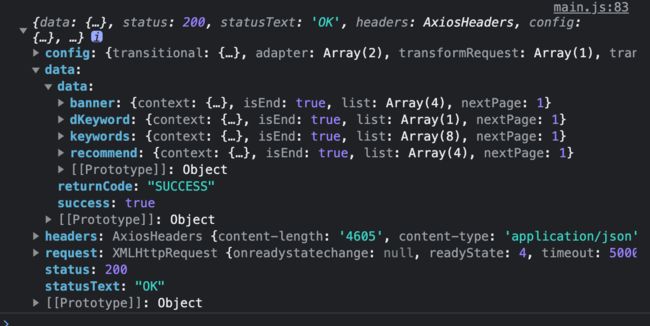
获取成功打印结果
还有一种方式:
在config里面传success和failure
network/reqeust.js
import axios from 'axios'
export function request(config) {
  //1.创建axios实例
  const instance1 = axios.create({
    baseURL: 'http://123.207.32.32:8000',
    timeout: 5000
  })
  //发送真正的网络请求
  instance1(config.baseConfig)
    .then(res => {
      config.success(res)
    })
    .catch(res => {
      config.failure(res)
    })
}
main.js
import { request } from './network/request'
request(
  {
   baseConfig:{

   },
    success:funciton(res){

  },
  failure:function(err){

}
  })
不过上面也不是最终方案,下面是改进方案:
network/request.js
import axios from 'axios'
export function request(config) {
 return new Promise((resolve,reject)=>{
    const instance1 = axios.create({
    baseURL: 'http://123.207.32.32:8000',
    timeout: 5000
  })
  //发送真正的网络请求
  instance1(config)
    .then(res => {
      resolve(res)
    })
    .catch(res => {
     reject(res)
    })
 })

}
main.js
import { request } from './network/request'
request({
    url:'/home/multidata'
  }).then(res=>{
    console.log(res)
  }).catch(err=>{
    console.log(err)
  })
还有一种方法:
network/request.js
import axios from 'axios'
export function request(config) {

  //1.创建axios实例
  const instance1 = axios.create({
    baseURL: 'http://123.207.32.32:8000',
    timeout: 5000
  })
		//发送真正的网络请求
  return instance1(config)
}
案例:函数的回调
function test(aaa,bbb){
  aaa('hel lo')
  bbb('err message')
}

test(function(res){
  console.log(res)//hello
},function(err){
  console.log(err)//err message
})
回调就是吧某一个函数作为参数,传到另外一个函数里面。
6.axios的拦截器的使用
在请求之前,可能想对某一些请求进行拦截。
比如给它拼接上一些东西,或者判断一下你有没有携带一些东西。
或者你想在某些地方,一旦发送网络请求的话,在整个界面里面,给它增加一些动画等等。
意思就是,你想将它的请求过程拦截下来。就可以使用拦截器
axios拦截器,既提供了请求成功的拦截,也提供了失败的拦截。
instance.interceptors.request.use(config=>{
  console.log('来到request拦截success中');
  return config;
},err => {
  console.log('来到了request拦截failure中');
  return err
})
包括响应成功和失败,也是可以拦截的。
instance.interceptors.response.use(response=>{
  console.log('来到request拦截success中');
  return response.data;
},err => {
  console.log('来到了request拦截failure中');
  return err
})
响应失败,一般是服务器没有给我具体的数据过来,而是给我一个错误码。
1.请求拦截
request.js
import axios from 'axios'
export function request(config) {
  //1.创建axios实例
  const instance1 = axios.create({
    baseURL: 'http://123.207.32.32:8000',
    timeout: 5000
  })
  //2.axios的拦截器
  //全局拦截:axios.interceptors
  //进行实例的拦截
  //请求拦截
    instance1.interceptors.request.use(config => {
    console.log(config);
  }, err => {
    console.log(err);
  })
  //instance1.intercaptors.response;//响应拦截
  //3.发送真正的网络请求
 return instance1(config)
}
上面request请求拦截,打印config信息
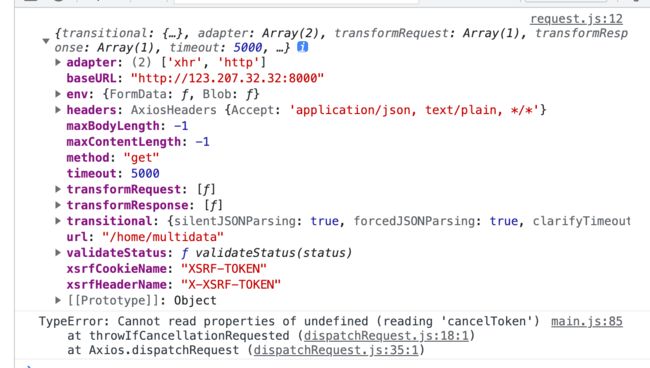
为什么main.js里面的打印报错呢?
因为config被拦截掉了,所以要在拦截器里面原封不动的把configreturn出去
 instance1.interceptors.request.use(config => {
    console.log(config);
   return config
  }, err => {
    console.log(err);
  })
这样main.js就可以成功获取到res了

一般请求拦截要做的事情:
- 比如config中一些信息,不符合服务器的要求
你需要对config里面的东西,进行某种变化,再给服务器传过去。
比如,希望在每次请求的时候,加上一些独立的特殊的headers。
- 每次发送网络请求时,都希望在界面中显示一个请求的图标。
就可以在请求的时候,让那个转圈的图标show出来,然后在后面响应respone的拦截里面,再将它隐藏起来。
- 某些网络请求(比如登陆(token)),是必须携带一些特殊的信息的。
2.响应拦截
 instance1.interceptors.response.use(res => {
    console.log(res);
  }, err => {
    console.log(err);
  })

一般在响应拦截这里,我要取出来的一般都是res.data
但是处理结果是在main.js里面处理的
在request.js里面拦截的res要返回出去res.data
 instance1.interceptors.response.use(res => {
    console.log(res);
   return res.data
  }, err => {
    console.log(err);
  })
main.js
这边拿到的就只有res.data
import { request } from './network/request'
request({
  url: '/home/multidata'
})
  .then(res => {
    console.log(res)
  })
  .catch(err => {
    console.log(err)
  })


