Spring Cloud的介绍及项目搭建
SpringBoot与SpringCloud的关系与区别
1,SpringBoot :是一个快速开发框架,通过用maven依赖的继承方式,帮我们快速整合第三方框架,完全采用注解化(使用注解方式启动SpringMVC),简化XML配置,内置HTTP服务器(Tomcat,Jetty),最终以Java应用程序进行执行。
简化了spring的程序的搭建和开发。
2,SpringCloud:是一套目前完整的微服务框架,它是是一系列框架的有序集合。通过SpringBoot风格进行再封装屏蔽掉了复杂的配置和实现原理,最终给开发者留出了一套简单易懂、易部署和易维护的分布式系统开发工具包。它利用Spring Boot的开发便利性巧妙地简化了分布式系统基础设施的开发,如服务发现注册、配置中心、消息总线、负载均衡、断路器、数据监控等,都可以用SpringBoot的开发风格做到一键启动和部署。
通过上面的描述可以总结出:
(1) maven是springboot的基础,springboot项目本身就是maven项目。在maven项目中使用springboot的多个starter加几个约定,就能成为springboot项目了。
(2)springboot是springcloud的基础,springcloud本身是springboot项目。
(3)关系:maven->springboot->springcloud
maven是springboot的基础,springboot是springcloud的基础,maven不依赖于springboot,springboot不依赖与springcloud。
SpringCloud 包含哪些?
服务注册与发现 zookeeper nacos consul
服务调用 openfeign
服务熔断
负载均衡
服务降级 hystrix stentienl
服务消息队列
配置中心管理 nacos
服务网关 gateway
服务监控
全链路追踪
自动化构建部署
手动搭建一个SpringCloud项目
<?xml version="1.0" encoding="UTF-8"?>
<project xmlns="http://maven.apache.org/POM/4.0.0"
         xmlns:xsi="http://www.w3.org/2001/XMLSchema-instance"
         xsi:schemaLocation="http://maven.apache.org/POM/4.0.0 http://maven.apache.org/xsd/maven-4.0.0.xsd">
    <modelVersion>4.0.0</modelVersion>

    <groupId>com.demo</groupId>
    <artifactId>springcloud2022</artifactId>
    <packaging>pom</packaging>
    <version>1.0-SNAPSHOT</version>
    <modules>
        <module>provider-payment</module>
        <module>consumer-order</module>
        <module>commons</module>
    </modules>

    <!-- 统一管理jar包版本 -->
    <properties>
        <project.build.sourceEncoding>UTF-8</project.build.sourceEncoding>
        <maven.compiler.source>1.8</maven.compiler.source>
        <maven.compiler.target>1.8</maven.compiler.target>
        <junit.version>4.12</junit.version>
        <lombok.version>1.16.18</lombok.version>
        <mysql.version>5.1.47</mysql.version>
        <druid.version>1.1.16</druid.version>
        <druid.spring.boot.starter.version>1.1.10</druid.spring.boot.starter.version>
        <mybatis.plus.boot.starter.version>3.3.2</mybatis.plus.boot.starter.version>
    </properties>

    <!-- 1、只是声明依赖,并不实际引入,子项目按需声明使用的依赖 -->
    <!-- 2、子项目可以继承父项目的 version 和 scope -->
    <!-- 3、子项目若指定了 version 和 scope,以子项目为准 -->
    <dependencyManagement>
        <dependencies>
            <dependency>
                <groupId>org.springframework.boot</groupId>
                <artifactId>spring-boot-dependencies</artifactId>
                <version>2.3.2.RELEASE</version>
                <type>pom</type>
                <scope>import</scope>
            </dependency>
            <dependency>
                <groupId>org.springframework.cloud</groupId>
                <artifactId>spring-cloud-dependencies</artifactId>
                <version>Hoxton.SR7</version>
                <type>pom</type>
                <scope>import</scope>
            </dependency>
            <dependency>
                <groupId>com.alibaba.cloud</groupId>
                <artifactId>spring-cloud-alibaba-dependencies</artifactId>
                <version>2.2.1.RELEASE</version>
                <type>pom</type>
                <scope>import</scope>
            </dependency>

            <dependency>
                <groupId>mysql</groupId>
                <artifactId>mysql-connector-java</artifactId>
                <version>${mysql.version}</version>
            </dependency>
            <dependency>
                <groupId>com.alibaba</groupId>
                <artifactId>druid</artifactId>
                <version>${druid.version}</version>
            </dependency>
            <dependency>
                <groupId>com.alibaba</groupId>
                <artifactId>druid-spring-boot-starter</artifactId>
                <version>${druid.spring.boot.starter.version}</version>
            </dependency>
            <dependency>
                <groupId>com.baomidou</groupId>
                <artifactId>mybatis-plus-boot-starter</artifactId>
                <version>${mybatis.plus.boot.starter.version}</version>
            </dependency>
            <dependency>
                <groupId>junit</groupId>
                <artifactId>junit</artifactId>
                <version>${junit.version}</version>
            </dependency>
            <dependency>
                <groupId>org.projectlombok</groupId>
                <artifactId>lombok</artifactId>
                <version>${lombok.version}</version>
                <optional>true</optional>
            </dependency>
        </dependencies>
    </dependencyManagement>


</project>
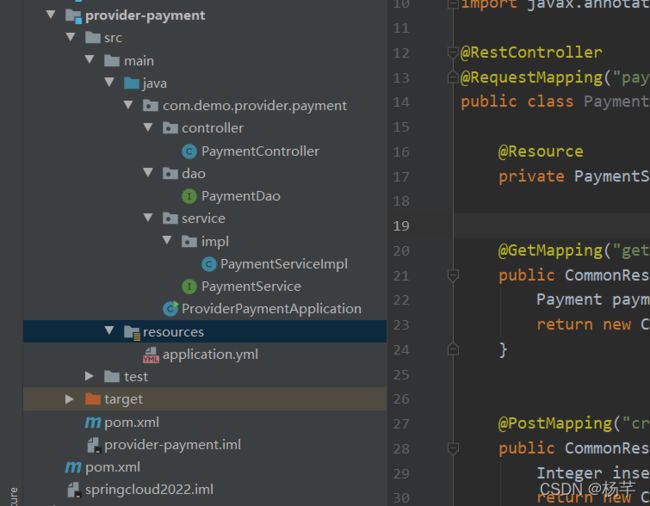
4,建子工程
5,配置子工程的pom文件
<?xml version="1.0" encoding="UTF-8"?>
<project xmlns="http://maven.apache.org/POM/4.0.0"
         xmlns:xsi="http://www.w3.org/2001/XMLSchema-instance"
         xsi:schemaLocation="http://maven.apache.org/POM/4.0.0 http://maven.apache.org/xsd/maven-4.0.0.xsd">
    <parent>
        <artifactId>springcloud2022</artifactId>
        <groupId>com.demo</groupId>
        <version>1.0-SNAPSHOT</version>
    </parent>
    <modelVersion>4.0.0</modelVersion>

    <artifactId>provider-payment</artifactId>

    <dependencies>
        <dependency>
            <groupId>org.springframework.boot</groupId>
            <artifactId>spring-boot-starter-web</artifactId>
        </dependency>

        <dependency>
            <groupId>org.springframework.boot</groupId>
            <artifactId>spring-boot-starter-actuator</artifactId>
        </dependency>

        <dependency>
            <groupId>com.baomidou</groupId>
            <artifactId>mybatis-plus-boot-starter</artifactId>
        </dependency>

        <dependency>
            <groupId>com.alibaba</groupId>
            <artifactId>druid-spring-boot-starter</artifactId>
        </dependency>

        <dependency>
            <groupId>mysql</groupId>
            <artifactId>mysql-connector-java</artifactId>
        </dependency>

        <dependency>
            <groupId>org.projectlombok</groupId>
            <artifactId>lombok</artifactId>
            <optional>true</optional>
        </dependency>

        <dependency>
            <groupId>org.springframework.boot</groupId>
            <artifactId>spring-boot-starter-test</artifactId>
            <scope>test</scope>
        </dependency>

        <dependency>
            <groupId>com.demo</groupId>
            <artifactId>commons</artifactId>
            <version>1.0-SNAPSHOT</version>
        </dependency>

    </dependencies>


</project>
<?xml version="1.0" encoding="UTF-8"?>
<project xmlns="http://maven.apache.org/POM/4.0.0"
         xmlns:xsi="http://www.w3.org/2001/XMLSchema-instance"
         xsi:schemaLocation="http://maven.apache.org/POM/4.0.0 http://maven.apache.org/xsd/maven-4.0.0.xsd">
    <parent>
        <artifactId>springcloud2022</artifactId>
        <groupId>com.demo</groupId>
        <version>1.0-SNAPSHOT</version>
    </parent>
    <modelVersion>4.0.0</modelVersion>

    <artifactId>commons</artifactId>

    <dependencies>

        <dependency>
            <groupId>org.projectlombok</groupId>
            <artifactId>lombok</artifactId>
            <optional>true</optional>
        </dependency>

    </dependencies>


</project>
基础类
controller 类

package com.demo.provider.payment.controller;


import com.demo.entity.CommonResult;
import com.demo.entity.Payment;
import com.demo.provider.payment.service.PaymentService;

import org.springframework.web.bind.annotation.*;

import javax.annotation.Resource;

@RestController
@RequestMapping("payment")
public class PaymentController {

    @Resource
    private PaymentService paymentService;


    @GetMapping("get/{id}")
    public CommonResult<Payment> selectOne(@PathVariable("id") String id) {
        Payment payment = this.paymentService.listById(id);
        return new CommonResult<Payment>(200, "select success", payment);
    }


    @PostMapping("create")
    public CommonResult<Integer> create(@RequestBody Payment payment) {
        Integer insert = this.paymentService.create(payment);
        return new CommonResult<>(200, "insert success", insert);
    }
}

service 接口

package com.demo.provider.payment.service;


import com.baomidou.mybatisplus.extension.service.IService;
import com.demo.entity.Payment;


public interface PaymentService extends IService<Payment> {


    Payment listById(String id);


    Integer create(Payment payment);

}

service impl 类

package com.demo.provider.payment.service.impl;


import com.baomidou.mybatisplus.extension.service.impl.ServiceImpl;
import com.demo.entity.Payment;
import com.demo.provider.payment.dao.PaymentDao;
import com.demo.provider.payment.service.PaymentService;
import org.springframework.stereotype.Service;

import javax.annotation.Resource;


@Service("paymentService")
public class PaymentServiceImpl extends ServiceImpl<PaymentDao,Payment> implements PaymentService {
    @Resource
    private PaymentDao paymentDao;

    @Override
    public Payment listById(String id) {
        return paymentDao.selectById(id);
    }

    @Override
    public Integer create(Payment payment) {
        return paymentDao.insert(payment);
    }
}

dao 接口

package com.demo.provider.payment.dao;

import com.baomidou.mybatisplus.core.mapper.BaseMapper;
import com.demo.entity.Payment;
import org.apache.ibatis.annotations.Mapper;

@Mapper
public interface PaymentDao extends BaseMapper<Payment> {

}

启动类

package com.demo.provider.payment;

import org.springframework.boot.SpringApplication;
import org.springframework.boot.autoconfigure.SpringBootApplication;

@SpringBootApplication
public class ProviderPaymentApplication {
    public static void main(String[] args) {
        SpringApplication.run(ProviderPaymentApplication.class,args);
    }
}


配置文件

server:
  port: 8011

spring:
  application:
    name: provider-payment

#mysql  5用的驱动是com.mysql.jdbc.Driver
#mysql  6用的驱动是com.mysql.cj.jdbc.Driver
  datasource:
    driver-class-name: com.mysql.jdbc.Driver
    url: jdbc:mysql://58.48.40.198:14306/test?autoRreconnect=true&useSSL=false&useUnicode=true&characterEncoding=utf-8&allowMultiQueries=true&serverTimezone=GMT%2b8
    username: root
    password: bcle98i3nf
9,消费者-订单模块
基础类
RestTemplateConfig  类

package com.demo.consumerorder.config;

import org.springframework.context.annotation.Bean;
import org.springframework.context.annotation.Configuration;
import org.springframework.web.client.RestTemplate;

@Configuration
public class RestTemplateConfig {


    @Bean
    public RestTemplate getRestTemplate() {
        return new RestTemplate();
    }
}

controller 类

package com.demo.consumerorder.controller;


import com.demo.entity.CommonResult;
import com.demo.entity.Payment;

import org.springframework.web.bind.annotation.*;
import org.springframework.web.client.RestTemplate;

import javax.annotation.Resource;


@RestController
@RequestMapping("consumer")
public class OrderController {

    public static final String PAYMENT_URL = "http://localhost:8011";


    @Resource
    private RestTemplate restTemplate;

    @PostMapping("/create")
    public CommonResult<Payment> create(@RequestBody Payment payment) {
        return restTemplate.postForObject(PAYMENT_URL + "/payment/create", payment, CommonResult.class);
    }

    @GetMapping("/get/{id}")
    public CommonResult<Payment> getPayment(@PathVariable("id") Long id) {
        return restTemplate.getForObject(PAYMENT_URL + "/payment/get/" + id, CommonResult.class);
    }

}

启动类

package com.demo.consumerorder;

import org.springframework.boot.SpringApplication;
import org.springframework.boot.autoconfigure.SpringBootApplication;

@SpringBootApplication
public class ConsumerOrderApplication {

    public static void main(String[] args) {
        SpringApplication.run(ConsumerOrderApplication.class,args);
    }
}
配置类


server:
  port: 8012

spring:
  application:
    name: consumer-order

  #mysql  5用的驱动是com.mysql.jdbc.Driver
  #mysql  6用的驱动是com.mysql.cj.jdbc.Driver
  datasource:
    driver-class-name: com.mysql.jdbc.Driver
    url: jdbc:mysql://58.48.40.198:14306/test?autoRreconnect=true&useSSL=false&useUnicode=true&characterEncoding=utf-8&allowMultiQueries=true&serverTimezone=GMT%2b8
    username: root
    password: bcle98i3nf
运行结果:


