Rust 调用标准C接口的自定义c/c++库,FFI详解
目录
-
- 前言
- 关于库
- 创建项目
- 手动绑定
- 自动绑定
- 结构体
- union联合体
- enum枚举
- 回调函数
- 空指针
- 析构
- ownership
- panic
- 参考文章:
前言
没有前言,干就完事了。
关于库
本人环境是win10,vs2013。
不管什么环境,用下面的文件制作出对应的动态库和静态库就可以。
hello.h 文件
#include "stdio.h"
#include hello.c文件
#include "hello.h"

DLLEXPORT void say_hello(){
	cout << "hello" <<endl;
}
DLLEXPORT int num(int a, int b){
	return a + b;
}
DLLEXPORT int get_strlen(char * s){
	return (int)strlen(s);
}
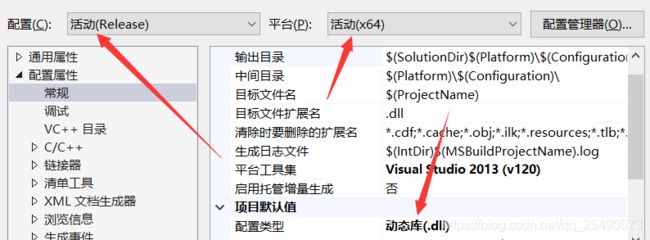
注意:rust项目和动态库编译一定要统一平台,都是x86,或者都是x64
我这里都是x64,Unicode编码,如下图

点击生成,制作出动态库和静态库。
创建项目
cargo new testffi
手动绑定
修改main.rs如下
#[link(name = "hello")]
extern {
    pub fn say_hello();
}
fn c_say_hello(){
    unsafe {
        say_hello();
    }
}
fn main() {
    c_say_hello();
}
- link宏说明:
name指的是库名 - kind指定 默认动态库 后缀 so/dll/dylib/a
//标记静态库
#[link(name = "foo", kind = "static")]
//osx的一种特殊库
#[link(name = "CoreFoundation", kind = "framework")]
- extern 标记的快表示是外来的,默认"C" ABI,就是库中来的,完整应该是
extern "C" {
}
运行如下命令编译运行
//编译
cargo build
//运行
cargo run
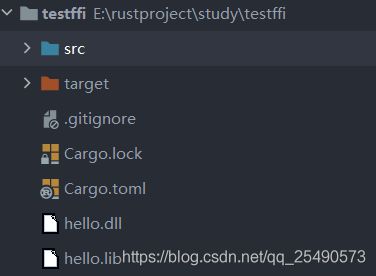
如下图

编译时需要两个库.dll .lib 都存在(win10,其他环境为测试),运行exe是只需要你指定的库就可以,我们删除掉hello.lib,运行如下命令也是可以的。

自动绑定
这里使用bindgen包做构建
1 前提
1.1 安装vs2015或更高版本
1.2 安装llvm 6以上版本
llvm下载地址:https://releases.llvm.org/download.html#6.0.1
1.3 设置环境变量LIBCLANG_PATH为指向LLVM安装目录的bin目录
查看环境变量是否生效,在powershell中输入命令 查看
Get-ChildItem env:
2 引入包
编辑cargo.toml 文件,加入
[build-dependencies]
bindgen = "0.57"
3 根目录下新建build.rs文件,编辑如下
fn main(){
    println!("cargo:rustc-link-lib=hello"); //指定库
    // println!("cargo:rerun-if-changed=lib/hello.h");
    let bindings = bindgen::Builder::default()
        .header("./lib/hello.h") //指定头文件,可以指定多个.h文件作为输入
        .parse_callbacks(Box::new(bindgen::CargoCallbacks))
        .generate()
        .expect("Unable to generate bindings");
    bindings.write_to_file("./src/output.rs").unwrap(); //输出到那个目录
}
4 将hello.h文件编辑一下,放入项目中。主要是去掉不能识别的部分。
void say_hello();
int num(int a, int b);
int get_strlen(char * s);
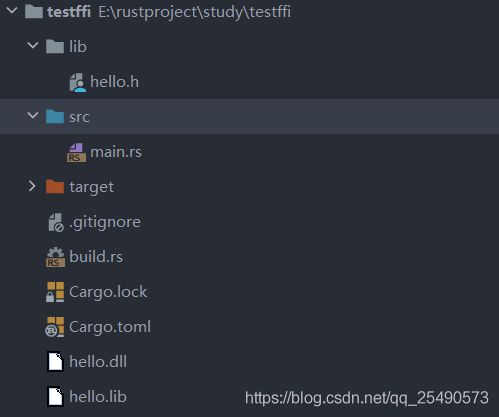
最终目录如下

5 修改main.rs为fn main(){}
6 运行编译命令 cargo build生成output.rs

7 修改main.rs 如下
- 这里标注一个fixme,ownership有详细说明
use std::ffi::CStr;
mod output;

fn c_say_hello(){
    unsafe {
        output::say_hello();
    }
}
fn c_num(a:i32,b:i32)->i32{
    unsafe {
       return output::num(a, b);
    }
}
//Fixme 对于owned类型此处是一个不那么正确的使用
fn c_get_strlen(s:&str)->i32{
    unsafe {
        let s = CStr::from_bytes_with_nul(s.as_bytes()).expect("&str to cstr failed");
        return output::get_strlen(s.as_ptr() as *mut i8);
    }
}
fn main() {
    c_say_hello();
    println!("2+3={}",c_num(2,3));
    //c中字符串以\0结
    println!("\"hello world\" len is {}",c_get_strlen("hello world\0"));
}
结构体
在.h文件中添加一个结构体如下:
typedef struct struct_hello{
	int index;
}hello;
重新构建,依次生成如下结构体,测试单元,别名
#[repr(C)]
#[derive(Debug, Copy, Clone)]
pub struct struct_hello {
    pub index: ::std::os::raw::c_int,
}
#[test]
fn bindgen_test_layout_struct_hello() {
...
}
pub type hello = struct_hello;
- #[repr(Rust)],默认布局或不指定repr属性。
- #[repr©],C 布局,这告诉编译器"像C那样对类型布局",可使用在结构体,枚举和联合类型。
union联合体
在.h文件中写入一个union结构
union union_world {
    unsigned short int index;
    struct {
        unsigned int in : 7;//(bit 0-6)
        unsigned int d : 6;//(bit 7-12)
        unsigned int ex : 3;//(bit 13-15)
    };
}world;
构建后得到结果大致如下,标签上和结构体差不多,但多了union_world__bindgen_ty_1 结构和相应的操作方法,方便位的操作。
#[repr(C)]
#[derive(Copy, Clone)]
pub union union_world {
    pub index: ::std::os::raw::c_ushort,
    pub __bindgen_anon_1: union_world__bindgen_ty_1,
    ...
}
...
pub struct union_world__bindgen_ty_1 {
...
}
impl union_world__bindgen_ty_1 {
... //联合体相关操作
}
#[test]
fn bindgen_test_layout_union_world() {
...
}
extern "C" {
    pub static mut world: union_world;
}
enum枚举
于struct差别不大
回调函数
1 编辑hello项目,hello.h中添加函数生命和方法。这里改造一下求和方法。
typedef int(*callback) (int);
EXTERN_C DLLEXPORT int num_callback(int a, callback);
2 编辑hello.c实现num_callback方法
DLLEXPORT int num_callback(int a, callback func){
	return func(a);
}
3 拷贝hello.lib和hello.dll 到根目录下。编辑testffi项目中的lib/hello.h文件,将新加入的头部信息写入。重新构建output.rs文件。
4 在main.rs中编写回调函数,重写main方法。
- rust回调给c的函数,只需要在rust函数的基础上添加extern "C"就可以了。
use std::os::raw::c_int;
mod output;
pub extern "C" fn square(a:c_int)->c_int{
    return a * a;
}
fn main() {
    unsafe {
        let cb:output::callback = Some(square);
        println!("3*3={}",output::num_callback(3,cb));
    }
}
空指针
如果需要一个空指针。可以用使用 0 as *const _或者 std::ptr::null()来生产一个空指针。
析构
在涉及ffi调用时最常见的就是析构问题:这个对象由谁来析构?是否会泄露或use after free? 有些情况下c库会把一类类型malloc了以后传出来,然后不再关系它的析构。因此在做ffi操作时请为这些类型实现析构(Drop Trait)
ownership
由于编译器会自动插入析构代码到块的结束位置,在使用owned类型时要格外的注意。
在上边fixme 注意是标明了一处错误的使用。
rust中CString对应c中的字符串,所以正确的使用应该如下:
fn c_get_strlen(s:&str)->i32{
    unsafe {
        let s = CString::new(s).expect("&str to cstring failed");
        //使用into_raw避免rust在代码块结束时释放cstring
        return output::get_strlen(s.into_raw());
    }
}
fn main() {
	//此处不需要加\0,CString和c字符串对应
    println!("\"hello world\" len is {}",c_get_strlen("hello world"));
}
panic
由于在ffi中panic是未定义行为,切忌在cffi时panic包括直接调用panic!,unimplemented!,以及强行unwrap等情况。
引用大佬的一句话
当你写cffi时,记住:你写下的每个单词都可能是发射核弹的密码!
参考文章:
官档doc.rust: https://doc.rust-lang.org/nomicon/ffi.html
极客大佬:https://wiki.jikexueyuan.com/project/rust-primer/ffi/calling-ffi-function.html
bindgen用户指南:https://rust-lang.github.io/rust-bindgen/introduction.html


