ShardingSphere分库分表实战之绑定表
![]()
| ShardingSphere |
算法刷题专栏 | 面试必备算法 | 面试高频算法
越难的东西,越要努力坚持,因为它具有很高的价值,算法就是这样✨
作者简介:硕风和炜,CSDN-Java领域优质创作者,保研|国家奖学金|高中学习JAVA|大学完善JAVA开发技术栈|面试刷题|面经八股文|经验分享|好用的网站工具分享
恭喜你发现一枚宝藏博主,赶快收入囊中吧
人生如棋,我愿为卒,行动虽慢,可谁曾见我后退一步?
| ShardingSphere |
![]()
![]()
目录
-
- 一.ShardingSphere项目实战集群环境准备
- 二.ShardingSphere分库分表实战之绑定表
-
- 2.1 绑定表概念
- 2.2 需求分析说明
- 2.2 数据库创建
- 三.SpringBoot项目中水平分表的配置
-
- 3.1 配置文件 - 基本配置
- 3.2 配置文件 - 数据源
- 3.3 配置文件 - 配置数据节点
- 3.4 配置文件 - 配置分片策略(包括分片键和分片算法)
-
- 3.4.1 分片键配置
- 3.4.2 分片算法配置
- 3.5 配置文件 - 分布式序列配置
-
- 3.5.1 UUID
- 3.5.2 SNOWFLAKE
- 3.6 配置文件 - 绑定表信息配置
- 四.SpringBoot项目相关代码准备
-
- 4.1 实体类编写
- 4.2 Mapper编写
- 4.3 配置绑定表
-
- 4.3.1 编写对应的SQL语句
- 4.3.2 封装接收的对象
- 4.3.3 编写CourseMapper数据接口层方法
- 五.水平分库 & 水平分表绑定表测试
-
- 5.1 添加数据测试
- 5.2 水平分库 & 水平分表绑定表测试
- 六.总结
- 七.共勉
一.ShardingSphere项目实战集群环境准备
关于项目启动需要提前准备并进行配置的环境我在上一篇文章中做了详细的讲解,如果还有问题的同学可以参考上一篇文章进行学习。
ShardingSphere项目实战集群环境准备
ShardingSphere分库分表实战之水平分表
ShardingSphere分库分表实战之水平分库和水平分表
二.ShardingSphere分库分表实战之绑定表
特别说明:本篇文章需要建立在上一篇文章的基础上进行的项目实操,如果有问题的同学可以先学习上一篇文章,再来看这篇博客就会更好的理解!博主地址如下所示:
ShardingSphere分库分表实战之水平分库和水平分表
2.1 绑定表概念
绑定表是分片规则一致的关系表,分为主表和子表,例如t_order和t_order_item,均按照order_id分片,则此两个表互为绑定表关系。
绑定表之间的多表关联查询不会出现笛卡尔积关联,可以提升关联查询效率。
绑定表是建立在多表关联的基础上的.所以我们先来完成多表关联的配置。
2.2 需求分析说明
不变的需求:
- 在node1-shardingsphere 192.168.10.132服务器上, 创建数据库 ljw_course_db1;然后创建表 t_course_1 、 t_course_2 ;
- 在node2-shardingsphere 192.168.10.133服务器上, 创建数据库 ljw_course_db2;然后创建表 t_course_1 、 t_course_2;
- 约定规则:
- 水平分库规则 :以
user_id为分片键,分片策略为user_id % 2 +1,user_id为偶数操作db1数据源,否则操作db2数据源; - 水平分表规则 :以
cid为分片键,分片策略为Math.abs(cid.hashCode()) % 2 + 1 为偶数的时候,数据插入对应服务器的t_course_1表,反之,数据插入对应服务器的t_course_2。
新加的需求:
- 在node1-shardingsphere 192.168.10.132服务器上, 数据库 ljw_course_db1中;然后创建表 t_course_section_1、 t_course_section_2;
- 在node2-shardingsphere 192.168.10.133服务器上, 创建数据库 ljw_course_db2;然后创建表 t_course_section_1、 t_course_section_2;
2.2 数据库创建
CREATE TABLE `t_course_section_1` (
  `id` bigint(11) NOT NULL,
  `cid` bigint(11) DEFAULT NULL,
  `corder_no` bigint(20) DEFAULT NULL,
  `user_id` bigint(20) DEFAULT NULL,
  `section_name` varchar(50) DEFAULT NULL,
  `status` int(11) DEFAULT NULL,
  PRIMARY KEY (`id`)
) ENGINE=InnoDB DEFAULT CHARSET=utf8;

CREATE TABLE `t_course_section_2` (
  `id` bigint(11) NOT NULL,
  `cid` bigint(11) DEFAULT NULL,
  `corder_no` bigint(20) DEFAULT NULL,
  `user_id` bigint(20) DEFAULT NULL,
  `section_name` varchar(50) DEFAULT NULL,
  `status` int(11) DEFAULT NULL,
  PRIMARY KEY (`id`)
) ENGINE=InnoDB DEFAULT CHARSET=utf8;
表结构创建完成:
三.SpringBoot项目中水平分表的配置
sharding-jdbc进行分库分表的配置,主要包括:数据源、分片键、主键生成策略、分片策略等。
注意:项目实战过程中有不熟的概念可以参考对应的官方网站,因为内容较多,本篇文章不做过多详细的说明,包括使用到的很多知识内容,官网开发手册都有更加详细的指导说明。
ShardingSphere开发者手册
3.1 配置文件 - 基本配置
# 应用名称
spring.application.name=sharding-jdbc-demo
# 打印SQL语句
spring.shardingsphere.props.sql-show=true
# SQL输出日志
mybatis-plus.configuration.log-impl=org.apache.ibatis.logging.stdout.StdOutImpl
3.2 配置文件 - 数据源
# 定义多个数据源
spring.shardingsphere.datasource.names = db1,db2

# 数据源1连接信息配置
spring.shardingsphere.datasource.db1.type = com.zaxxer.hikari.HikariDataSource
spring.shardingsphere.datasource.db1.driver-class-name = com.mysql.jdbc.Driver
spring.shardingsphere.datasource.db1.url = jdbc:mysql://192.168.10.132:3306/ljw_course_db1?characterEncoding=UTF-8&useSSL=false
spring.shardingsphere.datasource.db1.username = root
spring.shardingsphere.datasource.db1.password = root

# 数据源2连接信息配置
spring.shardingsphere.datasource.db2.type = com.zaxxer.hikari.HikariDataSource
spring.shardingsphere.datasource.db2.driver-class-name = com.mysql.jdbc.Driver
spring.shardingsphere.datasource.db2.url = jdbc:mysql://192.168.10.132:3306/ljw_course_db2?characterEncoding=UTF-8&useSSL=false
spring.shardingsphere.datasource.db2.username = root
spring.shardingsphere.datasource.db2.password = root
3.3 配置文件 - 配置数据节点
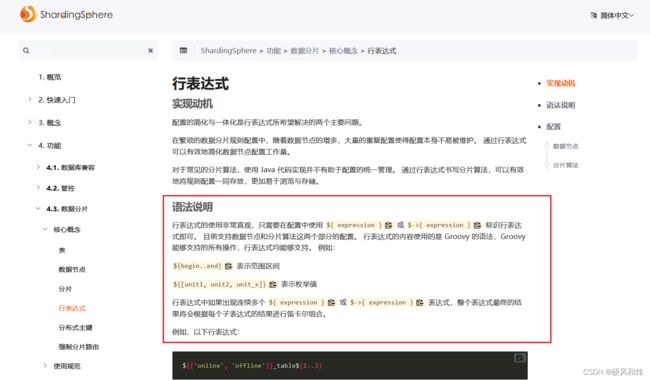
表达式 db1.t_course_$->{1..2}
$ 会被大括号中的 {1..2} 所替换, ${begin..end} 表示范围区间
会有两种选择: db1.t_course_1 和 db1.t_course_2
# 标准分片表配置  -  配置数据节点
# 由数据源名 + 表名组成,以小数点分隔。多个表以逗号分隔,支持 inline 表达式。
spring.shardingsphere.rules.sharding.tables.t_course.actual-data-nodes=db$->{1..2}.t_course_$->{1..2}
spring.shardingsphere.rules.sharding.tables.t_course_section.actual-data-nodes=db$->{1..2}.t_course_section_$->{1..2}
注意:此处使用了行表达式,想深入了解的同学可以参考官网进行学习!
行表达式官方网站学习手册
3.4 配置文件 - 配置分片策略(包括分片键和分片算法)
分片相关内容官方网站学习手册
3.4.1 分片键配置
# 水平分库配置
# t_course表
# 分片键名称
spring.shardingsphere.rules.sharding.tables.t_course.database-strategy.standard.sharding-column=user_id

# 水平分表配置
# t_course表
# 分片键名称
spring.shardingsphere.rules.sharding.tables.t_course.table-strategy.standard.sharding-column=cid

# 水平分库配置
# 分片列名称
# t_course_section 表
spring.shardingsphere.rules.sharding.tables.t_course_section.database-strategy.standard.sharding-column=user_id

# 水平分表配置
# t_course_section 表
# 分片键名称
spring.shardingsphere.rules.sharding.tables.t_course_section.table-strategy.standard.sharding-column=corder_no
3.4.2 分片算法配置
在配置分片算法之前,我们做如下的约定:
- t_course水平分库规则 :以
user_id为分片键,分片策略为user_id % 2 +1,user_id为偶数操作db1数据源,否则操作db2数据源; - t_course水平分表规则 :以
cid为分片键,分片策略为Math.abs(cid.hashCode()) % 2 + 1 为偶数的时候,数据插入对应服务器的t_course_1表,反之,数据插入对应服务器的t_course_2。 - t_course_section水平分库规则:以
user_id为分片键,分片策略为user_id % 2 +1,user_id为偶数操作db1数据源,否则操作db2数据源; - t_course_section水平分表规则:以
corder_no为分片键,分片策略为Math.abs(corder_no.hashCode()) % 2 + 1,user_id为偶数操作db1数据源,否则操作db2数据源;
# t_course
# 水平分库配置
# 分片算法
# 分片算法名称
spring.shardingsphere.rules.sharding.tables.t_course.database-strategy.standard.sharding-algorithm-name=table-inline
# 分片算法类型  --> 行表达式分片算法
spring.shardingsphere.rules.sharding.sharding-algorithms.table-inline.type=INLINE
# 分片算法的属性配置
spring.shardingsphere.rules.sharding.sharding-algorithms.table-inline.props.algorithm-expression=db$->{user_id % 2 + 1}

# 水平分表配置
# 分片算法
# 分片算法名称
spring.shardingsphere.rules.sharding.tables.t_course.table-strategy.standard.sharding-algorithm-name=inline-hash-mod
# 分片算法类型  --> hash取模算法
spring.shardingsphere.rules.sharding.sharding-algorithms.inline-hash-mod.type=INLINE
# 分片算法的属性配置
spring.shardingsphere.rules.sharding.sharding-algorithms.inline-hash-mod.props.algorithm-expression=t_course_$->{Math.abs(cid.hashCode()) % 2 + 1}

#t_course_section
#  分片算法名称
#  水平分库
spring.shardingsphere.rules.sharding.tables.t_course_section.database-strategy.standard.sharding-algorithm-name=table-mod
# 取模分片算法
spring.shardingsphere.rules.sharding.sharding-algorithms.table-mod.type=INLINE
# 分片算法属性配置
spring.shardingsphere.rules.sharding.sharding-algorithms.table-mod.props.algorithm-expression=db$->{user_id % 2 + 1}

# 水平分表
# 分片算法名称
spring.shardingsphere.rules.sharding.tables.t_course_section.table-strategy.standard.sharding-algorithm-name=table-hash-mod
# 哈希取模分片算法
# 分片算法类型
spring.shardingsphere.rules.sharding.sharding-algorithms.table-hash-mod.type=INLINE
# 分片算法属性配置
spring.shardingsphere.rules.sharding.sharding-algorithms.table-hash-mod.props.algorithm-expression=t_course_section_$->{Math.abs(corder_no.hashCode()) % 2 + 1}
3.5 配置文件 - 分布式序列配置
分布式主键相关内容官方网站学习手册
3.5.1 UUID
采用 UUID.randomUUID() 的方式产生分布式主键。
实体类中对应数据库表中的主键ID代码配置
	// 省略部分代码

	// 核心配置代码
    //通过MyBatisPlus生成主键
    @TableId(value="cid",type = IdType.ASSIGN_ID)
    private Long id;

    // 省略部分代码
3.5.2 SNOWFLAKE
在分片规则配置模块可配置每个表的主键生成策略,默认使用雪花算法(snowflake)生成 64bit 的长整型数据。
雪花算法是由 Twitter 公布的分布式主键生成算法,它能够保证不同进程主键的不重复性,以及相同进程主键的有序性。
配置文件:
# t_course 表主键生成策略
# 分布式序列配置
# 分布式序列的列名
spring.shardingsphere.rules.sharding.tables.t_course.key-generate-strategy.column=cid
# 分布式序列-算法名称
spring.shardingsphere.rules.sharding.tables.t_course.key-generate-strategy.key-generator-name=alg-snowflake


# t_course_section 表主键生成策略
# 分布式序列列名称
spring.shardingsphere.rules.sharding.tables.t_course_section.key-generate-strategy.column=id
# 分布式序列算法名称
spring.shardingsphere.rules.sharding.tables.t_course_section.key-generate-strategy.key-generator-name=snowflake


#  --
# 分布式序列-算法类型
spring.shardingsphere.rules.sharding.key-generators.alg-snowflake.type=SNOWFLAKE
实体类中对应数据库表中的主键ID代码配置
	// 省略部分代码

	// 核心配置代码
    @TableId(type = IdType.AUTO)
    private Long id;

    // 省略部分代码
3.6 配置文件 - 绑定表信息配置
spring.shardingsphere.rules.sharding.binding-tables[0]=t_course,t_course_section
四.SpringBoot项目相关代码准备
4.1 实体类编写
编写与数据库表对应的实体类
@TableName("t_course_section")
@Data
@ToString
public class CourseSection {

    @TableId(type = IdType.AUTO)
    private Long id;

    private Long cid;

    private Long userId;

    private Long corderNo;

    private String sectionName;

    private Integer status;
}
4.2 Mapper编写
@Mapper
public interface CourseSectionMapper extends BaseMapper<CourseSection> {

}
4.3 配置绑定表
查询每个订单的订单号和课程名称以及每个课程的章节的数量
4.3.1 编写对应的SQL语句
SELECT
  c.corder_no,
  c.cname,
  COUNT(cs.id) num
FROM t_course c INNER JOIN t_course_section cs ON c.corder_no = cs.corder_no
GROUP BY c.corder_no,c.cname;
4.3.2 封装接收的对象
@Data
public class CourseVo {

    private Long corderNo;

    private String cname;

    private Integer num;
}
4.3.3 编写CourseMapper数据接口层方法
@Mapper
public interface CourseMapper extends BaseMapper<Course> {

    @Select({"SELECT \n" +
            "  c.corder_no,\n" +
            "  c.cname,\n" +
            "  COUNT(cs.id) num\n" +
            "FROM t_course c INNER JOIN t_course_section cs ON c.corder_no = cs.corder_no\n" +
            "GROUP BY c.corder_no,c.cname"})
    List<CourseVo> selectCourseAndSection();
}
五.水平分库 & 水平分表绑定表测试
5.1 添加数据测试
	@Test
    public void test(){
        for (int i = 0; i < 6; i++) {
            Course course = new Course();
            course.setUserId(1L+i);
            course.setCorderNo(1000L+i);
            course.setCname("ShardingSphere");
            course.setBrief("ShardingSphere保姆级学习教程!!!");
            course.setPrice(100.00);
            course.setStatus(1);
            courseMapper.insert(course);

            Long cid = course.getCid();
            for (int j = 0; j < 6; j++) {
                CourseSection section = new CourseSection();
                section.setCid(cid);
                section.setUserId(1L+i);
                section.setCorderNo(1000L+i);
                section.setSectionName("ShardingSphere保姆级学习教程" + i);
                section.setStatus(1);
                courseSectionMapper.insert(section);
            }
        }
    }
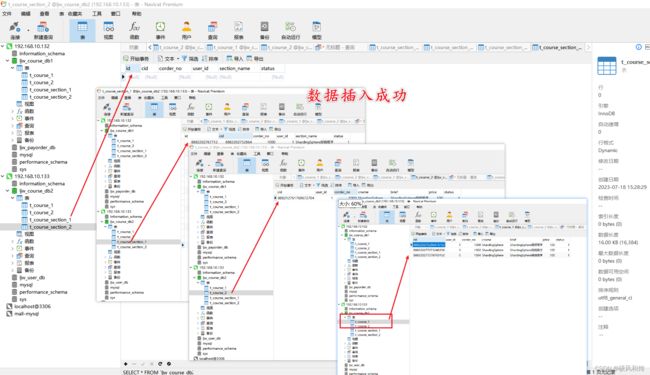
结果查询
数据库表查询:
5.2 水平分库 & 水平分表绑定表测试
	@Test
    public void testSelectCourseAndSection(){
        List<CourseVo> list = courseMapper.selectCourseAndSection();
        list.forEach(System.out::println);
    }
结果查询
配置绑定表:控制台输出结果为4个SQL。
六.总结
本篇文章主要讲解了ShardingSphere分库分表实战之绑定表,多表关联查询不会出现笛卡尔积关联,关联查询效率将大大提升。下节预告,ShardingSphere分库分表实战之广播表,敬请期待。
七.共勉
| 最后,我想和大家分享一句一直激励我的座右铭,希望可以与大家共勉! |
![]()


