svg上篇
svg上篇
什么是SVG?
svg是可伸缩矢量图形的缩写全称全称Scalable Vector Graphics。它是一种图形格式,其中以XML指定形状。然后由SVG查看器呈现XML。
计算机中图形分类
一般可以分为两大类:位图,矢量图。位图(bitmap),亦称为点阵图像或栅格图像,是由称作像素(图片元素)的单个点组成的平时拍的照片就是位图,它是由一个个像素点组成,放大后就会模糊。 而矢量图更像是点到点的位置填充,没有分辨率概念,图像可以随意的放大或缩小不存在失真情况。
svg优点
【1】可无限伸缩,打印显示不失真
【2】可以像日常编写代码一样的控制svg,使用近乎无成本
【3】占用空间极小(相对于位图)且可进行gzip压缩进一步压缩其大小
【4】svg是通过xml方式渲染,本质是dom
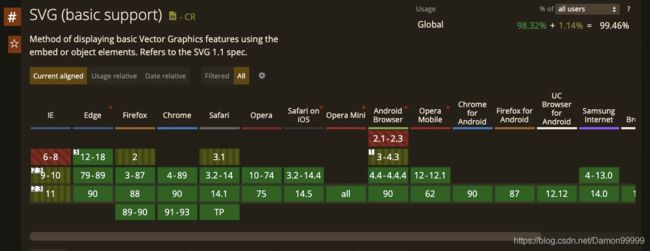
svg兼容性
svg图画
【1】svg基本引用方式
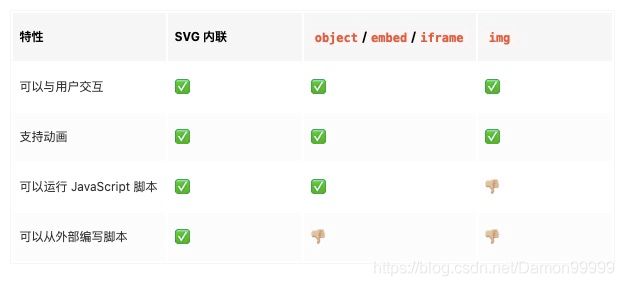
在Web浏览器(例如Chrome,Firefox和Internet Explorer)中显示SVG可以通过浏览器指向SVG文件的URL,将SVG嵌入HTML页面,使用iframe元素,使用img元素等方法
主流可通过四种方式来实现引用
1:使用iframe元素
<iframe :src="require('@/assets/data-show/banner/bt-image-09.png')" >
2:使用img元素
<img class="s-left" :src="require('@/assets/data-show/banner/bt-image-09.png')" />
3:使用embed
<embed :src="require('@/assets/data-show/banner/bt-image-09.png')" pluginspage="http://www.adobe.com/svg/viewer/install/" />
4:直接嵌入html
<!DOCTYPE html>
<html lang="en">
<head>
  <meta charset="UTF-8">
  <meta name="viewport" content="width=device-width, initial-scale=1.0">
  <meta http-equiv="X-UA-Compatible" content="ie=edge">
</head>
<body>
<svg width="500" height="500" xmlns="http://www.w3.org/2000/svg"
 xmlns:xlink="http://www.w3.org/1999/xlink">
</svg>
</body>
</html>
【2】svg线条属性
| 属性 | 描述 |
|---|---|
| fill | 设置形状的填充颜色 |
| fill-opacity | 设置形状的填充不透明度 |
| stroke | 设置用于绘制此形状轮廓的笔触(线条)颜色 |
| stroke-width | 设置用于绘制此形状轮廓的笔触(线条)宽度 |
| stroke-dasharray | 设置用于绘制此形状轮廓的笔划(虚线) |
| stroke-opacity | 设置用于绘制此形状轮廓的笔触(直线)不透明度 |
【3】svg基本图形元素介绍
矩形:SVG
<rect x="10" y="10" height="100" width="100" style="stroke:#006600; fill: #00cc00"/>
圆形:SVG
<circle cx="40" cy="40" r="24" style="stroke:#006600; fill:#00cc00"/>
椭圆形:SVG
<ellipse cx="40" cy="40" rx="30" ry="15" style="stroke:#006600; fill:#00cc00"/>
线段:SVG
<line x1="0" y1="10" x2="0" y2="100" style="stroke:#006600;"></line>
折线:SVG
<polyline fill="none" stroke="black" points="20,100 40,60 70,80 100,20"/>
多边形:SVG
<polygon points="10,0 60,0 35,50" style="stroke:#660000; fill:#cc3333;"/>
创建svg坐标系统并构建完整图案
我们创建一个一个二维的坐标系统用 x 代表横轴,y 代表纵轴,单位默认像素(px)。x增加位置右移,y增加位置下移。这和我们认知的笛卡尔坐标系相反。
<!DOCTYPE html>
<html lang="en">
<head>
    <meta charset="UTF-8">
    <meta name="viewport" content="width=device-width, initial-scale=1.0">
    <meta http-equiv="X-UA-Compatible" content="ie=edge">
    <title>SVG</title>
    <style type="text/css">
        html, body {
            height: 100%;
            width: 100%;
            background: #e9e9e9;
        }
        body {
            margin: 0;
            text-align: center;
        }
        .grid {
            width: 500px;
            height: 500px;
            margin: 0 auto;
            padding-top: 100px;
            padding-left: 100px;
            background-image: url('grid.png');
            position: relative;
        }
        .grid::before {
            content: "";
            border-left: 1px solid #7c7cea;
            position: absolute;
            top: 0;
            left: 100px;
            width: 50px;
            height: 600px;
        }
        .grid::after {
            content: "";
            border-top: 1px solid #7c7cea;
            position: absolute;
            top: 100px;
            left: 0;
            width: 600px;
            height: 500px;
        }
        .st0{fill-rule:evenodd;clip-rule:evenodd;fill:#FFFFFF;}
    </style>
</head>
<body>
<div class="grid">
    <svg version="1.1"
         width="500" height="500"
         xmlns="http://www.w3.org/2000/svg"
         xmlns:xlink="http://www.w3.org/1999/xlink">
        <polyline class="right-ear" style="stroke:#583504; stroke-width: 3; fill:#fddb55" points="120,80 250,180 120,180 120,80"/>
        <polyline class="left-ear" style="stroke:#583504; stroke-width: 3; fill:#fddb55" points="370,80 250,180 370,180 370,80"/>
        <circle cx="250" cy="250" r="150" style="stroke:#583504; stroke-width: 3; fill:#fddb55"/>
        <circle cx="183" cy="178" r="16" style="fill:#FFFFFF"/>
        <circle cx="273" cy="180" r="18" style="fill:#FFFFFF"/>
        <g class="right-eye">
            <ellipse cx="170" cy="215" rx="45" ry="20" style="stroke:#583504; stroke-width: 3; fill:#FFFFFF"/>
            <circle cx="185" cy="215" r="18" style="stroke:#583504; stroke-width: 1; fill:#583504"/>
        </g>
        <g class="left-eye">
            <ellipse cx="300" cy="215" rx="45" ry="20" style="stroke:#583504; stroke-width: 3; fill:#FFFFFF"/>
            <circle cx="315" cy="215" r="18" style="stroke:#583504; stroke-width: 1; fill:#583504"/>
        </g>
        <g class="nose">
            <path id="路径" transform='translate(117 235) scale(1.6)' class="st0" d="M39.9,12.9c2.5-7.5,9.3-11.6,20.4-12.3S80.1,3,86.4,10c6.7-5.6,15.7-8.7,26.9-9.4s20.5,2.5,28,9.4
		c13.3,14.8,13.3,32.5,0,53.1c-16.7,22.1-38.5,33.1-65.3,33c-15.7-0.4-31.9-6.7-48.6-19.1C9.4,63.9,0.3,49.6,0.2,34.4
		c0.3-9.8,4.6-17,13-21.5S30.5,8.3,39.9,12.9z"/>
            <ellipse cx="225" cy="285" rx="30" ry="18" style="stroke:#583504; stroke-width: 3; fill:#583504"/>
            <line x1="225"  y1="295" x2="225"   y2="325" style="stroke:#583504; stroke-width: 5;"></line>
            <line x1="190"  y1="325" x2="275"   y2="325" style="stroke:#583504; stroke-width: 5;"></line>
        </g>

    </svg>
</div>
</body>
</html>
svg代码复用问题
我们所知道的是svg的代码块都是极其庞大且复杂的,但是为了尽量的节约代码,svg也出现了代码复用的解决方案(即类似组件化的思路来复用基础组件来组合复杂图案)。
【1】
 <svg version="1.1"
         width="500" height="500"
         xmlns="http://www.w3.org/2000/svg"
         xmlns:xlink="http://www.w3.org/1999/xlink">
        <!-- g#house嵌套了g#man和g#woman -->
        <g id="house" style="fill:none;stroke:black;" width="240px" height="240px">
            <title>house</title>
            <desc>House width door</desc>
            <rect x="6" y="50" width="60" height="60"></rect>
            <polyline points="6 50,36 9,66 50"></polyline>
            <polyline points="35 110,36 80,50 80,50 110" />
        </g>
        <g id="man" style="fill:none;stroke:black;">
            <title>man</title>
            <desc>Male human</desc>
            <circle cx="85" cy="56" r="10" />
            <line x1="85" y1="66" x2="85" y2="80" />
            <polyline points="76 104,85 80,94 104" />
            <polyline points="76 70,85 76,94 70" />
        </g>
        <g id="woman" style="fill:none;stroke:black;">
            <title>woman</title>
            <desc>Female human</desc>
            <circle cx="110" cy="56" r="10" />
            <polyline points="110 66,110 80,100 90,120 90,110 80" />
            <line x1="104" y1="104" x2="108" y2="90" />
            <line x1="112" y1="90" x2="116" y2="104" />
            <polyline points="101 70,110 76,119 80" />
        </g>
    </svg>
【2】
复杂的图形中经常会出现重复元素,svg使用元素为定义在
定义了一组标签再次显示它们。要指定想要的重用的组合就给xlink:href属性指定URI即可,同时还要指定x和y的位置以表示组合应该移动到的位置。
<use xlink:href="#house" x="70" y="100"></use> // house模块
<use xlink:href="#man" x="-55" y="100"></use> // man模块
<use xlink:href="#woman" x="-50" y="100"></use> // woman模块
【3】
<svg version="1.1"
         width="500" height="500"
         xmlns="http://www.w3.org/2000/svg"
         xmlns:xlink="http://www.w3.org/1999/xlink">
        <defs>
	        <g id="house" style="fill:none;stroke:red;" width="240px" height="240px">
	            <title>house</title>
	            <desc>House width door</desc>
	            <rect x="6" y="50" width="60" height="60"></rect>
	            <polyline points="6 50,36 9,66 50"></polyline>
	            <polyline points="35 110,36 80,50 80,50 110" />
	        </g>
	        <g id="man" style="fill:none;stroke:black;">
	            <title>man</title>
	            <desc>Male human</desc>
	            <circle cx="85" cy="56" r="10" />
	            <line x1="85" y1="66" x2="85" y2="80" />
	            <polyline points="76 104,85 80,94 104" />
	            <polyline points="76 70,85 76,94 70" />
	        </g>
	        <g id="woman" style="fill:none;stroke:black;">
	            <title>woman</title>
	            <desc>Female human</desc>
	            <circle cx="110" cy="56" r="10" />
	            <polyline points="110 66,110 80,100 90,120 90,110 80" />
	            <line x1="104" y1="104" x2="108" y2="90" />
	            <line x1="112" y1="90" x2="116" y2="104" />
	            <polyline points="101 70,110 76,119 80" />
	        </g>
        </defs>
        <use xlink:href="#house" x="70" y="100"></use>
        <use xlink:href="#man" x="-55" y="100"></use>
        <use xlink:href="#woman" x="-50" y="100"></use>
    </svg>
【4】
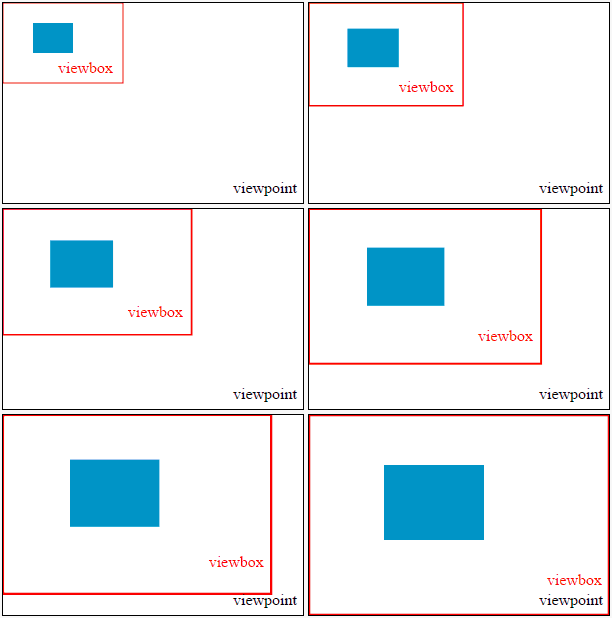
viewBox和preserveAspectRatio属性,通过给元素添加width和height属性就可以让symbol适配视口大小。这边就简单的介绍一下viewPort、viewBox与preserveAspectRatio。
viewPort:简单而言就是所要显示的区域的大小即屏幕大小。如果有设置具体大小则以设置的为准(支持单位混合但不推荐)
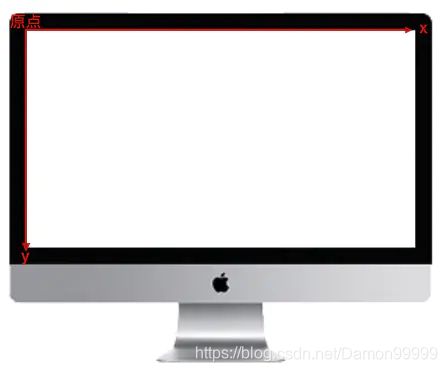
viewBox:viewBox拥有四个参数( min-x, min-y, width, height )。 其中 min-x:左上角横坐标,min-y:左上角纵坐标,width:宽度,height:高度。 原点默认位于左上角,x 轴水平向右,y 轴垂直向下
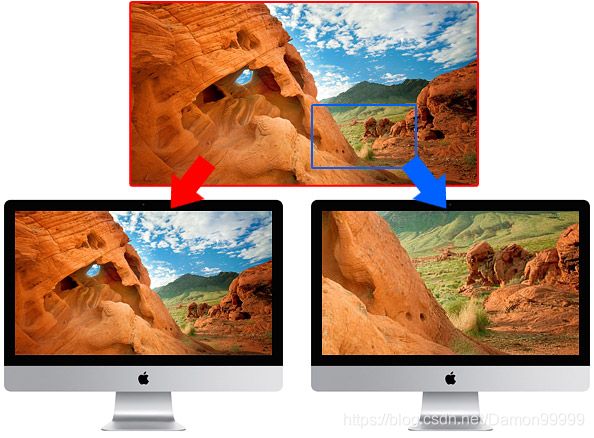
本质上viewBox是改变了坐标系与单位,将区域图像变成用户坐标和用户单位
那么这些事如何得到的?下面是一个例子
<svg width="500" height="200" viewBox="0 0 50 20" >
    <rect x="20" y="10" width="10" height="5"
          style="stroke: #000000; fill:none;"/>
</svg>
本示例创建一个宽度为500像素,高度为200 的元素。的viewBox属性包含四个坐标。这些坐标定义了元素的视图框(ViewBox)。坐标是x y width height视图框(ViewBox)的坐标。在这种情况下,视图框(ViewBox)从处开始0,0并且50宽而20高。也就是说,500 x 200像素元素在内部使用从0,0 到的坐标系50,20。换句话说,用于内部形状的坐标中的每1个单位对应于宽度500/50 = 10像素,高度对应200/20 = 10像素。这就是为什么x位置为20,y位置为10的矩形真正位于的原因200,100,并且其宽度(10)和高度(5)分别对应于100个像素和50个像素。
如果图像超出?
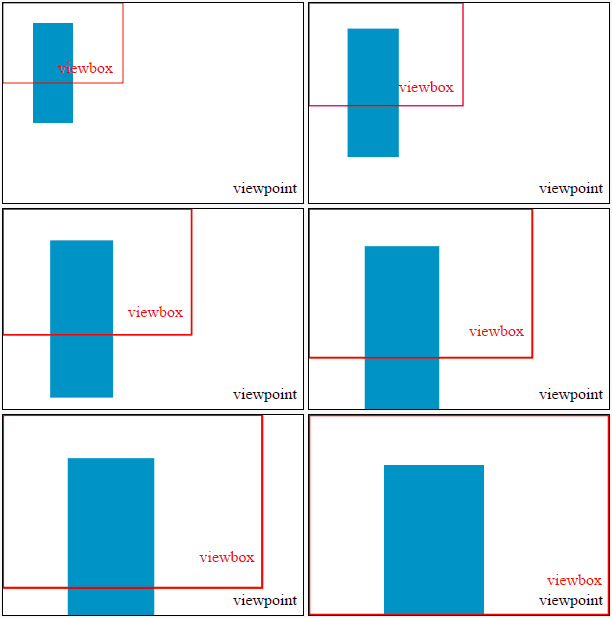
在前面的例子中我们的viewBox的宽高比是相同的(500/200 = 50/20)但是在实际应用中不一定比例一定相同,那么或造成三种结果
1: 按较小尺寸等比缩放图形,以完全填充
2: 按较大尺寸等比缩放图形,超出部分进行切割
3: 拉伸或者压缩图形以使其完全是配视口(意思就是完全不保留宽高比,适应视口为第一要务)
preserveAspectRatio:该属性允许我们指定被缩放的图像相对与视口的对齐方式,以及是希望它适配边缘还是要剪裁。
这一模型preserveAspectRatio= "( align [meet/Slice/none] )"
| align值 | 描述 |
|---|---|
| xMin | 按视口的左侧边缘对齐 |
| xMid | 按视口的水平中心对齐 |
| xMax | 按视口的右侧边缘对齐 |
| YMin | 按视口的顶部边缘对齐 |
| YMid | 按视口的垂直中心对齐 |
| YMax | 按视口的底部边缘对齐 |
| [meet/Slice/none]值 | 描述 |
|---|---|
| meet | 保留宽高比并缩放视图框(ViewBox)以适合视口(Viewport)。 |
| slice | 保留宽高比并切掉不适合视口(Viewport)内部的图像任何部分。 |
| none | 不保留宽高比。缩放图像以使视图框(ViewBox)完全适合视口(Viewport)。比例会失真。 |
使用:preserveAspectRatio="xMidYMid meet" / preserveAspectRatio="xMinYMin slice"
总结
svg给了我们绘图的新的想象空间。虽然有弊端,但是这并不足以否定其地位。何况svg技术已经是W3C所推荐的标准。其在地图、高精度图形、可移植图形,由数据驱动的响应式图形领域的广泛应用也触及我们普通人的日常生活。同时在印刷领域也可通过svg提供高质量的输出文件,在跨平台的一致性上也可以做到极佳控制。正是由于这诸多优点,svg的学习与使用都能产生更多价值,也许很多有趣的应用场景也等待我们去发现扩展。
参考
SVG精髓(第二版) —— David Eisenberg & Amelia Bellamy-Royds
深入浅出 SVG —— Flavio Copes
https://juejin.cn/post/6844903589807128590 —— 富途web开发团队
https://www.oxxostudio.tw/articles/201409/svg-23-viewpoint-viewBox.html —— oxxo.studio
