CentOS7上使用GitLab搭建私有git代码仓库(超详细)
本片文章讲解的是GitLab13版本的安装,GitLab同时也是非常常用的私有git代码仓库,重点是社区版 “免费”!!!GitLab官网:https://about.gitlab.com
配置要求
官方的配置要求:https://docs.gitlab.com/ee/install/requirements.html
安装包下载
(如果下载不可用了,可以私信我索要安装包)
下载地址:https://packages.gitlab.com/gitlab/gitlab-ce/packages/el/7/gitlab-ce-13.12.11-ce.0.el7.x86_64.rpm/download.rpm
下载界面:https://packages.gitlab.com/gitlab/gitlab-ce/packages/el/7/gitlab-ce-13.12.12-ce.0.el7.x86_64.rpm
也可以通过命令进行下载:
# 安装wget下载器
yum install -y wget
# 下载GitLab安装包
wget https://packages.gitlab.com/gitlab/gitlab-ce/packages/el/7/gitlab-ce-13.12.12-ce.0.el7.x86_64.rpm/download.rpm -O gitlab-ce-13.12.12-ce.0.el7.x86_64.rpm
最好校验一下文件:
[root@localhost src]# ll
total 884956
-rw-r--r--. 1 root root 906193007 Sep 22 17:23 gitlab-ce-13.12.12-ce.0.el7.x86_64.rpm
[root@localhost src]# md5sum gitlab-ce-13.12.12-ce.0.el7.x86_64.rpm
952a9965c0b628bfac34b076630f4a57  gitlab-ce-13.12.12-ce.0.el7.x86_64.rpm
[root@localhost src]# sha256sum gitlab-ce-13.12.12-ce.0.el7.x86_64.rpm
0d86311423993e811de9c7e4edc244890c94c133d2d199b36591dfca5dcc3165  gitlab-ce-13.12.12-ce.0.el7.x86_64.rpm
[root@localhost src]# sha512sum gitlab-ce-13.12.12-ce.0.el7.x86_64.rpm
435af2b37d30fdb04ea1f49890400be71280f4a77fb3ea0ca381143f23419fdfe38b8c30055e2217e62e1473758f1b0ab8921917b03a774d1833784cf671153f  gitlab-ce-13.12.12-ce.0.el7.x86_64.rpm
当然你下载下来的13的版本不同,相对应的数值可能也不一样
依赖安装
执行如下代码进行安装(摘自官网):
# 安装一些依赖
sudo yum install -y curl policycoreutils-python openssh-server perl
# Enable OpenSSH server daemon if not enabled: sudo systemctl status sshd
sudo systemctl enable sshd
sudo systemctl start sshd

# Check if opening the firewall is needed with: sudo systemctl status firewalld
sudo firewall-cmd --permanent --add-service=http
sudo firewall-cmd --permanent --add-service=https
sudo systemctl reload firewalld

# 安装邮箱所需要的软件包
sudo yum install -y postfix
sudo systemctl enable postfix
sudo systemctl start postfix
软件安装
执行命令:
rpm -ivh gitlab-ce-13.12.12-ce.0.el7.x86_64.rpm
配置
修改 /etc/gitlab/gitlab.rb 文件,这一行如果有专门的域名那么就写域名,如果没有域名那么就写IP地址

更多配置,如邮箱、ssl(https)、redis、nginx、数据库等,可以参考官方文档,文档地址:
https://docs.gitlab.com/omnibus/settings/
执行以下命令使配置生效(可能时间有点长):
gitlab-ctl reconfigure
启动
常用命令:
# 启动gitlab
gitlab-ctl start

# 停止gitlab
gitlab-ctl stop

# 重启gitlab
gitlab-ctl restart

# 查看gitlab状态
gitlab-ctl status

# 查看gitlab日志
gitlab-ctl tail
分别执行 gitlab-ctl start 和 gitlab-ctl status 命令,可以看到启动成功

访问
访问成功,重置root密码,然后用户名为root,密码为你刚刚设置的密码,点击登录即可来到控制台:

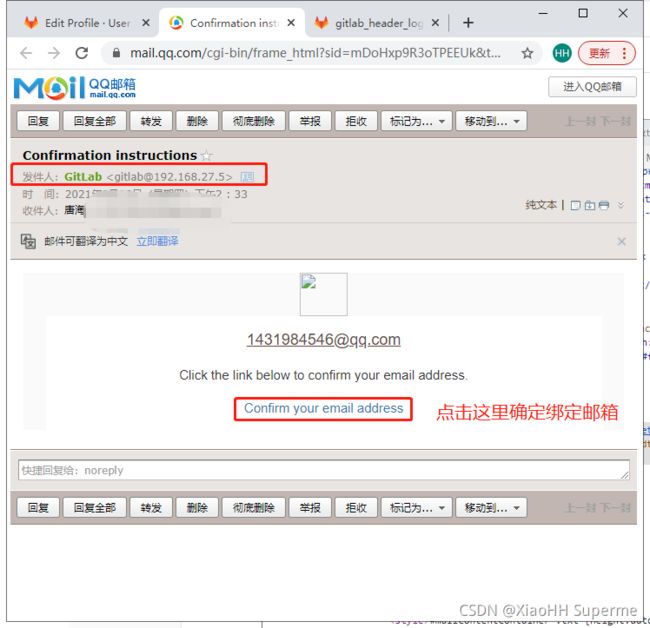
绑定邮箱Git Lab会向你发邮件确认,点击图中位置可以绑定邮箱成功

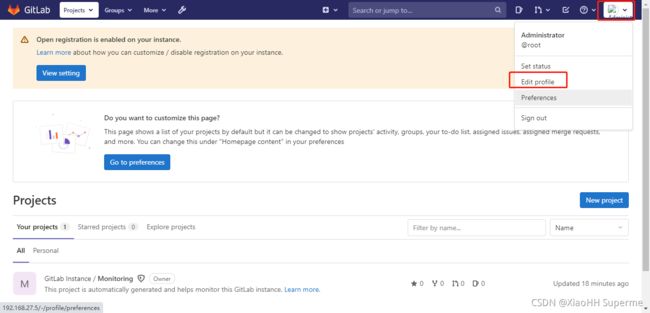
绑定ssh key,可以不用登录密码的访问代码仓库。点击Edit profile

SSH keys的生成(注意在git命令行中执行,然后生成的key在家目录下的 .ssh 目录下,id_rsa.pub 为公钥,也就是写在gitlab当中的内容,注意以文本方式打开)
# 配置个人信息(注意替换邮箱地址)
git config --global user.name "XiaoHH"
git config --global user.email "[email protected]"
# 生成 SSH key(注意替换邮箱地址)
ssh-keygen -t rsa -C "[email protected]"
# (之后连续几个回车即可生成SSH key)
点击 Add key 之后 Git Lab 还会发邮件通知你
创建一个代码仓库并测试
本地创建一个空目录并打开 Git Bash ,在空目录下右击然后选择 Git Bash Here(首先保证Windows上安装了git)然后执行一下几条命令:
# 初始化一个git仓库
git init
# 添加远程仓库地址(注意后面更改为自己的仓库地址)
git remote add origin [email protected]:root/test-project.git
新增一个 HelloGitLab.txt 文件,内容为 Hello GitLab,然后继续执行几行命令
# 查看git状态,是否有文件需要提交
git status
# 将刚刚新增的文件添加到git的管理区
git add HelloGitLab.txt
# 将git管理区的数据提交到本地仓库
git commit -m 'HelloGitLab.txt'
# 将本地仓库与远程仓库同步
git push origin master
好了,GitLab安装完成了,现在可以开始使用了!


