LeakCanary检测安卓内存泄漏
我们知道,在安卓应用程序运行过程中,偶尔会出现程序异常退出的情况,这一般是内存泄漏(OOM)的问题。
内存泄漏一般的排查步骤:
1.通过统计平台了解OOM情况
2.重现问题
3.在发生内存泄漏时Dump内存
4.在内存分析工具中反复查看,找出原本该被回收的对象
5.计算此对象到GC roots的最短强引用路径
6.确定引用路径中的哪个引用是不该有的,然后修复问题
因此,我们将需要内存泄漏检测分析工具。
在安卓开发中,常见的内存泄漏检测工具有:
- MAT(Memory Analyzer Tool),一个基于Eclipse的内存分析工具,是一个快速、功能丰富的JAVA heap分析工具。(操作复杂,学习成本高)
- YourKit,第三方收费软件。Java性能分析工具。
- LeakCanary
这里,我将重点介绍LeakCanary。
LeakCanary是一个内存泄漏检测工具。它能十分方便地检测出程序内的内存泄漏,同时提供非常友好的通知提示,Log信息详细。最主要的是它可以保存内存映像文件。、
LeakCanary的官网:https://github.com/square/leakcanary
文章中所使用的LeakCanary版本为
1.6.1
使用教程:
1.在 build.gradle 中加入引用,不同的编译环境使用不同的引用:
dependencies {
    debugImplementation 'com.squareup.leakcanary:leakcanary-android:1.6.1'  //debug环境
    releaseImplementation 'com.squareup.leakcanary:leakcanary-android-no-op:1.6.1'  //生产环境
    // Optional, if you use support library fragments:
    debugImplementation 'com.squareup.leakcanary:leakcanary-support-fragment:1.6.1'
 }
2.在 Application 中:
public class ExampleApplication extends Application {
  @Override
  public void onCreate() {
    super.onCreate();
    if (LeakCanary.isInAnalyzerProcess(this)) {
      // This process is dedicated to LeakCanary for heap analysis.
      // You should not init your app in this process.
      return;
    }
    LeakCanary.install(this);
  }
}
注:上述配置在 debug build (Debug版本)中,如果检测到某个 activity 有内存泄露,LeakCanary 就是自动地显示一个通知,但不能在发行版(Release)上检测。
LeakCanary默认检查所有Activity,如果需要忽略某些Activity,可以使用 以下方式:
public class ExampleApplication extends Application {

  @Override public void onCreate() {
    super.onCreate();
    if (LeakCanary.isInAnalyzerProcess(this)) {
      // This process is dedicated to LeakCanary for heap analysis.
      // You should not init your app in this process.
      return;
    }
    installLeakCanary();
  }
  //不做任何操作
  protected void installLeakCanary() {
    // no-op, LeakCanary is disabled in production.
  }
}
public class DebugExampleApplication extends ExampleApplication {
  @Override protected void installLeakCanary() {
    RefWatcher refWatcher = LeakCanary.refWatcher(this)
      .watchActivities(false)
      .buildAndInstall();
    registerActivityLifecycleCallbacks(new ActivityLifecycleCallbacks() {
      public void onActivityDestroyed(Activity activity) {
        if (activity instanceof ThirdPartyActivity) {
            return;
        }
        refWatcher.watch(activity);
      }
      // ...
    });
  }
}
使用 RefWatcher 监控 Fragment:
public abstract class BaseFragment extends Fragment {

  @Override public void onDestroy() {
    super.onDestroy();
    RefWatcher refWatcher = LeakCanary.installedRefWatcher();
    refWatcher.watch(this);
  }
}
- RefWatcher可以用来监控需要被垃圾回收机制回收的对象
示例:利用AsyncTask在屏幕旋转时引发的崩溃问题来演示LeakCanary的检测过程
在一个Activity中
public class SecondActivity extends AppCompatActivity {
    @Override
    protected void onCreate(Bundle savedInstanceState) {
        super.onCreate(savedInstanceState);
        setContentView(R.layout.activity_second);
        new MyTask().execute();
    }
    class MyTask extends AsyncTask {
        @Override
        protected Void doInBackground(Void... params) {
            try {
                Thread.sleep(20000);
            } catch (InterruptedException e) {
                e.printStackTrace();
            }
            return null;
        }
    }
}
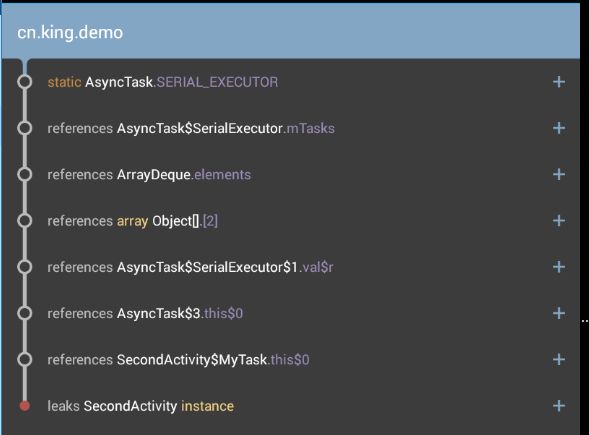
程序启动时,由于AsyncTask里面有个线程休眠的操作,旋转屏幕时,Activity发生重建,原来的线程并没有执行完,AsyncTask里面的线程持有之前Activity的引用得不到回收,造成了内存泄漏。
这时,LeakCanary会给我们如下提示:
界面提示:

Log信息:
03-30 05:28:29.240    2033-2176/cn.king.demo D/LeakCanary﹕ In cn.king.demo:1.0:1.
    * cn.king.demo.SecondActivity has leaked:
    * GC ROOT thread java.lang.Thread. (named 'AsyncTask #1')
    * references cn.king.demo.SecondActivity$MyTask.this$0
    * leaks cn.king.demo.SecondActivity instance
    * Reference Key: e097cbb3-8fb2-4df2-a463-b82d566f3543
    * Device: Genymotion generic Google Nexus 7 - 4.4.4 - API 19 - 800x1280 vbox86tp
    * Android Version: 4.4.4 API: 19
    * Durations: watch=5109ms, gc=105ms, heap dump=144ms, analysis=2662ms
好了,LeakCanary的简单介绍就到这里了!具体使用详情,大家可去参考官方示例。