python Xarray处理设置2维数组作为coordinates
因为想做笔记,所以直接做的很粗糙了,后面再更新!
import cv2
import numpy as np
from osgeo import gdal
import os
import xarray as xr
import matplotlib.pyplot as plt
import matplotlib as mpl

fig, ax = plt.subplots(figsize=(6, 1))
fig.subplots_adjust(bottom=0.5)

cmap = mpl.cm.cool
norm = mpl.colors.Normalize(vmin=5, vmax=10)

fig.colorbar(mpl.cm.ScalarMappable(norm=norm, cmap=cmap),
             cax=ax, orientation='horizontal', label='Some Units')
"""
res = cv2.resize(RasterArrray, dsize=(441,251), interpolation=cv2.INTER_CUBIC)

Here img is thus a numpy array containing the original image, whereas res is a numpy array containing the resized image. An important aspect is the interpolation parameter: there are several ways how to resize an image. Especially since you scale down the image, and the size of the original image is not a multiple of the size of the resized image. Possible interpolation schemas are:
INTER_NEAREST - a nearest-neighbor interpolation
INTER_LINEAR - a bilinear interpolation (used by default)
INTER_AREA - resampling using pixel area relation. It may be a preferred method for image decimation, as it gives moire’-free results. But when the image is zoomed, it is similar to the INTER_NEAREST method.
INTER_CUBIC - a bicubic interpolation over 4x4 pixel neighborhood
INTER_LANCZOS4 - a Lanczos interpolation over 8x8 pixel neighborhood

"""
def GetTimeSerises_nc(ncVariable):
    """
    获取 时间序列
    :param ncVariable:
    :return:
    """

timeSerises = ncVariable.time.data
return timeSerises
inNcFile = r"./solar-1979-01.nc"
inNc = xr.open_dataset(inNcFile)
print(inNc)
print(inNc.LATIXY.data)


import pandas as pd

# 创建 dataset
ds = xr.Dataset()


numLon = 1400
numLat = 800

# LATIXY LONGXY
inLat = inNc.LATIXY.data
inLon = inNc.LONGXY.data
# print("np.min(inLon):{}, np.max(inLon):{}".format(np.min(inLon), np.max(inLon)))
# print("np.min(inLat):{}, np.max(inLat):{}".format(np.min(inLat), np.max(inLat)))
lon = np.linspace(np.min(inLon), np.max(inLon), num=numLon, endpoint=True, retstep=False, dtype=None, axis=0)
lat = np.linspace(np.min(inLat), np.max(inLat), num=numLat, endpoint=True, retstep=False, dtype=None, axis=0)


lon, lat = np.meshgrid(lon, lat)

ds = ds.assign_coords({
    "lat": (["x", "y"], lat),
    "lon": (["x", "y"], lon)
})

solor = np.full(shape=(10, numLat, numLon) , fill_value= np.nan )

ncVariable = inNc.FSDS
timeSerises = GetTimeSerises_nc(ncVariable)

i = 0
for timeSerise in timeSerises[0:10]:
    print(timeSerise)
    # 获取数据
    arr = inNc.FSDS.loc[timeSerise].data
    print(arr.shape)
    solor[i,:,:] = cv2.resize(arr, dsize=(numLon,numLat), interpolation = cv2.INTER_LINEAR)
    print(arr.shape)
    i= i+1
    print(i)

ds["solor"] = xr.DataArray(solor, dims=['time','x', 'y'], )
ds.coords['time'] = pd.date_range(start='1979-01-01',periods=10,freq='3H')
# ds["lat"]  = xr.DataArray(lat, dims=['lat'], )
# ds["lon"]  = xr.DataArray(lon, dims=['lon'], )
print(ds)

ds.to_netcdf(r"./test_1.nc")
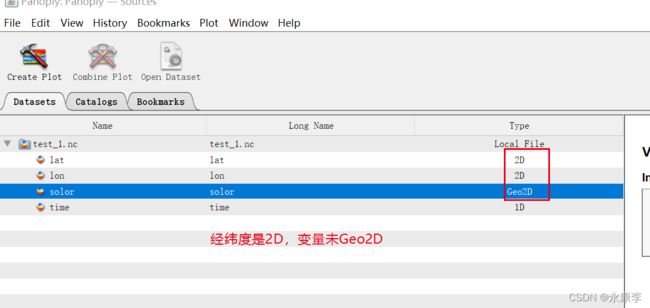
主要解决问题的代码块在这里:
lon = np.linspace(np.min(inLon), np.max(inLon), num=numLon, endpoint=True, retstep=False, dtype=None, axis=0)
lat = np.linspace(np.min(inLat), np.max(inLat), num=numLat, endpoint=True, retstep=False, dtype=None, axis=0)
lon, lat = np.meshgrid(lon, lat)

ds = ds.assign_coords({
    "lat": (["x", "y"], lat),
    "lon": (["x", "y"], lon)
})

ds["solor"] = xr.DataArray(solor, dims=['time','x', 'y'], )
ds.coords['time'] = pd.date_range(start='1979-01-01',periods=10,freq='3H')
写的粗糙还望见谅!
参考链接
https://stackoverflow.com/questions/67695672/xarray-set-new-2d-coordinate-as-dimension
