封装hiredis成dll包,为老项目提供redis网络支持
第一步:准备VS环境
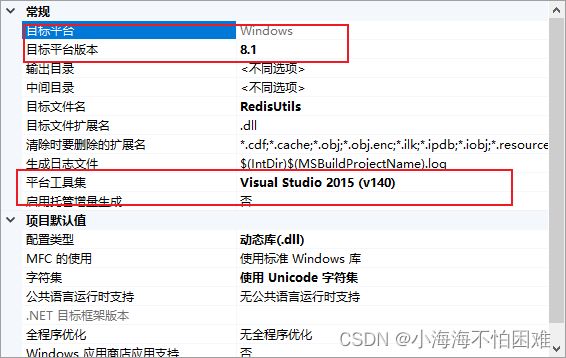
1、需要下载window8.1的SDK否则无法下载
2、平台工具集需要使用Visual Studio 2015(v140)
第二步:下载hiredis
去microsoft/hiredis下载windows版本的hiredis,并解压到本地
打开hiredis-master\msvs\vs-solutions中的sln,点击生成。
第三步:动态链接库(DLL)
1、创建DLL工程
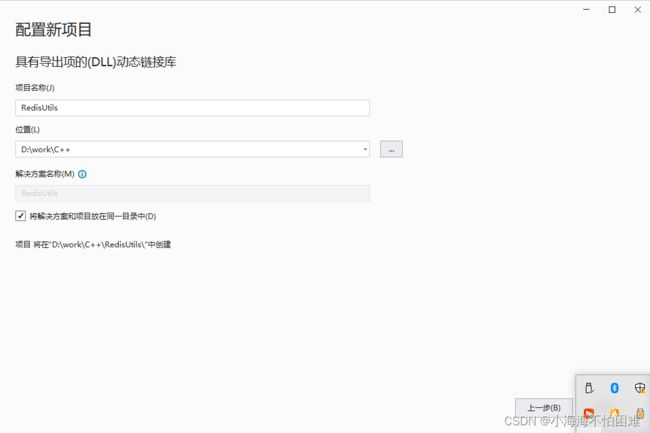
流程:文件 -> 新建 -> 项目 -> 动态链接库(DLL)-> Next - > 填写项目名。
图1:DLL项目创建
图2:DLL项目名设置
2、等待项目生成
等待项目生成后项目结构如下图。
3、配置依赖
点击项目按右键,选择在文件夹中打开项目
项目结构如下所示(其中Debug\、x64\文件夹是生成的,可忽略):
新建lib文件夹include文件夹和。lib文件夹包含上一步得到的.lib文件和.pdb文件。include文件夹包含hiredis\,win32_interop\和adapters\三个文件夹,分别对应hiredis-master\,msvs\win32_interop\和hiredis\adapters\下所有的.h文件。
添加额外的依赖项:
添加编译头:
在预处理器定义中添加如下字符:_CRT_SECURE_NO_WARNINGS
4、其它配置
在C/C++中选择代码生成,并选择运行库,在运行库中选择MDd模式。
![]()
在配置属性常规中选择配置类型为动态库。
![]()
设置平台SDK
第三步:撰写代码并编译
RedisUtils.h
extern "C" REDISUTILS_API int testRedis(char* host, int input_port);RedisUtils.cpp
REDISUTILS_API int testRedis(char* host, int input_port) {


	unsigned int j;
	redisContext* c;
	redisReply* reply;
	const char* hostname = host;
	int port = input_port;
	struct timeval timeout = { 1, 500000 }; // 1.5 seconds
	c = redisConnectWithTimeout(hostname, port, timeout);
	if (c == NULL || c->err) {
		if (c) {
			printf("Connection error: %s\n", c->errstr);
			redisFree(c);
		}
		else {
			printf("Connection error: can't allocate redis context\n");
		}
		exit(1);
	}

	/* PING server */
	reply = (redisReply*)redisCommand(c, "PING");
	printf("PING: %s\n", reply->str);
	freeReplyObject(reply);

	/* Set a key */
	reply = (redisReply*)redisCommand(c, "SET %s %s", "foo", "hello world");
	printf("SET: %s\n", reply->str);
	freeReplyObject(reply);

	/* Set a key using binary safe API */
	reply = (redisReply*)redisCommand(c, "SET %b %b", "bar", (size_t)3, "hello", (size_t)5);
	printf("SET (binary API): %s\n", reply->str);
	freeReplyObject(reply);

	/* Try a GET and two INCR */
	reply = (redisReply*)redisCommand(c, "GET foo");
	printf("GET foo: %s\n", reply->str);
	freeReplyObject(reply);

	reply = (redisReply*)redisCommand(c, "INCR counter");
	printf("INCR counter: %lld\n", reply->integer);
	freeReplyObject(reply);
	/* again ... */
	reply = (redisReply*)redisCommand(c, "INCR counter");
	printf("INCR counter: %lld\n", reply->integer);
	freeReplyObject(reply);

	/* Create a list of numbers, from 0 to 9 */
	reply = (redisReply*)redisCommand(c, "DEL mylist");
	freeReplyObject(reply);
	for (j = 0; j < 10; j++) {
		char buf[64];

		snprintf(buf, 64, "%d", j);
		reply = (redisReply*)redisCommand(c, "LPUSH mylist element-%s", buf);
		freeReplyObject(reply);
	}

	/* Let's check what we have inside the list */
	reply = (redisReply*)redisCommand(c, "LRANGE mylist 0 -1");
	if (reply->type == REDIS_REPLY_ARRAY) {
		for (j = 0; j < reply->elements; j++) {
			printf("%u) %s\n", j, reply->element[j]->str);
		}
	}
	freeReplyObject(reply);

	/* Disconnects and frees the context */
	redisFree(c);

	return 0;
}
编译代码:
右击项目点击生成
生成完毕后会在Debug目录下生成对应的dll文件
项目地址:
下面是项目的github地址,大家可以去看看:GitHub - 1756336885/RedisUtils: C++封装的DLL包,可以为一些老项目提供redis支持
参考文章:
Windows下使用hiredis各种常见问题(折磨死人了)_hiredis windows_无极之剑的博客-CSDN博客
C++编写Config类读取配置文件_vc++ 判断config 在不在_David_xtd的博客-CSDN博客
无法打开源文件 ctype.h和.exe 进行写入_无法打开源文件ctype.h_河西石头的博客-CSDN博客
hiredis在windows下的编译以及使用_hiredis windows_持久决心的博客-CSDN博客
redis++的编译,安装,使用_redis++库_YZF_Kevin的博客-CSDN博客
https://www.cnblogs.com/javaxubo/p/16684647.html


