Tensorflow benchmark 实操指南
环境搭建篇见环境搭建-CentOS7下Nvidia Docker容器基于TensorFlow1.15测试GPU_东方狱兔的博客-CSDN博客
1. 下载Benchmarks源码
从 TensorFlow 的 Github 仓库上下载 TensorFlow Benchmarks,可以通过以下命令来下载
https://github.com/tensorflow/benchmarks
我的 - settings -SSH and GPG Keys 添加公钥id_rsa.pub
拉取代码 git clone [email protected]:tensorflow/benchmarks.git
git同步远程分支到本地,拉取tensorflow对应版本的分支
git fetch origin 远程分支名xxx:本地分支名xxx
使用这种方式会在本地仓库新建分支xxx,但是并不会自动切换到新建的分支xxx,需要手动checkout,当然了远程分支xxx的代码也拉取到了本地分支xxx中。采用这种方法建立的本地分支不会和远程分支建立映射关系
root@818d19092cdc:/gpu/benchmarks# git checkout -b tf1.15 origin/cnn_tf_v1.15_compatible
![]()
2. 运行不同模型
root@818d19092cdc:/gpu/benchmarks/scripts/tf_cnn_benchmarks# pwd
/gpu/benchmarks/scripts/tf_cnn_benchmarks
root@818d19092cdc:/gpu/benchmarks/scripts/tf_cnn_benchmarks# python3 tf_cnn_benchmarks.py
真实操作:
[root@gputest ~]# docker ps
进入CONTAINER ID containerid
[root@gputest ~]# nvidia-docker exec -it 818d19092cdc /bin/bash
新开窗口
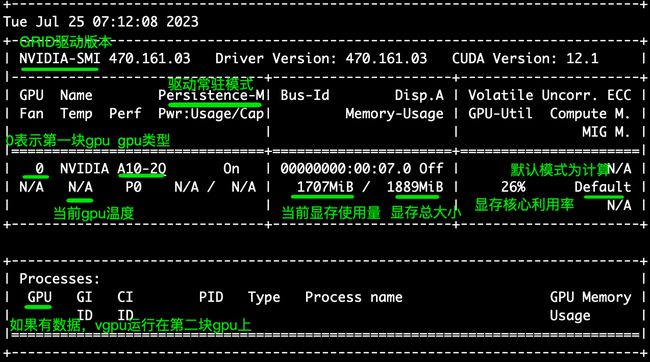
[root@gputest ~]# nvidia-smi -l 3
该命令将3秒钟输出一次GPU的状态和性能,可以通过查看输出结果来得出GPU的性能指标
一、resnet50模型
python3 tf_cnn_benchmarks.py --num_gpus=1 --batch_size=2 --model=resnet50 --variable_update=parameter_server
![]()
Running warm up
2023-07-21 09:50:55.398126: I tensorflow/stream_executor/platform/default/dso_loader.cc:50] Successfully opened dynamic library libcublas.so.12
2023-07-21 09:50:55.533068: I tensorflow/stream_executor/platform/default/dso_loader.cc:50] Successfully opened dynamic library libcudnn.so.8
Done warm up
Step Img/sec total_loss
1 images/sec: 10.1 +/- 0.0 (jitter = 0.0) 7.695
10 images/sec: 10.7 +/- 0.1 (jitter = 0.1) 8.022
20 images/sec: 10.7 +/- 0.1 (jitter = 0.2) 7.269
30 images/sec: 10.7 +/- 0.1 (jitter = 0.2) 7.889
40 images/sec: 10.7 +/- 0.1 (jitter = 0.2) 8.842
50 images/sec: 10.6 +/- 0.1 (jitter = 0.2) 6.973
60 images/sec: 10.6 +/- 0.1 (jitter = 0.2) 8.124
70 images/sec: 10.6 +/- 0.0 (jitter = 0.2) 7.644
80 images/sec: 10.6 +/- 0.0 (jitter = 0.2) 7.866
90 images/sec: 10.6 +/- 0.0 (jitter = 0.3) 7.687
100 images/sec: 10.6 +/- 0.0 (jitter = 0.3) 8.779
----------------------------------------------------------------
total images/sec: 10.63
二、vgg16模型
python3 tf_cnn_benchmarks.py --num_gpus=1 --batch_size=2 --model=vgg16 --variable_update=parameter_server
由于阿里云服务器申请的是2个G显存,所以只能跑size=1 2 和 4 ,超出会吐核
已放弃(吐核)--linux 已放弃(吐核) (core dumped) 问题分析
出现这种问题一般是下面这几种情况:
1.内存越界
2.使用了非线程安全的函数
3.全局数据未加锁保护
4.非法指针
5.堆栈溢出
也就是需要检查访问的内存、资源。
可以使用 strace 命令来进行分析
在程序的运行命令前加上 strace,在程序出现:已放弃(吐核),终止运行后,就可以通过 strace 打印在控制台的跟踪信息进行分析和定位问题
方法2:docker启动普通镜像的Tensorflow
$ docker pull tensorflow/tensorflow:1.8.0-gpu-py3
$ docker tag tensorflow/tensorflow:1.8.0-gpu-py3 tensorflow:1.8.0-gpu
# nvidia-docker run -it -p 8888:8888 tensorflow:1.8.0-gpu
$ nvidia-docker run -it -p 8033:8033 tensorflow:1.8.0-gpu
浏览器进入指定 URL(见启动终端回显) 就可以利用 IPython Notebook 使用 tensorflow
![]()
评测指标
-
训练时间:在指定数据集上训练模型达到指定精度目标所需的时间
-
吞吐:单位时间内训练的样本数
-
加速效率:加速比/设备数*100%。其中,加速比定义为多设备吞吐数较单设备的倍数
-
成本:在指定数据集上训练模型达到指定精度目标所需的价格
-
功耗:在指定数据集上训练模型达到指定精度目标所需的功耗
在初版评测指标设计中,我们重点关注训练时间、吞吐和加速效率三项
3. 保存镜像的修改
执行以下命令,保存TensorFlow镜像的修改
docker commit   -m "commit docker" CONTAINER_ID  nvcr.io/nvidia/tensorflow:18.03-py3
# CONTAINER_ID可通过docker ps命令查看。
[root@gputest ~]# docker commit -m "commit docker" 818d19092cdc nvcr.io/nvidia/tensorflow:23.03-tf1-py3
sha256:fc14c7fdf361308817161d5d0cc018832575e7f2def99fe49876d2a41391c52c
![]()
查看docker进程
[root@gputest ~]# docker ps
进入CONTAINER ID containerid
[root@gputest ~]# nvidia-docker exec -it 818d19092cdc /bin/bash
![]()
4. TensorFlow支持的所有参数
| 参数名称 |
描述 |
备注 |
| --help |
查看帮助信息 |
|
| --backend |
使用的框架名称,如TensorFlow,PyTorch等,必须指定 |
当前只支持TensorFlow,后续会增加对PyTorch的支持 |
| --model |
使用的模型名称,如alexnet、resnet50等,必须指定 |
请查阅所有支持的模型 |
| --batch_size |
batch size大小 |
默认值为32 |
| --num_epochs |
epoch的数量 |
默认值为1 |
| --num_gpus |
使用的GPU数量。设置为0时,仅使用CPU。
|
|
| --data_dir |
输入数据的目录,对于CV任务,当前仅支持ImageNet数据集;如果没有指定,表明使用合成数据 |
|
| --do_train |
执行训练过程 |
这三个选项必须指定其中的至少一个,可以同时指定多个选项。 |
| --do_eval |
执行evaluation过程 |
|
| --do_predict |
执行预测过程 |
|
| --data_format |
使用的数据格式,NCHW或NHWC,默认为NCHW。
|
|
| --optimizer |
所使用的优化器,当前支持SGD、Adam和Momentum,默认为SGD |
|
| --init_learning_rate |
使用的初始learning rate的值 |
|
| --num_epochs_per_decay |
learning rate decay的epoch间隔 |
如果设置,这两项必须同时指定 |
| --learning_rate_decay_factor |
每次learning rate执行decay的因子 |
|
| --minimum_learning_rate |
最小的learning rate值 |
如果设置,需要同时指定面的两项 |
| --momentum |
momentum参数的值 |
用于设置momentum optimizer |
| --adam_beta1 |
adam_beta1参数的值 |
用于设置Adam |
| --adam_beta2 |
adam_beta2参数的值 |
|
| --adam_epsilon |
adam_epsilon参数的值 |
|
| --use_fp16 |
是否设置tensor的数据类型为float16 |
|
| --fp16_vars |
是否将变量的数据类型设置为float16。如果没有设置,变量存储为float32类型,并在使用时转换为fp16格式。 建议:不要设置 |
必须同时设置--use_fp16 |
| --all_reduce_spec |
使用的AllReduce方式 |
|
| --save_checkpoints_steps |
间隔多少step存储一次checkpoint |
|
| --max_chkpts_to_keep |
保存的checkpoint的最大数量 |
|
| --ip_list |
集群中所有机器的IP地址,以逗号分隔 |
用于多机分布式训练 |
| --job_name |
任务名称,如‘ps'、’worker‘ |
|
| --job_index |
任务的索引,如0,1等 |
|
| --model_dir |
checkpoint的存储目录 |
|
| --init_checkpoint |
初始模型checkpoint的路径,用于在训练前加载该checkpoint,进行finetune等 |
|
| --vocab_file |
vocabulary文件 |
用于NLP |
| --max_seq_length |
输入训练的最大长度 |
用于NLP |
| --param_set |
创建和训练模型时使用的参数集。 |
用于Transformer |
| --blue_source |
包含text translate的源文件,用于计算BLEU分数 |
|
| --blue_ref |
包含text translate的源文件,用于计算BLEU分数 |
|
| --task_name |
任务的名称,如MRPC,CoLA等 |
用于Bert |
| --do_lower_case |
是否为输入文本使用小写 |
|
| --train_file |
训练使用的SQuAD文件,如train-v1.1.json |
用于Bert模型,运行SQuAD, --run_squad必须指定 |
| --predict_file |
预测所使用的SQuAD文件,如dev-v1.1.json或test-v1.1.json |
|
| --doc_stride |
当将长文档切分为块时,块之间取的间距大小 |
|
| --max_query_length |
问题包含的最大token数。当问题长度超过该值时,问题将被截断到这一长度。 |
|
| --n_best_size |
nbest_predictions.json输出文件中生成的n-best预测的总数 |
|
| --max_answer_length |
生成的回答的最大长度 |
|
| --version_2_with_negative |
如果为True,表明SQuAD样本中含有没有答案(answer)的问题 |
|
| --run_squad |
如果为True,运行SQUAD任务,否则,运行sequence (sequence-pair)分类任务 |
5. GPU机器学习调研tensorflow
如何在tensorflow中指定使用GPU资源
在配置好GPU环境的TensorFlow中 ,如果操作没有明确地指定运行设备,那么TensorFlow会优先选择GPU。在默认情况下,TensorFlow只会将运算优先放到/gpu:0上。如果需要将某些运算放到不同的GPU或者CPU上,就需要通过tf.device来手工指定
import tensorflow as tf

# 通过tf.device将运算指定到特定的设备上。
with tf.device('/cpu:0'):
   a = tf.constant([1.0, 2.0, 3.0], shape=[3], name='a')
   b = tf.constant([1.0, 2.0, 3.0], shape=[3], name='b')
with tf.device('/gpu:1'):
    c = a + b

sess = tf.Session(config=tf.ConfigProto(log_device_placement=True))
print sess.run(c)
