搭建简单的chatbot并部署到HuggingFace上
调用ChatGPT接口完成聊天任务
下面的代码调用ChatGPT的ChatCompletion接口实现聊天任务,生成的结果如下图打印的信息所示。而且,在封装Conversation class中,message一直使用append进行追加,即每次调用ChatCompletion接口时都传入了聊天的上下文信息,这里为了节省tokens的消耗,设置了只记住最近的三轮问题。所以在问第一个问题“what is first question I asked?”,chatgpt能准确回答出第一个问的问题。
import openai
import os
from dotenv import load_dotenv

load_dotenv()
openai.api_key = os.environ.get("OPENAI_API_KEY")

class Conversation2:
    def __init__(self, prompt, num_of_round):
        self.prompt = prompt
        self.num_of_round = num_of_round
        self.messages = []
        self.messages.append({"role": "system", "content": self.prompt})

    def ask(self, question):
        try:
            self.messages.append({"role": "user", "content": question})
            response = openai.ChatCompletion.create(
                model="gpt-3.5-turbo",
                messages=self.messages,
                temperature=0.5,
                max_tokens=2048,
                top_p=1,
            )
        except Exception as e:
            print(e)
            return e

        message = response["choices"][0]["message"]["content"]
        num_of_tokens = response['usage']['total_tokens']
        self.messages.append({"role": "assistant", "content": message})

        if len(self.messages) > self.num_of_round*2 + 1:
            del self.messages[1:3]
        return message, num_of_tokens

prompt = """you are a ai assistor"""
conv2 = Conversation2(prompt, 2)
question1 = "who are you? "
print("User : %s" % question1)
answer, num_of_token = conv2.ask(question1)
print("Assistant: {%s} 消耗的token数量是 : %d" % (answer, num_of_token))

question2 = "how are you? "
print("User : %s" % question2)
answer, num_of_token = conv2.ask(question2)
print("Assistant: {%s} 消耗的token数量是 : %d" % (answer, num_of_token))

question3 = "where are you from? "
print("User : %s" % question3)
answer, num_of_token = conv2.ask(question3)
print("Assistant: {%s} 消耗的token数量是 : %d" % (answer, num_of_token))

question4 = "what is first question I asked? "
print("User : %s" % question4)
answer, num_of_token = conv2.ask(question4)
print("Assistant: {%s} 消耗的token数量是 : %d" % (answer, num_of_token))
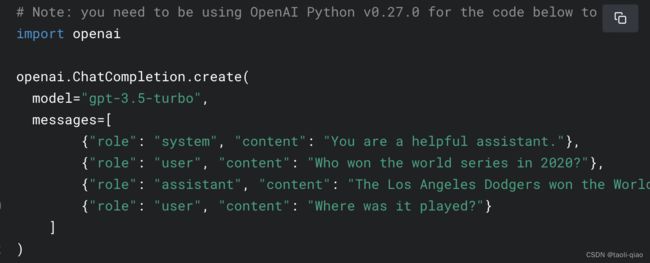
 在上面的代码中,调用接口时传入了model,messages,temperature,max_tokens,top_p几个参数,其中message的格式是:{"role":"xxx","content":"xxxx"},接口调用demo如下所示:
role总共有三类,system,assistant,user,当role=system时,表示给ChatGPT一个指令,例如指令是“你现在是一个测试专家,你需要给我设计测试用例”,给出指令后,设计具体问题时,可以用user或者assistant两个role中的任意一个即可。另外,上面的代码中还返回了消耗的tokens个数,ChatCompletion接口的response body中可直接获取到消耗的tokens个数。除了从接口返回的response中获取,还可以调用python的tiktoken库来提前计算需要消耗的tokens个数。
Tiktoken计算消耗的tokens数量
tiktoken 是一个用于文本处理的 Python 包,提供了一些对文本进行编码和解码的函数,包括 Byte Pair Encoding (BPE) 和 SentencePiece 等方法。使用这些函数可以帮助将文本转换为模型可以处理的向量表示形式。下面的代码使用tiktoken的包,将文字编码成了向量的表现形式。当然编码后,还可以通过decode进行解码,计算一段文字的tokens数量,即计算len(encode_text)即可。
import tiktoken

encoding = tiktoken.get_encoding("cl100k_base")
encode_text = encoding.encode('how are you? where are you from?')
print(encode_text)
print("the tokens is : %d" % (len(encode_text)))
print(encoding.decode(encode_text))
需要注意一点,如果调用gpt-3.5-turbo模型,那么传入的encoding名称是cl100k_base,如果使用其他模型,需要传入正确的encoding name,如下图映射所示:
Gradio简要介绍
Gradio是一个用于构建交互式应用程序的开源Python库。使用Gradio,您可以快速创建具有自定义输入和输出接口的应用程序,使您可以在Web应用程序上运行训练的模型。Gradio支持多种输入和输出类型,例如文本,图像,音频和视频。它还提供了预处理选项,可以在模型中使用,并支持多种模型类型,包括机器学习模型和深度学习模型。
下面的代码中调用了上面代码中封装的Conversation class中的方法,引入gradio,利用gradio提供的Blocks模块,实现一个简单的chatbot的UI。
prompt = """you are a ai assistor"""
conv2 = Conversation2(prompt, 2)

def predict(input, history=[]):
    history.append(input)
    response = conv2.ask(input)
    history.append(response)
    responses = [(u, b) for u, b in zip(history[::2], history[1::2])]
    return responses, history


with gr.Blocks(css="#chatbot{height:350px} .overflow-y-auto{height:500px}") as demo:
    chatbot = gr.Chatbot(elem_id="chatbot")
    state = gr.State([])

    with gr.Row():
        txt = gr.Textbox(show_label=False, placeholder="Enter text and press enter").style(
            container=False)

    txt.submit(predict, [txt, state], [chatbot, state])

demo.launch()
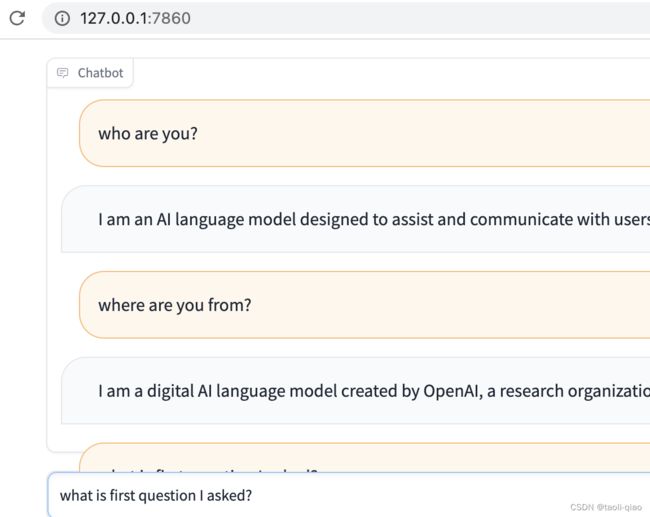
执行上面的代码,本地访问http://127.0.0.1:7086,即可开始进行对话,对话的结果如下图所示:
上面的代码中使用到了Blocks模块,实际Gradio包括interface和blocks两大模块,这两个模块都用于创建用户界面的模块,但它们的主要功能不同。interface模块提供了一系列高级函数,用于创建自定义的、交互式的用户界面,这些函数包括gradio.Interface()、gradio.Interface.load()和gradio.Interface.launch()。用户可以使用这些函数创建自己的用户界面,并将其与自己的机器学习模型集成。blocks模块则提供了一组预先构建的、可重复使用的UI组件,用于创建常见的输入和输出组件,如文本输入框、下拉框、图像上传、图表和文本输出。这些组件可以直接在interface模块中使用,以快速创建交互式的用户界面。同时,用户也可以通过组合和配置这些组件来创建自己的自定义界面。
import gradio as gr
import random
import time

with gr.Blocks() as demo:
    chatbot = gr.Chatbot()
    msg = gr.Textbox()
    clear = gr.Button("Clear")

    def respond(message, chat_history):
        bot_message = random.choice(
            ["How are you?", "I love you", "I'm very hungry"])
        chat_history.append((message, bot_message))
        time.sleep(1)
        return "", chat_history

    msg.submit(respond, [msg, chatbot], [msg, chatbot])
    clear.click(lambda: None, None, chatbot, queue=False)

demo.launch()
上面的代码是gradio官网给出了创建一个chatbot聊天机器人的code,输入信息后,chatbot会从random.choice(xxx)中随机抽取一段文字作为回答。可以看到,通过Blocks模块预定义好的Chatbot组件,可以很快实现一个聊天机器人界面 。上面的code中使用到了msg.submit(respond,[msg,chatbot],[msg,chatbot])。
msg.submit() 函数是 gradio 模块的一个方法,用于将当前文本框中输入的文本内容 message 作为参数传递给指定的回调函数 respond() 进行处理,同时传递一个聊天记录列表 chat_history 作为输入。这里 submit() 的第二个参数 [msg, chatbot] 表示将 msg 文本框和 chatbot 对象作为参数传递给 respond() 函数,其中 msg 表示当前的输入文本框,而 chatbot 是一个 gradio 中预先定义好的聊天机器人。在 respond() 函数中,通过随机选择一条预定义好的回答来作为机器人的回复,并将用户输入的 message 和机器人回答 bot_message 保存到 chat_history 列表中,然后返回一个空字符串和更新后的聊天记录列表 chat_history。msg.submit() 函数最后一个参数 [msg, chatbot] 用于告诉 gradio 需要更新哪些组件,这里 msg 和 chatbot 都需要更新,因为它们的状态已被修改。
将应用部署到HuggingFace上
将应用部署到HuggingFace上非常简单,首先,在HuggingFace上注册账号,创建space,这里可以选择free的硬件,SDK选择Gradio.
创建namespace后,HuggingFace有默认的指导内容,指导如何部署应用。总结而言有3个步骤
步骤一 :git clone代码,space创建成功后会生成一个用space名称的clone地址,下载的代码只有一个README.md文件。
步骤二:本地编写自己的代码,主要包含app.py文件,requirement.txt文件管理python的依赖。
步骤三:git命令上传代码,上传后刷新refresh space,HuggingFace即可开始自动构建部署应用。
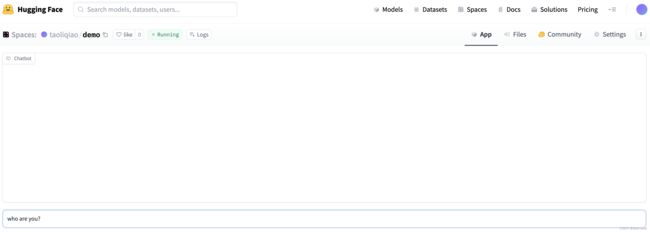
部署成功后入下图所示:
部署起来的界面和本地启动的界面相似,需要注意一点是聊天机器人代码中需要读取环境变量"OPENAI_API_KEY",在HuggingFace的Setting/Repository secret中可以配置该环境变量的值。配置后,restart space,即可开始和机器人聊天了。


