<原>在一个tableView上应用不同类型的DTAttributedTextCell
未经作者同意禁止转载
正在做一个项目,是一个考试答题系统,其题目的题干 或者选项都是用html语言描述的,有的题目题干甚至会出现一些复杂的公式
以及上下脚标,所以只能用 直接显示html的方法 因此找到了DTCoreText
但是由于DTCoreText 中的DTAttributedTextCell 形式特别不自由 其cell上显示html的时候 会填充到整个cell
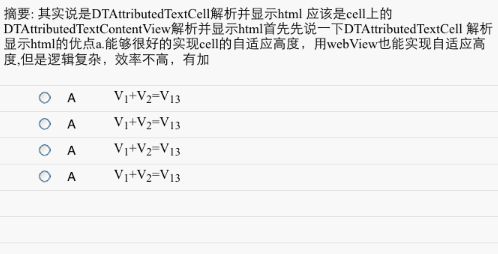
而我们需要的效果是这样的

这样就需要我们自定义DTCoreText 中的DTAttributedTextCell 在cell上加上图片 或者别的东西 同时能调整cell上显示html所占的大小 自定义DTAttributedTextCell 方法 在随笔中有记载
但是在这个界面中 cell第一行 与其他4行并不相同, 第一行 只是原生的DTAttributedTextCell 只显示题干 而下面的四行 上面要有图片等一些东西 同时其显示html的view还不能填满整个cell
很明显 第一行和下面四行 不会是一个类型的cell 这也就引出了本文的目的
在一个tableView上加载不同类型的cell(不同的 class) 但都是根据DTAttributedTextCell 改编过来的 自定义的相关方法参照
另一篇随笔 本文主要讲怎么在tableView上引用,以及怎么修改DTCoreText中的一些代码 达到兼容 并且出现上面的效果
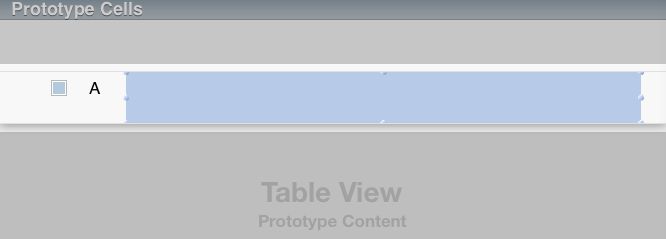
首先贴上我们自定义的两个cell

第一个cell 的class就是DTAttributedTextCell
第二个cell 的class是MyCell 其与DTAttributedTextCell基本相同,只不过DTAttributedTextCell 中是用代码创建的
DTAttributedTextContentView 加到了cell上 MyCell是 用storyboard创建的DTAttributedTextContentView
以及 别的控件 并进行连接 (与自定义相关的内容参照 自定义DTAttributedTextContentView)
tableViewController.m 中
这里改动比较大 因为要引用两个不同的cell 所以要进行一些判断 来确定是读取,创建哪个 cell 尤其注意 不要刻意的定性某个cell
要先进行判断 再确定cell类型
 1 - (CGFloat)tableView:(UITableView *)tableView heightForRowAtIndexPath:(NSIndexPath *)indexPath

 2 {

 3     MyCell *myCell;

 4     DTAttributedTextCell *dtCell;

 5     if (indexPath.row==0) {

 6         dtCell=(DTAttributedTextCell *)[self tableView:tableView preparedCellForIndexPath:indexPath];

 7         //return  dtCell.attributedTextContextView.frame.size.height+10;

 8         return [dtCell requiredRowHeightInTableView:tableView]+20;

 9     }else{

10         myCell = (MyCell *)[self tableView:tableView preparedCellForIndexPath:indexPath];

11         return  myCell.attributedTextContextView.frame.size.height+10;

12     }

13

14 }

15

16 - (UITableViewCell *)tableView:(UITableView *)tableView cellForRowAtIndexPath:(NSIndexPath *)indexPath

17 {

18     id cell;

19     if (indexPath.row==0) {

20         cell=(DTAttributedTextCell *)[self tableView:tableView preparedCellForIndexPath:indexPath];

21

22     }else{

23        cell = (MyCell *)[self tableView:tableView preparedCellForIndexPath:indexPath];

24     }

25     return cell;

26 }
上边两个方法是tableView 调用的第一层方法 里面都用if 进行了判断 然后 再确定相应的类型 并进行下一步调用
 1 - (id)tableView:(UITableView *)tableView preparedCellForIndexPath:(NSIndexPath *)indexPath

 2 {

 3

 4     if (!cellCache)

 5     {

 6         cellCache = [[NSCache alloc] init];

 7     }

 8

 9     // workaround for iOS 5 bug

10     NSString *key = [NSString stringWithFormat:@"%d-%d", indexPath.section, indexPath.row];

11

12     id cell = [cellCache objectForKey:key];

13

14     if (!cell)

15     {

16         // reuse does not work for variable height

17         //cell = (DTAttributedTextCell *)[tableView dequeueReusableCellWithIdentifier:cellIdentifier];

18

19         if (!cell)

20         {

21            //这里面是核心代码   判断是哪个类型 再创建对应的类型

22             if (indexPath.row==0) {

23                 cell = [[DTAttributedTextCell alloc] initWithReuseIdentifier:@"title" accessoryType:UITableViewCellAccessoryDisclosureIndicator];

24

25             }else{

26                 cell=[myTableView dequeueReusableCellWithIdentifier:@"answer"];

27             }

28

29

30         }

31

32         // cache it

33         [cellCache setObject:cell forKey:key];

34     }

35

36     [self configureCell:cell forIndexPath:indexPath];

37

38     return cell;

39 }
核心代码已经标出 同样要判断 要用哪个类型的cell 再创建对应的类型 注意 此方法 返回的参数为ID 因为我们不确定返回哪个类型的cell
 1 - (NSInteger)tableView:(UITableView *)tableView numberOfRowsInSection:(NSInteger)section {

 2     return 5;

 3 }

 4

 5 - (void)configureCell:(id)cell forIndexPath:(NSIndexPath *)indexPath

 6 {

 7     MyCell *myCell;

 8     DTAttributedTextCell *dtCell;

 9     if (indexPath.row==0) {

10         dtCell=(DTAttributedTextCell *)cell;

11         NSString *html=@"摘要: 其实说是DTAttributedTextCell解析并显示html 应该是cell上的DTAttributedTextContentView解析并显示html首先先说一下DTAttributedTextCell 解析显示html的优点a.能够很好的实现cell的自适应高度,用webView也能实现自适应高度,但是逻辑复杂,效率不高,有加";

12        //下面一句是代码的作用后面会解释

13         dtCell.attributedTextContextView.identifier=@"title";

14         [dtCell setHTMLString:html];

15         dtCell.userInteractionEnabled=NO;

16         [dtCell setSelectionStyle:UITableViewCellSelectionStyleNone];

17         dtCell.attributedTextContextView.shouldDrawImages = YES;

18         dtCell.attributedTextContextView.backgroundColor=[UIColor clearColor];

19

20     }

21     else

22     {

23         myCell=(MyCell *)cell;

24         NSString *html=@"V<sub>1</sub>+V<sub>2</sub>=V<sub>13</sub>";

25        //下面代码的作用后面会解释

26         myCell.attributedTextContextView.identifier=@"answer";

27         CGSize size=myCell.attributedTextContextView.frame.size;

28         myCell.attributedTextContextView.realSize=size;

29         [myCell setHTMLString:html];

30        myCell.ABCDlabel.text=@"A";

31         myCell.imageView.image=[UIImage imageNamed:@"answer-notselected"];

32         myCell.attributedTextContextView.backgroundColor=[UIColor clearColor];

33         myCell.attributedTextContextView.shouldDrawImages = YES;

34

35     }

36 }
这里同样进行判断来进行不同的初始化 加注释的代码有很重要的作用, 后面会详细解释
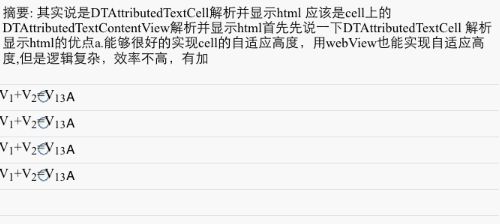
这时 cell引用没有问题 点击运行 如下图所示

第一个cell正常显示 MyCell 虽然在storyboard中我们并没有将 DTAttributedTextContentView设置为整个cell但是
运行后 仍然变为整个 cell
参考随笔(自定义DTAttributedTextCell) 我们知道 我们必须要修改一下DTAttributedTextContentView的relayoutText方法
DTAttributedTextContentView.h
 1 @interface DTAttributedTextContentView : UIView

 2

 3 {

 4

 5 NSAttributedString *_attributedString;

 6

 7 DTCoreTextLayoutFrame *_layoutFrame;

 8

 9

10

11 UIEdgeInsets edgeInsets;

12

13

14

15 NSMutableDictionary *customViewsForAttachmentsIndex;

16

17 //这是我们自己给其添加的一个属性,用来区分不同的实例

18 NSString *identifier;

19 //这个用来装载不同实例的 frame.size

20 CGSize realSize;

21

22 }

23

24 @property(nonatomic,retain)NSString *identifier;

25

26 @property(nonatomic)CGSize realSize;
我们自己定义了 两个实例
NSString *identifier;
CGSize realSize;
这就对应上了 我们在tableViewController.m中的
- (void)configureCell:(id)cell forIndexPath:(NSIndexPath *)indexPath
方法中的几句代码
1          myCell.attributedTextContextView.identifier=@"answer";

2          CGSize size=myCell.attributedTextContextView.frame.size;

3          myCell.attributedTextContextView.realSize=size;

4          [myCell setHTMLString:html];
在这里 我们判断出了到底使用哪个cell 然后 设定attributedTextContextView.identifier为某个特定的标记
并且将attributedTextContextView.frame.size的值传入attributedTextContextView.realSize
注意 对attributedTextContextView.identifier以及attributedTextContextView.frame.size的赋值一定要在
[myCell setHTMLString:html]; 方法之前 因为这个方法调用后 才会层层深入调用 一直调用到DTAttributedTextContentView.m 中的relayoutText方法 然后我们再读取identifier 以及realsize
若放到[myCell setHTMLString:html]; 之后赋值 进入relayoutText后 identifier realSize为空 根本无法判断
DTAttributedTextContentView.m
 1 - (void)relayoutText

 2 {

 3     //CGRect frame=self.frame;

 4

 5     //下面的代码进行判断  并利用isMyCell设定了一个标志

 6     int isMyCell;

 7     if ([self.identifier isEqualToString:@"answer"]) {

 8         isMyCell=2;

 9     }else if(self.identifier==nil)

10     {

11         isMyCell=3;

12

13     }

14     else if([self.identifier isEqualToString:@"title"])

15     {

16         isMyCell=1;

17     }

18

19     // Make sure we actually have a superview before attempting to relayout the text.

20     if (self.superview) {

21         // need new layouter

22         self.layouter = nil;

23         self.layoutFrame = nil;

24         // remove all links because they might have merged or split

25        [self removeAllCustomViewsForLinks];

26

27         if (_attributedString)

28         {

29             // triggers new layout

30

31             CGSize neededSize;

32            //这里根据isMyCell的值确定 是用的哪个cell再设定一些尺寸相关的代码

33             if (isMyCell==2) {

34                 neededSize = [self sizeThatFits:self.realSize];

35                 self.frame = CGRectMake(152, self.frame.origin.y, neededSize.width, neededSize.height);

36             }

37             else if(isMyCell==1){

38                 neededSize=[self sizeThatFits:self.bounds.size];

39                 super.frame = CGRectMake(self.frame.origin.x, self.frame.origin.y, neededSize.width, neededSize.height);

40             }

41             // set frame to fit text preserving origin

42             // call super to avoid endless loop

43             [self willChangeValueForKey:@"frame"];

44

45             [self didChangeValueForKey:@"frame"];

46         }

47         [self setNeedsDisplay];

48         [self setNeedsLayout];

49     }

50 }
这段代码首先 我们根据我们事先设置好的identifier 确定了是哪个cell上的view 然后进行不同的尺寸设置
注意 这里不能直接把 if(isMyCell)换成 if([identifier isEqualtoString:@"xxx"])判断 这样会造成程序僵死 原因尚不明确
关于if()中对尺寸的设置 可以参考随笔 (自定义DTAttributedTextContentView.m)
对本例的扩展:
如果我们tableView中存在更多的 cell类型 这里 可以根据这个思路, 再增加一组 identifier 并且 设置相应的尺寸
然后给isMyCell 增加编号 当然tableViewController中的判断 也要多加一个if判断 等等