前端框架 React 学习总结
目录
一、React在HTML里的运用
二、React框架的常用操作
项目打包
1、JSX基础语法规则
2、state数据的使用
3、生命周期
4、数据的双向绑定与Ref
5、PropTypes验证规则
6、React里的插槽
7、错误边界
8、直接操作refs元素
9、高阶组件的运用案例
10、性能优化
11、Hook生命周期钩子的使用
12、React里的计算属性
三、组件之间的传值
1、父子组件之间传值
2、子向父传值
3、context实现跨层级通信
context hook案例
四、网络请求框架使用
五、React路由的使用
声明式导航
编程式导航
编程式跳转
六、Anti Desgin的使用实现UI界面
七、Redux中央仓库的使用
1、新建src/redux/index.js用于存放redux的文件
2、在src/index.js里引入
3、可以通过logger查看redux日志
4、Redux的模块化管理
5、注意事项
6、总结Redux使用的完整步骤
一、React在HTML里的运用
React在HTML里的使用核心就是导入3个依赖:
案例代码如下:
test
运行效果:
执行流程如下:
二、React框架的常用操作
脚手架创建:
使用详情查看官网,这里只记录我的笔记:React 官方中文文档 – 用于构建用户界面的 JavaScript 库
npx create-react-app projectName项目打包
打包时为了路径对应需要到package.json中添加"homepage":"./"这一属性。
1、JSX基础语法规则
案例代码:object对象不能执行渲染,arr可以通过map函数进行遍历输出。
import React from 'react';
 function App () {
     const num=16
     const bool=true
     const name="string"
     const arr=[1,2,3,4,"Jack",true]
     const obj={name:"Mary",age:12}

     return(

             num:{num}
             bool:{bool}
             name:{name}
             arr:{arr}
             arr遍历: {
                 arr.map((item,index)=>(
                     {item}
                 ))
             }
             {/*对象不能直接打印*/}
             {/*obj:{obj}*/}
             obj.name:{obj["name"]}

     )
 }

 export default App;
效果:
2、state数据的使用
参考文档:State & 生命周期 – React
3、生命周期
发送网络请求一般在componentDidMount里执行,
销毁组件开销一般在componentWillUnmount里执行。
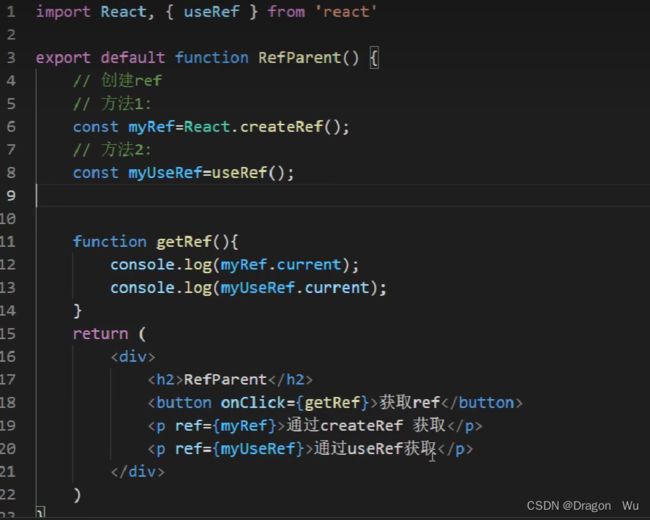
4、数据的双向绑定与Ref
方法一:
class Test extends Component {

    constructor (props, context) {
        super(props, context)
        this.state={
            val: "233"
        }
    }

    changeVal=(e)=>{
        console.log(e)
        this.setState({
            val: e.target.value
        })
        console.log(e.target.value)
    }

    render () {
        return (


        )
    }
}
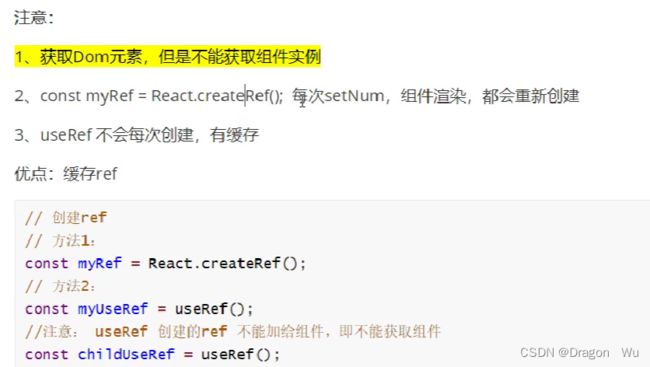
方法二:通过ref实现
class Test extends Component {

    constructor (props, context) {
        super(props, context)
        this.state={
            val: "233"
        }
        //1、在构造函数里创建ref的语法
        this.myRef=React.createRef()
    }

    search=()=>{
        //3、获取DOM元素
        console.log(this.myRef.current.value)
    }

    render () {
        return (

                {/*2、绑定到元素上去*/}


        )
    }
}
refs的操作参考:
Refs and the DOM – React
5、PropTypes验证规则
参考:
使用 PropTypes 进行类型检查 – React
6、React里的插槽
参考:
组合 vs 继承 – React
7、错误边界
避免一错全不渲染的情况
参考:错误边界 – React
8、直接操作refs元素
函数组件里使用:
参考:Refs 转发 – React
9、高阶组件的运用案例
参考:高阶组件 – React
实现组件加载时间的复用
import React from "react"

export default function showTime (Comp) {
    return class extends React.Component {
        constructor (props, context) {
            super(props, context)
            this.state = {
                startTime: new Date().getTime(),
                loadingTime: 0
            }
        }

        componentDidMount () {
            let endTime = new Date().getTime()
            this.setState({
                loadingTime: endTime - this.state.startTime
            })
        }

        render () {
            return (

            )
        }
    }
}
这样便实现了高阶组件的复用,需要使用这个功能时,只需要调用该函数对象进行功能追加即可。
10、性能优化
参考:性能优化 – React
1、新版本以后Component用PureComponent,
PureComponent自带state和props的检查,但其中有变化时才重写渲染,否则不重新渲染,提升性能。
函数组件中的优化:相当于pureComonent
React.memo()生命周期钩子,相当于pureCompnent会在props和state变化时才发生更新。
案例代码:
import React from "react"

const componentTwo = React.memo((props) => {
    return (


    )
})

export default componentTwo
2、组件用完后资源记得释放
11、Hook生命周期钩子的使用
参考:Hook API 索引 – React
使用函数组件的效率一般会比类组件效率高一些,但在函数组件(无状态组件)中又没有state等属性,所以这里诞生了Hook为函数组件添加state和生命周期等元素。
Hook 简介 – React
案例一: useState 修改状态
import React,{useState} from "react"
function FunComponentOne () {
//定义一个变量,初始值为0,可通过setCount方法修改值
//第一个位置变量名,第二个位置方法名:修改变量的方法
const [count,setCount]=useState(0)
return (
{count}
)
}
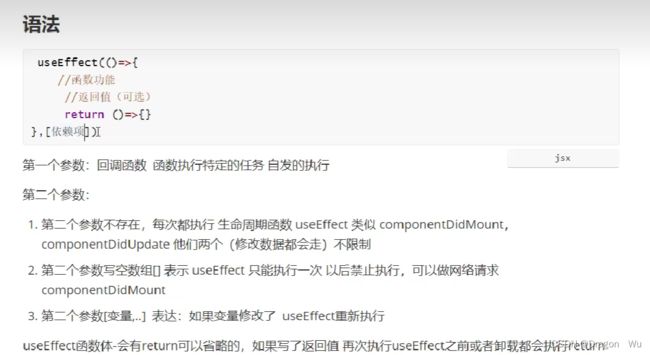
export default FunComponentOne案例二:useEffect 生命周期钩子
import React,{useState,useEffect} from "react"
function FunComponentOne () {
//定义一个变量,初始值为0,可通过setCount方法修改值
//第一个位置变量名,第二个位置方法名
const [count,setCount]=useState(0)
//第二个参数为空,相当于生命周期钩子:componentDidMount+componentDidUpdate
//加载完成和数据修改都会走该函数
useEffect(() => {
console.log("=======================")
})
//第二个参数为空数组[],相当于componentDidMount,可以用于网络请求
useEffect(() => {
console.log("++++++++++++++++++++++++++++")
}, [])
//第二个参数可以传入有值的数组,当数组里的变量修改,会调用该函数
useEffect(() => {
console.log("!!!!!!!!!!!!!!!!!!!!!!!!!")
}, [count])
//当第二个参数为空数组[],且有返回函数时相当于componentWillUnMount
//一般用于销毁主键
useEffect(() => {
return function clearUp(){
console.log("clearUp")
}
},[])
return (
{count}
)
}
export default FunComponentOne
案例3: Hook reducer类似于升级版的useState
参考:Hook API 索引 – React
案例4:自定义Hook 降低耦合度
参考:自定义 Hook – React
可以将频繁调用的hook定义到自己的hook里,注意要用use开头
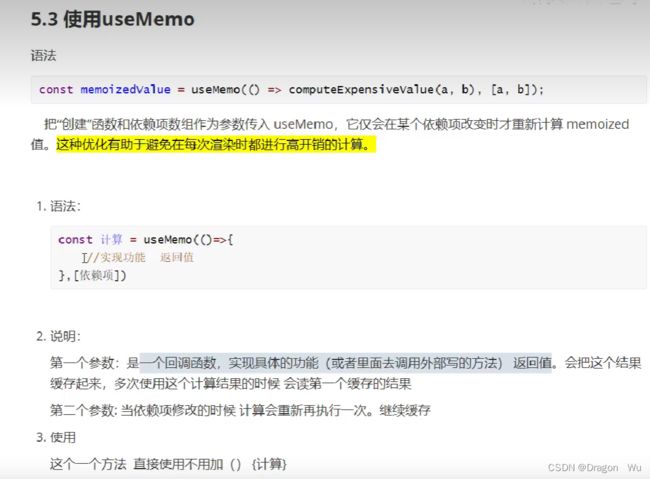
12、React里的计算属性
相当于Vue里的Computed
三、组件之间的传值
1、父子组件之间传值
通过组件传参的方式:
子组件接收参数:
class ChildTwo extends Component {
    render () {
        return (

                我是子组件ChildTwo: {this.props.name}

        )
    }
}

function ChildOne (prop) {
     return(

             ChildOne子组件:{prop.num}

     )
}
2、子向父传值
通过父组件传递方法对象给子组件,子组件再调用该方法并传入对应参数和处理给父组件。
父组件:
function ParentOne () {
function getSonData (data) {
console.log(data)
}
return (
子组件:
function ChildThree (prop) {
function sendData(){
prop.getSonData("我是子组件的数据")
}
return(
)
}这里父组件将getSonData方法对象先传递给子组件,子组件拿到方法对象后可以通过prop进行调用并传入子组件的参数到方法里,此时会调用父组件里的方法以拿到子组件的数据。
3、context实现跨层级通信
参考:Context – React
(1)首先,创建一个MyContext.js用来管理context环境变量
import React from "react"
//创建中间仓库
const MyContext=React.createContext(undefined)

export default MyContext
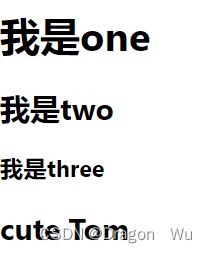
(2)案例
第一层父组件,提供数据
class LayerOne extends Component {

    constructor (props, context) {
        super(props, context)
        this.state={
            name: "cute Tom"
        }
    }

    render () {
        return (

                我是one


        )
    }
}
第二层:包含第三层
class LayerTwo extends Component {
render () {
return (
我是two
第三层可以直接消费数据,注意这里需要声明一下是哪个MyContext
class LayerThree extends Component {
render () {
return (
我是three
{value => {value.name}
}
)
}
}
LayerThree.contextType=MyContext效果:
context hook案例
函数组件中的使用:Context Hook
链接:useContext使用 - 简书
四、网络请求框架使用
见我博客:
前端框架 网络请求 Fetch Axios_Dragon Wu的博客-CSDN博客
五、React路由的使用
官方文档:React Router: Declarative Routing for React.js
参考:
React Router 6 (React路由) 最详细教程-阿里云开发者社区
6.v新特性:
react-router 6 新特性总结 - 知乎
首先安装依赖:
yarn add react-router-dom@6声明式导航
(推荐使用编程式导航效率更高)
案例代码:一般使用BrowseRouter有history记录
import React, { Component } from "react"
import { BrowserRouter, Routes, Route, Navigate, NavLink, useParams,Link,Outlet } from "react-router-dom"
class Home extends Component {
render () {
return (
Home
)
}
}
class About extends Component {
render () {
return (
About
)
}
}
function Detail () {
console.log(useParams())
return (
详情
id: {useParams().id}
)
}
function Main(){
return (
文档
文档1
文档2
文档3
{/*嵌套路由时注意书写这个标签*/}
首页 |
关于 |
详情 |
文档
}>
one} />
two} />
three} />
{/*动态路由*/}
)
}
export default App
// 用来作为 404 页面的组件
const NotFound = () => {
return 你来到了没有知识的荒原
}
编程式导航
(1)新建src/router/index.js文件
import { Navigate } from "react-router-dom"
import Home from "../page/home/Home"
import HomeLeft from "../page/home/HomeLeft"
import HomeRight from "../page/home/HomeRight"
import About from "../page/About"
import Detail from "../page/Detail"
const routes=[
{
path: "/",
element: 404页面不存在
}
]
export default routes
(2)为src/index.js添加BrowserRouter容器
注意: BrowserRouter必须在App标签的外层
(3)App.js如下:
import React from 'react'
import routes from "./router/index.js"
import {useRoutes,NavLink } from "react-router-dom"
function App () {
// useRoutes可以用路由表生成... 结构
// 根据路由表生成对应的路由规则
const element = useRoutes(routes)
return(
首页 |
关于 |
详情
{element}
)
}
export default App
(4)若有嵌套路由要使用标签标明子组件插入的位置
class Home extends Component {
render () {
return (
Home
homeRight
homeLeft
{/*嵌套路由时注意书写这个标签*/}
编程式跳转
默认是push 模式
export default function HomeNews() {
const navigate = useNavigate();
const jump = ()=>{
navigate('/home')
}
return (
)
}
使用{replace:true} 就会变为replace模式
navigate('/home', { replace: true });
也可以使用 navigate(-1) 传入一个数字来进行跳转
navigate(1)//传入数字六、Anti Desgin的使用实现UI界面
官方文档:Ant Design - A UI Design Language
1、添加到项目:
yarn add antd2、样式引入
全局映入样式:在src/index.js里引入样式,不推荐,会导入很多无用的样式
import 'antd/dist/antd.css'; // or 'antd/dist/antd.less'按需映入,推荐
下面两种方式都可以只加载用到的组件。
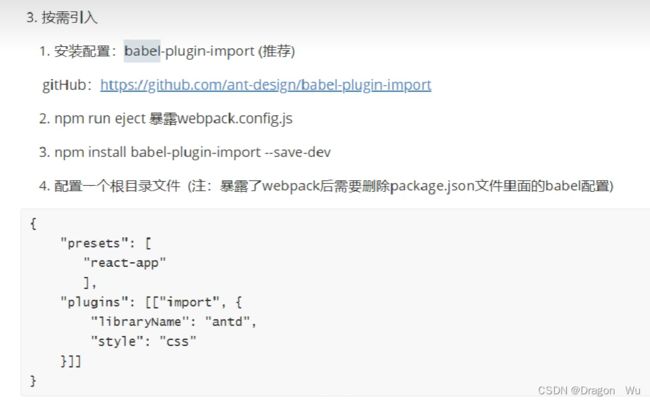
-
使用 babel-plugin-import(推荐)。
-
yarn add babel-plugin-import// .babelrc or babel-loader option { "plugins": [ ["import", { "libraryName": "antd", "style": "css" }] // `style: true` 会加载 less 文件 ] } -
然后只需从 antd 引入模块即可,无需单独引入样式。等同于下面手动引入的方式。
// babel-plugin-import 会帮助你加载 JS 和 CSS import { DatePicker } from 'antd'; -
手动引入
import DatePicker from 'antd/lib/date-picker';  // 加载 JS
import 'antd/lib/date-picker/style/css';        // 加载 CSS
// import 'antd/lib/date-picker/style';         // 加载 LESS
3、组件里直接调用即可
七、Redux中央仓库的使用
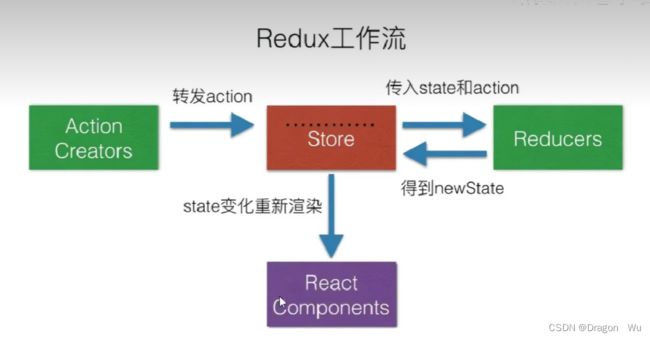
当我们的项目稍微复杂一些时,原生的state可能无法高效的管理和操作数据缓存,通过Redux可以将数据统一管理,并且减低代码耦合。
参考:入门 Redux | Redux 中文官网
其工作原理与hook reducer类似
yarn add @reduxjs/toolkit安装参考:安装 | Redux 中文官网
1、新建src/redux/index.js用于存放redux的文件
//1、引入redux
import { configureStore } from "@reduxjs/toolkit"

//2、创建仓库
const store = configureStore({reducer})

//3、reducer为store服务的执行者, action={type:"",data:5}
function reducer (preState = 10, action) {
    switch (action.type) {
        case "add":
            return preState + action.data
        case "sub":
            return preState - action.data
        default:
            return preState
    }
}

//4、使用store
console.log(store)
//获取仓库的数据
console.log(store.getState())
//触发action
store.dispatch({
    type: "add",
    data: 5
})
console.log(store.getState())
2、在src/index.js里引入
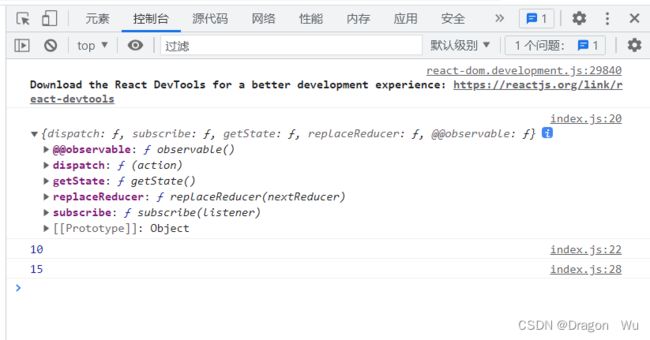
运行结果:可以看到数据已经被操作了
3、可以通过logger查看redux日志
yarn add redux-logger添加logger后:
//1、引入redux
import { configureStore } from "@reduxjs/toolkit"
//引入日志
import { logger } from "redux-logger/src"

//2、创建仓库
// const store = configureStore({reducer})
const store = configureStore({
    reducer,
    middleware: (getDefaultMiddleware) => getDefaultMiddleware().concat(logger)
})

//3、reducer为store服务的执行者, action={type:"",data:5}
function reducer (preState = 10, action) {
    switch (action.type) {
        case "add":
            return preState + action.data
        case "sub":
            return preState - action.data
        default:
            return preState
    }
}

//4、使用store
console.log(store)
//获取仓库的数据
console.log(store.getState())
//触发action
store.dispatch({
    type: "add",
    data: 5
})
console.log(store.getState())
可以看到日志的打印:
合并多个reducer
//1、引入redux
import { configureStore} from "@reduxjs/toolkit"
//引入日志
import { logger } from "redux-logger/src"

//2、创建仓库
// const store = configureStore({reducer})
const store = configureStore({
    //合并多个reducer
    reducer:{
        reducer,
        reducer2
    },
    middleware: (getDefaultMiddleware) => getDefaultMiddleware().concat(logger)
})

//3、reducer为store服务的执行者, action={type:"",data:5}
function reducer (preState = 10, action) {
    switch (action.type) {
        case "add":
            return preState + action.data
        case "sub":
            return preState - action.data
        default:
            return preState
    }
}

function reducer2 (preState = { user: "", num: 5 }, action) {
    const { type, data } = action
    let newState = { ...preState }
    switch (type) {
        case "addUser":
            newState.user = data.user
            return newState
        case "delUser":
            newState.user = ""
            return newState
        default:
            return newState
    }
}

//4、使用store
console.log(store)
//获取仓库的数据
console.log(store.getState())
// //触发action
store.dispatch({
    type: "add",
    data: 5
})
console.log(store.getState())

store.dispatch({
    type: "addUser",
    data: {
        user: "大猫"
    }
})

store.dispatch({
    type: "delUser"
})
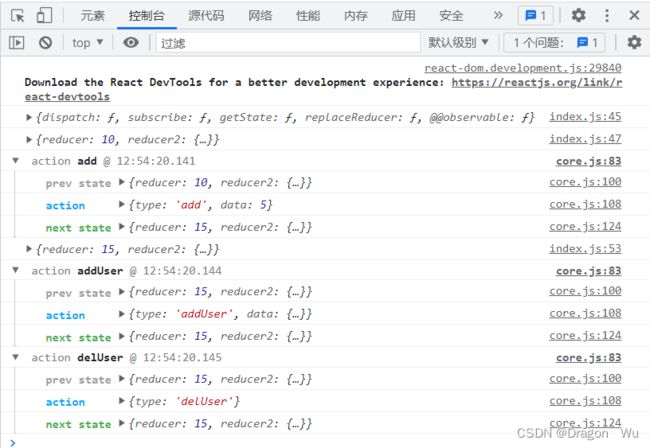
运行结果:
4、Redux的模块化管理
项目书写时我们需要加上命名空间以避免重复:
另外,我们还需要将常量单独提取到一个文件里管理:
分类管理reducers:
reducer/index.js: 引入所有reducers方便调用
import { count } from "./countReducer"
import {user} from "./userReducer"

export const reducers={
    count,
    user
}
redux/index.js引入reducer的索引文件即可:
//1、引入redux
import { configureStore} from "@reduxjs/toolkit"
//引入日志
import { logger } from "redux-logger/src"

//引入reducers
import { reducers } from "./reducers"

//2、创建仓库
// const store = configureStore({reducer})
const store = configureStore({
    //合并多个reducer
    reducer: reducers,
    middleware: (getDefaultMiddleware) => getDefaultMiddleware().concat(logger)
})
5、注意事项
返回值注意:
书写时最好按照这种格式的逻辑:
redux默认不支持异步操作,一般实现思路是等异步任务做完后同步回调时进行redux操作:
6、总结Redux使用的完整步骤
安装依赖:
yarn add @reduxjs/toolkit

yarn add react-redux
日志依赖:
yarn add redux-logger(1)创建store仓库,reducers分开管理
reducers: 数据开发中type字符串应放入一个常量管理
export function count(preState={num:0},action){
    const {type,data}=action
    let newState={...preState}
    switch (type) {
        case "num/add":
            newState.num+=data.num
            return newState
        case "num/sub":
            newState.num-=data.num
            return newState
        default:
            return newState
    }
}
export function user(preState={user:{name:"",age:1}},action){
    const {type,data}=action
    let newState={...preState}
    switch (type) {
        case "user/update":
            newState.user=data.user
            return newState
        case "user/delete":
            newState.user={name:"",age:1}
            return newState
        default:
            return newState
    }
}
索引所有reducers:
import { count } from "./countReducer"
import { user } from "./userReducer"

export const reducers = {
    count,
    user
}
创建store仓库并开启日志:
//1、引入redux
import { configureStore } from "@reduxjs/toolkit"
//引入日志
import { logger } from "redux-logger/src"

//导入reducers
import { reducers } from "./reducers"

//2、创建仓库
// const store = configureStore({reducer})
const store = configureStore({
    //合并多个reducer
    reducer: reducers,
    middleware: (getDefaultMiddleware) => getDefaultMiddleware().concat(logger)
})


export default store
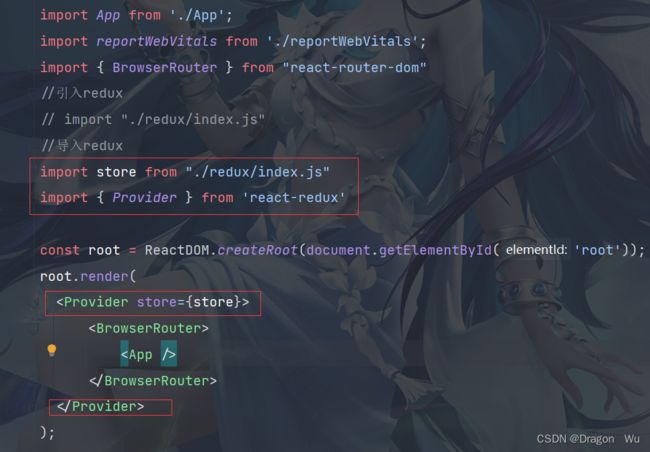
(2)导入到src/index.js文件,全局配置
(3)组件中的使用
import React from "react"
import { connect } from "react-redux"
function ReduxTestComp (props) {
return (
count: {props.count.num}
user:{props.user.user.age},{props.user.user.name}
)
}
export default connect((state) => {//读取仓库中所有state
console.log(state)
return {
count: state.count,
user: state.user
}
}, (dispatch) => {//action操作
console.log(dispatch)
return {
updateUser: (data) => {
return dispatch({ type: "user/update", data: data })
},
deleteUser: ()=>{
return dispatch({type:"user/delete"})
},
addNum:()=>{
return dispatch({type:"num/add",data:{num:12}})
}
}
})(ReduxTestComp)
import React from "react"
import ReduxTestComp from "./component/reduxTest/ReduxTestComp"
function App () {
return (
至此,实现redux的全程应用。


