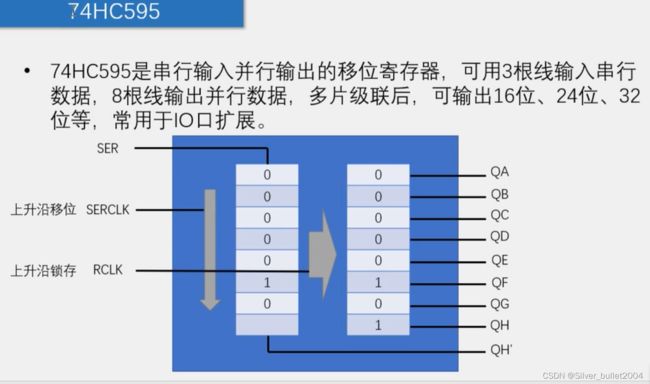
为了通用性考虑,需要把用到的几个口用特殊位声明来重新命名,由于RCLK在头文件中已有定义,所以这里把P3^5声明成RCK吧。。这样的做法可以提高可读性
sbit RCK = P3^5; //RCLK
sbit SCK = P3^6; //SRCLK
sbit SER = P3^4;
void _74HC595_WriteByte(unsigned char Byte)
{
unsigned char i;
for(int i = 0; i < 8; i ++) {
SER = Byte & (0x80 >> i); //一个数据赋到一位上,结果非0即1,相当于取Byte的第i + 1位赋给SER
SCK = 1; //移位1次
SCK = 0; //手动恢复
}
}
void main()
{
SCK = 0; //移位初始是0
while(1)
{
}
}
执行完八次循环后数据就会存到移位寄存器里面了,接下来要输出只需要给RCLK一个高电平即可
给个完整代码
#include
sbit RCK = P3^5;
sbit SCK = P3^6;
sbit SER = P3^4;
void _74HC595_WriteByte(unsigned char Byte)
{
unsigned char i;
for(i = 0; i < 8; i ++) {
SER = Byte & (0x80 >> i); //一个数据赋到一位上,结果非0即1,相当于取Byte的第i + 1位赋给SER
SCK = 1; //移位1次
SCK = 0; //手动恢复
}
RCK = 1; //输出
RCK = 0; //手动恢复
}
void main()
{
P0 = 0;
SCK = 0; //移位初始是0
RCK = 0; //锁存初始是0
_74HC595_WriteByte(0xf0);
while(1)
{
}
}
输入了0xf0即为1111 0000 ,而P0全部置0,所以呈现出一半一半的现象!
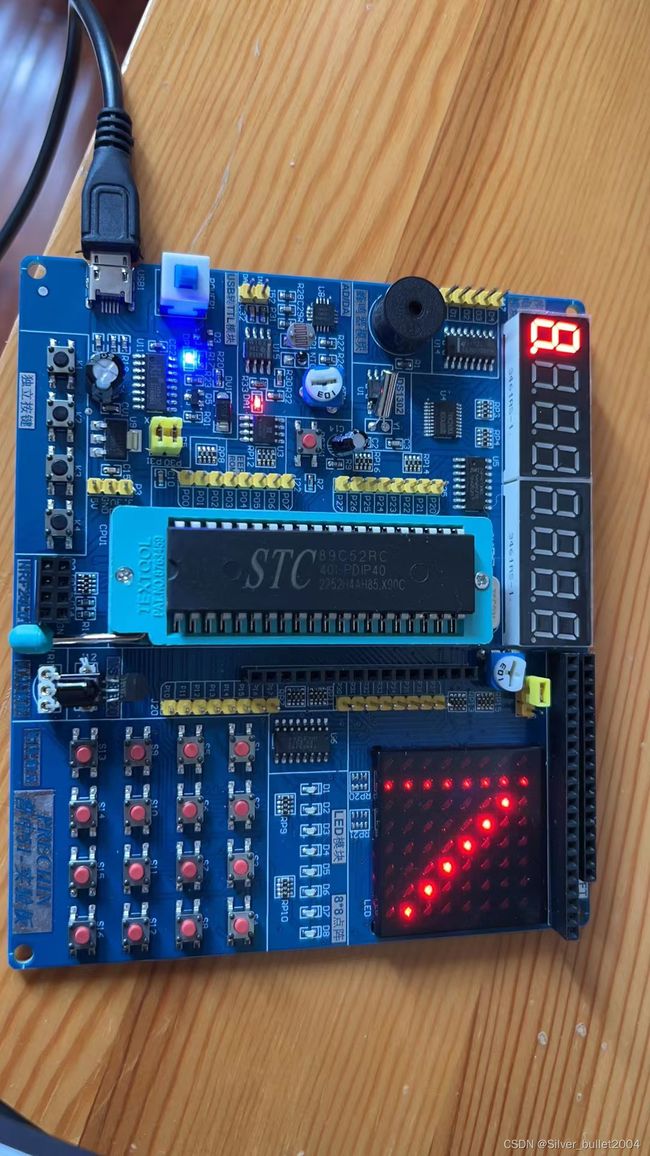
接下来需要更具体地来控制LED点阵屏:D0~D7来源于移位寄存器,只需要像之前控制矩阵键盘一样通过扫描每行或者扫描每列的方式来编写即可
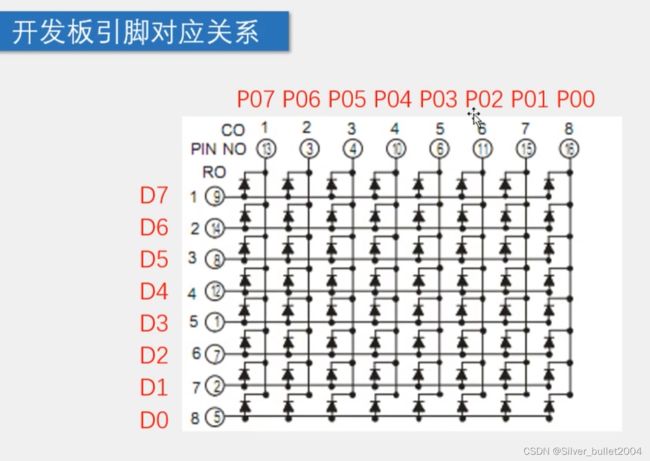
void MatrixLED_ShowColumn(unsigned char Column, Data)
{
_74HC595_WriteByte(Data);
//依次扫描每一列
P0 = ~(0x80 >> Column); //打开第Column列
}
Data对应D7~D0 ,Column是要打开的某一列(0~7列)
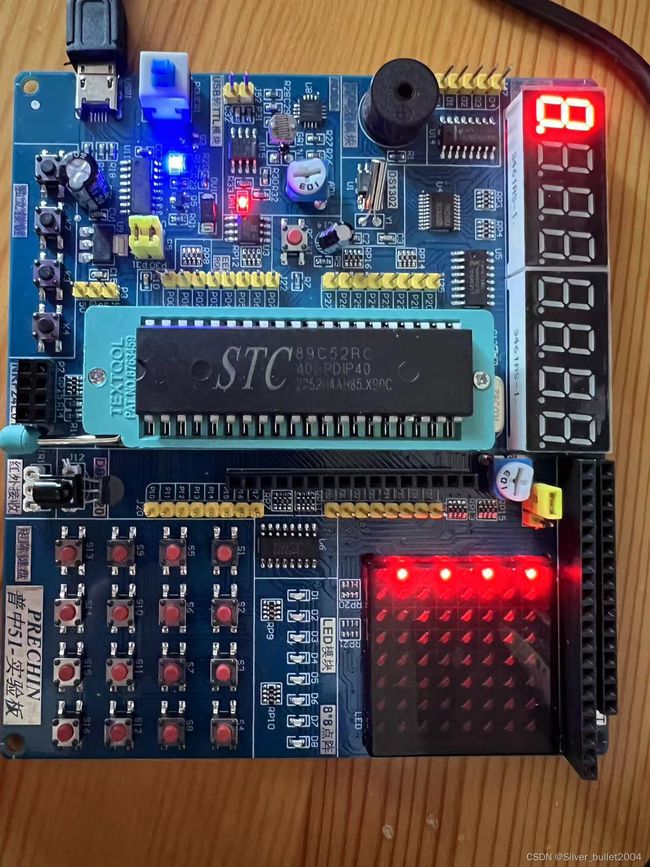
比如在main中执行函数MatrixLED_ShowColumn(0, 0xAA);
0xAA = 1010 1010 ,列Column = 0;效果如下:
接下来实现一下在LED点阵屏显示一个爱心图形
先在Excel画好,算出它的Data
#include
#include "Delay.h"
sbit RCK = P3^5;
sbit SCK = P3^6;
sbit SER = P3^4;
#define MATRIX_LED_PORT P0
/**
* @ brief 74HC595写入一个字节
* @ param 要写的字节
* @ retval 无
*/
void _74HC595_WriteByte(unsigned char Byte)
{
unsigned char i;
for(i = 0; i < 8; i ++) {
SER = Byte & (0x80 >> i); //一个数据赋到一位上,结果非0即1,相当于取Byte的第i + 1位赋给SER
SCK = 1; //移位1次
SCK = 0; //手动恢复
}
RCK = 1; //输出
RCK = 0; //手动恢复
}
/**
* @ brief LED点阵屏亮灯显示一列数据
* @ param Column 列数 0~7 从左往右
* @ param Data 选择列显示的数据 高位在上,1亮,0灭
* @ retval 无
*/
void MatrixLED_ShowColumn(unsigned char Column, Data)
{
_74HC595_WriteByte(Data);
//依次扫描每一列
MATRIX_LED_PORT = ~(0x80 >> Column); //打开第Column列 ,位选
Delay(1);
MATRIX_LED_PORT = 0xFF; //位清零
}
void main()
{
SCK = 0; //移位初始是0
RCK = 0; //锁存初始是0
while(1)
{
MatrixLED_ShowColumn(0, 0x78);
MatrixLED_ShowColumn(1, 0x84);
MatrixLED_ShowColumn(2, 0x42);
MatrixLED_ShowColumn(3, 0x21);
MatrixLED_ShowColumn(4, 0x21);
MatrixLED_ShowColumn(5, 0x42);
MatrixLED_ShowColumn(6, 0x84);
MatrixLED_ShowColumn(7, 0x78);
}
}
最后把main里面开始的两句写成MatrixLED的初始化函数,一起封装成MatrixLED模块,以下是封装好的MareixLED.c 文件:要注意位声明和重定义都需要写在这个文件里面,同时也需要调用Delay模块
#include
#include "Delay.h"
sbit RCK = P3^5;
sbit SCK = P3^6;
sbit SER = P3^4;
#define MATRIX_LED_PORT P0
/**
* @ brief 点阵屏初始化
* @ param 无
* @ retval 无
*/
void MatrixLED_Init()
{
SCK = 0; //移位初始是0
RCK = 0; //锁存初始是0
}
/**
* @ brief 74HC595写入一个字节
* @ param 要写的字节
* @ retval 无
*/
void _74HC595_WriteByte(unsigned char Byte)
{
unsigned char i;
for(i = 0; i < 8; i ++) {
SER = Byte & (0x80 >> i); //一个数据赋到一位上,结果非0即1,相当于取Byte的第i + 1位赋给SER
SCK = 1; //移位1次
SCK = 0; //手动恢复
}
RCK = 1; //输出
RCK = 0; //手动恢复
}
/**
* @ brief LED点阵屏亮灯显示一列数据
* @ param Column 列数 0~7 从左往右
* @ param Data 选择列显示的数据 高位在上,1亮,0灭
* @ retval 无
*/
void MatrixLED_ShowColumn(unsigned char Column, Data)
{
_74HC595_WriteByte(Data);
//依次扫描每一列
MATRIX_LED_PORT = ~(0x80 >> Column); //打开第Column列 ,位选
Delay(1);
MATRIX_LED_PORT = 0xFF; //位清零
}
静态图像显示搞定了,接下来实现简单的动画,一个流动字幕!利用文字取模软件来得到Data并存到main的数组里
#include
#include "Delay.h"
#include "MatrixLED.h"
unsigned Animation[] = {
/*-- 调入了一幅图像:这是您新建的图像 --*/
/*-- 宽度x高度=32x8 --*/
0x00,0xFF,0x40,0x20,0x10,0x08,0x04,0x02,0xFF,0x00,0x00,0x9F,0x00,0x00,0x3C,0x42,
0x81,0x81,0x81,0x42,0x00,0x00,0x00,0xFF,0x91,0x91,0x91,0x91,0x81,0x00,0x00,0x00,
};
void main()
{
MatrixLED_Init();
while(1)
{
MatrixLED_ShowColumn(0, Animation[0]);
MatrixLED_ShowColumn(1, Animation[1]);
MatrixLED_ShowColumn(2, Animation[2]);
MatrixLED_ShowColumn(3, Animation[3]);
MatrixLED_ShowColumn(4, Animation[4]);
MatrixLED_ShowColumn(5, Animation[5]);
MatrixLED_ShowColumn(6, Animation[6]);
MatrixLED_ShowColumn(7, Animation[7]);
}
}
这样做可以显示出第一帧的图像,只要每次都偏移8位,就能实现一张张图片的逐帧动画,但这里我就写个简单的每次偏移一位的流动动画
#include
#include "Delay.h"
#include "MatrixLED.h"
unsigned Animation[] = {
/*-- 调入了一幅图像:这是您新建的图像 --*/
/*-- 宽度x高度=32x8 --*/
0x00,0xFF,0x40,0x20,0x10,0x08,0x04,0x02,0xFF,0x00,0x00,0x9F,0x00,0x00,0x3C,0x42,
0x81,0x81,0x81,0x42,0x00,0x00,0x00,0xFF,0x91,0x91,0x91,0x91,0x81,0x00,0x00,0x00,
};
void main()
{
unsigned char i = 0, offset = 3, Count = 0;
MatrixLED_Init();
while(1)
{
for( i = 0; i < 8; i ++) {
MatrixLED_ShowColumn(i, Animation[i + offset]);
}
Count ++;
if(Count > 5) Count = 0, offset ++; //一帧图像扫描(停留)五遍以后再偏移一位
if(offset > (32 - 8)) {offset = 0;}; //到末尾重复播放
}
}
这里设定的Count的判断条件越大,一帧的画面就停留越久,流动字幕速度越慢
Offset是偏移量
当动画素材比较多时,数组Animation会比较占内存,此时可以在数组名前加上关键字code ,这样就能把这些数据放到内存更大的flash里面,但是要注意如果加上关键字code,那么数组里的元素就不能更改了