Kubernetes 组件安全 CIS基准以及kube-beach使用
Security is a concern that never fades away, and it doesn’t matter how recent the technology has rolled out. So we should always harden the Kubernetes cluster by using kube bench, kube-hunter and the CIS benchmarks. The more secure our cluster is, they are less prone to downtimes and hackers.
安全性是一个永远不会消失的问题,无论该技术推出多长时间都无关紧要。因此,我们应该始终使用 kube bench、kube-hunter 和 CIS 基准来强化 Kubernetes 集群。我们的集群越安全,它们就越不容易出现停机和黑客攻击。
Container Security and Best Practices

A containerised platform needs certain parts to come together to work in full flow. So, to start with, we need a Container Image, an Image Registry, a Runtime Environment, an Orchestration platform and finally, a Host OS. It gets difficult to check for vulnerabilities with these many objects involved; continuous monitoring becomes hectic.

But, let’s look at some of the basic things, a.k.a best practices, that we can do to keep our environment secure:
- Use updated container images, scan and sign them for further use.
- Make your image registry private and keep monitoring it.
- App security must be at par, and the network protocol and payloads must be secure.
- Limit the Orchestration platform according to roles, and monitor the pod communication.
- The Host OS should have an access control system and, monitoring is a must.
The tool used for scanning a container image is Trivy; Prometheus and Grafana for monitoring purposes, and Cilium for the firewall.
用于扫描容器镜像的工具是Trivy;Prometheus和Grafana用于监控目的,Cilium 用于防火墙。
CIS Benchmarks for Kubernetes
Center for Internet Security (CIS) lays down guidelines and benchmarks for secure software development and maintenance. In addition, provide us with the best practices for the secure configuration of a target system.
互联网安全中心 (CIS) 制定了安全软件开发和维护的指南和基准。此外,请为我们提供安全配置目标系统的最佳实践。

The CIS Benchmark is tied up to a particular version of a system. Hence, it is the same for K8s as well. The CIS Kubernetes Benchmark is a collection of propositions for securing a secure Kubernetes environment. It is made open-source for Kubernetes distribution.
CIS 基准与系统的特定版本相关联。因此,K8s 也是如此。CIS Kubernetes 基准是一系列保护安全 Kubernetes 环境的提议。它是为 Kubernetes 发行版开源的。
Also Read: Our blog post on Kubernetes Ingress. Click here
What is kube bench?
With more flexibility comes more vulnerabilities and, configuring Kubernetes security is a task indeed. The Center for Internet Security (CIS) provides guidelines and benchmarks tests for securing Kubernetes and achieving a Hardening level for a K8s cluster.
Kube Bench is an open-source Go application that runs the CIS Kubernetes Benchmark and tests a K8s cluster to ensure that it meets the CIS guidelines for security.

Although there are many kinds of Kubernetes clusters, kube bench runs as a container. Since we can test all types of clusters that exist, I will be showing you a step-by-step procedure for running a test on your Kubernetes cluster. Aquasec, the guys who created the tool, has got you covered for the on-premise cluster too.
Kubernetes Security Best Practices
We know that the best practices are not mandatory to make our cluster functional. However, there has to be a reason for these to be called the ‘best practices’, right? Well, let’s look at some of them regarding the security of Kubernetes.
- Keep Kubernetes up to date.
- Enable Kubernetes Role-Based Access Control (RBAC)
- Use Third-Party Authentication for API Server
- Make sure you’re using namespace
- Use network policies to restrict access
- Do not run as root
- Protect etcd with TLS, Firewall and Encryption
- Isolate Kubernetes Nodes
- Set up IAM access
- Have regular security reviews
So, let’s see everything in action and make our clusters secure as ever!
CIS安全基准
互联网安全中心(CIS,Center for Internet Security),是一个非盈利组织,致力为互联网提供免费的安全防御解决方案。

对每个组件定义了安全配置,针对每个组件都有具体的规则和建议如何更加规范的配置保证集群的安全。

Kube-Bench:用于运行 Kubernetes CIS 基准测试的开源工具
互联网安全中心为保护代码的最佳实践提供了许多指南和基准测试。正如Michael Cherny 最近描述的那样,CIS 最近发布了Kubernetes的基准,现在我们很高兴地向您介绍我们对这些测试的新开源实现:kube-bench。
它是作为 Go 应用程序编写的(当然也作为容器分发),但是每个单独的测试都在一个 YAML 文件中定义,随着基准测试与 Kubernetes 本身一起发展,这将使扩展和更新测试套件变得更加容易。它还支持 JSON 格式的输出,以便更轻松地与自动化工具集成。
与其他 CIS 基准测试一样,您可以在每个节点上运行它,以确定您的部署是否符合 CIS 社区的最佳实践建议。您不仅可以获得有关每个测试是通过还是失败的信息,还可以获得有关如何修复已检测到的任何问题的建议。例如,这可能包括建议更改或删除其中一个 Kubernetes 可执行文件上的不安全配置设置,或者使配置文件的权限更具限制性。

kube-bench 的示例测试输出
按照基准文档中定义的测试,主节点和工作节点以及联合部署中的节点有不同的测试套件。
kube-bench 工具允许您立即查看您的设置是否符合关键领域的最佳实践,根据基准文档,包括:
- Proper user authentication and authorization 正确的用户身份验证和授权
- Securing data in transit 保护传输中的数据
- Securing data at rest 保护静态数据
- Using least privileges 使用最少权限
CIS基准测试工具

下载pdf后,根据里面的基准来检查K8s集群配置,但内容量太大,一般会采用相关工具来完成这项工作。
这个工具就是检查k8s在运行当中,某个参数是否以CIS最佳实践去配置的,如果不是会给出修复建议。
工具介绍
Kube-Bench是一款针对Kubernete的安全检测工具,从本质上来说,Kube-Bench是一个基于Go开发的应用程序,它可以帮助研究人员对部署的Kubernete进行安全检测,安全检测原则遵循CIS Kubernetes Benchmark。
测试规则需要通过YAML文件进行配置,因此我们可以轻松更新该工具的测试规则。
注意事项
- Kube-Bench尽可能地实现了CIS Kubernetes Benchmark,如果kube bench没有正确执行安全基准测试,请点击【这里】提交问题。
- Kubernete版本和CIS基准测试版本之间没有一对一的映射。请参阅CIS Kubernetes基准测试支持,以查看基准测试的不同版本包含哪些Kubernetes版本。
- Kube-Bench无法检查受管集群的主节点,例如GKE、EKS和AKS,因为Kube-Bench不能访问这些节点。不过,Kube-Bench在这些环境中仍然可以检查worker节点配置。

CIS Kubernetes Benchmark支持
Kube-Bench支持的Kubernete测试规则定义在CIS Kubernetes Benchmark之中:
| CIS Kubernetes Benchmark |
kube-bench配置 |
Kubernetes版本 |
| 1.3.0 |
cis-1.3 |
1.11-1.12 |
| 1.4.1 |
cis-1.4 |
1.13-1.14 |
| 1.5.0 |
cis-1.5 |
1.15- |
| GKE 1.0.0 |
gke-1.0 |
GKE |
| EKS 1.0.0 |
eks-1.0 |
EKS |
| Red Hat OpenShift hardening guide |
rh-0.7 |
OCP 3.10-3.11 |
默认配置下,Kube-Bench将根据目标设备上运行的Kubernete版本来确定要运行的测试集,但请注意,Kube-Bench不会自动检测OpenShift和GKE。
CIS基准测试工具:kube-bench部署
1、下载二进制包
[root@master ~]# tar xf kube-bench_0.6.3_linux_amd64.tar.gz
[root@master ~]# mkdir -p /etc/kube-bench
[root@master ~]# mv cfg /etc/kube-bench
[root@master ~]# mv kube-bench /usr/bin/
CIS基准测试工具:kube-beach使用
使用kube-bench run进行测试,该指令有以下常用参数:
常用参数:
- -s, --targets 指定要基础测试的目标,这个目标需要匹配cfg/
中的文件名称,已有目标:master, controlplane, node, etcd, policies - --version:指定k8s版本,如果未指定会自动检测
- --benchmark:手动指定CIS基准版本,不能与--version一起使用

[root@master ~]# ls /etc/kube-bench/cfg/
ack-1.0  aks-1.0  cis-1.5  cis-1.6  config.yaml  eks-1.0  gke-1.0  rh-0.7  rh-1.0


使用云原生的k8s就是使用cis-1.5  cis-1.6


[root@master cis-1.6]# ls
config.yaml  controlplane.yaml  etcd.yaml  master.yaml  node.yaml  policies.yaml

根据这些文件对集群当中的组件扫描已有的配置
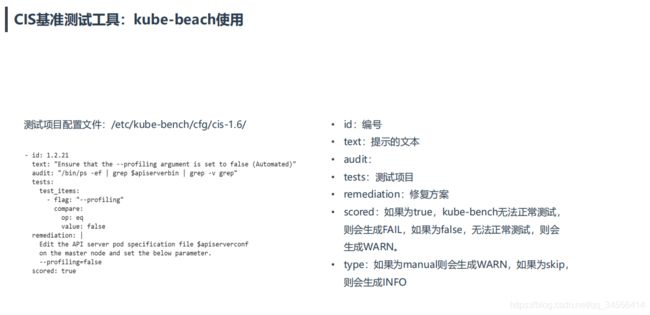
CIS基准测试工具:kube-beach使用
例如:检查master组件安全配置
这个会扫描master组件对应的参数,会给出提示哪些需要配置

[root@master ~]# kube-bench run --targets=master
[INFO] 1 Master Node Security Configuration
[INFO] 1.1 Master Node Configuration Files
[PASS] 1.1.1 Ensure that the API server pod specification file permissions are set to 644 or more restrictive (Automated)
[PASS] 1.1.2 Ensure that the API server pod specification file ownership is set to root:root (Automated)
[PASS] 1.1.3 Ensure that the controller manager pod specification file permissions are set to 644 or more restrictive (Automated)
[PASS] 1.1.4 Ensure that the controller manager pod specification file ownership is set to root:root (Automated)
[PASS] 1.1.5 Ensure that the scheduler pod specification file permissions are set to 644 or more restrictive (Automated)
[PASS] 1.1.6 Ensure that the scheduler pod specification file ownership is set to root:root (Automated)
[FAIL] 1.1.7 Ensure that the etcd pod specification file permissions are set to 644 or more restrictive (Automated)
[FAIL] 1.1.8 Ensure that the etcd pod specification file ownership is set to root:root (Automated)
[WARN] 1.1.9 Ensure that the Container Network Interface file permissions are set to 644 or more restrictive (Manual)
[WARN] 1.1.10 Ensure that the Container Network Interface file ownership is set to root:root (Manual)
[FAIL] 1.1.11 Ensure that the etcd data directory permissions are set to 700 or more restrictive (Automated)
[FAIL] 1.1.12 Ensure that the etcd data directory ownership is set to etcd:etcd (Automated)
[PASS] 1.1.13 Ensure that the admin.conf file permissions are set to 644 or more restrictive (Automated)
[PASS] 1.1.14 Ensure that the admin.conf file ownership is set to root:root (Automated)
[PASS] 1.1.15 Ensure that the scheduler.conf file permissions are set to 644 or more restrictive (Automated)
[PASS] 1.1.16 Ensure that the scheduler.conf file ownership is set to root:root (Automated)
[PASS] 1.1.17 Ensure that the controller-manager.conf file permissions are set to 644 or more restrictive (Automated)
[PASS] 1.1.18 Ensure that the controller-manager.conf file ownership is set to root:root (Automated)
[FAIL] 1.1.19 Ensure that the Kubernetes PKI directory and file ownership is set to root:root (Automated)
[PASS] 1.1.20 Ensure that the Kubernetes PKI certificate file permissions are set to 644 or more restrictive (Manual)
[PASS] 1.1.21 Ensure that the Kubernetes PKI key file permissions are set to 600 (Manual)
[INFO] 1.2 API Server
[WARN] 1.2.1 Ensure that the --anonymous-auth argument is set to false (Manual)
[PASS] 1.2.2 Ensure that the --basic-auth-file argument is not set (Automated)
[PASS] 1.2.3 Ensure that the --token-auth-file parameter is not set (Automated)
[PASS] 1.2.4 Ensure that the --kubelet-https argument is set to true (Automated)
[PASS] 1.2.5 Ensure that the --kubelet-client-certificate and --kubelet-client-key arguments are set as appropriate (Automated)
[FAIL] 1.2.6 Ensure that the --kubelet-certificate-authority argument is set as appropriate (Automated)
[PASS] 1.2.7 Ensure that the --authorization-mode argument is not set to AlwaysAllow (Automated)
[PASS] 1.2.8 Ensure that the --authorization-mode argument includes Node (Automated)
[PASS] 1.2.9 Ensure that the --authorization-mode argument includes RBAC (Automated)
[WARN] 1.2.10 Ensure that the admission control plugin EventRateLimit is set (Manual)
[PASS] 1.2.11 Ensure that the admission control plugin AlwaysAdmit is not set (Automated)
[WARN] 1.2.12 Ensure that the admission control plugin AlwaysPullImages is set (Manual)
[WARN] 1.2.13 Ensure that the admission control plugin SecurityContextDeny is set if PodSecurityPolicy is not used (Manual)
[PASS] 1.2.14 Ensure that the admission control plugin ServiceAccount is set (Automated)
[PASS] 1.2.15 Ensure that the admission control plugin NamespaceLifecycle is set (Automated)
[FAIL] 1.2.16 Ensure that the admission control plugin PodSecurityPolicy is set (Automated)
[PASS] 1.2.17 Ensure that the admission control plugin NodeRestriction is set (Automated)
[PASS] 1.2.18 Ensure that the --insecure-bind-address argument is not set (Automated)
[PASS] 1.2.19 Ensure that the --insecure-port argument is set to 0 (Automated)
[PASS] 1.2.20 Ensure that the --secure-port argument is not set to 0 (Automated)
[PASS] 1.2.21 Ensure that the --profiling argument is set to false (Automated)
[FAIL] 1.2.22 Ensure that the --audit-log-path argument is set (Automated)
[FAIL] 1.2.23 Ensure that the --audit-log-maxage argument is set to 30 or as appropriate (Automated)
[FAIL] 1.2.24 Ensure that the --audit-log-maxbackup argument is set to 10 or as appropriate (Automated)
[FAIL] 1.2.25 Ensure that the --audit-log-maxsize argument is set to 100 or as appropriate (Automated)
[WARN] 1.2.26 Ensure that the --request-timeout argument is set as appropriate (Automated)
[PASS] 1.2.27 Ensure that the --service-account-lookup argument is set to true (Automated)
[PASS] 1.2.28 Ensure that the --service-account-key-file argument is set as appropriate (Automated)
[PASS] 1.2.29 Ensure that the --etcd-certfile and --etcd-keyfile arguments are set as appropriate (Automated)
[PASS] 1.2.30 Ensure that the --tls-cert-file and --tls-private-key-file arguments are set as appropriate (Automated)
[PASS] 1.2.31 Ensure that the --client-ca-file argument is set as appropriate (Automated)
[PASS] 1.2.32 Ensure that the --etcd-cafile argument is set as appropriate (Automated)
[WARN] 1.2.33 Ensure that the --encryption-provider-config argument is set as appropriate (Manual)
[WARN] 1.2.34 Ensure that encryption providers are appropriately configured (Manual)
[WARN] 1.2.35 Ensure that the API Server only makes use of Strong Cryptographic Ciphers (Manual)
[INFO] 1.3 Controller Manager
[WARN] 1.3.1 Ensure that the --terminated-pod-gc-threshold argument is set as appropriate (Manual)
[PASS] 1.3.2 Ensure that the --profiling argument is set to false (Automated)
[PASS] 1.3.3 Ensure that the --use-service-account-credentials argument is set to true (Automated)
[PASS] 1.3.4 Ensure that the --service-account-private-key-file argument is set as appropriate (Automated)
[PASS] 1.3.5 Ensure that the --root-ca-file argument is set as appropriate (Automated)
[PASS] 1.3.6 Ensure that the RotateKubeletServerCertificate argument is set to true (Automated)
[FAIL] 1.3.7 Ensure that the --bind-address argument is set to 127.0.0.1 (Automated)
[INFO] 1.4 Scheduler
[FAIL] 1.4.1 Ensure that the --profiling argument is set to false (Automated)
[FAIL] 1.4.2 Ensure that the --bind-address argument is set to 127.0.0.1 (Automated)

== Remediations master ==
1.1.7 Run the below command (based on the file location on your system) on the master node.
For example,
chmod 644 /etc/kubernetes/manifests/etcd.yaml

1.1.8 Run the below command (based on the file location on your system) on the master node.
For example,
chown root:root /etc/kubernetes/manifests/etcd.yaml

1.1.9 Run the below command (based on the file location on your system) on the master node.
For example,
chmod 644

1.1.10 Run the below command (based on the file location on your system) on the master node.
For example,
chown root:root

1.1.11 On the etcd server node, get the etcd data directory, passed as an argument --data-dir,
from the below command:
ps -ef | grep etcd
Run the below command (based on the etcd data directory found above). For example,
chmod 700 /var/lib/etcd

1.1.12 On the etcd server node, get the etcd data directory, passed as an argument --data-dir,
from the below command:
ps -ef | grep etcd
Run the below command (based on the etcd data directory found above).
For example, chown etcd:etcd /var/lib/etcd

1.1.19 Run the below command (based on the file location on your system) on the master node.
For example,
chown -R root:root /etc/kubernetes/pki/

1.2.1 Edit the API server pod specification file /etc/kubernetes/manifests/kube-apiserver.yaml
on the master node and set the below parameter.
--anonymous-auth=false

1.2.6 Follow the Kubernetes documentation and setup the TLS connection between
the apiserver and kubelets. Then, edit the API server pod specification file
/etc/kubernetes/manifests/kube-apiserver.yaml on the master node and set the
--kubelet-certificate-authority parameter to the path to the cert file for the certificate authority.
--kubelet-certificate-authority=

1.2.10 Follow the Kubernetes documentation and set the desired limits in a configuration file.
Then, edit the API server pod specification file /etc/kubernetes/manifests/kube-apiserver.yaml
and set the below parameters.
--enable-admission-plugins=...,EventRateLimit,...
--admission-control-config-file=

1.2.12 Edit the API server pod specification file /etc/kubernetes/manifests/kube-apiserver.yaml
on the master node and set the --enable-admission-plugins parameter to include
AlwaysPullImages.
--enable-admission-plugins=...,AlwaysPullImages,...

1.2.13 Edit the API server pod specification file /etc/kubernetes/manifests/kube-apiserver.yaml
on the master node and set the --enable-admission-plugins parameter to include
SecurityContextDeny, unless PodSecurityPolicy is already in place.
--enable-admission-plugins=...,SecurityContextDeny,...

1.2.16 Follow the documentation and create Pod Security Policy objects as per your environment.
Then, edit the API server pod specification file /etc/kubernetes/manifests/kube-apiserver.yaml
on the master node and set the --enable-admission-plugins parameter to a
value that includes PodSecurityPolicy:
--enable-admission-plugins=...,PodSecurityPolicy,...
Then restart the API Server.

1.2.22 Edit the API server pod specification file /etc/kubernetes/manifests/kube-apiserver.yaml
on the master node and set the --audit-log-path parameter to a suitable path and
file where you would like audit logs to be written, for example:
--audit-log-path=/var/log/apiserver/audit.log

1.2.23 Edit the API server pod specification file /etc/kubernetes/manifests/kube-apiserver.yaml
on the master node and set the --audit-log-maxage parameter to 30 or as an appropriate number of days:
--audit-log-maxage=30

1.2.24 Edit the API server pod specification file /etc/kubernetes/manifests/kube-apiserver.yaml
on the master node and set the --audit-log-maxbackup parameter to 10 or to an appropriate
value.
--audit-log-maxbackup=10

1.2.25 Edit the API server pod specification file /etc/kubernetes/manifests/kube-apiserver.yaml
on the master node and set the --audit-log-maxsize parameter to an appropriate size in MB.
For example, to set it as 100 MB:
--audit-log-maxsize=100

1.2.26 Edit the API server pod specification file /etc/kubernetes/manifests/kube-apiserver.yaml
and set the below parameter as appropriate and if needed.
For example,
--request-timeout=300s

1.2.33 Follow the Kubernetes documentation and configure a EncryptionConfig file.
Then, edit the API server pod specification file /etc/kubernetes/manifests/kube-apiserver.yaml
on the master node and set the --encryption-provider-config parameter to the path of that file: --encryption-provider-config=

1.2.34 Follow the Kubernetes documentation and configure a EncryptionConfig file.
In this file, choose aescbc, kms or secretbox as the encryption provider.

1.2.35 Edit the API server pod specification file /etc/kubernetes/manifests/kube-apiserver.yaml
on the master node and set the below parameter.
--tls-cipher-suites=TLS_ECDHE_ECDSA_WITH_AES_128_GCM_SHA256,TLS_ECDHE_RSA_WITH_AES_128_GCM
_SHA256,TLS_ECDHE_ECDSA_WITH_CHACHA20_POLY1305,TLS_ECDHE_RSA_WITH_AES_256_GCM
_SHA384,TLS_ECDHE_RSA_WITH_CHACHA20_POLY1305,TLS_ECDHE_ECDSA_WITH_AES_256_GCM
_SHA384

1.3.1 Edit the Controller Manager pod specification file /etc/kubernetes/manifests/kube-controller-manager.yaml
on the master node and set the --terminated-pod-gc-threshold to an appropriate threshold,
for example:
--terminated-pod-gc-threshold=10

1.3.7 Edit the Controller Manager pod specification file /etc/kubernetes/manifests/kube-controller-manager.yaml
on the master node and ensure the correct value for the --bind-address parameter

1.4.1 Edit the Scheduler pod specification file /etc/kubernetes/manifests/kube-scheduler.yaml file
on the master node and set the below parameter.
--profiling=false

1.4.2 Edit the Scheduler pod specification file /etc/kubernetes/manifests/kube-scheduler.yaml
on the master node and ensure the correct value for the --bind-address parameter


== Summary master ==
40 checks PASS
14 checks FAIL
11 checks WARN
0 checks INFO

== Summary total ==
40 checks PASS
14 checks FAIL
11 checks WARN
0 checks INFO 配置有问题的,检查failed的以及给出的建议,我们这里主要是关注失败的,对于失败的给出了修复方案,执行后会逐个检查安全配置并输出修复方案及汇总信息输出:

- [PASS]:测试通过
- [FAIL]:测试未通过,重点关注,在测试结果会给出修复建议
- [WARN]:警告,可做了解
- [INFO]:信息
二进制部署可以修改加固,但那kubeadm部署的etcd是以容器的形式部署,这项就没必要修复了,看具体环境

[FAIL] 1.1.12 Ensure that the etcd data directory ownership is set to etcd:etcd (Automated)
1.1.12 On the etcd server node, get the etcd data directory, passed as an argument --data-dir,
from the below command:
ps -ef | grep etcd
Run the below command (based on the etcd data directory found above).
For example, chown etcd:etcd /var/lib/etcd


[root@master ~]# id etcd
uid=997(etcd) gid=995(etcd) groups=995(etcd)
[root@master ~]# ls -ld /var/lib/etcd
drwxr-xr-x 3 etcd root 4096 May 20 12:42 /var/lib/etcd

[root@master ~]# chown etcd:etcd /var/lib/etcd
[root@master ~]# ls -ld /var/lib/etcd
drwxr-xr-x 3 etcd etcd 4096 May 20 12:42 /var/lib/etcd

--profiling 通过web接口host:port/debug/pprof/启用profiling,默认值 true这个是在集群上面开启了接口,为k8s的二次开发提供了可能,如果你的集群不二次开发建议关闭,类似于debug的一个接口
[root@master ~]# vim /etc/kubernetes/manifests/kube-apiserver.yaml
   - --profiling=False
确保 --profiling 参数设置为false
-
- 描述
- 如果不需要,禁用分析。概要分析允许识别特定的性能瓶颈。它生成大量的程序数据,这些数据可能被用来揭示系统和程序细节。如果您没有遇到任何瓶颈,并且不需要使用分析器进行故障排除,建议关闭分析器以减少潜在的攻击面。
- 检查
- ps -ef | grep kube-controller-manager
- 验证 --profiling参数设置为false
- 配置
- 编辑/etc/kubernetes/manifests/controller-manager.yaml配置文件,添加 --profiling=false这个参数
- 默认(1.15.1)
- 开启
- 参考
- https://kubernetes.io/docs/admin/kube-controller-manager/
- https://github.com/kubernetes/c
- 描述
-
--profiling设置为false,以大大减少攻击面。当遇到系统性能瓶颈的时候,profiling可以通过识别定位瓶颈来发挥作用,对性能调优有显著帮助。
修复如下
1.1.11 On the etcd server node, get the etcd data directory, passed as an argument --data-dir,
from the below command:
ps -ef | grep etcd
Run the below command (based on the etcd data directory found above). For example,
chmod 700 /var/lib/etcd

1.1.12 On the etcd server node, get the etcd data directory, passed as an argument --data-dir,
from the below command:
ps -ef | grep etcd
Run the below command (based on the etcd data directory found above).
For example, chown etcd:etcd /var/lib/etcd

#修复前
[root@master ~]# ls -ld /var/lib/etcd
drwxr-xr-x 3 etcd root 4096 Aug 13 10:18 /var/lib/etcd
#修复后
[root@node1 ~]# ls -ld /var/lib/etcd
drwx------ 3 etcd etcd 4096 Aug 25 10:14 /var/lib/etcd
[FAIL] 1.1.19 Ensure that the Kubernetes PKI directory and file ownership is set to root:root (Automated)
1.1.19 Run the below command (based on the file location on your system) on the master node.
For example,
chown -R root:root /etc/kubernetes/pki/
#修复前
[root@master ~]# ls -ld /etc/kubernetes/pki/
drwxr-xr-x 2 kube root 4096 May 20 15:03 /etc/kubernetes/pki/
#修复后
[root@master01 ~]# ls -ld /etc/kubernetes/pki/
drwxr-xr-x 2 root root 4096 Aug 23 19:30 /etc/kubernetes/pki/[FAIL] 1.2.21 Ensure that the --profiling argument is set to false (Automated)
1.2.1 Edit the API server pod specification file /etc/kubernetes/manifests/kube-apiserver.yaml
on the master node and set the below parameter.
--anonymous-auth=false