Rshiny基本函数(交互式web应用)
Rshiny基础函数
- 引言
- shiny包的下载
- shinyApp的构成
- ui的设计函数
-
- HTML类比
- img函数无法加载图片
- 控件函数
- ui设计的输出对象
- server
- 总结
引言
R语言
shiny包可以帮助我们轻松的制作交互式的web应用,并且可以搭建为独立的桌面可执行程序,非常方便制作和分享,其可以使用数据分析人员展开工作汇报、报表制作等等!
shiny包的下载
> install.packages('shiny')
shinyApp的构成
shinyApp的构成:
1.用户交互式脚本-ui
2.服务器运行脚本-server
> library(shiny)
> ui <- ...

> server <- ...

> shinyApp(ui, server)
ui的设计函数
HTML类比
| shiny函数 | 作用 |
|---|---|
p |
段落文本 |
h1 |
一级标题 |
h2 |
二级标题 |
h3 |
三级标题 |
h4 |
四级标题 |
h5 |
五级标题 |
h6 |
六级标题 |
a |
超链接 |
br |
换行 |
div |
统一风格的文本划分 |
span |
统一的样式对文本进行行内分割 |
pre |
预定义格式文本 |
code |
计算机代码块 |
img |
图片 |
strong |
加粗 |
em |
斜体 |
HTML |
直接将字符串作为HTML代码传递 |
> ui <- fluidPage(
+ titlePanel("My Shiny App"),
+ sidebarLayout(
+ sidebarPanel(),
+ mainPanel(
+ h1("First level title"),
+ h2("Second level title"),
+ h3("Third level title"),
+ h4("Fourth level title"),
+ h5("Fifth level title"),
+ h6("Sixth level title")
+ )
+ )
+ )
>
> server = function(input, output){ }
>
> shinyApp(ui, server)

> ui <- fluidPage(
+ titlePanel("My Shiny App"),
+ sidebarLayout(
+ sidebarPanel(),
+ mainPanel(
+ p("p creates a paragraph of text."),
+ p("A new p() command starts a new paragraph. Supply a style attribute
+ to change the format of the entire paragraph.", style = "font-family:
+ 'times'; font-si16pt"),
+ strong("strong() makes bold text."),
+ em("em() creates italicized (i.e, emphasized) text."),
+ br(),
+ code("code displays your text similar to computer code"),
+ div("div creates segments of text with a similar style. This division
+ of text is all blue because I passed the argument 'style = color:blue' to
+ div", style = "color:blue"),
+ br(),
+ p("span does the same thing as div, but it works with",
+ span("groups of words", style = "color:blue"),
+ "that appear inside a paragraph.")
+ )
+ )
+ )
>
> server = function(input, output){ }
>
> shinyApp(ui, server)

img函数无法加载图片
img函数常用用法为:img(src = ‘.png’,height = ,width = ),经过本人测试,这种方式在RGui中无法使用,所以建议大家在Rstudio中使用.
以下为img函数在Rstudio中的使用方法.
 图1 第一步 图1 第一步
|
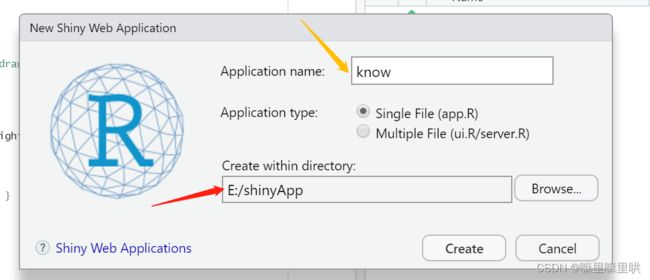 图2 第二步 图2 第二步
|
在图片第二步选择了根目录
E:\shinyApp下建立文件夹know, 需要在know文件夹下必须添加名为www的文件夹,将需要展示的图片放入www文件夹下
在图片第二步中我们选择的是建立app.R文件,将我们需要的ui、server、shinyApp函数写入app.R文件,之后点击保存runApp选项,会提示是否保存app.R文件,点击保存即可.
根据Rstudio分析RGui报错原因,在Rstudio中其运行是:
> runApp('~/know')
成功截图:

控件函数
| 函数 | 作用 |
|---|---|
| actionButton | 操作选项 |
| checkboxInput | 单一选择 |
| dateInput | 日期输入 |
| dateRangeInput | 日期范围 |
| fileInput | 文件选择 |
| helpText | 为其他控件增加说明 |
| numericInput | 数值输入 |
| radioButtons | 单选按钮 |
| checkboxGroupInput | 多选按钮 |
| selectInput | 提供选项的框 |
| sliderInput | 平滑的点击选择框 |
| submitButton | 提交按钮 |
| textInput | 输入文本的字段 |
每项控件函数的图片展示:

ui设计的输出对象
在ui中增加R对象.
| ui中的输出函数 | 输出类型 |
|---|---|
| dataTableOutput | 数据表 |
| htmlOutput | 原生html |
| imageOutput | 图片输出 |
| plotOutput | R中图片输出 |
| tableOutput | 表输出:小型矩阵与数据款 |
| textOutput | 文本输出 |
| uiOutput | 原生html |
| verbatimTextOutput | 文本输出 |
> ui <- fluidPage(
+         titlePanel("Hello Shiny!"),
+       sidebarLayout(
+         sidebarPanel(
+          sliderInput(inputId = "bins",
+           label = "Number of bins:",
+           min = 1,
+           max = 50,
+           value = 30)
+                    ),
+         mainPanel(
+            plotOutput('plot'))
+                    )
+ )
以上为ui设计对象的输出例子:plotOutput.
server
服务器运行脚本提供R代码支撑ui中的输出对象.
render*函数将R代码产生的对象转为ui中的输出对象.
render* |
对象 |
|---|---|
| renderDataTable | 数据表 |
| renderImage | 图片 |
| renderPlot | R中的plot |
| renderPrint | 需要打印的输出 |
| renderTable | 小型的表:数据框、矩阵 |
| renderText | 文本 |
| renderUI | HTML |
总结
关于Rshiny的基本简单使用讲到这里就结束了,文中所列举的都是Rshiny开发交互式web的基本函数,大家掌握方能写出自己想要的web.
另外关于shiny有几百个函数,我不可能在一篇博客中尽数到来,但是会在以后的博客中根据自己所需来展示一些函数的使用.
最后由于本人偏好RGui,因此在一直使用其来制作自己的shinyApp,但是某些情况下极为不方便,所以在这里推荐大家使用Rstudio!
谢谢大家!!!
晚安!!!