OSLog与NSLog对比
NSLog:
NSLog的文档,第一句话就说:Logs an error message to the Apple System Log facility.,所以首先,NSLog就不是设计作为普通的debug log的,而是error log;其次,NSLog也并非是printf的简单封装,而是Apple System Log(ASL)的封装。
ASL是啥?从官方手册上可以看到说明:
These routines provide an interface to the Apple System Log facility. They are intended to be a replacement for the syslog(3) API, which will continue to be supported for backwards compatibility.
这些例程为Apple系统日志功能提供了一个接口。它们旨在取代syslog(3)API,后者将继续支持向后兼容性。
意思就是ASL是个系统级别的log工具,syslog的替代版,提供了一系列强大的log功能。不过一般我们接触不到,NSLog就对它提供了高层次的封装,如这篇文档所提到的:
You can use two interfaces in OS X to log messages: ASL and Syslog. You can also use a number of higher-level approaches such as NSLog. However, because most daemons are not linked against Foundation or the Application Kit, the low-level APIs are often more appropriate。
您可以在OSX中使用两个接口来记录消息:ASL和Syslog。您还可以使用许多更高级的方法,如NSLog。但是,由于大多数守护进程没有与Foundation或应用程序工具包链接,因此底层API通常更合适。
一些底层相关的守护进程(deamons)不会link如Foundation等高层框架,所以asl用在这儿正合适;而asl就是对应应用层的用NSLog。
在CocoaLumberjack的文档中也说了NSLog效率低下的问题:
NSLog does 2 things:
- It writes log messages to the Apple System Logging (asl) facility. This allows log messages to show up in Console.app.
- It also checks to see if the application’s stderr stream is going to a terminal (such as when the application is being run via Xcode). If so it writes the log message to stderr (so that it shows up in the Xcode console).
To send a log message to the ASL facility, you basically open a client connection to the ASL daemon and send the message. BUT - each thread must use a separate client connection. So, to be thread safe, every time NSLog is called it opens a new asl client connection, sends the message, and then closes the connection.
NSLog做两件事:
-它将日志消息写入Apple系统日志(asl)功能。这允许日志消息显示在Console.app中。
-它还检查应用程序的stderr流是否要到达终端(例如当应用程序通过Xcode运行时)。如果是这样,它会将日志消息写入stderr(以便它显示在Xcode控制台中)。
要向ASL设施发送日志消息,基本上需要打开与ASL守护进程的客户端连接并发送消息。但是-每个线程必须使用一个单独的客户端连接。因此,为了线程安全,每次调用NSLog时,它都会打开一个新的asl客户端连接,发送消息,然后关闭连接。
意识大概是说,NSLog会向ASL写log,同时向Terminal写log,而且同时会出现在Console.app中(Mac自带软件,用NSLog打出的log在其中全部可见);不仅如此,每一次NSLog都会新建一个ASL client并向ASL守护进程发起连接,log之后再关闭连接。所以说,当这个过程出现N次时,消耗大量资源导致程序变慢也就不奇怪了。
时间和进程信息
主要原因已经找到,还有个值得注意的问题是NSLog每次会将当前的系统时间,进程和线程信息等作为前缀也打印出来,如:
2023-08-05 16:53:32.177524+0800 刷新冲突[4136:33556] dateToMd5String - d41d8cd98f00b204e9800998ecf8427e
每次格式化生成时间戳也会有一定的性能损耗,当然这些也可能是作为ASL的参数创建的。
OSLog:
苹果官方文档这样介绍:OSLog是一个统一的日志系统,在iOS 10中可用。macOS 10.12及以上版本,tvOS 10.0及以上版本,watchOS 3.0及以上版本。该系统将取代Apple system Logger (ASL)和Syslog api。
它相比以前的NSLog更加优越,苹果极力推荐使用新的日志系统。以前,日志消息被写到磁盘上的特定位置,比如/etc/system.log。统一日志系统将消息存储在内存和数据存储中,而不是写入基于文本的日志文件。
NSLog效率低的原因是NSLog做了两件事:
- 1.-它将日志消息写入Apple System Logging (asl)设施。这允许日志消息显示在Console.app中。
- 2.-它还检查应用程序的stderr流是否要去终端(比如当应用程序通过Xcode运行时)。如果是,它将日志消息写入stderr(这样它就会显示在Xcode控制台中)。
要向ASL设施发送日志消息,基本上需要打开到ASL守护进程的客户机连接并发送消息。BUT -每个线程必须使用单独的客户端连接。因此,为了线程安全,每次调用NSLog时,它都会打开一个新的asl客户端连接,发送消息,然后关闭连接。所以说,当这个过程出现N次时,消耗大量资源导致程序变慢也就不奇怪了。
OSLog相比NSlog的优点
1.新的日志系统,跨多个平台Mac,ios,WachOS
2.相比以前的系统更加的高效
3.日志组织的更有条理。有了 Log levels(default info debug error fault)一些第三方的日志如也有类似功能, 日志有分类的功能
4.保护隐私功能,格式化信息
5.日志不是可读文本(用console 及相关命令行工具 log 可以查),但可以打包获取,分发
6.苹果提供了日志处理命令行工具
7.可以使用配置文件对日志进行配置
OSLog重要部分讲解
Log Levels
统一日志系统使用了几个日志级别,它们对应于应用程序可能需要捕获的不同类型的消息,并定义消息何时保存到数据存储中,以及消息保存多长时间。系统为每个级别实现标准行为。可以使用日志命令行工具或自定义配置文件覆盖此行为(请参阅调试时自定义日志行为)。
- default 默认级别的消息最初存储在内存缓冲区中。在不更改配置的情况下,它们将被压缩并随着内存缓冲区的填充移动到数据存储区。它们会一直保留到超过存储配额,此时,最古老的消息将被清除。使用此级别捕获可能导致失败的信息。
- info 信息级消息最初存储在内存缓冲区中。如果不进行配置更改,则不会将它们移动到数据存储区,并在内存缓冲区填充时清除它们。但是,当发生错误或错误时,它们会在数据存储中捕获。当信息级别的消息被添加到数据存储中时,它们将一直保留在那里,直到超过存储配额,此时,最古老的消息将被清除。使用此级别捕获对故障排除可能有帮助但不是必需的信息。
- debug 调试级别的消息只在通过配置更改启用调试日志记录时在内存中捕获。根据配置的持久性设置清除它们。此级别记录的消息包含在开发期间或排除特定问题时可能有用的信息。调试日志记录用于开发环境,而不是发布软件。
- error 错误级别的消息总是保存在数据存储中。它们会一直保留到超过存储配额,此时,最古老的消息将被清除。错误级消息用于报告流程级错误。如果存在活动对象,则此级别的日志记录将捕获整个流程链的信息。
- fault 故障级消息总是保存在数据存储中。它们会一直保留到超过存储配额,此时,最古老的消息将被清除。故障级消息仅用于捕获系统级或多进程错误。如果存在活动对象,则此级别的日志记录将捕获整个流程链的信息。
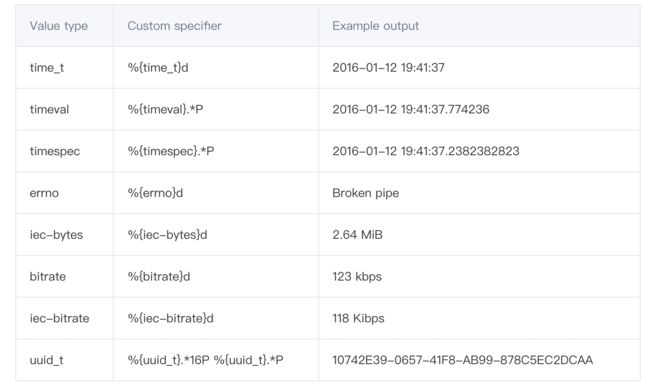
保护隐私功能,格式化信息
要格式化日志消息,请使用标准的NSString或printf格式字符串,如清单4所示。有关格式化规则,请参阅字符串格式说明符。
image.png
// 代码示例
os_log("now build-in %{time_t}d ",Int(Date().timeIntervalSince1970))
os_log("now %@ ", NSDate())
os_log("uuid_t %@ ",NSUUID())
os_log("self %@ ",self)
os_log("string %{public}s ","string")
os_log("iec-bytes %{iec-bytes}d ",1024)

// 结果
2022-10-29 15:09:07.724062+0800 SwiftDemo[5317:849193] now build-in 2022-10-29 15:09:07+0800
2022-10-29 15:09:07.724151+0800 SwiftDemo[5317:849193] now Sat Oct 29 15:09:07 2022
2022-10-29 15:09:07.724187+0800 SwiftDemo[5317:849193] uuid_t 7779AA5E-6C78-4D01-8C80-588E0191CDF0
2022-10-29 15:09:07.724216+0800 SwiftDemo[5317:849193] self
2022-10-29 15:09:07.724257+0800 SwiftDemo[5317:849193] string string
2022-10-29 15:09:07.724270+0800 SwiftDemo[5317:849193] iec-bytes 1 KiB
三、OSLog的实践
1.基本用法
// 输出一个default-level 信息
os_log("This is a log message.")
// 输出一个info-level 信息
os_log("This is additional info that may be helpful for troubleshooting.", log: OSLog.default, type: .info)// 输出一个自定义子系统,级别为debug-level 信息
let customLog = OSLog(subsystem: "com.your_company.your_subsystem_name.plist", category: "your_category_name")
os_log("This is info that may be helpful during development or debugging.", log: customLog, type: .debug)// 示例与结果
let myLog : OSLog = OSLog(subsystem:"mySubsystem", category:"myCategory")
let date = Date()
os_log("测试default-date-%@", date as CVarArg)
os_log(.debug, log: myLog, "测试debug-date-%@", date as CVarArg)
os_log(.error, log: myLog, "测试error-date-%@", date as CVarArg)
os_log(.info, log: myLog, "测试info-date-%@", date as CVarArg)
os_log(.fault, log: myLog, "测试fault-date-%@", date as CVarArg)
// 结果:
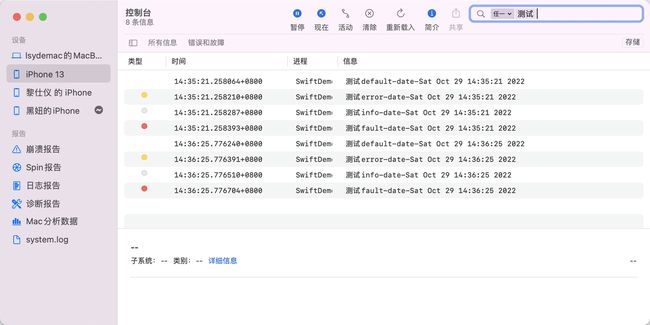
2022-10-29 14:02:17.336726+0800 SwiftDemo[41978:4599820] 测试default-date-Sat Oct 29 14:02:17 2022
2022-10-29 14:02:17.336798+0800 SwiftDemo[41978:4599820] [myCategory] 测试debug-date-Sat Oct 29 14:02:17 2022
2022-10-29 14:02:17.336850+0800 SwiftDemo[41978:4599820] [myCategory] 测试error-date-Sat Oct 29 14:02:17 2022
2022-10-29 14:02:17.336911+0800 SwiftDemo[41978:4599820] [myCategory] 测试info-date-Sat Oct 29 14:02:17 2022
2022-10-29 14:02:17.337007+0800 SwiftDemo[41978:4599820] [myCategory] 测试fault-date-Sat Oct 29 14:02:17 20222.在控制台app中的展示
3.os_log与NSlog效率对比
// 单条线程测试时间对比
private func timeTest() {
        let startNSLog = CFAbsoluteTimeGetCurrent()
        for i in 0..<10000 {
            NSLog("nslog---%d", i)
        }
        let endNSLog = CFAbsoluteTimeGetCurrent()

        let startOSLog = CFAbsoluteTimeGetCurrent()
        for i in 0..<10000 {
            os_log("oslog---%d",i)
        }
        let endOSLog = CFAbsoluteTimeGetCurrent()

        print("NSLogTime:%f",endNSLog-startNSLog)
        print("OSLogTime:%f",endOSLog-startOSLog)
}

// 结果
NSLogTime:%f 0.7270380258560181
OSLogTime:%f 0.5310770273208618

NSLogTime:%f 0.6149619817733765
OSLogTime:%f 0.4749699831008911

NSLogTime:%f 0.7736960649490356
OSLogTime:%f 0.5272040367126465

// 多条线程测试时间对比
private func timeTest() {
        let queue = DispatchQueue(label: "myQueue", attributes: [.concurrent])
        let startNSLog = CFAbsoluteTimeGetCurrent()
        for i in 0..<5000 {
            NSLog("nslog---%d", i)
        }
        queue.async {
            for i in 0..<5000 {
                queue.sync {
                    NSLog("nslog---%d", i)
                }
            }
            let endNSLog = CFAbsoluteTimeGetCurrent()
            print("NSLogTime:%f \n",endNSLog-startNSLog)
        }

        let startOSLog = CFAbsoluteTimeGetCurrent()
        for i in 0..<5000 {
            os_log("oslog---%d",i)
        }
        queue.async {
            for i in 0..<5000 {
                DispatchQueue.global().sync {
                    os_log("oslog---%d",i)
                }
            }
            let endOSLog = CFAbsoluteTimeGetCurrent()
            print("OSLogTime:%f",endOSLog-startOSLog)
        }
}

// 结果
NSLogTime:%f 1.227236032485962
OSLogTime:%f 0.8558480739593506

NSLogTime:%f 1.2800310850143433
OSLogTime:%f 0.9496610164642334

NSLogTime:%f 1.2216260433197021
OSLogTime:%f 0.9060399532318115
实测来看,OSLog 比 NSLog的效率提升了25% - 30%。
OSLog与NSLog,OSLog的实践

