使用gitbook编译md文件为html并使用jenkins发布到nginx【多方式详细步骤】;
文章目录
- 需求
- 一、手动将markdown文件用gitbook编译为html发布到nginx
-
- 1.安装node
- 2.使用npm安装gitbook
- 3.拉取所需要编译的markdown文件到本地
- 4.进入项目代码目录下编译markdown文件为html文件
- 5.将编译好的_book目录发布到nginx
- 二、结合jenkins实现自动将markdown文件使用gitbook编译为html文件并发布到nginx
-
- 1.前期准备:
- 2.新建一个流水线项目并进行配置;
- 总结
需求
因公司服务需要重构,架构也提出了一套自己用markdown写的的开发指南,里面包括一些框架以及各种流程图和一些代码的开发规范,也有一些常用网站供开发者们写代码时进行参考;现在需要运维来将这些markdown文件转换为html文件并使用nginx(web)展示出来;
发布方式分为:
- 手动发布:手动发布就是让大家熟悉下整个流程
- 自动发布:使用jenkins根据手动发布的流程实现自动发布的效果;
一、手动将markdown文件用gitbook编译为html发布到nginx
1.安装node
因为使用gitbook进行编译需要依赖于node环境,所以先安装node;
[root@k8s-master ~]# tar -zxf node-v15.14.0-linux-x64.tar.gz
[root@k8s-master ~]# mv node-v15.14.0-linux-x64 /usr/local/node-v15.14.0
[root@k8s-master local]# vim /etc/profile #设置环境变量
##node-v15.14.0##
export NODE_HOME=/usr/local/node-v15.14.0
export PATH=$NODE_HOME/bin:$PATH
[root@k8s-master ~]# source /etc/profile
[root@k8s-master ~]# node -v
v15.14.0
[root@k8s-master ~]# npm -v
7.7.6
2.使用npm安装gitbook
安装gitbook-cli
[root@k8s-master ~]# npm install gitbook-cli -g
...
npm notice
npm notice New major version of npm available! 7.7.6 -> 8.12.2
npm notice Changelog: https://github.com/npm/cli/releases/tag/v8.12.2
npm notice Run npm install -g [email protected] to update!
npm notice
在安装完gitbook-cli之后需要执行gitbook -V命令安装gitbook库(gitbook-cli 构建需要依赖gitbook 库)并验证是否安装成功
提示:其实这里不一定要执行gitbook -V命令,后面第4步构建的时候执行gitbook build命令也行;
[root@k8s-master ~]# gitbook -V
CLI version: 2.3.2
Installing GitBook 3.2.3
/usr/local/node-v15.14.0/lib/node_modules/gitbook-cli/node_modules/npm/node_modules/graceful-fs/polyfills.js:287
      if (cb) cb.apply(this, arguments)
                 ^

TypeError: cb.apply is not a function
    at /usr/local/node-v15.14.0/lib/node_modules/gitbook-cli/node_modules/npm/node_modules/graceful-fs/polyfills.js:287:18
    at FSReqCallback.oncomplete (node:fs:194:5)
可用看到在执行gitbook命令的时候报错了,根据报错信息我们可用看到没有找到function这个函数,这个是因为版本问题,我们把有关使用这个函数的代码去掉就可以了;
[root@k8s-master ~]# vim /usr/local/node-v15.14.0/lib/node_modules/gitbook-cli/node_modules/npm/node_modules/graceful-fs/polyfills.js
  //fs.stat = statFix(fs.stat)  #这三行代码大约在62行,给他注释掉就可以了
  //fs.fstat = statFix(fs.fstat)
  //fs.lstat = statFix(fs.lstat)
然后再次gitbook -V查看;
[root@k8s-master ~]# gitbook -V
CLI version: 2.3.2
Installing GitBook 3.2.3
[email protected] ../../tmp/tmp-18981Z4Mwyfs1QNRu/node_modules/gitbook
├── [email protected]
├── [email protected]
├── [email protected]
├── [email protected]
├── [email protected]
├── [email protected]
...
└── [email protected]
GitBook version: 3.2.3
安装gitbook完成;
3.拉取所需要编译的markdown文件到本地
[root@k8s-master ~]# git clone https://gitee.com/xxxx.git
Cloning into 'xxxx'...
Username for 'https://gitee.com': xxxx
Password for 'https://[email protected]':
remote: Enumerating objects: 341, done.
remote: Counting objects: 100% (341/341), done.
remote: Compressing objects: 100% (330/330), done.
remote: Total 341 (delta 193), reused 0 (delta 0), pack-reused 0
Receiving objects: 100% (341/341), 464.85 KiB | 349.00 KiB/s, done.
Resolving deltas: 100% (193/193), done.
[root@k8s-master ~]# ll dev-doc/
total 8
drwxr-xr-x 2 root root   41 Jun 18 19:50 attachment
drwxr-xr-x 2 root root   38 Jun 18 19:50 components
drwxr-xr-x 2 root root   20 Jun 18 19:50 faq
drwxr-xr-x 2 root root  100 Jun 18 19:50 images
drwxr-xr-x 2 root root  101 Jun 18 19:50 introduction
drwxr-xr-x 3 root root  222 Jun 18 19:50 project
-rw-r--r-- 1 root root  185 Jun 18 19:50 README.md
drwxr-xr-x 2 root root  302 Jun 18 19:50 scaffold
-rw-r--r-- 1 root root 2213 Jun 18 19:50 SUMMARY.md
提示:这个SUMMARY.md文件是很重要的,他类似于目录,gitbook编译的时候需要有这个文件
[root@k8s-master ~]# ll dev-doc/introduction/
total 20
-rw-r--r-- 1 root root   81 Jun 18 19:50 arch.md
-rw-r--r-- 1 root root 2198 Jun 18 19:50 framework.md
-rw-r--r-- 1 root root  124 Jun 18 19:50 oauthflow.md
-rw-r--r-- 1 root root   69 Jun 18 19:50 简介.md
-rw-r--r-- 1 root root 1918 Jun 18 19:50 网站地址.md
4.进入项目代码目录下编译markdown文件为html文件
[root@k8s-master ~]# cd dev-doc/
[root@k8s-master dev-doc]# gitbook build
info: 7 plugins are installed
info: 6 explicitly listed
info: loading plugin "highlight"... OK
info: loading plugin "search"... OK
info: loading plugin "lunr"... OK
info: loading plugin "sharing"... OK
info: loading plugin "fontsettings"... OK
info: loading plugin "theme-default"... OK
info: found 27 pages
info: found 14 asset files
info: >> generation finished with success in 1.8s !
编译完成后会生成一个_book的目录,里面就是编译好了的html文件;
[root@k8s-master dev-doc]# ll
total 16
drwxr-xr-x  2 root root   41 Jun 18 19:50 attachment
drwxr-xr-x 10 root root  239 Jun 18 20:22 _book
drwxr-xr-x  2 root root   38 Jun 18 19:50 components
drwxr-xr-x  2 root root   20 Jun 18 19:50 faq
drwxr-xr-x  2 root root  100 Jun 18 19:50 images
drwxr-xr-x  2 root root  101 Jun 18 19:50 introduction
drwxr-xr-x  3 root root   51 Jun 18 20:10 node_modules
-rw-r--r--  1 root root   57 Jun 18 20:10 package.json
-rw-r--r--  1 root root  721 Jun 18 20:10 package-lock.json
drwxr-xr-x  3 root root  222 Jun 18 19:50 project
-rw-r--r--  1 root root  185 Jun 18 19:50 README.md
drwxr-xr-x  2 root root  302 Jun 18 19:50 scaffold
-rw-r--r--  1 root root 2213 Jun 18 19:50 SUMMARY.md
[root@k8s-master dev-doc]# cd _book/introduction/
[root@k8s-master introduction]# ll
total 92
-rw-r--r-- 1 root root 19891 Jun 18 20:22 arch.html
-rw-r--r-- 1 root root 24235 Jun 18 20:22 framework.html
-rw-r--r-- 1 root root 20440 Jun 18 20:22 oauthflow.html
-rw-r--r-- 1 root root    69 Jun 18 20:22 简介.md
-rw-r--r-- 1 root root 22509 Jun 18 20:22 网站地址.html##可用对比第三步这里以及变成了html
[root@k8s-master introduction]# pwd
/root/dev-doc/_book/introduction
5.将编译好的_book目录发布到nginx
提示:这里拿安装好的nginx做个简单的示例,只需要把编译好的_book目录放到nginx的网站目录下就行;
[root@k8s-master ~]# cp -pr /root/dev-doc/_book /usr/share/nginx/html/_book
[root@k8s-master ~]# cd /etc/nginx/conf.d/
[root@k8s-master conf.d]# vim dev-doc.conf
server {
        listen  80;
        server_name www.my-dev-doc.com;
        root   /usr/share/nginx/html/_book;
        index  index.html index.htm;
        }
[root@k8s-master conf.d]# nginx -t
nginx: the configuration file /etc/nginx/nginx.conf syntax is ok
nginx: configuration file /etc/nginx/nginx.conf test is successful
[root@k8s-master conf.d]# nginx -s reload
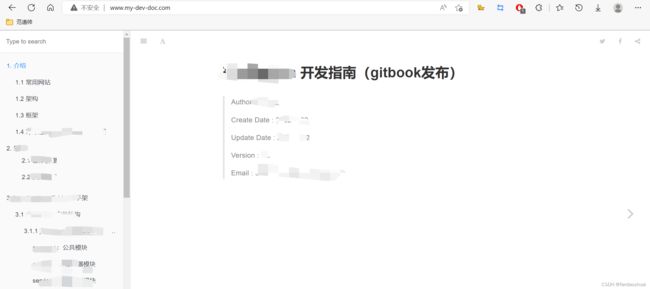
去浏览器访问下ww.my-dev-doc.com看下效果;

发布完成;
以上就是通过手动发布的过程;
二、结合jenkins实现自动将markdown文件使用gitbook编译为html文件并发布到nginx
1.前期准备:
①结合jenkins发布的话,我们需要在jenkins的主机上安装npm以及gitbook,也就是手动发布里的第1,2步骤,这里我就省略了,大家可以参考手动发布里的步骤在jenkins主机安装;
②安装Publish Over SSH插件并配置,用于发布文件到远程主机;

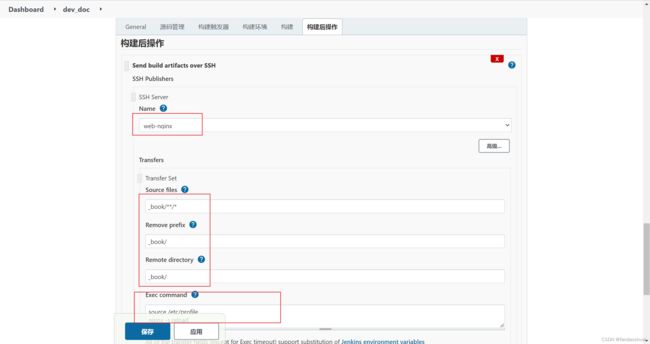
在jenkins配置管理处(Manage Jenkins–>System Configuration–>Configure System)配置Publish over SSH(添加远程nginx主机)


提示:在高级里面要设置远程主机的密码,然后可以先点击Test Configuration测试连接;
Remote Directory:远程主机的发布目录,也就是你jenkins将编译好的包放到远程主机的哪个目录下(建议填写发布目录),我这里写的是nginx的网站根目录,一会儿我们要把编译好的_book文件放到这个目录下面;
2.新建一个流水线项目并进行配置;

这里我已经建过这个名称的项目了,所以他会提示已存在;
配置流水线

pipeline {
agent any
//全局变量
environment {
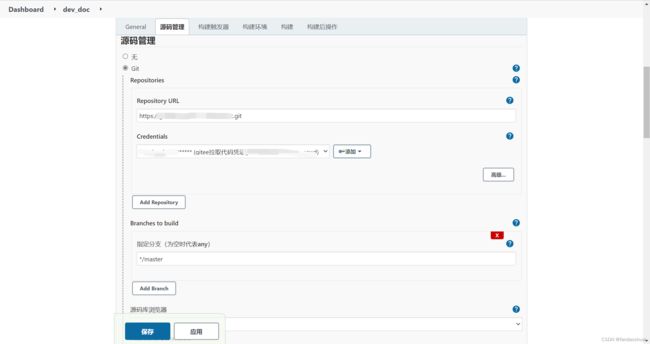
//gitee代码仓库地址;
Gitee_Registry_URL= 'https://gitee.com/xxxx.git'
}
parameters {
gitParameter branch: '', branchFilter: '.*', defaultValue: 'master', description: '选择拉取代码的分支', name: 'Branch', quickFilterEnabled: false, selectedValue: 'NONE', sortMode: 'NONE', tagFilter: '*', type: 'GitParameterDefinition'
}
stages {
stage('拉取代码') {
steps {
checkout([$class: 'GitSCM', branches: [[name: "${params.Branch}"]], extensions: [], userRemoteConfigs: [[credentialsId: 'pull-code_gitee_fandaoshuai', url: "${Gitee_Registry_URL}"]]])
}
}
stage('代码编译') {
steps {
sh """
cd $JENKINS_HOME/workspace/$JOB_NAME/
source /etc/profile
//这里我们进入jenkins当前项目工作空间下进行编译
gitbook build
"""
}
}
stage('部署') {
steps {
sshPublisher(publishers: [sshPublisherDesc(configName: 'web-nginx', transfers: [sshTransfer(cleanRemote: false, excludes: '', execCommand: '''source /etc/profile
nginx -s reload ''', execTimeout: 120000, flatten: false, makeEmptyDirs: false, noDefaultExcludes: false, patternSeparator: '[, ]+', remoteDirectory: '_book/', remoteDirectorySDF: false, removePrefix: '_book/', sourceFiles: '_book/**/*')], usePromotionTimestamp: false, useWorkspaceInPromotion: false, verbose: false)])
}
}
}
}
提示:"拉取代码" 和“部署”处的流水线语句大家可以在片段生成器里生成,然后粘贴到steps里就可以;


然后点击下面的生成流水线脚本粘贴到steps里即可;
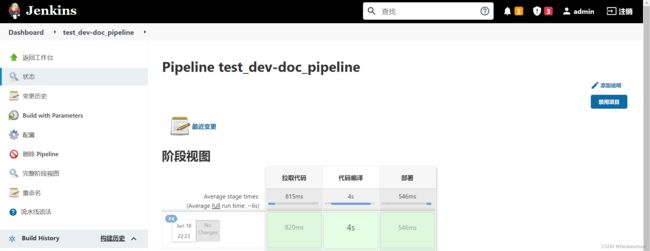
然后保存并退出,开始构建

构建结果;

浏览器访问测试:
最后再给大家看下不用流水线的配置过程:

Send build artifacts over SSH这个模块参数不熟悉的话可参考:jenkins的Send build artifacts over SSh参数详解;
然后应用保存退出后开始构建;效果是和流水线一样的;
总结
例如:以上就是今天要记录的内容,使用gitbook编译markdown文件为html并发布到nginx;