Spring基于注解管理bean(一文搞懂注解及使用注解)
基于注解管理bean
- 一、标记与扫描机制
-
- 1. 注解的作用
-
- ① 注解
- ② 扫描
- 2. 构建环境及测试注解
-
- ① 新建Module
- ② 创建Spring配置文件
- ③ 创建一组组件类
- ④ 四个典型注解本质是一样的
- ⑤ 扫描
- ⑥ 组件的唯一标识
- 二、自动装配
-
- 1. 应用场景
- 2. 自动装配的实现
- 3. @Autowired注解其他细节
-
- ① 标记在其他位置
- ②@Autowired工作流程
- ③ 自由装配
- 三、完全注解开发
-
- 1. 使用配置类取代配置文件
- 2. 在配置类中配置bean
- 3. 在配置类中配置自动扫描的包
- 四、整合junit4
-
- 1. 整合的介绍
- 2. 操作
一、标记与扫描机制
1. 注解的作用
① 注解
和 XML 配置文件一样,注解本身并不能执行,注解本身仅仅只是做一个标记,具体的功能是框架检测到注解标记的位置,然后针对这个位置按照注解标记的功能来执行具体操作。
本质上:所有一切的操作都是Java代码来完成的,XML和注解只是告诉框架中的Java代码如何执行。
举例:在修建道路的时候为道路留下测量后的标记
测绘人员做了所有标记,工人们来完成具体工作。道路上的标记相当于我们在代码中使用的注解,后面施工团队做的工作,相当于框架的具体操作。
② 扫描
Spring 为了知道程序员在哪些地方标记了什么注解,就需要通过扫描的方式,来进行检测。然后根据注解进行后续操作。
2. 构建环境及测试注解
① 新建Module
在pomp文件配置依赖
<dependencies>
    <dependency>
        <groupId>org.springframeworkgroupId>
        <artifactId>spring-contextartifactId>
        <version>5.3.1version>
    dependency>

    <dependency>
        <groupId>junitgroupId>
        <artifactId>junitartifactId>
        <version>4.12version>
        <scope>testscope>
    dependency>
dependencies>
- 基于Maven依赖传递性,导入spring-context依赖即可导入当前所需所有jar包
② 创建Spring配置文件
③ 创建一组组件类
- 使用@Component注解标记的普通组件
package com.zengchuiyu.ioc.component;
import org.springframework.stereotype.Component;
/**
 * @author zengchuiyu
 * @create 2021-10-13 22:28
 */
@Component
public class OneComponent {
}
-
使用@Controller注解标记的控制器组件
这个组件就是我们在三层架构中表述层里面,使用的控制器。以前是Servlet,我们使用Controller来代替Servlet。
package com.zengchuiyu.ioc.component;
import org.springframework.stereotype.Controller;
/**
 * @author zengchuiyu
 * @create 2021-10-13 22:30
 */
@Controller
public class StudentController {
}
-
使用@Service注解标记的业务逻辑组件
这个组件就是我们在三层架构中使用的业务逻辑组件。
package com.zengchuiyu.ioc.component;
import org.springframework.stereotype.Service;
/**
 * @author zengchuiyu
 * @create 2021-10-13 22:31
 */
@Service
public class StudentService {
}
-
使用@Repository注解标记的持久化层组件
这个组件就是我们以前用的Dao类,但是以后我们整合了Mybatis,这里就变成了Mapper接口,而Mapper接口是由Mybatis和Spring的整合包负责扫描的。
由于Mybatis整合包想要把Mapper接口背后的代理类加入Spring的IOC容器需要结合Mybatis对Mapper配置文件的解析,所以这个事情是Mybatis和Spring的整合包来完成,将来由Mybatis负责扫描,也不使用@Repository注解。
package com.zengchuiyu.ioc.component;
import org.springframework.stereotype.Repository;
/**
 * @author zengchuiyu
 * @create 2021-10-13 22:32
 */
@Repository
public class StudentDao {
}
④ 四个典型注解本质是一样的

通过查看源码我们得知,@Controller、@Service、@Repository这三个注解只是在@Component注解的基础上起了三个新的名字。
注意:虽然它们本质上一样,但是为了代码的可读性,为了程序结构严谨我们也不能随便胡乱标记。
⑤ 扫描
- 情况一:最基本的扫描方式[常用]
<context:component-scan base-package="com.zengchuiyu.ioc.component"/>
从IOC容器中获取bean:
public class TestAnno {
    //获取IOC容器对象
    private ApplicationContext context =
            new ClassPathXmlApplicationContext("applicationContext.xml");

    @Test
    public void test1(){
        //获取四个类的实例
        OneComponent oneComponent = context.getBean(OneComponent.class);
        StudentController studentController = context.getBean(StudentController.class);
        StudentService studentService = context.getBean(StudentService.class);
        StudentDao studentDao = context.getBean(StudentDao.class);

        System.out.println(oneComponent);
        System.out.println(studentController);
        System.out.println(studentService);
        System.out.println(studentDao);
    }
}
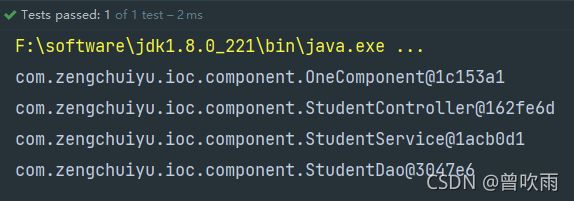
结果:

如图:四个对象都成功的在容器中获取到了,证明我们使用注解的方式装配对象成功了!
- 情况二:指定匹配模式
    <context:component-scan
            base-package="com.zengchuiyu.ioc.component"
            resource-pattern="Student*.class"/>
Student*表示以Student开头的类,所以OneComponent对象无法创建,在这就不一一测试。
- 情况三:指定要排除的组件
    <context:component-scan
            base-package="com.zengchuiyu.ioc.component">
        <context:exclude-filter type="annotation" expression="org.springframework.stereotype.Controller"/>
    context:component-scan>
- context:exclude-filter标签:指定排除规则
- type属性:指定根据什么来进行排除,annotation取值表示根据注解来排除
- expression属性:指定排除规则的表达式,对于注解来说指定全类名即可
- 情况四:仅扫描指定组件
<context:component-scan
            base-package="com.zengchuiyu.ioc.component"
            use-default-filters="false">
        <context:include-filter type="annotation" expression="org.springframework.stereotype.Controller"/>
context:component-scan>
在这里要说明并不是跟排除那样只写个context:include-filter标签指定就好,因为context:component-scan标签是默认扫描全部的,当指定扫描指定类时还要附加上取消默认过滤规则为false
⑥ 组件的唯一标识
在我们使用XML方式管理bean的时候,每个bean都有一个唯一标识,便于在其他地方引用。现在使用注解后,每个组件仍然应该有一个唯一标识。
- 默认情况
类名首字母小写就是bean的id。例如:StudentController类对应的bean的id就是studentController。
- 使用value属性指定
@Service(value = "zengchuiyu")
public class StudentService {
}
当注解中只设置一个属性时,value属性的属性名可以省略:
@Service("zengchuiyu")
public class StudentService {
}
二、自动装配
1. 应用场景
- StudentController需要StudentService
- StudentService需要StudentDao
且在各个组件中声明了要调用的方法
① StudentController中声明的方法
@Controller
public class StudentController {

    private StudentService studentService;

    public void getMessage(){
        studentService.getMessage();
    }

}
② StudentService中声明的方法
@Service(value = "zengchuiyu")
public class StudentService {

    private StudentDao studentDao;

    public void getMessage(){
        studentDao.getMessage();
    }

}
③ StudentDao中声明的方法
@Repository
public class StudentDao {

    public void getMessage(){
        System.out.println("I am a student!");
    }

}
2. 自动装配的实现
① 前提
参与自动装配的组件(需要装配别人、被别人装配)全部都必须在IOC容器中。
② @Autowired注解
在成员变量上直接标记@Autowired注解即可,不需要提供setXxx()方法。
3. @Autowired注解其他细节
① 标记在其他位置
- 构造器
@Controller
public class StudentController {

    private StudentService studentService;

    public void getMessage(){
        studentService.getMessage();
    }
@Autowired
    public void setStudentService(StudentService studentService) {
        this.studentService = studentService;
    }
	@Autowired
    public StudentController(StudentService studentService) {
        this.studentService = studentService;
    }
}
- setXxx()方法
@Controller
public class StudentController {

    private StudentService studentService;

    public void getMessage(){
        studentService.getMessage();
    }
	@Autowired
    public void setStudentService(StudentService studentService) {
        this.studentService = studentService;
    }
}
这两种方式都可以实现自动装配,但是出于习惯以及方便我们还是常用局部变量直接注册比较多
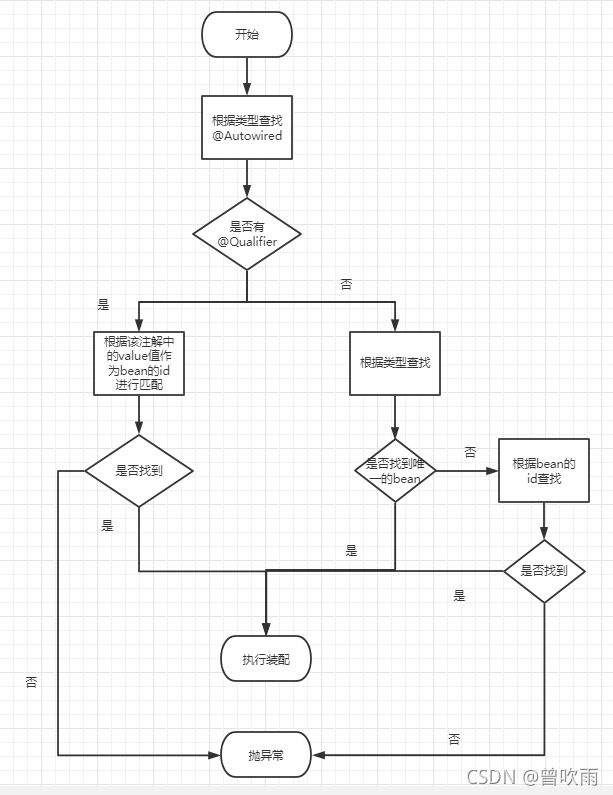
②@Autowired工作流程
-
能够找到唯一的bean:直接执行装配
-
如果完全找不到匹配这个类型的bean:装配失败
和所需类型匹配的bean不止一个
-
没有@Qualifier注解:根据@Autowired标记位置成员变量的变量名作为bean的id进行匹配
-
能够找到:执行装配
-
找不到:装配失败
-
使用@Qualifier注解:根据@Qualifier注解中指定的名称作为bean的id进行匹配
-
能够找到:执行装配
-
找不到:装配失败
@Controller
public class StudentController {
    @Qualifier(value = "One")
    @Autowired
    private StudentService studentService;
    public void getMessage(){
        studentService.getMessage();
    }
}
③ 自由装配
给@Autowired注解设置required = false属性表示:能装就装,装不上就不装。
@Autowired(required = false)
三、完全注解开发
完全注解开发,是完全舍弃XML配置文件,全面使用注解来完成主要的配置。
1. 使用配置类取代配置文件
① 创建配置类
使用@Configuration注解将一个普通的类标记为Spring的配置类。
package com.zengchuiyu.ioc.configuration;

import org.springframework.context.annotation.Configuration;

/**
 * @author zengchuiyu
 * @create 2021-10-13 23:24
 */
@Configuration
public class OneConfiguration {
}
② 根据配置类创建IOC容器对象
private ApplicationContext contextAnno =
            new AnnotationConfigApplicationContext(OneConfiguration.class);
- AnnotationConfigApplicationContext根据配置类创建IOC容器对象
2. 在配置类中配置bean
@Configuration
public class OneConfiguration {

    @Bean
    public OneComponent getComponent(){
        OneComponent oneComponent = new OneComponent();
        oneComponent.setComponentName("zengchuiyu");
        return oneComponent;
    }

}
- @Bean注解相当于XML配置文件中的bean标签
- @Bean注解标记的方法的返回值会被放入IOC容器
3. 在配置类中配置自动扫描的包
使用@ComponentScan注解
@Configuration
@ComponentScan("com.zengchuiyu.ioc.component")
public class OneConfiguration {
取消在OneComponent类上的注解配置,进行测试
 @Test
    public void test2(){
        OneComponent bean = contextAnno.getBean(OneComponent.class);
        String componentName = bean.getComponentName();
        System.out.println(componentName);
    }
四、整合junit4
1. 整合的介绍
通过整合junit4我们再也不需要自己创建IOC容器对象了
而且任何需要的bean都可以在测试类中直接享受自动装配
2. 操作
① 加入依赖
<dependency>
    <groupId>org.springframeworkgroupId>
    <artifactId>spring-testartifactId>
    <version>5.3.1version>
dependency>
② 创建测试类
/**
 * @author zengchuiyu
 * @create 2021-10-13 23:38
 */
@RunWith(SpringJUnit4ClassRunner.class)
@ContextConfiguration(value = {"classpath:applicationContext.xml"})
public class Junit4Test {
    @Autowired
    private StudentController controller;
    @Test
    public void test1(){
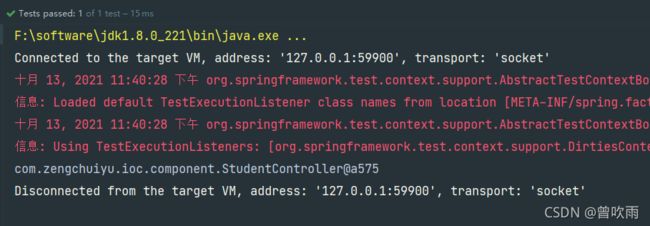
        System.out.println(controller);
    }
}
- junit的@RunWith注解:指定Spring为Junit提供的运行器
- Spring的@ContextConfiguration指定Spring配置文件的位置
好东西嘿嘿


