Docker的安装配置及基础学习
Docker的安装
# 1、卸载旧版本
yum remove docker \
                  docker-client \
                  docker-client-latest \
                  docker-common \
                  docker-latest \
                  docker-latest-logrotate \
                  docker-logrotate \
                  docker-engine

# 2、需要的软件包
yum install -y yum-utils

# 3、设置镜像仓库
yum-config-manager --add-repo http://mirrors.aliyun.com/docker-ce/linux/centos/docker-ce.repo

# 4、更新yum索引
yum makecache fast

# 5、安装Docker引擎及相关依赖包 社区版
yum install docker-ce docker-ce-cli containerd.io docker-compose-plugin

# 6、启动Docker
systemctl start docker

# 7、查看安装是否成功
docker version

# 8、运行hello-world
docker run hello-world

# 9、查看下载的hello-world镜像
docker images


## 卸载 Docker Engine、CLI、containerd 和 Docker Compose 软件包:
yum remove docker-ce docker-ce-cli containerd.io docker-compose-plugin docker-ce-rootless-extras

## 主机上的映像、容器、卷或自定义配置文件 不会自动删除。删除所有映像、容器和 卷:

 sudo rm -rf /var/lib/docker
 sudo rm -rf /var/lib/containerd
Docker的常用命令
帮助命令
docker version			# 显示docker的版本信息
docker info				# 显示docker的系统信息,包括镜像和容器的数量
docker --help			# 帮助命令
帮助文档地址:https://docs.docker.com/reference/
镜像命令
docker images 查看所有本地的主机上的镜像
[root@yunwei_test ~]# docker images
REPOSITORY    TAG       IMAGE ID       CREATED         SIZE
hello-world   latest    feb5d9fea6a5   16 months ago   13.3kB

# 解释
REPOSITORY 镜像的仓库源
TAG		   镜像的标签
IMAGE	   镜像的id
CREATED    镜像的创建时间
SIZE	   镜像的大小

# 可选项
  -a, --all            	# 列出所有的镜像
  -q, --quiet           # 只显示镜像的id
docker search 搜索镜像
[root@yunwei_test ~]# docker search mysql
NAME                            DESCRIPTION                                     STARS     OFFICIAL   AUTOMATED
mysql                           MySQL is a widely used, open-source relation…   13746     [OK]
mariadb                         MariaDB Server is a high performing open sou…   5242      [OK]
phpmyadmin                      phpMyAdmin - A web interface for MySQL and M…   728       [OK]
percona                         Percona Server is a fork of the MySQL relati…   599       [OK]

# 可选项,通过搜索来过滤
 --filter=STARS=3000  #搜索出来的镜像就是STARS大于3---的

[root@yunwei_test ~]# docker search --filter=STARS=3000 mysql
NAME      DESCRIPTION                                     STARS     OFFICIAL   AUTOMATED
mysql     MySQL is a widely used, open-source relation…   13746     [OK]
mariadb   MariaDB Server is a high performing open sou…   5242      [OK]
[root@yunwei_test ~]# docker search --filter=STARS=5000 mysql
NAME      DESCRIPTION                                     STARS     OFFICIAL   AUTOMATED
mysql     MySQL is a widely used, open-source relation…   13746     [OK]
mariadb   MariaDB Server is a high performing open sou…   5242      [OK]
docker pull 下载镜像
# 下载镜像 docker pull 镜像名[:tag]
[root@yunwei_test ~]# docker pull mysql
Using default tag: latest	# 如果不写tag,默认就是latest
latest: Pulling from library/mysql
39fbafb6c7ef: Pull complete	  # 分层下载,docker image的核心 联合文件系统
76e9f8ca4fd7: Pull complete
3898be77c395: Pull complete
992f720677b1: Pull complete
9b298d35e4a8: Pull complete
c7a7ae1e6628: Pull complete
9501ab7b6608: Pull complete
69d00a593dfe: Pull complete
d5a5c1244ef5: Pull complete
ec08e11879d6: Pull complete
f8dbf0a1ea0e: Pull complete
Digest: sha256:03b0af22f4df273a2b7bb6320ca305f9e0dcaebe411a1ec75e6adc9fea051aa2   # 签名
Status: Downloaded newer image for mysql:latest
docker.io/library/mysql:latest	# 真实地址

# 等价于它
docker pull mysql
docker pull docker.io/library/mysql:latest

# 指定版本下载
[root@yunwei_test ~]# docker pull mysql:5.7
5.7: Pulling from library/mysql
e048d0a38742: Pull complete
c7847c8a41cb: Pull complete
351a550f260d: Pull complete
8ce196d9d34f: Pull complete
17febb6f2030: Pull complete
d4e426841fb4: Pull complete
fda41038b9f8: Pull complete
f47aac56b41b: Pull complete
a4a90c369737: Pull complete
97091252395b: Pull complete
84fac29d61e9: Pull complete
Digest: sha256:8cf035b14977b26f4a47d98e85949a7dd35e641f88fc24aa4b466b36beecf9d6
Status: Downloaded newer image for mysql:5.7
docker.io/library/mysql:5.7
docker rmi 删除镜像
[root@yunwei_test ~]# docker rmi -f 容器id	# 删除指定的容器
[root@yunwei_test ~]# docker rmi -f 容器id 容器id 容器id 容器id # 删除多个容器
[root@yunwei_test ~]# docker rmi -f $(docker images -aq ) # 删除全部的容器
容器命令
说明:有了镜像之后才能创建容器,下载一个centos镜像进行测试。
docker pull centos
Using default tag: latest
latest: Pulling from library/centos
a1d0c7532777: Pull complete
Digest: sha256:a27fd8080b517143cbbbab9dfb7c8571c40d67d534bbdee55bd6c473f432b177
Status: Downloaded newer image for centos:latest
docker.io/library/centos:latest
新建容器并启动
docker run [可选参数] image

# 参数说明
--name="Name"	容器的名字 tomcat1 tomcat2 用来区分容器
-d				以后台方式运行容器
-it				以交互方式运行容器
-p				指定容器的端口 -p 8080:8080
	-p ip:主机端口:容器端口
	-p 主机端口:容器端口(常用)
	-p 容器端口
-P				随机指定容器端口

# 测试,启动并进入容器
[root@yunwei_test ~]# docker run -it centos /bin/bash
[root@901e5a83ab29 /]# ls  # 查看容器内的centos,基础版本,很多命令都不完善
bin  dev  etc  home  lib  lib64  lost+found  media  mnt  opt  proc  root  run  sbin  srv  sys  tmp  usr  var

# 从容器中退回主机
[root@901e5a83ab29 /]# exit
exit
[root@yunwei_test /]#ls
bin  boot  dev  etc  home  lib  lib64  media  mnt  opt  proc  root  run  sbin  srv  sys  tmp  usr  var
列出所有运行的容器
# docker ps 命令
   # 列出当前正在运行的容器+历史运行过的容器
-a # 列出当前正在运行的容器+历史运行过的容器
-n=? # 显示最近创建的容器
-q # 只显示容器的编号

[root@yunwei_test /]# docker ps
CONTAINER ID   IMAGE     COMMAND   CREATED   STATUS    PORTS     NAMES
[root@yunwei_test /]# docker ps -a
CONTAINER ID   IMAGE          COMMAND       CREATED          STATUS                      PORTS     NAMES
901e5a83ab29   centos         "/bin/bash"   30 minutes ago   Exited (0) 28 minutes ago             upbeat_solomon
f11c4f1a8f46   feb5d9fea6a5   "/hello"      6 hours ago      Exited (0) 6 hours ago
退出容器
exit  # 直接退出并停止容器
Ctrl + P + Q  # 退出但不停止容器
删除容器
docker rm 容器id	# 删除指定的容器,不能删除正在运行的容器,但如果需强制删除则 rm -f
docker rm -f $(docker ps -aq)	# 删除所有的容器
docker ps -a -q |xargs docker rm # 删除所有的容器
启动和停止容器的操作
docker start 容器id		# 启动容器
docker restart 容器id		# 重启容器
docker stop 容器id		# 停止当前正在运行的容器
docker kill 容器id		# 强制停止当前运行的容器
常用其他命令
后台启动容器
# 命令 docker run -d 镜像名
[root@yunwei_test ~]# docker run -d centos
cc078d471344f8ee68318853622bad6a8ec077479658709a82edf1c6888d000b

[root@yunwei_test ~]# docker ps  # docker ps后发现docker停止了
CONTAINER ID   IMAGE     COMMAND   CREATED   STATUS    PORTS     NAMES

# docker 容器使用后台运行时,必须要有一个前台进程,docker发现没有应用,就会自动停止
# ningx 容器启动后,发现没有提供服务,就会立刻停止。
查看日志
docker logs -f -t --tail 容器id

# 编写一段shell测试脚本
[root@yunwei_test ~]# docker run -d centos /bin/bash -c 'while true; do echo Myth;sleep 1;done'

# [root@yunwei_test ~]# docker ps
CONTAINER ID   IMAGE     COMMAND                  CREATED         STATUS         PORTS     NAMES
f7d44d4e642a   centos    "/bin/bash -c 'while…"   3 minutes ago   Up 3 minutes             frosty_visvesvaraya

# 显示日志
 -tf			# 显示日志带上时间戳
 --tail number	# 显示日志最后多少条日志
 [root@yunwei_test ~]# docker logs -tf --tail 10 f7d44d4e642a
2023-02-03T02:18:09.036768384Z Myth
2023-02-03T02:18:10.039162872Z Myth
2023-02-03T02:18:11.043371114Z Myth
2023-02-03T02:18:12.047663981Z Myth
2023-02-03T02:18:13.051700874Z Myth
2023-02-03T02:18:14.054361646Z Myth
2023-02-03T02:18:15.056890565Z Myth
2023-02-03T02:18:16.060914018Z Myth
2023-02-03T02:18:17.063585858Z Myth
2023-02-03T02:18:18.067941296Z Myth
2023-02-03T02:18:19.071049640Z Myth
2023-02-03T02:18:20.073741441Z Myth
查看容器中进程信息
# 命令 docker top 容器id
[root@yunwei_test ~]# docker top f7d44d4e642a
UID                 PID                 PPID                C                   STIME               TTY                 TIME                CMD
root                15383               15364               0                   10:15               ?                   00:00:00            /bin/bash -c while true; do echo Myth;sleep 1;done
root                15923               15383               0                   10:23               ?                   00:00:00            /usr/bin/coreutils --coreutils-prog-shebang=sleep /usr/bin/sleep 1
查看cpu状态
[root@yunwei_test ~]# docker stats
查看镜像的元数据
# 命令 docker inspect 容器id

# 测试
[root@yunwei_test ~]# docker ps
CONTAINER ID   IMAGE     COMMAND                  CREATED          STATUS          PORTS     NAMES
f7d44d4e642a   centos    "/bin/bash -c 'while…"   11 minutes ago   Up 11 minutes             frosty_visvesvaraya
[root@yunwei_test ~]# docker inspect f7d44d4e642a
[
    {
        "Id": "f7d44d4e642a1a4bd2a1870c6a364a09d69a687de6adc59147f6bf68dae0e42e",
        "Created": "2023-02-03T02:15:45.923946588Z",
        "Path": "/bin/bash",
        "Args": [
            "-c",
            "while true; do echo Myth;sleep 1;done"
        ],
        "State": {
            "Status": "running",
            "Running": true,
            "Paused": false,
            "Restarting": false,
            "OOMKilled": false,
            "Dead": false,
            "Pid": 15383,
            "ExitCode": 0,
            "Error": "",
            "StartedAt": "2023-02-03T02:15:46.505765036Z",
            "FinishedAt": "0001-01-01T00:00:00Z"
        },
        "Image": "sha256:5d0da3dc976460b72c77d94c8a1ad043720b0416bfc16c52c45d4847e53fadb6",
        "ResolvConfPath": "/var/lib/docker/containers/f7d44d4e642a1a4bd2a1870c6a364a09d69a687de6adc59147f6bf68dae0e42e/resolv.conf",
        "HostnamePath": "/var/lib/docker/containers/f7d44d4e642a1a4bd2a1870c6a364a09d69a687de6adc59147f6bf68dae0e42e/hostname",
        "HostsPath": "/var/lib/docker/containers/f7d44d4e642a1a4bd2a1870c6a364a09d69a687de6adc59147f6bf68dae0e42e/hosts",
        "LogPath": "/var/lib/docker/containers/f7d44d4e642a1a4bd2a1870c6a364a09d69a687de6adc59147f6bf68dae0e42e/f7d44d4e642a1a4bd2a1870c6a364a09d69a687de6adc59147f6bf68dae0e42e-json.log",
        "Name": "/frosty_visvesvaraya",
        "RestartCount": 0,
        "Driver": "overlay2",
        "Platform": "linux",
        "MountLabel": "",
        "ProcessLabel": "",
        "AppArmorProfile": "",
        "ExecIDs": null,
        "HostConfig": {
            "Binds": null,
            "ContainerIDFile": "",
            "LogConfig": {
                "Type": "json-file",
                "Config": {}
            },
            "NetworkMode": "default",
            "PortBindings": {},
            "RestartPolicy": {
                "Name": "no",
                "MaximumRetryCount": 0
            },
            "AutoRemove": false,
            "VolumeDriver": "",
            "VolumesFrom": null,
            "CapAdd": null,
            "CapDrop": null,
            "CgroupnsMode": "host",
            "Dns": [],
            "DnsOptions": [],
            "DnsSearch": [],
            "ExtraHosts": null,
            "GroupAdd": null,
            "IpcMode": "private",
            "Cgroup": "",
            "Links": null,
            "OomScoreAdj": 0,
            "PidMode": "",
            "Privileged": false,
            "PublishAllPorts": false,
            "ReadonlyRootfs": false,
            "SecurityOpt": null,
            "UTSMode": "",
            "UsernsMode": "",
            "ShmSize": 67108864,
            "Runtime": "runc",
            "ConsoleSize": [
                0,
                0
            ],
            "Isolation": "",
            "CpuShares": 0,
            "Memory": 0,
            "NanoCpus": 0,
            "CgroupParent": "",
            "BlkioWeight": 0,
            "BlkioWeightDevice": [],
            "BlkioDeviceReadBps": null,
            "BlkioDeviceWriteBps": null,
            "BlkioDeviceReadIOps": null,
            "BlkioDeviceWriteIOps": null,
            "CpuPeriod": 0,
            "CpuQuota": 0,
            "CpuRealtimePeriod": 0,
            "CpuRealtimeRuntime": 0,
            "CpusetCpus": "",
            "CpusetMems": "",
            "Devices": [],
            "DeviceCgroupRules": null,
            "DeviceRequests": null,
            "KernelMemory": 0,
            "KernelMemoryTCP": 0,
            "MemoryReservation": 0,
            "MemorySwap": 0,
            "MemorySwappiness": null,
            "OomKillDisable": false,
            "PidsLimit": null,
            "Ulimits": null,
            "CpuCount": 0,
            "CpuPercent": 0,
            "IOMaximumIOps": 0,
            "IOMaximumBandwidth": 0,
            "MaskedPaths": [
                "/proc/asound",
                "/proc/acpi",
                "/proc/kcore",
                "/proc/keys",
                "/proc/latency_stats",
                "/proc/timer_list",
                "/proc/timer_stats",
                "/proc/sched_debug",
                "/proc/scsi",
                "/sys/firmware"
            ],
            "ReadonlyPaths": [
                "/proc/bus",
                "/proc/fs",
                "/proc/irq",
                "/proc/sys",
                "/proc/sysrq-trigger"
            ]
        },
        "GraphDriver": {
            "Data": {
                "LowerDir": "/var/lib/docker/overlay2/07a0f4fcb07e0209f3155f84daeb5162989365299109d1aa02a292f8de3f7af4-init/diff:/var/lib/docker/overlay2/8ba3a365aba3dc7fcc4b82c9fd9756dec98979222959823c60ba3ab5c53c1625/diff",
                "MergedDir": "/var/lib/docker/overlay2/07a0f4fcb07e0209f3155f84daeb5162989365299109d1aa02a292f8de3f7af4/merged",
                "UpperDir": "/var/lib/docker/overlay2/07a0f4fcb07e0209f3155f84daeb5162989365299109d1aa02a292f8de3f7af4/diff",
                "WorkDir": "/var/lib/docker/overlay2/07a0f4fcb07e0209f3155f84daeb5162989365299109d1aa02a292f8de3f7af4/work"
            },
            "Name": "overlay2"
        },
        "Mounts": [],
        "Config": {
            "Hostname": "f7d44d4e642a",
            "Domainname": "",
            "User": "",
            "AttachStdin": false,
            "AttachStdout": false,
            "AttachStderr": false,
            "Tty": false,
            "OpenStdin": false,
            "StdinOnce": false,
            "Env": [
                "PATH=/usr/local/sbin:/usr/local/bin:/usr/sbin:/usr/bin:/sbin:/bin"
            ],
            "Cmd": [
                "/bin/bash",
                "-c",
                "while true; do echo Myth;sleep 1;done"
            ],
            "Image": "centos",
            "Volumes": null,
            "WorkingDir": "",
            "Entrypoint": null,
            "OnBuild": null,
            "Labels": {
                "org.label-schema.build-date": "20210915",
                "org.label-schema.license": "GPLv2",
                "org.label-schema.name": "CentOS Base Image",
                "org.label-schema.schema-version": "1.0",
                "org.label-schema.vendor": "CentOS"
            }
        },
        "NetworkSettings": {
            "Bridge": "",
            "SandboxID": "f9e71af1b30932a4fc8f1225a17bb17d81ae09632b0bda733788371479c5f5ad",
            "HairpinMode": false,
            "LinkLocalIPv6Address": "",
            "LinkLocalIPv6PrefixLen": 0,
            "Ports": {},
            "SandboxKey": "/var/run/docker/netns/f9e71af1b309",
            "SecondaryIPAddresses": null,
            "SecondaryIPv6Addresses": null,
            "EndpointID": "e837fe81a395deaaed78cd6808f31849bcd989cf82add4ab78ac7e6ee64e7f8a",
            "Gateway": "172.17.0.1",
            "GlobalIPv6Address": "",
            "GlobalIPv6PrefixLen": 0,
            "IPAddress": "172.17.0.2",
            "IPPrefixLen": 16,
            "IPv6Gateway": "",
            "MacAddress": "02:42:ac:11:00:02",
            "Networks": {
                "bridge": {
                    "IPAMConfig": null,
                    "Links": null,
                    "Aliases": null,
                    "NetworkID": "66362ff3c986989d58b4267349850e4c609960faf6cd0855058b2f2721e02f1a",
                    "EndpointID": "e837fe81a395deaaed78cd6808f31849bcd989cf82add4ab78ac7e6ee64e7f8a",
                    "Gateway": "172.17.0.1",
                    "IPAddress": "172.17.0.2",
                    "IPPrefixLen": 16,
                    "IPv6Gateway": "",
                    "GlobalIPv6Address": "",
                    "GlobalIPv6PrefixLen": 0,
                    "MacAddress": "02:42:ac:11:00:02",
                    "DriverOpts": null
                }
            }
        }
    }
]
进入当前正在进行的容器
# 容器通常都是以后台方式运行的,需要进入容器查看信息或修改一些配置

# 命令一
docker exec -it 容器id bashShell

# 测试
[root@yunwei_test ~]# docker ps
CONTAINER ID   IMAGE     COMMAND                  CREATED          STATUS          PORTS     NAMES
f7d44d4e642a   centos    "/bin/bash -c 'while…"   16 minutes ago   Up 15 minutes             frosty_visvesvaraya
[root@yunwei_test ~]# docker exec -it f7d44d4e642a /bin/bash
[root@f7d44d4e642a /]# ls
bin  dev  etc  home  lib  lib64  lost+found  media  mnt  opt  proc  root  run  sbin  srv  sys  tmp  usr  var
[root@f7d44d4e642a /]# ps -ef
UID        PID  PPID  C STIME TTY          TIME CMD
root         1     0  0 02:15 ?        00:00:00 /bin/bash -c while true; do echo Myth;sleep 1;done
root       991     0  0 02:32 pts/0    00:00:00 /bin/bash
root      1110     1  0 02:33 ?        00:00:00 /usr/bin/coreutils --coreutils-prog-shebang=sleep /usr/bin/sleep 1
root      1111   991  0 02:33 pts/0    00:00:00 ps -ef

# 命令二
docker attach 容器id
[root@yunwei_test ~]# docker attach f7d44d4e642a
正在执行当前的代码...

# docker exec		# 进入容器后开启一个新的终端,可以在里面进行操作(常用)
# docker attach		# 进入容器后正在执行的终端,不会启动新的进程
从容器内拷贝文件到宿主机上
dpcker cp 容器id :容器内路径 目的的主机路径

# 查看正在运行的容器
[root@yunwei_test home]# docker ps -a
CONTAINER ID   IMAGE     COMMAND       CREATED              STATUS              PORTS     NAMES
023a4cf5711d   centos    "/bin/bash"   About a minute ago   Up About a minute             practical_borg

# 查看当前主机目录下
[root@yunwei_test home]# ls

# 进入docker容器内部
[root@yunwei_test home]# docker attach 023a4cf5711d
[root@023a4cf5711d /]# cd /home/
[root@023a4cf5711d home]# ls

# 在容器内新建一个文件
[root@023a4cf5711d home]# touch myth.java
[root@023a4cf5711d home]# exit
exit

# 将容器内文件拷贝到宿主机上
[root@yunwei_test home]# docker cp 023a4cf5711d:/home/myth.java /home
[root@yunwei_test home]# ls
myth.java

# 拷贝是一个手动过程,后续可以使用 -V 卷的技术,可以实现同步
命令总结
attach 		Attach to a running container						# 当前 shell 下 attach 连接指定运行镜像
build 		Build an image from a Dockerfile					# 通过 Dockerfile 定制镜像
commit 		Create a new image from a container changes			# 提交当前容器为新的镜像
cp 			Copyfiles/foldersfrom the containers filesystem to the host path	#从容器中拷贝指定文件或者目录到宿主机中
create 		Create a new container								# 创建一个新的容器,同 run,但不启动容器
diff 		Inspect changes on a container's filesystem			# 查看 docker 容器变化
events 		Get real time events from the server				#从 docker 服务获取容器实时事件
exec 		Run a command in an existing container				# 在已存在的容器上运行命令
export 		Streamthe contentsof acontainer as a tar archive	# 导出容器的内容流作为一个 tar 归档文件[对应 import ]
history 	show the history of an image						# 展示一个镜像形成历史
images 		List images											# 列出系统当前镜像
import 		Create anewfilesystemimage from the contents of a tarbal1			#从tar包中的内容创建一个新的文件系统映像[对应export]
info 		Display system-wide information						# 显示系统相关信息
inspect 	Return low-level information on a container			# 查看容器详细信息
kill 		Kill a running container							# kill 指定 docker 容器
load 		Load an image from a tar archive					# 从一个 tar 包中加载一个镜像[对应 save ]
login 		Register or Login to the docker registry server		# 注册或者登陆一个 docker 源服务器
logout 		Log out from a Docker registry server				# 从当前 Docker reaistry 退出
logs 		Fetch the logs of a container						# 输出当前容器日志信息
port 		Lookup thepublic-facing port which is NAT-ed tO PRIVATE PORT		# 查看映射端口对应的容器内部源端口
pause 		Pause all processes within a containen				# 暂停容器
ps 			List containers										# 列出容器列表
pull		Pull an image or a repository from the docker registry server		# 从docker镜像源服务器拉取指定镜像或者库镜像
push 		Push an image or a repository to the docker registry server			# 推送指定镜像或者库镜像至docker源服务器
restart 	Restart a runnina containen							# 重启运行的容器
rm 			Remove one or more containers						# 移除一个或者多个容器
rmi 		Remove one or more images							# 移除一个或多个镜像[无容器使用该镜像才可删除,否则需删除相关容器才可继续或 -f 强制删除]
run 		Run a command in a new container					# 创建一个新的容器并运行一个命令
save 		Save an image to a tar archive						# 保存一个镜像为一个 tar 包[对应 load]
search 		Search for an image on the Docker Hub				# 在 docker hub 中搜索镜像
start 		Start a stopped containers							# 启动容器
stop 		Stop a running containers							# 停止容器
tag 		Taa an image into a repository						# 给源中镜像打标签
top 		Lookup the runnina processes of a containen			# 查看容器中运行的进程信息
unpause 	Unpause a paused container							# 取消暂停容器
version 	Show the docker version information					# 查看 docker 版本号
wait 		Block until a container stops, then print its exit code				# 载取容器停止时的退出状态值
Docker的运用
Docker安装Nginx
# 1、搜索镜像 search 建议去docker hub搜索 查看帮助文档
# 2、下载镜像 pull tag
# 3、运行测试
[root@yunwei_test ~]# docker pull nginx:1.22.0

# -d 后台运行
# --name 给容器命名
# -p 宿主机端口:容器内部端口
[root@yunwei_test ~]# docker run --name nginx1 -d -p 8080:80 nginx:1.22.0
f976ecd209b7255025789114120f03d0f864b5a69bc29890433b194a2c9a8ef1
[root@yunwei_test ~]# docker ps
CONTAINER ID   IMAGE           COMMAND                  CREATED          STATUS          PORTS                                       NAMES
f976ecd209b7   nginx:1.22.0    "/docker-entrypoint.…"   28 minutes ago   Up 28 minutes   0.0.0.0:8080->80/tcp, :::8080->80/tcp       nginx1

[root@yunwei_test ~]# curl localhost:8080

# 进入容器
[root@yunwei_test ~]# docker exec -it nginx1 bash
root@f976ecd209b7:/# whereis nginx
nginx: /usr/sbin/nginx /usr/lib/nginx /etc/nginx /usr/share/nginx
root@f976ecd209b7:/# cd /etc/nginx/
root@f976ecd209b7:/etc/nginx# ls
conf.d	fastcgi_params	mime.types  modules  nginx.conf  scgi_params  uwsgi_params
Docker安装Tomcat
# 官方文档的使用
docker run -it --rm tomcat:9.0

# docker run -it --rm 一般用来测试,用完即删

# 正常安装下载
docker pull tomcat:8.5.85

# 启动运行
[root@yunwei_test ~]# docker run --name tomcat1 -p 8000:8080 tomcat:8.5.85

# 测试访问
[root@yunwei_test ~]# curl localhost:8000

# 进入容器
[root@yunwei_test ~]# docker exec -it tomcat1 bash
root@da54651eb335:/usr/local/tomcat# ls
bin  BUILDING.txt  conf  CONTRIBUTING.md  lib  LICENSE  logs  native-jni-lib  NOTICE  README.md  RELEASE-NOTES  RUNNING.txt  temp  webapps  webapps.dist  work
root@da54651eb335:/usr/local/tomcat# cp -r webapps.dist/* webapps

# 没有webapps,默认是最小的镜像,所有不必要的都会剔除,保证最小可运行的环境。
安装部署es + kibana
# es 暴露的端口很多
# es 十分的占用内存
# es 的数据一般需要放置安全目录进行挂载
# --net somenetwork 网络配置

# 启动 elasticsearch  -e 修改配置文件 增加内存的限制 环境配置进行修改
docker run -d --name elasticsearch --net somenetwork -p 9200:9200 -p 9300:9300 -e "discovery.type=single-node" -e ES_JAVA_OPST="Xms512m --Xmx512m" elasticsearch:7.6.2

# 查看占用状态 docker stats

[root@yunwei_test ~]# docker stats
CONTAINER ID   NAME            CPU %     MEM USAGE / LIMIT     MEM %     NET I/O           BLOCK I/O     PIDS
7ff7e3fd3085   elasticsearch   0.53%     1.232GiB / 7.638GiB   16.14%    2.04kB / 1.3kB    0B / 1.63MB   45
f976ecd209b7   nginx1          0.00%     2.484MiB / 7.638GiB   0.03%     3.31kB / 3.66kB   0B / 6.14kB   4

# 测试访问
[root@yunwei_test ~]# curl localhost:9200
{
  "name" : "7ff7e3fd3085",
  "cluster_name" : "docker-cluster",
  "cluster_uuid" : "k9ZlClOXSMWk_9K8GDg3GA",
  "version" : {
    "number" : "7.6.2",
    "build_flavor" : "default",
    "build_type" : "docker",
    "build_hash" : "ef48eb35cf30adf4db14086e8aabd07ef6fb113f",
    "build_date" : "2020-03-26T06:34:37.794943Z",
    "build_snapshot" : false,
    "lucene_version" : "8.4.0",
    "minimum_wire_compatibility_version" : "6.8.0",
    "minimum_index_compatibility_version" : "6.0.0-beta1"
  },
  "tagline" : "You Know, for Search"
}
commit提交镜像
docker commit 提交容器成为一个新的副本

# 命令和git原理类似
docker commi -m "提交的描述信息" -a "作者" 容器id 目标镜像名:[TAG]

# 1、启动一个默认的tomcat

# 2、官方的镜像默认是没有webapps应用文件的

# 3、在webapps下新增基本的文件

# 4、将操作过的容器通过commit提交为一个镜像,以后就可以直接使用修改过的镜像。

[root@yunwei_test ~]# docker commit -m "add webapps" -a "Myth" da54651eb335 tomcat2:2.0
sha256:57e10e7947b9b987d3adf4082a6ec0c48fa546e0230c95d173fd57c6779e40ac
[root@yunwei_test ~]# docker images
REPOSITORY      TAG       IMAGE ID       CREATED         SIZE
tomcat2         2.0       57e10e7947b9   6 seconds ago   479MB
tomcat          8.5.85    292c9acdf312   5 days ago      474MB
nginx           1.22.0    08a1cbf9c69e   4 months ago    142MB
centos          latest    5d0da3dc9764   16 months ago   231MB
elasticsearch   7.6.2     f29a1ee41030   2 years ago     791MB
容器数据卷
docker run -it -v 主机目录:容器内目录

# 测试
[root@yunwei_test home]# docker run -it -v /home/Myth:/home centos /bin/bash
[root@yunwei_test home]# docker inspect eb15d2e3112c
        "Mounts": [                             # 挂载 -v 卷
            {
                "Type": "bind",
                "Source": "/home/myth",			# 宿主机内的地址
                "Destination": "/home",			# docker容器内的地址
                "Mode": "",
                "RW": true,
                "Propagation": "rprivate"
            }
        ],
Docker安装MySQL
# 获取镜像
[root@yunwei_test ~]# docker pull mysql:5.7

# 运行容器 需要做数据挂载 安装启动mysql,需要配置密码
# 官方测试:docker run --name some-mysql -e MYSQL_ROOT_PASSWORD=my-secret-pw -d mysql:tag

# 自行修改测试
-d 后台运行 -p 端口映射 -v数据卷挂载 -e 环境配置 --name 容器名称
[root@yunwei_test ~]# docker run -d -p 3306:3306 -v /usr/local/mysql/conf:/etc/mysql/conf.d -v /usr/local/mysql/data:/var/lib/mysql -e MYSQL_ROOT_PASSWORD=123456 --name mysql01 mysql:5.7

# 成功启动之后,使用Navicat来连接测试一下是否能够连接成功

# 将测试的mysql容器进行删除
[root@yunwei_test local]# docker rm -f 710d6d6f7530
710d6d6f7530
[root@yunwei_test local]# docker ps -a
CONTAINER ID   IMAGE                 COMMAND                  CREATED        STATUS        PORTS                                                                                  NAMES
eb15d2e3112c   centos                "bash"                   7 hours ago    Up 7 hours                                                                                           zen_torvalds
7ff7e3fd3085   elasticsearch:7.6.2   "/usr/local/bin/dock…"   22 hours ago   Up 22 hours   0.0.0.0:9200->9200/tcp, :::9200->9200/tcp, 0.0.0.0:9300->9300/tcp, :::9300->9300/tcp   elasticsearch
f976ecd209b7   nginx:1.22.0          "/docker-entrypoint.…"   31 hours ago   Up 31 hours   0.0.0.0:8080->80/tcp, :::8080->80/tcp                                                  nginx1
# 查看mysql数据是否存在
[root@yunwei_test local]# cd mysql/data/
[root@yunwei_test data]# ls
auto.cnf  ca-key.pem  ca.pem  client-cert.pem  client-key.pem  ib_buffer_pool  ibdata1  ib_logfile0  ib_logfile1  ibtmp1  mysql  mysql.sock  performance_schema  private_key.pem  public_key.pem  server-cert.pem  server-key.pem  sys

# 发现挂载到本地的数据卷并没有丢失,实现了容器数据持久化的功能
具名和匿名挂载
# 匿名挂载
-v 容器内路径
[root@yunwei_test data]# docker run -d -P --name nginx01 -v /etc/nginx nginx:1.22.0

# 查看所有的 volume 情况
[root@yunwei_test data]# docker volume ls
DRIVER    VOLUME NAME
local     4a4651229d846d3d31b057bb9399662dce9ec01f346361404cd1d66fb7d80993

# 这种就是匿名挂载,-v 只写了容器内的路径,并没有写宿主机的路径

# 具名挂载
[root@yunwei_test data]# docker run -d -P --name nginx02 -v juming-nginx:/etc/nginx nginx:1.22.0
[root@yunwei_test data]# docker volume ls
DRIVER    VOLUME NAME
local     4a4651229d846d3d31b057bb9399662dce9ec01f346361404cd1d66fb7d80993
local     juming-nginx

# 通过 -v 卷名:容器内路径
# 查看一下卷的路径
[root@yunwei_test data]# docker volume inspect juming-nginx
[
    {
        "CreatedAt": "2023-02-07T17:13:16+08:00",
        "Driver": "local",
        "Labels": null,
        "Mountpoint": "/var/lib/docker/volumes/juming-nginx/_data",
        "Name": "juming-nginx",
        "Options": null,
        "Scope": "local"
    }
]
所有docker容器内的卷,在没有指定目录的情况下都是在**/var/lib/docker/volumes/xxx/_data**下
可以通过具名挂载来方便的找到卷,大多数情况都是在使用**具名挂载**
# 如何确定是具名挂载还是匿名挂载,还是指定路径挂载
-v 容器内路径           # 匿名挂载
-v 卷名:容器内路径		  # 具名挂载
-v 宿主机路径:容器内路径  #指定路径挂载
扩展:
# 通过 -v 容器内路径: ro rw
ro   readonly   # 只读
rw	 readwrite	# 可读写
# 一旦设置了容器权限,容器对挂载出来的内容就有限制
[root@yunwei_test data]# docker run -d -P --name nginx02 -v juming-nginx:/etc/nginx:ro nginx:1.22.0
[root@yunwei_test data]# docker run -d -P --name nginx02 -v juming-nginx:/etc/nginx:rw nginx:1.22.0

# 只要看到 ro 就说明这个路径只能通过宿主机来进行操作,容器内部无法进行操作
初识Dockerfile
Dockerfile就是用来构建docker镜像的构建文件
通过脚本命令来生成镜像,镜像是分层的,对应脚本的一个个命令,每个命令都是一层
# 创建一个dockerfile文件,名字可以自定义,但建议使用 dockerfile
# 文件中的内容  指令(大写) 参数
[root@yunwei_test docker-test-volume]# cat dockerfile1
FORM centos

VOLUME ["volume01","volume02"]

CMD echo "----end----"

CMD /bin/bash

# 每一行命令就是镜像的一层

[root@yunwei_test docker-test-volume]# docker build -f dockerfile1 -t myth/centos:1.0 .
Sending build context to Docker daemon  2.048kB
Step 1/4 : FROM centos
 ---> 5d0da3dc9764
Step 2/4 : VOLUME ["volume01","volume02"]
 ---> Running in 103f5522e34a
Removing intermediate container 103f5522e34a
 ---> 150a2c282254
Step 3/4 : CMD echo "----end----"
 ---> Running in ebeb0377ebaf
Removing intermediate container ebeb0377ebaf
 ---> 7ac7c95725d1
Step 4/4 : CMD /bin/bash
 ---> Running in 26f7262958b9
Removing intermediate container 26f7262958b9
 ---> 3fd9e7f04a66
Successfully built 3fd9e7f04a66
Successfully tagged myth/centos:1.0
[root@yunwei_test docker-test-volume]# docker images
REPOSITORY      TAG       IMAGE ID       CREATED              SIZE
myth/centos     1.0       3fd9e7f04a66   About a minute ago   231MB
tomcat2         2.0       57e10e7947b9   8 hours ago          479MB
mysql           5.7       be16cf2d832a   6 days ago           455MB
nginx           1.22.0    08a1cbf9c69e   4 months ago         142MB
centos          latest    5d0da3dc9764   16 months ago        231MB
elasticsearch   7.6.2     f29a1ee41030   2 years ago          791MB
启动构建的镜像并进入
[root@yunwei_test ~]# docker run -it 3fd9e7f04a66 bash
[root@6f00f84dc89f /]# ls
bin  etc   lib	  lost+found  mnt  proc  run   srv  tmp  var	   volume02
dev  home  lib64  media       opt  root  sbin  sys  usr  volume01

# 能够查看到volume01 volume02目录就是生成镜像时自动挂载的数据卷目录
# 这个卷和外部是一定存在一个同步的目录

# docker inspect 查看容器信息 可以看到挂载目录的信息
[root@yunwei_test ~]# docker inspect 6f00f84dc89f
       "Mounts": [
            {
                "Type": "volume",
                "Name": "807e1d116e2e28b858ab1a8b191c19aebe231d7c74c5ab633a67d943d1b19882",
                "Source": "/var/lib/docker/volumes/807e1d116e2e28b858ab1a8b191c19aebe231d7c74c5ab633a67d943d1b19882/_data",
                "Destination": "volume01",
                "Driver": "local",
                "Mode": "",
                "RW": true,
                "Propagation": ""
            },
            {
                "Type": "volume",
                "Name": "cdebf56a3f90a4bbb7183bd7b57ed5146cb82dbe965fecc0a47403fe68c7ef19",
                "Source": "/var/lib/docker/volumes/cdebf56a3f90a4bbb7183bd7b57ed5146cb82dbe965fecc0a47403fe68c7ef19/_data",
                "Destination": "volume02",
                "Driver": "local",
                "Mode": "",
                "RW": true,
                "Propagation": ""
            }
        ],
# 可以在容器内挂载目录创建一个文件
[root@6f00f84dc89f /]# cd volume01
[root@6f00f84dc89f volume01]# touch test.txt

# 退出容器,验证文件是否同步
[root@yunwei_test ~]# cd /var/lib/docker/volumes/807e1d116e2e28b858ab1a8b191c19aebe231d7c74c5ab633a67d943d1b19882/_data
[root@yunwei_test _data]# ls
test.txt

# 通常构建镜像时使用这种方式来进行挂载卷,如果构建镜像时没有挂载卷,则需要手动挂载 -v 卷名:容器内路径
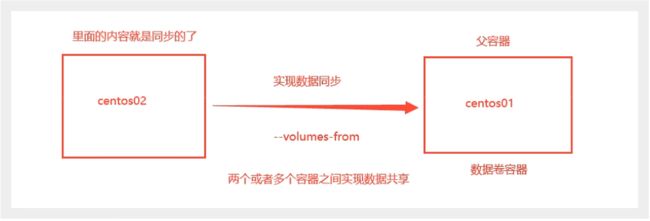
数据卷容器
多个mysql同步数据
DockerFile
DockerFile介绍
dockerfile是用来构建docker镜像的文件,命令参数脚本
构建步骤:
1、编写一个dockerfile文件
2、docker build构建成为一个镜像
3、docker run 运行镜像
4、docker push 发布镜像(DockerHub、阿里云镜像仓库)
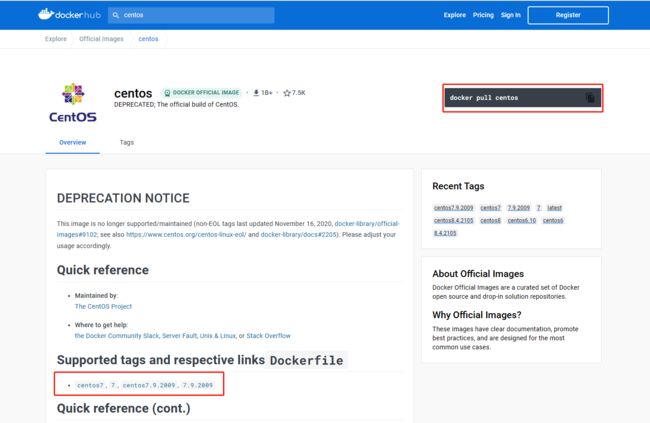
查看一下DockerHub官方文档说明
很多官方镜像都是基础包,很多功能没有,一般通常需要自己搭建个性化镜像
DockerFile构建过程
基础知识:
1、每个保留关键字(指令)都必须是大写字母
2、执行从上到下的顺序进行执行
3、# 表示注释
4、每一个指令都会创建提交一个新的镜像层,并提交
[外链图片转存失败,源站可能有防盗链机制,建议将图片保存下来直接上传(img-UnIuRU83-1677727282917)(C:\Users\Myth\AppData\Roaming\Typora\typora-user-images\image-20230214094829309.png)]!
dockerfile是面向开发的,以后发布项目,做镜像,就需要编写dockerfile文件
步骤:开发,部署,运维··· 缺一不可
Dockerfile:构建文件,定义了一切的步骤,类似于源代码
DockerImages:通过DockerFile构建生成的镜像,最终发布和运行的产品
Dokcer容器:容器就是镜像运行起来提供服务器
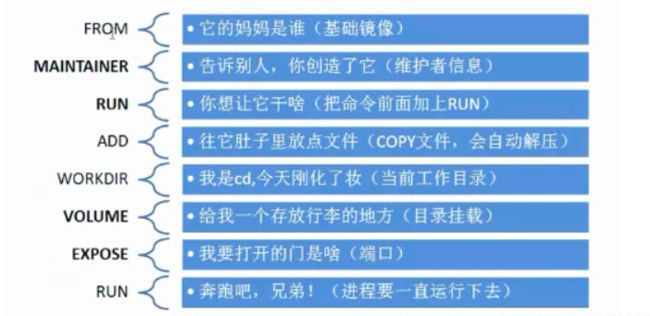
DokcerFile的指令
FROM			# 基础镜像,从这里开始构建
MAINTAINER		# 镜像是谁写的,姓名+邮箱
RUN				# 镜像构建的时候需要运行的命令
ADD				# 添加内容,比如中间件压缩包
WORKDIR			# 镜像的工作目录,可自定义
VOLUME			# 挂载目录
EXPOSE			# 暴露端口配置
CMD				# 指定这个容器启动时要运行的命令,只有最后一个会生效,可被替代
ENTRYPOINT		# 指定这个容器启动时要运行的命令,可以追加命令
ONBUILD			# 当构建一个被继承 DockerFile 这个时候就会运行 ONBUILD 的指令,触发指令
COPY			# 类似ADD ,将我们文件拷贝到镜像中
ENV				# 构建的时候设置环境变量
实战测试
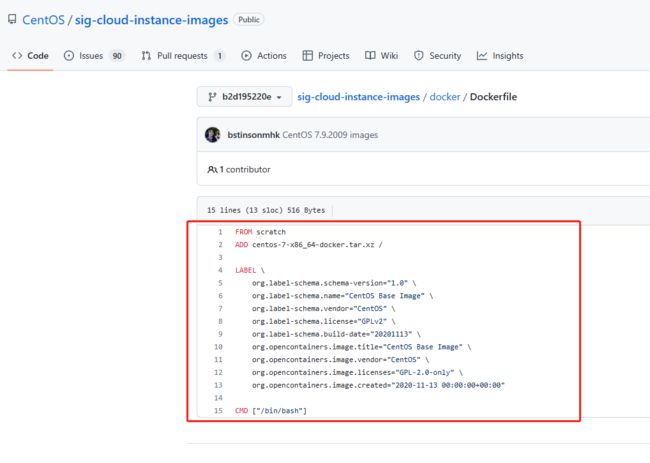
Docker Hub 中 99% 的镜像都是从这个基础镜像过来的FROM scratch ,然后配置需要的软件和配置来进行构建
创建一个自己的centos
# 1、编写Dockerfile的文件
[root@yunwei_test dockerfile]# cat mydockerfile-centos
FROM centos
MAINTAINER lxb<37334188@qq.com>

ENV MYPATH /usr/local
WORKDIR $MYPATH

RUN yum -y install vim
RUN yum -y install net-tools

EXPOSE 80

CMD echo $MYPATH
CMD echo "---end---"
CMD /bin/bash

# 2、通过这个文件构建镜像
# 命令 docker build -f dockerfile 文件路径 -t 镜像名:[tag]
[root@yunwei_test dockerfile]# docker build -f mydockerfile-centos -t mycentos:1.0 .
Successfully built 3601740ddf98
Successfully tagged mycentos:1.0

# 3、测试运行
[root@yunwei_test dockerfile]# docker images
REPOSITORY      TAG       IMAGE ID       CREATED         SIZE
mycentos        1.0       3601740ddf98   5 minutes ago   656MB
[root@yunwei_test dockerfile]# docker run -it mycentos:1.0
[root@b304420d58e4 local]# pwd   查看设置的工作目录
/usr/local
[root@b304420d58e4 local]# ifconfig      测试新增的命令
eth0: flags=4163<UP,BROADCAST,RUNNING,MULTICAST>  mtu 1500
        inet 172.17.0.4  netmask 255.255.0.0  broadcast 172.17.255.255
        ether 02:42:ac:11:00:04  txqueuelen 0  (Ethernet)
        RX packets 8  bytes 656 (656.0 B)
        RX errors 0  dropped 0  overruns 0  frame 0
        TX packets 0  bytes 0 (0.0 B)
        TX errors 0  dropped 0 overruns 0  carrier 0  collisions 0

lo: flags=73<UP,LOOPBACK,RUNNING>  mtu 65536
        inet 127.0.0.1  netmask 255.0.0.0
        loop  txqueuelen 1000  (Local Loopback)
        RX packets 0  bytes 0 (0.0 B)
        RX errors 0  dropped 0  overruns 0  frame 0
        TX packets 0  bytes 0 (0.0 B)
        TX errors 0  dropped 0 overruns 0  carrier 0  collisions 0

[root@b304420d58e4 local]# vim test    测试新增的命令
docker history
# docker history 镜像id  可以查看本地镜像的变更历史
[root@yunwei_test ~]# docker history 3601740ddf98
IMAGE          CREATED          CREATED BY                                      SIZE      COMMENT
3601740ddf98   15 minutes ago   /bin/sh -c #(nop)  CMD ["/bin/sh" "-c" "/bin…   0B
ab4189647c16   15 minutes ago   /bin/sh -c #(nop)  CMD ["/bin/sh" "-c" "echo…   0B
2551a151d9e4   15 minutes ago   /bin/sh -c #(nop)  CMD ["/bin/sh" "-c" "echo…   0B
998a99dbfd4a   15 minutes ago   /bin/sh -c #(nop)  EXPOSE 80                    0B
62f986730035   15 minutes ago   /bin/sh -c yum -y install net-tools             199MB
b87f0bcb7857   15 minutes ago   /bin/sh -c yum -y install vim                   254MB
331d7d5dba10   21 minutes ago   /bin/sh -c #(nop) WORKDIR /usr/local            0B
a6411536dfe5   21 minutes ago   /bin/sh -c #(nop)  ENV MYPATH=/usr/local        0B
f4e00319fe8f   21 minutes ago   /bin/sh -c #(nop)  MAINTAINER lxb<37334188@q…   0B
eeb6ee3f44bd   17 months ago    /bin/sh -c #(nop)  CMD ["/bin/bash"]            0B
<missing>      17 months ago    /bin/sh -c #(nop)  LABEL org.label-schema.sc…   0B
<missing>      17 months ago    /bin/sh -c #(nop) ADD file:b3ebbe8bd304723d4…   204MB

# 可以通过这个命令查看一个镜像,来研究它是怎么做的
CMD 和 ENTRYPOINT 的区别
CMD				# 指定这个容器启动时要运行的命令,只有最后一个会生效,可被替代
ENTRYPOINT		# 指定这个容器启动时要运行的命令,可以追加命令
测试CMD
# 编写 dockerfile文件
[root@yunwei_test dockerfile]# vim dockerfile-cmd-test
FROM centos:7
CMD ["ls","-a"]

# 构建镜像
[root@yunwei_test dockerfile]# docker build -f dockerfile-cmd-test -t cmdtest .
Sending build context to Docker daemon  3.072kB
Step 1/2 : FROM centos:7
 ---> eeb6ee3f44bd
Step 2/2 : CMD ["ls","-a"]
 ---> Running in bc5dea41dfc9
Removing intermediate container bc5dea41dfc9
 ---> ed92fecb12ae
Successfully built ed92fecb12ae
Successfully tagged cmdtest:latest

# run运行,发现 ls -a 命令生效
[root@yunwei_test dockerfile]# docker run ed92fecb12ae
.
..
.dockerenv
anaconda-post.log
bin
dev
etc
home
lib
lib64

# 想追加一个命令 -l
[root@yunwei_test dockerfile]# docker run ed92fecb12ae -l
docker: Error response from daemon: failed to create shim task: OCI runtime create failed: runc create failed: unable to start container process: exec: "-l": executable file not found in $PATH: unknown.
# CMD的清理下 -l 替换了CMD ["ls","-a"] 命令,-l 不是命令所以报错

[root@yunwei_test dockerfile]# docker run ed92fecb12ae ls -al
total 12
drwxr-xr-x.   1 root root     6 Feb 14 03:03 .
drwxr-xr-x.   1 root root     6 Feb 14 03:03 ..
-rwxr-xr-x.   1 root root     0 Feb 14 03:03 .dockerenv
-rw-r--r--.   1 root root 12114 Nov 13  2020 anaconda-post.log
lrwxrwxrwx.   1 root root     7 Nov 13  2020 bin -> usr/bin
drwxr-xr-x.   5 root root   340 Feb 14 03:03 dev
drwxr-xr-x.   1 root root    66 Feb 14 03:03 etc
drwxr-xr-x.   2 root root     6 Apr 11  2018 home
lrwxrwxrwx.   1 root root     7 Nov 13  2020 lib -> usr/lib
lrwxrwxrwx.   1 root root     9 Nov 13  2020 lib64 -> usr/lib64
测试ENTRYPOINT
# 编写 dockerfile文件
[root@yunwei_test dockerfile]# vim dockerfile-cmd-entrypoint
FROM centos:7
ENTRYPOINT ["ls","-a"]

# 构建镜像
[root@yunwei_test dockerfile]# docker build -f dockerfile-cmd-entrypoint -t entrypoint-test .
Sending build context to Docker daemon  4.096kB
Step 1/2 : FROM centos:7
 ---> eeb6ee3f44bd
Step 2/2 : ENTRYPOINT ["ls","-a"]
 ---> Running in a75d84286139
Removing intermediate container a75d84286139
 ---> ba92b091198c
Successfully built ba92b091198c
Successfully tagged entrypoint-test:latest

# run运行,发现 ls -a 命令生效
[root@yunwei_test dockerfile]# docker run ba92b091198c
.
..
.dockerenv
anaconda-post.log
bin
dev
etc
home
lib
lib64

# 追加的命令是直接拼接在 ENTRYPOINT 命令的后面,并不会出现报错
[root@yunwei_test dockerfile]# docker run ba92b091198c -l
total 12
drwxr-xr-x.   1 root root     6 Feb 14 03:07 .
drwxr-xr-x.   1 root root     6 Feb 14 03:07 ..
-rwxr-xr-x.   1 root root     0 Feb 14 03:07 .dockerenv
-rw-r--r--.   1 root root 12114 Nov 13  2020 anaconda-post.log
lrwxrwxrwx.   1 root root     7 Nov 13  2020 bin -> usr/bin
drwxr-xr-x.   5 root root   340 Feb 14 03:07 dev
drwxr-xr-x.   1 root root    66 Feb 14 03:07 etc
drwxr-xr-x.   2 root root     6 Apr 11  2018 home
lrwxrwxrwx.   1 root root     7 Nov 13  2020 lib -> usr/lib
lrwxrwxrwx.   1 root root     9 Nov 13  2020 lib64 -> usr/lib64
dockerfile中很多命令都十分相似,需要了解它们的区别,最好的学习方式就是进行对比它们,然后测试效果
实战:Tomcat镜像
1、准备镜像文件 tomcat 压缩包,jdk 压缩包
[root@yunwei_test tomcat]# ls
apache-tomcat-8.5.82.tar.gz  jdk-8u333-linux-x64.tar.gz
2、编写dockerfile文件,官方命名 Dockerfile ,build 会自动寻找这个文件 就不需要 -f 指定了
[root@yunwei_test tomcat]# vim Dockerfile
[root@yunwei_test tomcat]# cat Dockerfile
FROM centos:7
MAINTAINER myth<37334188@qq.com>

COPY readme.txt /usr/local/readme.txt

ADD jdk-8u333-linux-x64.tar.gz /usr/local/
ADD apache-tomcat-8.5.82.tar.gz /usr/local/

RUN yum -y install vim

ENV MYPATH /usr/local
WORKDIR $MYPATH

ENV JAVA_HOME /usr/local/jdk1.8.0_333
ENV CLASSPATH $JAVA_HOME/lib/dt.jar:$JAVA_HOME/lib/tools.jar
ENV CATALINA_HOME /usr/local/apache-tomcat-8.5.82
ENV CATALINA_BASH /usr/local/apache-tomcat-8.5.82
ENV PATH $PATH:JAVA_HOME/bin:$CATALINA_HOME/bin

EXPOSE 8080

CMD /usr/local/apache-tomcat-8.5.82/bin/startup.sh && tail -F /usr/local/apache-tomcat-8.5.82/logs/catalina.out
3、构建镜像
# docker build -t diytomcat
4、启动镜像
[root@yunwei_test tomcat]# docker run -d -p 9090:8080 --name Mythtomcat -v /home/myth/build/tomcat/test:/usr/local/apache-tomcat-8.5.82/webapps/test -v /home/myth/build/tomcat/tomcatlogs:/usr/local/apache-tomcat-8.5.82/logs diytomcat
5、访问测试
# 测试是否能够正常访问成功
[root@yunwei_test tomcatlogs]# curl localhost:9090

# 测试挂载目录文件是否同步
[root@yunwei_test /]# cd /home/myth/build/tomcat/test/
[root@yunwei_test test]# ls
WEB-INF
[root@yunwei_test test]# docker exec -it b4a6be5d1e00 bash
[root@b4a6be5d1e00 local]# cd apache-tomcat-8.5.82/webapps/test/
[root@b4a6be5d1e00 test]# ls
WEB-INF
发布创建的镜像
DockerHub
1、官方地址:https://hub.docker.com/ 注册账号
2、在服务器上进行登录
[root@yunwei_test test]# docker login --help

Usage:  docker login [OPTIONS] [SERVER]

Log in to a Docker registry.
If no server is specified, the default is defined by the daemon.

Options:
  -p, --password string   Password
      --password-stdin    Take the password from stdin
  -u, --username string   Username

[root@yunwei_test test]# docker login -u myth426
Password:
WARNING! Your password will be stored unencrypted in /root/.docker/config.json.
Configure a credential helper to remove this warning. See
https://docs.docker.com/engine/reference/commandline/login/#credentials-store

Login Succeeded
3、登录完毕即可提交镜像
[root@yunwei_test test]# docker tag 0058b0b0a864 myth/diytomcat:1.0

[root@yunwei_test test]# docker push myth/diytomcat:1.0
阿里云镜像服务
1、登录阿里云
2、找到容器镜像服务
3、创建命名空间
4、创建容器镜像
5、根据阿里云官方介绍进行登录并上传

编写不易,如需转载,请注明出处,谢谢!