【RabbitMQ上手——单实例安装&5种简单模式实现通讯过程】
【RabbitMQ入门-单实例安装&5种简单模式实现通讯过程】
-
- 一、环境说明
- 二、安装RabbitMQ
- 三、用户权限及Virtual Host设置
- 四、5种简单模式实现通讯过程的实现
- 五、小结
一、环境说明
- 安装环境:虚拟机VMWare + Centos7.6 + Maven3.6.3 + JDK1.8
- RabbitMQ版本:rabbitmq-server-3.8.8-1.el7.noarch.rpm
二、安装RabbitMQ
具体安装过程,可参考:CentOS7安装RabbitMQ(rpm包方式)
三、用户权限及Virtual Host设置
-
用户角色创建
RabbitMQ在安装好后,可以访问http://localhost:15672 ;其自带了guest/guest的用户名和密码;如果需要创建自定义用户;那么也可以登录管理界面后,如下操作:

默认情况下,访问RabbitMQ服务的用户名和密码都是"guest",这个账户有限制,默认只能通过本地网络(如localhost)访问,远程网络访问受限,使用默认的用户 guest / guest (此也为管理员用户)登陆,会发现无法登陆,报错:User can only log in via localhost。那是因为默认是限制了guest用户只能在本机登陆,也就是只能登陆localhost:15672。所以在实现生产和消费消息之前,需要另外添加一个用户,并设置相应的访问权限。添加新用户,用户名为"sujiangming",密码为"openGauss@1234",该步骤需要在rabbitmq所在Linux服务器上执行,执行命令如下:rabbitmqctl add_user sujiangming openGauss@1234为root用户设置所有权限,且设置用户为管理员角色,执行如下命令:
rabbitmqctl set_permissions -p / root ".*" ".*" ".*" rabbitmqctl set_user_tags sujiangming administrator超级管理员(administrator):可登陆管理控制台,可查看所有的信息,并且可以对用户,策略(policy)进行操作。监控者(monitoring):可登陆管理控制台,同时可以查看rabbitmq节点的相关信息(进程数,内存使用情况,磁盘使用情况等)策略制定者(policymaker):可登陆管理控制台, 同时可以对policy进行管理。但无法查看节点的相关信息(上图红框标识的部分)。普通管理者(management):仅可登陆管理控制台,无法看到节点信息,也无法对策略进行管理。其他角色:无法登陆管理控制台,通常就是普通的生产者和消费者。
-
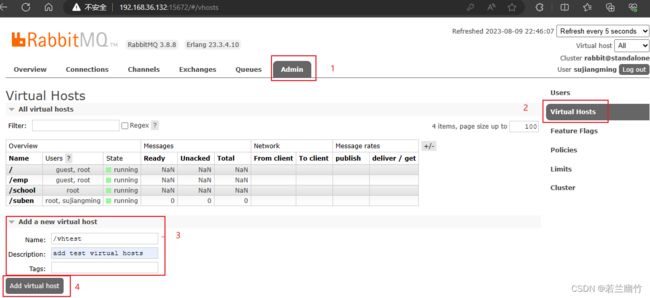
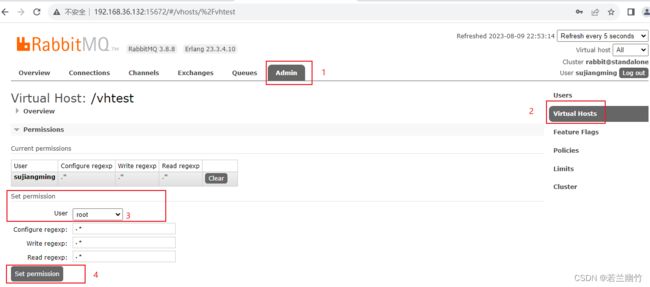
Virtual Host设置
像mysql拥有数据库的概念并且可以指定用户对库和表等操作的权限。RabbitMQ也有类似的权限管理。在RabbitMQ中有
虚拟消息服务器Virtual Host,每个Virtual Hosts相当于一个相对独立的RabbitMQ服务器,每个VirtualHost之间是相互隔离的。exchange、queue、message不能互通。 相当于mysql的db。Virtual Name一般以/开头。
四、5种简单模式实现通讯过程的实现
-
在IDEA中创建maven工程,添加依赖到pom.xml中,项目结构如下图所示;
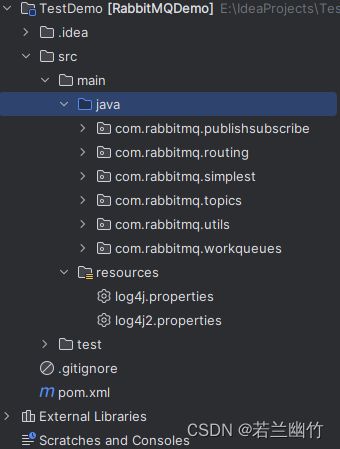
在pom.xml中添加如下内容:<properties> <maven.compiler.source>8</maven.compiler.source> <maven.compiler.target>8</maven.compiler.target> <project.build.sourceEncoding>UTF-8</project.build.sourceEncoding> <amqp-version>5.6.0</amqp-version> <slf4j.version>1.7.25</slf4j.version> </properties> <dependencies> <dependency> <groupId>com.rabbitmq</groupId> <artifactId>amqp-client</artifactId> <version>${amqp-version}</version> </dependency> <dependency> <groupId>org.slf4j</groupId> <artifactId>slf4j-api</artifactId> <version>${slf4j.version}</version> </dependency> <dependency> <groupId>org.slf4j</groupId> <artifactId>slf4j-log4j12</artifactId> <version>${slf4j.version}</version> </dependency> </dependencies>创建com.rabbitmq.utils.CommonUtils工具类,代码如下:
import com.rabbitmq.client.Connection; import com.rabbitmq.client.ConnectionFactory; import java.io.IOException; import java.util.concurrent.TimeoutException; /** * 连接rabbitmq工具类 */ public class ConnectionUtils { public static Connection getConnection() throws IOException, TimeoutException { //1、创建链接工厂对象 ConnectionFactory factory = new ConnectionFactory(); //2、设置RabbitMQ服务主机地址 factory.setHost("192.168.36.132"); //3、设置RabbitMQ服务端口 factory.setPort(5672); //4、设置虚拟主机名字 factory.setVirtualHost("/vhtest"); //5、设置用户连接名 factory.setUsername("sujiangming"); //6、设置链接密码 factory.setPassword("openGauss@1234"); return factory.newConnection(); } } -
第一种:简单模式
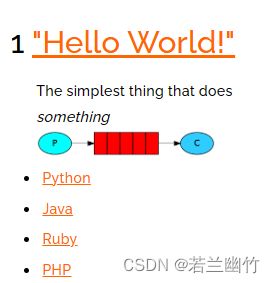
P:生产者,也就是要发送消息的程序
C:消费者:消息的接受者,会一直等待消息到来。
Queue:消息队列,图中红色部分。类似一个邮箱,可以缓存消息;生产者向其中投递消息,消费者从其中取出消息。创建
com.rabbitmq.simplest.SimpleProducer类,代码如下:import com.rabbitmq.client.AMQP; import com.rabbitmq.client.Channel; import com.rabbitmq.client.Connection; import com.rabbitmq.utils.ConnectionUtils; import org.slf4j.Logger; import org.slf4j.LoggerFactory; import java.io.IOException; import java.nio.charset.StandardCharsets; import java.util.concurrent.TimeoutException; /** * //1、创建链接工厂对象-factory=newConnectionFactory() * //2、设置RabbitMQ服务主机地址,默认localhost-factory.setHost("localhost") * //3、设置RabbitMQ服务端口,默认-1-factory.setPort(5672) * //4、设置虚拟主机名字,默认/-factory.setVirtualHost("szitheima") * //5、设置用户连接名,默认guest-factory.setUsername("admin") * //6、设置链接密码,默认guest-factory.setPassword("admin") * //7、创建链接-connection=factory.newConnection() * //8、创建频道-channel=connection.createChannel() * //9、声明队列-channel.queueDeclare(名称,是否持久化,是否独占本连接,是否自动删除,附加参数) * //10、创建消息-Stringm=xxx * //11、消息发送-channel.basicPublish(交换机[默认DefaultExchage],路由key[简单模式可以传递队列名称],消息其它属性,消息内容) * //12、关闭资源-channel.close();connection.close() */ public class SimpleProducer { private static final Logger logger = LoggerFactory.getLogger(SimpleProducer.class); public static void main(String[] args) throws IOException, TimeoutException { Connection connection = ConnectionUtils.getConnection(); Channel channel = connection.createChannel(); //9、声明队列-channel.queueDeclare(名称,是否持久化,是否独占本连接,是否自动删除,附加参数) AMQP.Queue.DeclareOk queueDeclare = channel.queueDeclare("simple_queue",true,false,false,null); System.out.println("=====>>>开始消息发送<<<====="); for (int i = 0; i < 10; i++) { //10、创建消息-Stringm=xxx String message = "我是第"+ i + "消息,我喜欢的数字是:" + i; System.out.println(">>>"+message+"<<<"); //11、消息发送-channel.basicPublish(交换机[默认DefaultExchage],路由key[简单模式可以传递队列名称],消息其它属性,消息内容) channel.basicPublish("","simple_queue",null,message.getBytes(StandardCharsets.UTF_8)); } //12、关闭资源-channel.close(); channel.close(); connection.close(); //13、打印提升信息 System.out.println("=====>>>消息发送结束<<====="); } }创建
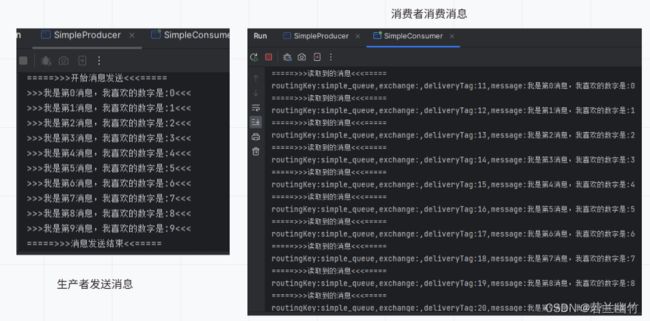
com.rabbitmq.simplest.SimpleConsumer类,代码如下:import com.rabbitmq.client.*; import com.rabbitmq.utils.ConnectionUtils; import org.slf4j.Logger; import org.slf4j.LoggerFactory; import java.io.IOException; import java.nio.charset.StandardCharsets; import java.util.concurrent.TimeoutException; /** * 消费者 */ public class SimpleConsumer { private static final Logger logger = LoggerFactory.getLogger(SimpleConsumer.class); public static void main(String[] args) throws IOException, TimeoutException { logger.debug("info"); // 获取链接 Connection connection = ConnectionUtils.getConnection(); //8、创建频道-channel=connection.createChannel() Channel channel = connection.createChannel(); //9、声明队列-channel.queueDeclare(名称,是否持久化,是否独占本连接,是否自动删除,附加参数) channel.queueDeclare("simple_queue",true,false,false,null); //10、创建消费者 Consumer callback = new DefaultConsumer(channel){ /** * @param consumerTag 消费者标签,在channel.basicConsume时候可以指定 * @param envelope 信封,消息包的内容,可从中获取消息id,消息routingkey,交换机,消息和重传标志(收到消息失败后是否需要重新发送) * @param properties 属性信息(生产者的发送时指定) * @param body 消息内容 * @throws IOException */ @Override public void handleDelivery(String consumerTag, Envelope envelope, AMQP.BasicProperties properties, byte[] body) throws IOException { //路由的key String routingKey = envelope.getRoutingKey(); //获取交换机信息 String exchange = envelope.getExchange(); //获取消息ID long deliveryTag = envelope.getDeliveryTag(); //获取消息信息 String message = new String(body, StandardCharsets.UTF_8); System.out.println("=====>>>读取到的消息<<<====="); System.out.println( "routingKey:" + routingKey + ",exchange:" + exchange + ",deliveryTag:" + deliveryTag + ",message:" + message); } }; //11、消息消费,注意,此处不建议关闭资源,让程序一直处于读取消息 /** * 消息消费 * 参数1:队列名称 * 参数2:是否自动应答,true为自动应答[mq接收到回复会删除消息],设置为false则需要手动应答 * 参数3:消息接收到后回调 */ channel.basicConsume("simple_queue",true,callback); } }运行测试:
-
第二种:Work queues工作队列模式
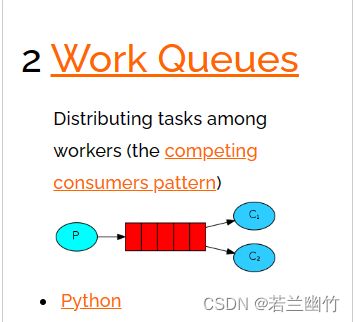
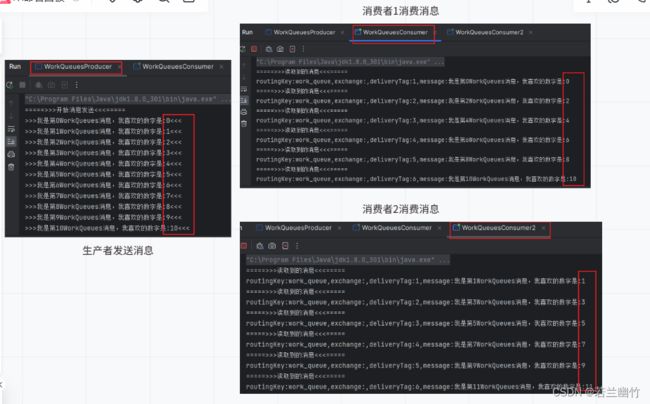
Work Queues与入门程序的简单模式相比,多了一个或一些消费端,多个消费端共同消费同一个队列中的消息。
应用场景:对于任务过重或任务较多情况,使用工作队列模式使用多个消费者可以提高任务处理的速度。
Work Queues特点:在一个队列中如果有多个消费者,那么消费者之间对于同一个消息的关系是竞争的关系。创建生产者
com.rabbitmq.workqueues.WorkQueuesProducer,代码如下:import com.rabbitmq.client.Channel; import com.rabbitmq.client.Connection; import com.rabbitmq.utils.ConnectionUtils; import java.io.IOException; import java.nio.charset.StandardCharsets; import java.util.concurrent.TimeoutException; public class WorkQueuesProducer { public static void main(String[] args) throws IOException, TimeoutException { Connection connection = ConnectionUtils.getConnection(); Channel channel = connection.createChannel(); System.out.println("=====>>>开始消息发送<<<====="); for (int i = 0; i < 100; i++) { //9、声明队列-channel.queueDeclare(名称,是否持久化,是否独占本连接,是否自动删除,附加参数) channel.queueDeclare("work_queue",true,false,false,null); //10、创建消息-Stringm=xxx String message = "我是第"+ i + "WorkQueues消息,我喜欢的数字是:" + i; System.out.println(">>>"+message+"<<<"); //11、消息发送-channel.basicPublish(交换机[默认DefaultExchage],路由key[简单模式可以传递队列名称],消息其它属性,消息内容) channel.basicPublish("","work_queue",null,message.getBytes(StandardCharsets.UTF_8)); } //12、关闭资源-channel.close(); channel.close(); connection.close(); //13、打印提升信息 System.out.println("=====>>>消息发送结束<<====="); } }创建第一个生产者
com.rabbitmq.workqueues.WorkQueuesConsumer,代码如下:import com.rabbitmq.client.*; import com.rabbitmq.utils.ConnectionUtils; import org.slf4j.Logger; import org.slf4j.LoggerFactory; import java.io.IOException; import java.nio.charset.StandardCharsets; import java.util.concurrent.TimeoutException; public class WorkQueuesConsumer { private static final Logger logger = LoggerFactory.getLogger(WorkQueuesConsumer.class); public static final String WORK_QUEUES_NAME="work_queue"; public static void main(String[] args) throws IOException, TimeoutException { logger.debug("info"); // 获取链接 Connection connection = ConnectionUtils.getConnection(); //8、创建频道-channel=connection.createChannel() Channel channel = connection.createChannel(); //9、声明队列-channel.queueDeclare(名称,是否持久化,是否独占本连接,是否自动删除,附加参数) channel.queueDeclare(WORK_QUEUES_NAME,true,false,false,null); //10、创建消费者 Consumer callback = new DefaultConsumer(channel){ @Override public void handleDelivery(String consumerTag, Envelope envelope, AMQP.BasicProperties properties, byte[] body) throws IOException { //路由的key String routingKey = envelope.getRoutingKey(); //获取交换机信息 String exchange = envelope.getExchange(); //获取消息ID long deliveryTag = envelope.getDeliveryTag(); //获取消息信息 String message = new String(body, StandardCharsets.UTF_8); System.out.println("=====>>>读取到的消息<<<====="); System.out.println( "routingKey:" + routingKey + ",exchange:" + exchange + ",deliveryTag:" + deliveryTag + ",message:" + message); } }; //11、消息消费,注意,此处不建议关闭资源,让程序一直处于读取消息 channel.basicConsume(WORK_QUEUES_NAME,true,callback); } }创建第二个生产者
com.rabbitmq.workqueues.WorkQueuesConsumer2,代码如下:import com.rabbitmq.client.*; import com.rabbitmq.utils.ConnectionUtils; import org.slf4j.Logger; import org.slf4j.LoggerFactory; import java.io.IOException; import java.nio.charset.StandardCharsets; import java.util.concurrent.TimeoutException; public class WorkQueuesConsumer2 { private static final Logger logger = LoggerFactory.getLogger(WorkQueuesConsumer2.class); public static final String WORK_QUEUES_NAME="work_queue"; public static void main(String[] args) throws IOException, TimeoutException { logger.debug("info"); // 获取链接 Connection connection = ConnectionUtils.getConnection(); //8、创建频道-channel=connection.createChannel() Channel channel = connection.createChannel(); //9、声明队列-channel.queueDeclare(名称,是否持久化,是否独占本连接,是否自动删除,附加参数) channel.queueDeclare(WORK_QUEUES_NAME,true,false,false,null); //10、创建消费者 Consumer callback = new DefaultConsumer(channel){ @Override public void handleDelivery(String consumerTag, Envelope envelope, AMQP.BasicProperties properties, byte[] body) throws IOException { //路由的key String routingKey = envelope.getRoutingKey(); //获取交换机信息 String exchange = envelope.getExchange(); //获取消息ID long deliveryTag = envelope.getDeliveryTag(); //获取消息信息 String message = new String(body, StandardCharsets.UTF_8); System.out.println("=====>>>读取到的消息<<<====="); System.out.println( "routingKey:" + routingKey + ",exchange:" + exchange + ",deliveryTag:" + deliveryTag + ",message:" + message); } }; //11、消息消费,注意,此处不建议关闭资源,让程序一直处于读取消息 channel.basicConsume(WORK_QUEUES_NAME,true,callback); } } -
第三种:Publish&Subscribe发布订阅模式
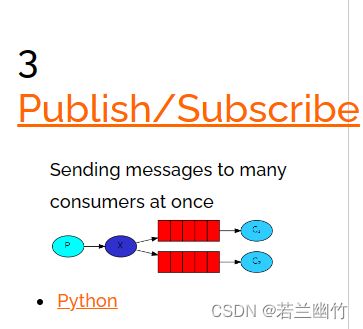
在发布订阅模型中,多了一个x(exchange)角色,而且过程略有变化。
P:生产者,也就是要发送消息的程序,但是不再发送到队列中,而是发给X(交换机)
C:消费者,消息的接受者,会一直等待消息到来。
Queue:消息队列,接收消息、缓存消息。
Exchange:交换机,图中的X。一方面,接收生产者发送的消息。另一方面,知道如何处理消息,例如递交给某个特别队列、递交给所有队列、或是将消息丢弃。到底如何操作,取决于Exchange的类型。Exchange有常见以下3种类型:
Fanout:广播,将消息交给所有绑定到交换机的队列
Direct:定向,把消息交给符合指定routing key 的队列
Topic:通配符,把消息交给符合routing pattern(路由模式) 的队列
Exchange(交换机)只负责转发消息,不具备存储消息的能力,因此如果没有任何队列与Exchange绑定,或者没有符合路由规则的队列,那么消息会丢失!创建生产者
com.rabbitmq.publishsubscribe.FanoutProducer,代码如下:import com.rabbitmq.client.BuiltinExchangeType; import com.rabbitmq.client.Channel; import com.rabbitmq.client.Connection; import com.rabbitmq.utils.ConnectionUtils; import java.io.IOException; import java.nio.charset.StandardCharsets; import java.util.concurrent.TimeoutException; public class FanoutProducer { public static final String EXCHANGE_NAME = "fanout_exchange"; public static void main(String[] args) throws IOException, TimeoutException { Connection connection = ConnectionUtils.getConnection(); Channel channel = connection.createChannel(); //9、声明交换机 channel.exchangeDeclare(EXCHANGE_NAME, BuiltinExchangeType.FANOUT); System.out.println("=====>>>开始消息发送<<<====="); for (int i = 10; i < 100; i++) { //10、创建消息-Stringm=xxx String message = "我是第 【"+ i + "】 fanout_exchange 消息,我喜欢的数字是: " + i; System.out.println(">>>"+message+"<<<"); //11、消息发送-channel.basicPublish(交换机[默认DefaultExchage],路由key[简单模式可以传递队列名称],消息其它属性,消息内容) channel.basicPublish(EXCHANGE_NAME,"",null,message.getBytes(StandardCharsets.UTF_8)); } //12、关闭资源-channel.close(); channel.close(); connection.close(); //13、打印提升信息 System.out.println("=====>>>消息发送结束<<====="); } }创建第一个消费者
com.rabbitmq.publishsubscribe.FanoutConsumer01,代码如下:import com.rabbitmq.client.*; import com.rabbitmq.utils.ConnectionUtils; import org.slf4j.Logger; import org.slf4j.LoggerFactory; import java.io.IOException; import java.nio.charset.StandardCharsets; import java.util.concurrent.TimeoutException; public class FanoutConsumer01 { private static final Logger logger = LoggerFactory.getLogger(FanoutConsumer01.class); public static final String QUEUES_NAME="fanout_queue1"; public static final String EXCHANGE_NAME = "fanout_exchange"; public static void main(String[] args) throws IOException, TimeoutException { logger.debug("info"); // 获取链接 Connection connection = ConnectionUtils.getConnection(); //8、创建频道-channel=connection.createChannel() Channel channel = connection.createChannel(); //9、声明队列-channel.queueDeclare(名称,是否持久化,是否独占本连接,是否自动删除,附加参数) channel.queueDeclare(QUEUES_NAME,true,false,false,null); //10、绑定队列到交换机: channel.queueBind(队列名, 交换机名, 路由key[广播消息设置为空串]) channel.queueBind(QUEUES_NAME,EXCHANGE_NAME,""); //10、创建消费者 Consumer callback = new DefaultConsumer(channel){ @Override public void handleDelivery(String consumerTag, Envelope envelope, AMQP.BasicProperties properties, byte[] body) throws IOException { //路由的key String routingKey = envelope.getRoutingKey(); //获取交换机信息 String exchange = envelope.getExchange(); //获取消息ID long deliveryTag = envelope.getDeliveryTag(); //获取消息信息 String message = new String(body, StandardCharsets.UTF_8); System.out.println( "routingKey:" + routingKey + ",exchange:" + exchange + ",deliveryTag:" + deliveryTag + ",message:" + message); } }; //11、消息消费,注意,此处不建议关闭资源,让程序一直处于读取消息 channel.basicConsume(QUEUES_NAME,true,callback); } }创建第二个消费者
com.rabbitmq.publishsubscribe.FanoutConsumer02,代码如下:import com.rabbitmq.client.*; import com.rabbitmq.utils.ConnectionUtils; import org.slf4j.Logger; import org.slf4j.LoggerFactory; import java.io.IOException; import java.nio.charset.StandardCharsets; import java.util.concurrent.TimeoutException; public class FanoutConsumer02 { private static final Logger logger = LoggerFactory.getLogger(FanoutConsumer02.class); public static final String QUEUES_NAME="fanout_queue2"; public static final String EXCHANGE_NAME = "fanout_exchange"; public static void main(String[] args) throws IOException, TimeoutException { // 获取链接 Connection connection = ConnectionUtils.getConnection(); //8、创建频道-channel=connection.createChannel() Channel channel = connection.createChannel(); //9、声明队列-channel.queueDeclare(名称,是否持久化,是否独占本连接,是否自动删除,附加参数) channel.queueDeclare(QUEUES_NAME,true,false,false,null); //10、绑定队列到交换机: channel.queueBind(队列名, 交换机名, 路由key[广播消息设置为空串]) channel.queueBind(QUEUES_NAME,EXCHANGE_NAME,""); //10、创建消费者 Consumer callback = new DefaultConsumer(channel){ @Override public void handleDelivery(String consumerTag, Envelope envelope, AMQP.BasicProperties properties, byte[] body) throws IOException { //路由的key String routingKey = envelope.getRoutingKey(); //获取交换机信息 String exchange = envelope.getExchange(); //获取消息ID long deliveryTag = envelope.getDeliveryTag(); //获取消息信息 String message = new String(body, StandardCharsets.UTF_8); System.out.println( "routingKey:" + routingKey + ",exchange:" + exchange + ",deliveryTag:" + deliveryTag + ",message:" + message); } }; //11、消息消费,注意,此处不建议关闭资源,让程序一直处于读取消息 channel.basicConsume(QUEUES_NAME,true,callback); } }注意:
绑定交换机的前提是得先有这个交换机,所以得先执行一次生产者,如果没有这个交换机就执行消费者绑定交换机的话会报错.执行完两个消费者再执行生产者后,就会看到两个消费者都消费这一条消息了。运行测试:启动所有消费者,然后使用生产者发送消息;在每个消费者对应的控制台可以查看到生产者发送的所有消息;到达广播的效果。
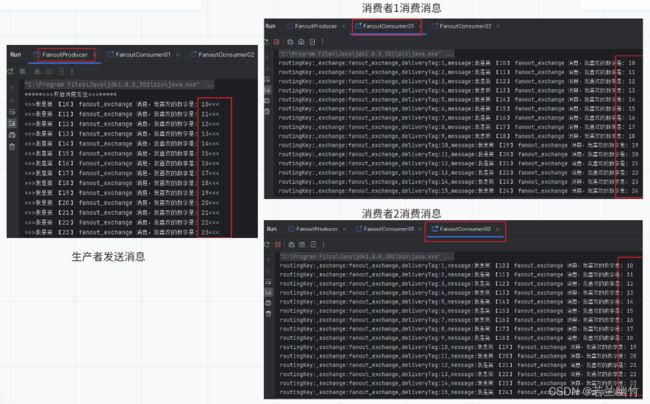
测试结论:交换机需要与队列进行绑定,绑定之后;一个消息可以被多个消费者都收到。
发布订阅模式与work队列模式的区别
1、work队列模式不用定义交换机,而发布/订阅模式需要定义交换机。
2、发布/订阅模式的生产方是面向交换机发送消息,work队列模式的生产方是面向队列发送消息(底层使用默认交换机)。
3、发布/订阅模式的消费者需要设置队列和交换机的绑定,work队列模式不需要设置,实际上work队列模式会将队列绑 定到默认的交换机 。 -
第四种:Routing路由模式
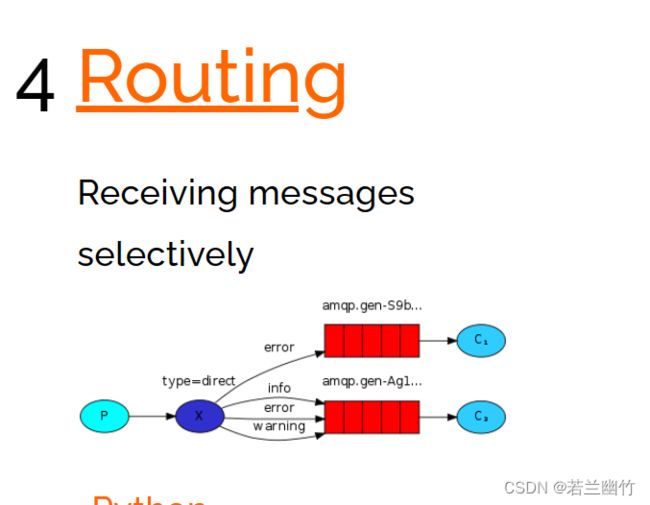
P:生产者,向Exchange发送消息,发送消息时,会指定一个routing key。
X:Exchange(交换机),接收生产者的消息,然后把消息递交给 与routing key完全匹配的队列
C1:消费者,其所在队列指定了需要routing key 为 error 的消息
C2:消费者,其所在队列指定了需要routing key 为 info、error、warning 的消息
路由模式特点:
1.队列与交换机的绑定,不能是任意绑定了,而是要指定一个RoutingKey(路由key)
2.消息的发送方在 向 Exchange发送消息时,也必须指定消息的 RoutingKey。
3.Exchange不再把消息交给每一个绑定的队列,而是根据消息的Routing Key进行判断,只有队列的Routingkey与消息的 Routing key完全一致,才会接收到消息创建生产者
com.rabbitmq.routing.RoutingProducer,代码如下:import com.rabbitmq.client.BuiltinExchangeType; import com.rabbitmq.client.Channel; import com.rabbitmq.client.Connection; import com.rabbitmq.utils.ConnectionUtils; import java.io.IOException; import java.nio.charset.StandardCharsets; import java.util.concurrent.TimeoutException; public class RoutingProducer { public static final String EXCHANGE_NAME = "routing_exchange"; public static final String ROUTING_LOG_ERROR = "log.error"; public static final String ROUTING_LOG_INFO = "log.info"; public static final String ROUTING_LOG_WARNING= "log.warning"; public static void main(String[] args) throws IOException, TimeoutException { Connection connection = ConnectionUtils.getConnection(); Channel channel = connection.createChannel(); //9、声明交换机 channel.exchangeDeclare(EXCHANGE_NAME, BuiltinExchangeType.DIRECT); System.out.println("=====>>>开始消息发送<<<====="); for (int i = 100; i < 1000; i++) { String routingKey = ""; //发送消息的时候根据相关逻辑指定相应的routing key。 switch (i%3){ case 0: //假设i=0,为error消息 routingKey = ROUTING_LOG_ERROR; break; case 1: //假设i=1,为info消息 routingKey = ROUTING_LOG_INFO; break; case 2: //假设i=2,为warning消息 routingKey = ROUTING_LOG_WARNING; break; } //10、创建消息-Stringm=xxx String message = "我是第 【"+ i + "】 "+ EXCHANGE_NAME +" 消息,我喜欢的数字是: " + i; System.out.println(">>>"+message+"<<<"); //11、消息发送-channel.basicPublish(交换机[默认DefaultExchage],路由key[简单模式可以传递队列名称],消息其它属性,消息内容) channel.basicPublish(EXCHANGE_NAME,routingKey,null,message.getBytes(StandardCharsets.UTF_8)); } //12、关闭资源-channel.close(); channel.close(); connection.close(); //13、打印提升信息 System.out.println("=====>>>消息发送结束<<====="); } }创建第一个消费者
com.rabbitmq.routing.RoutingConsumer01,代码如下:import com.rabbitmq.client.*; import com.rabbitmq.utils.ConnectionUtils; import org.slf4j.Logger; import org.slf4j.LoggerFactory; import java.io.IOException; import java.nio.charset.StandardCharsets; import java.util.concurrent.TimeoutException; public class RoutingConsumer01 { private static final Logger logger = LoggerFactory.getLogger(RoutingConsumer01.class); public static final String QUEUES_NAME="routing_queue1"; public static final String EXCHANGE_NAME = RoutingProducer.EXCHANGE_NAME; public static void main(String[] args) throws IOException, TimeoutException { logger.debug("info"); // 获取链接 Connection connection = ConnectionUtils.getConnection(); //8、创建频道-channel=connection.createChannel() Channel channel = connection.createChannel(); //9、声明队列-channel.queueDeclare(名称,是否持久化,是否独占本连接,是否自动删除,附加参数) channel.queueDeclare(QUEUES_NAME,true,false,false,null); //10、绑定队列到交换机: channel.queueBind(队列名, 交换机名, 路由key[广播消息设置为空串]) channel.queueBind(QUEUES_NAME,EXCHANGE_NAME,RoutingProducer.ROUTING_LOG_ERROR); //10、创建消费者 Consumer callback = new DefaultConsumer(channel){ @Override public void handleDelivery(String consumerTag, Envelope envelope, AMQP.BasicProperties properties, byte[] body) throws IOException { //路由的key String routingKey = envelope.getRoutingKey(); //获取交换机信息 String exchange = envelope.getExchange(); //获取消息ID long deliveryTag = envelope.getDeliveryTag(); //获取消息信息 String message = new String(body, StandardCharsets.UTF_8); System.out.println( "routingKey: " + routingKey + " ,exchange: " + exchange + " ,deliveryTag: " + deliveryTag + " ,message: " + message); } }; //11、消息消费,注意,此处不建议关闭资源,让程序一直处于读取消息 channel.basicConsume(QUEUES_NAME,true,callback); } }创建第二个消费者
com.rabbitmq.routing.RoutingConsumer02,代码如下:import com.rabbitmq.client.*; import com.rabbitmq.utils.ConnectionUtils; import org.slf4j.Logger; import org.slf4j.LoggerFactory; import java.io.IOException; import java.nio.charset.StandardCharsets; import java.util.concurrent.TimeoutException; public class RoutingConsumer02 { private static final Logger logger = LoggerFactory.getLogger(RoutingConsumer02.class); public static final String QUEUES_NAME="routing_queue2"; public static final String EXCHANGE_NAME = RoutingProducer.EXCHANGE_NAME; public static void main(String[] args) throws IOException, TimeoutException { logger.debug("info"); // 获取链接 Connection connection = ConnectionUtils.getConnection(); //8、创建频道-channel=connection.createChannel() Channel channel = connection.createChannel(); //9、声明队列-channel.queueDeclare(名称,是否持久化,是否独占本连接,是否自动删除,附加参数) channel.queueDeclare(QUEUES_NAME,true,false,false,null); //10、绑定队列到交换机: channel.queueBind(队列名, 交换机名, 路由key[广播消息设置为空串]) channel.queueBind(QUEUES_NAME,EXCHANGE_NAME,RoutingProducer.ROUTING_LOG_ERROR); channel.queueBind(QUEUES_NAME,EXCHANGE_NAME,RoutingProducer.ROUTING_LOG_INFO); channel.queueBind(QUEUES_NAME,EXCHANGE_NAME,RoutingProducer.ROUTING_LOG_WARNING); //10、创建消费者 Consumer callback = new DefaultConsumer(channel){ @Override public void handleDelivery(String consumerTag, Envelope envelope, AMQP.BasicProperties properties, byte[] body) throws IOException { //路由的key String routingKey = envelope.getRoutingKey(); //获取交换机信息 String exchange = envelope.getExchange(); //获取消息ID long deliveryTag = envelope.getDeliveryTag(); //获取消息信息 String message = new String(body, StandardCharsets.UTF_8); System.out.println( "routingKey: " + routingKey + " ,exchange: " + exchange + " ,deliveryTag: " + deliveryTag + " ,message: " + message); } }; //11、消息消费,注意,此处不建议关闭资源,让程序一直处于读取消息 channel.basicConsume(QUEUES_NAME,true,callback); } }运行测试:启动所有消费者,然后使用生产者发送消息;在消费者对应的控制台可以查看到生产者发送对应routing key,对应队列的消息;到达按照需要接收的效果。
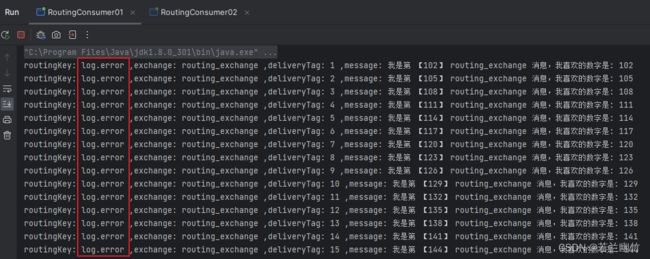
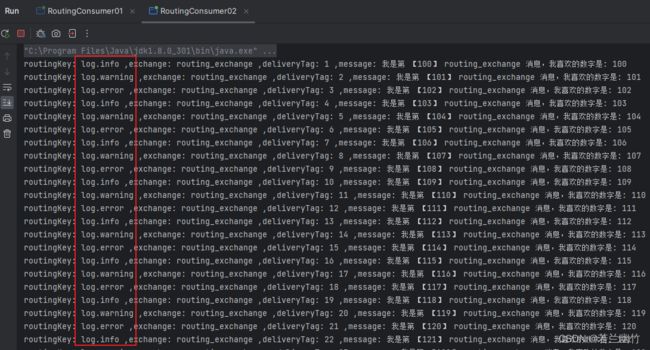
测试结论:Routing模式要求队列在绑定交换机时要指定routing key,消息会转发到符合routing key的队列。
-
第五种:Topics主题模式
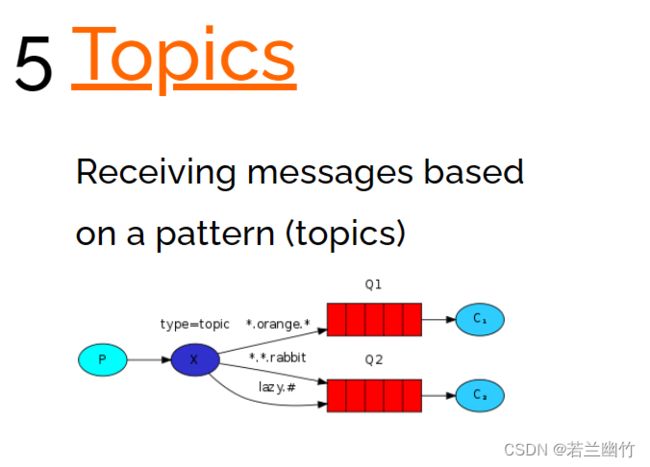
Topic类型与Direct相比,都是可以根据RoutingKey把消息路由到不同的队列。只不过Topic类型Exchange可以让队列在绑定Routing key的时候使用通配符!
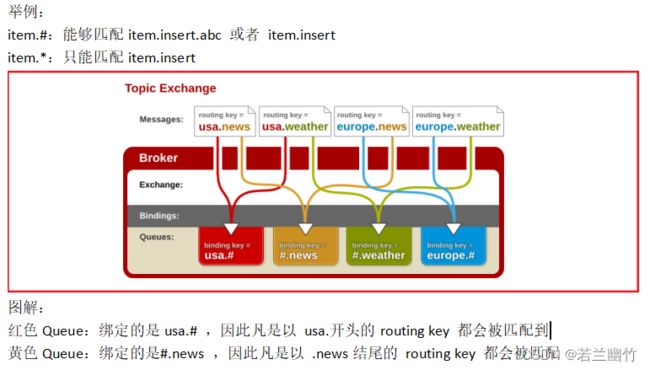
Routingkey 一般都是有一个或多个单词组成,多个单词之间以“ . ”分割,例如: item.insert
通配符规则:
#:匹配一个或多个词
*:匹配不多不少恰好1个词
创建生产者
com.rabbitmq.topics.TopicProducer,代码如下:import com.rabbitmq.client.BuiltinExchangeType; import com.rabbitmq.client.Channel; import com.rabbitmq.client.Connection; import com.rabbitmq.utils.ConnectionUtils; import java.io.IOException; import java.nio.charset.StandardCharsets; import java.util.concurrent.TimeoutException; public class TopicProducer { public static final String EXCHANGE_NAME = "topic_exchange"; public static final String ROUTING_LOG_ERROR = "log.error"; public static final String ROUTING_LOG_INFO = "log.info"; public static final String ROUTING_LOG_INFO_ADD = "log.info.add"; public static final String ROUTING_LOG_INFO_UPDATE = "log.info.update"; public static final String ROUTING_LOG_WARNING= "log.warning"; public static void main(String[] args) throws IOException, TimeoutException { Connection connection = ConnectionUtils.getConnection(); Channel channel = connection.createChannel(); //9、声明交换机 channel.exchangeDeclare(EXCHANGE_NAME, BuiltinExchangeType.TOPIC); System.out.println("=====>>>开始消息发送<<<====="); for (int i = 0; i < 100; i++) { String routingKey = ""; //发送消息的时候根据相关逻辑指定相应的routing key。 switch (i%5){ case 0: //假设i=0,为error消息 routingKey = ROUTING_LOG_ERROR; break; case 1: //假设i=1,为info消息 routingKey = ROUTING_LOG_INFO; break; case 2: //假设i=2,为warning消息 routingKey = ROUTING_LOG_WARNING; break; case 3: //假设i=3,为log.info.add消息 routingKey = ROUTING_LOG_INFO_ADD; break; case 4: //假设i=4,为log.info.update消息 routingKey = ROUTING_LOG_INFO_UPDATE; break; } //10、创建消息-Stringm=xxx String message = "我是第 【"+ i + "】 "+ EXCHANGE_NAME +" 消息,我喜欢的数字是: " + i; System.out.println(">>>"+message+"<<<"); //11、消息发送-channel.basicPublish(交换机[默认DefaultExchage],路由key[简单模式可以传递队列名称],消息其它属性,消息内容) channel.basicPublish(EXCHANGE_NAME,routingKey,null,message.getBytes(StandardCharsets.UTF_8)); } //12、关闭资源-channel.close(); channel.close(); connection.close(); //13、打印提升信息 System.out.println("=====>>>消息发送结束<<====="); } }创建第一个消费者
com.rabbitmq.topics.TopicConsumer01,代码如下:import com.rabbitmq.client.*; import com.rabbitmq.utils.ConnectionUtils; import org.slf4j.Logger; import org.slf4j.LoggerFactory; import java.io.IOException; import java.nio.charset.StandardCharsets; import java.util.concurrent.TimeoutException; public class TopicConsumer01 { private static final Logger logger = LoggerFactory.getLogger(TopicConsumer01.class); public static final String QUEUES_NAME="topic_queue1"; public static final String EXCHANGE_NAME = TopicProducer.EXCHANGE_NAME; public static void main(String[] args) throws IOException, TimeoutException { logger.debug("info"); // 获取链接 Connection connection = ConnectionUtils.getConnection(); //8、创建频道-channel=connection.createChannel() Channel channel = connection.createChannel(); //9、声明队列-channel.queueDeclare(名称,是否持久化,是否独占本连接,是否自动删除,附加参数) channel.queueDeclare(QUEUES_NAME,true,false,false,null); //10、绑定队列到交换机: channel.queueBind(队列名, 交换机名, 路由key[广播消息设置为空串]) topic支持通配符方式 // log.* 表示匹配log.后面一个,如log.error,log.info等 channel.queueBind(QUEUES_NAME,EXCHANGE_NAME,"log.*"); //10、创建消费者 Consumer callback = new DefaultConsumer(channel){ @Override public void handleDelivery(String consumerTag, Envelope envelope, AMQP.BasicProperties properties, byte[] body) throws IOException { //路由的key String routingKey = envelope.getRoutingKey(); //获取交换机信息 String exchange = envelope.getExchange(); //获取消息ID long deliveryTag = envelope.getDeliveryTag(); //获取消息信息 String message = new String(body, StandardCharsets.UTF_8); System.out.println( "routingKey: " + routingKey + " ,exchange: " + exchange + " ,deliveryTag: " + deliveryTag + " ,message: " + message); } }; //11、消息消费,注意,此处不建议关闭资源,让程序一直处于读取消息 channel.basicConsume(QUEUES_NAME,true,callback); } }创建第二个消费者
com.rabbitmq.topics.TopicConsumer01,代码如下:import com.rabbitmq.client.*; import com.rabbitmq.utils.ConnectionUtils; import org.slf4j.Logger; import org.slf4j.LoggerFactory; import java.io.IOException; import java.nio.charset.StandardCharsets; import java.util.concurrent.TimeoutException; public class TopicConsumer02 { private static final Logger logger = LoggerFactory.getLogger(TopicConsumer02.class); public static final String QUEUES_NAME="topic_queue2"; public static final String EXCHANGE_NAME = TopicProducer.EXCHANGE_NAME; public static void main(String[] args) throws IOException, TimeoutException { logger.debug("info"); // 获取链接 Connection connection = ConnectionUtils.getConnection(); //8、创建频道-channel=connection.createChannel() Channel channel = connection.createChannel(); //9、声明队列-channel.queueDeclare(名称,是否持久化,是否独占本连接,是否自动删除,附加参数) channel.queueDeclare(QUEUES_NAME,true,false,false,null); //10、绑定队列到交换机: channel.queueBind(队列名, 交换机名, 路由key[广播消息设置为空串]) topic支持通配符方式 // log.# 表示匹配log.后面一个或者多个词,如log.info,log.info.add等 channel.queueBind(QUEUES_NAME,EXCHANGE_NAME,"log.#"); //10、创建消费者 Consumer callback = new DefaultConsumer(channel){ @Override public void handleDelivery(String consumerTag, Envelope envelope, AMQP.BasicProperties properties, byte[] body) throws IOException { //路由的key String routingKey = envelope.getRoutingKey(); //获取交换机信息 String exchange = envelope.getExchange(); //获取消息ID long deliveryTag = envelope.getDeliveryTag(); //获取消息信息 String message = new String(body, StandardCharsets.UTF_8); System.out.println( "routingKey: " + routingKey + " ,exchange: " + exchange + " ,deliveryTag: " + deliveryTag + " ,message: " + message); } }; //11、消息消费,注意,此处不建议关闭资源,让程序一直处于读取消息 channel.basicConsume(QUEUES_NAME,true,callback); } }运行测试:启动所有消费者,然后使用生产者发送消息;在消费者对应的控制台可以查看到生产者发送对应routing key对应队列的消息;到达按照需要接收的效果。
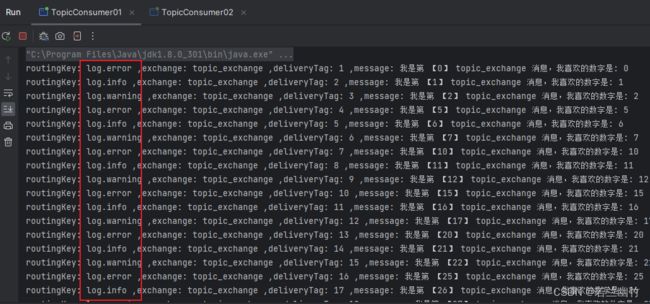
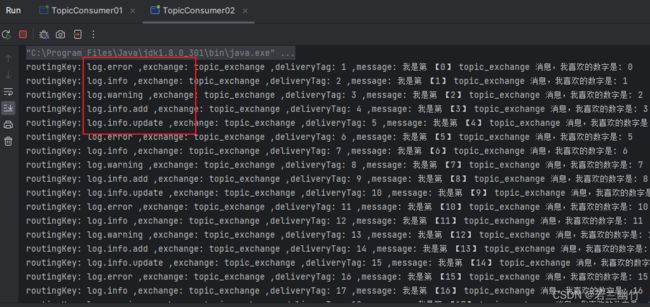
测试小结:Topic主题模式可以实现 Publish/Subscribe发布订阅模式 和 Routing路由模式 的双重功能;只是Topic在配置routing key 的时候可以使用通配符,显得更加灵活。
五、小结
- RabbitMQ五种工作模式小结:
1、简单模式 HelloWorld
一个生产者、一个消费者,不需要设置交换机(使用默认的交换机)
2、工作队列模式 Work Queue
一个生产者、多个消费者(竞争关系),不需要设置交换机(使用默认的交换机)
3、发布订阅模式 Publish/subscribe
需要设置类型为fanout的交换机,并且交换机和队列进行绑定,当发送消息到交换机后,交换机会将消息发送到绑定的队列
4、路由模式 Routing
需要设置类型为direct的交换机,交换机和队列进行绑定,并且指定routing key,当发送消息到交换机后,交换机会根据routing key将消息发送到对应的队列
5、通配符模式 Topic
需要设置类型为topic的交换机,交换机和队列进行绑定,并且指定通配符方式的routing key,当发送消息到交换机后,交换机会根据routing key将消息发送到对应的队列 - 学习资料总结
本文参考了来自网络上的资料,如有侵权,请及时联系博主进行删除。本文仅是博主本人在学习过程中作为学习笔记使用,常言道:好记性不如烂笔头。如本文对您有所帮助,请您动动发财的手指给博主点个赞,谢谢您的阅读~~~

