【C++模板进阶】
目录
- 一、模板使用时的一个小注意点
- 二、非类型模板参数
- 三、类模板的特化
-
- 3.1函数模板的特化
- 3.2类模板的特化
-
- 3.2.1全特化
- 3.2.2偏特化
- 四、模板的分离编译
-
- 4.1模板不支持分离编译
- 4.2模板分离编译报错的分析
- 4.2解决方案
- 五、模板的总结
一、模板使用时的一个小注意点
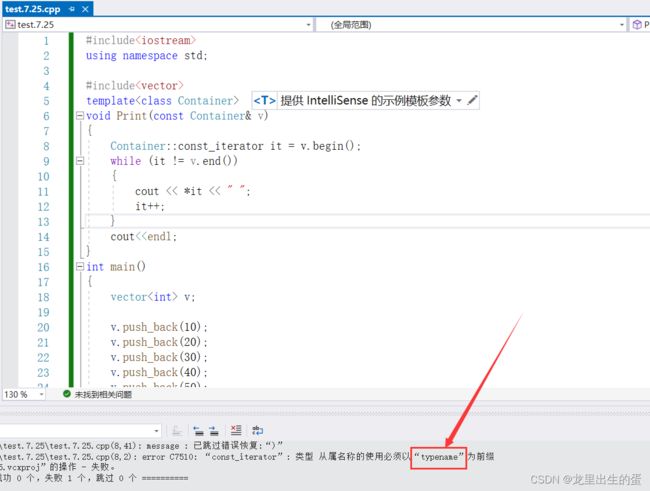
在使用模板时,在有些场景下需要加上typename来告诉编译器这里是类型,否则会编译不通过。如:我想写一个不只是针对vector类型打印数据该怎么改写上面的代码呢?
#include首先对于泛型编程的思想一般都会考虑到用模板,所以一般我们都会这么改写代码。如:
#include但是呢这种代码连编译都通过不了。如:

为什呢?
其实是编译器不知道Container::const_iterator这个是类型还是对象
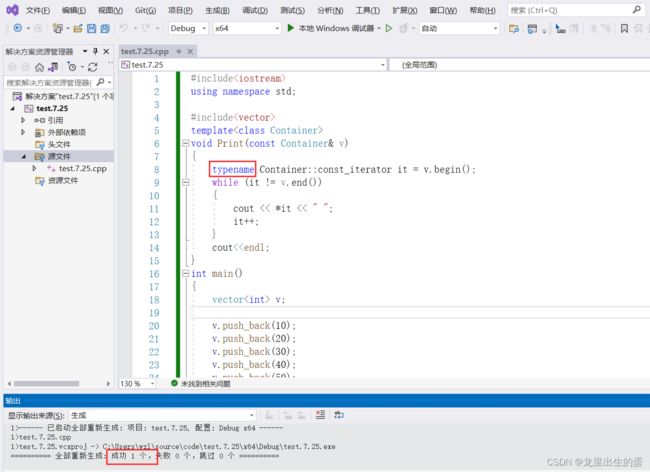
需要在前面加上typename告诉编译器这个是类型,等模板实例化后再去找。如:

二、非类型模板参数
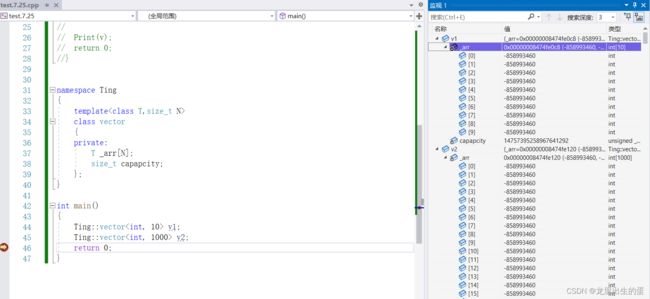
假设有这样一个场景,我需要创建2个静态的顺序表。一个顺序表的容量是10个,另一个是1000个,该怎么玩呢?按照常规的方法肯定是玩不了的,这时就需要非类型模板参数了。可以这么玩。如:
namespace Ting
{
	template<class T,size_t N>
	class vector
	{
	private:
		T _arr[N];
		size_t capapcity;
	};
}

int main()
{
	Ting::vector<int, 10> v1;
	Ting::vector<int, 1000> v2;
	return 0;
}
- 浮点数、类对象以及字符串是不允许作为非类型模板参数的。
- 非类型的模板参数必须在编译期就能确认结果且不能被修改。
三、类模板的特化
3.1函数模板的特化
直接先看代码,见一见猪跑。
//函数模板的特化
template<class T>
bool Less(T x, T y)
{
	return x < y;
}

//对函数模板进行特化
template<>
bool Less<int*>(int* x, int* y)
{
	return *x < *y;
}
int main()
{
	int a = 2, b = 1;
	cout << Less(&a, &b) << endl;
	return 0;
}
乍一看是不是感觉函数模板特化有点与函数重载类似?感觉这个没啥用,但是这个是错觉。如:
//函数模板的特化
template<class T>
bool Less(T x, T y)
{
	return x < y;
}

//对函数模板进行特化
template<class T>
bool Less(T* x, T* y)
{
	return *x < *y;
}
int main()
{
	int a = 2, b = 1;
	double c = 2.1, d = 2.2;

	cout << Less(&a, &b) << endl;
	cout << Less(&c, &d) << endl;
	return 0;
}
这种写法比函数重载要方便多了。
函数模板的特化步骤:
- 必须要先有一个基础的函数模板
- 关键字template后面接一对空的尖括号<>
- 函数名后跟一对尖括号,尖括号中指定需要特化的类型
- 函数形参表: 必须要和模板函数的基础参数类型完全相同,如果不同编译器可能会报一些奇怪的错误。
3.2类模板的特化
类模板的特化的步骤:
1.必须要有基础的类模板
2.关键字template后面接一对空的尖括号<>
3.类名后跟一对尖括号<>,尖括号中指定需要特化的类型。
类模板的特化分为:全特化和偏特化
3.2.1全特化
全特化即是将模板参数列表中所有的参数都确定化。
//函数模板的全特化
template<class T1,class T2>
class Ting
{
public:
	Ting()
	{
		cout << "Ting" << endl;
	}
};
template<>
class Ting<int,char>
{
public:
	Ting()
	{
		cout << "Ting" << endl;
	}
};
template<>
class Ting<double, char>
{
public:
	Ting()
	{
		cout << "Ting" << endl;
	}
};

int main()
{
	Ting<int, float> zft01;
	Ting<double, char> zft02;
	Ting<int, char> zft03;
	Ting<float, int> zft04;
	return 0;
}
3.2.2偏特化
//函数模板的偏特化
template<class T1, class T2>
class Ting
{
public:
	Ting()
	{
		cout << "Ting" << endl;
	}
};

template<class T1>
class Ting<T1,int>
{
public:
	Ting()
	{
		cout << "Ting" << endl;
	}
};

template<class T1>
class Ting<T1, double>
{
public:
	Ting()
	{
		cout << "Ting" << endl;
	}
};

//还可以对某种类型参数做进一步限制 如:
template<class T1,class T2>
class Ting<T1*,T2*>
{
public:
	Ting()
	{
		cout << "Ting" << endl;
	}
};

template<class T1, class T2>
class Ting<T1&, T2&>
{
public:
	Ting()
	{
		cout << "Ting" << endl;
	}
};

int main()
{
	return 0;
}
四、模板的分离编译
4.1模板不支持分离编译
比如有这样一个Add函数。如:
.h文件
#pragma once
template<class T>
T Add(T x, T y);
.cpp文件
#include"Add.h"

template<class T>
T Add(T x, T y)
{
	return x + y;
}
测试文件
//模板的分离编译
#include"Add.h"
int main()
{
	cout << Add(1, 2) << endl;
	return 0;
}
4.2模板分离编译报错的分析
为什么会这样呢?
分析:
C/C++程序要运行,一般要经历一下步骤:
预处理—>编译—>汇编—>链接
编译:对程序按照语言特性进行词法、语法、语义分析,错误检查无误后生成汇编代码。注意头文件不参与编译,编译器对工程中的多个源文件是分离开单独编译的。
链接:将多个obj文件合成一个,并处理没有解决的地址问题。

4.2解决方案
第一种方法:显示实例化
.cpp文件
#include"Add.h"

template<class T>
T Add(T x, T y)
{
	return x + y;
}

//显示实例化
template
int Add(int x,int y);
int Add(double x, double y);
(以上的方法不推荐)
第二种方法:将声明和定义放到一个文件 “xxx.hpp” 里面或者xxx.h其实也是可以的。推荐使用这种。
五、模板的总结
【优点】
- 模板复用了代码,节省资源,更快的迭代开发,C++的标准模板库(STL)因此而产生
- 增强了代码的灵活性
【缺陷】 - 模板会导致代码膨胀问题,也会导致编译时间变长
- 出现模板编译错误时,错误信息非常凌乱,不易定位错误

