B057-spring增强 依赖注入 AOP 代理模式 创建Bean
目录
-
-
- AOP
-
- 概念
- 代理模式引出
- AOP实现方式
-
- xml方式实现
- 注解方式实现
-
AOP
概念
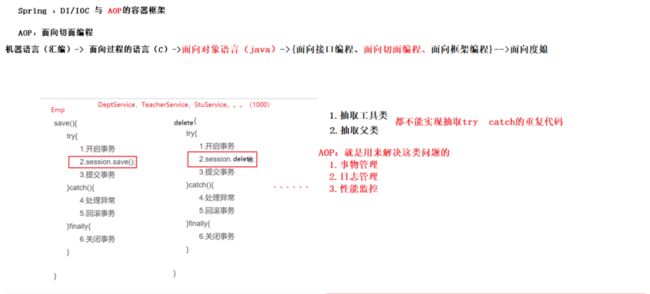
事务管理:比如可以抽取try catch的重复代码
日志监控:比如业务逻辑前后打印关于当前订单数量的日志,了解业务做了什么
性能监控:比如业务前后打印时间,相减可查看业务跑完所需时间
代理模式引出
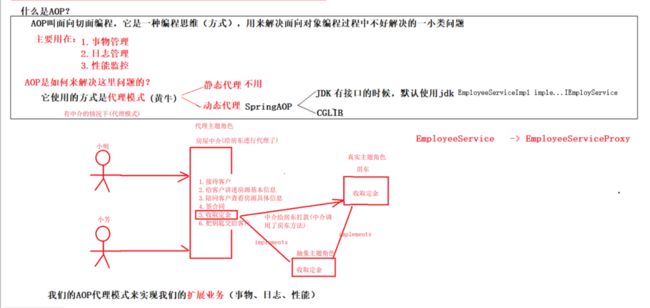
用aop实现扩展功能,
aop用代理模式实现,但是代理模式里的扩展功能还是需要我们自己写,
静态代理:相当于一个中介只代理一个固定的房东的房源,基本不用
动态代理:默认没有,使用的时候动态生成
AOP:以上大方向
SpringAOP:AOP的spring实现方式,用动态代理方式实现。它的实现方式又有两种:jdk,CGLIB,spring自动选择用其中哪种方式,代理类自动生成也不用管,有接口的时候默认使用jdk,没有的时候用cglib(第三方jar包),现在一般service都有接口
AOP实现方式
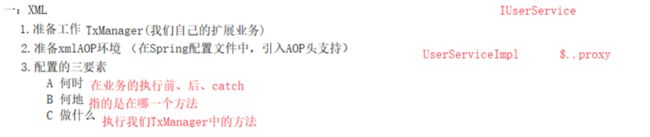
xml方式实现
1.编写TxManager用来提供业务逻辑外的扩展功能 - 如事务管理
/*我们自己的扩展功能*/
public class TxManager {

    public void open (){
        System.out.println("开启事务");
    }

    public void commit (){
        System.out.println("提交事务");
    }

    public void rollback(Throwable e){
        e.printStackTrace();//处理异常
        System.out.println("回滚事务");
    }

    public void close(){
    System.out.println("关闭事务");
    }

    public void around(ProceedingJoinPoint point){
        try {
            open();
            point.proceed();//执行真正的业务
            commit();
        } catch (Throwable e) {
            e.printStackTrace();
            rollback(e);
        } finally {
            close();
        }
    }
}
2.准备xmlAOP环境,在Spring配置文件中引入头支持以支持aop标签
SpringTest-Context.xml
<beans xmlns="http://www.springframework.org/schema/beans"
       xmlns:aop="http://www.springframework.org/schema/aop"
       xmlns:xsi="http://www.w3.org/2001/XMLSchema-instance"
       xsi:schemaLocation="
       http://www.springframework.org/schema/beans http://www.springframework.org/schema/beans/spring-beans.xsd
       http://www.springframework.org/schema/aop http://www.springframework.org/schema/aop/spring-aop.xsd">
3.配置的三要素
何时,如在业务的执行前、后、catch
何地,指的是在哪一个方法
做什么,执行我们自定义扩展业务类的方法
面向切面编程,面向扩展功能编程
其他
spring通过动态代理实现aop,配置aop后只能注入接口,通过接口找到被引用的代理类,Spring容器中就只有代理类没有实现类,
@RunWith(SpringJUnit4ClassRunner.class)
@ContextConfiguration//回到当前类的包下 查找当前类名-Context.xml的配置文件
public class SpringTest {

    @Autowired
    IUserService userService;

    @Test
    public void testUser(){
        System.out.println(userService.getClass());
    }
}
SpringTest-Context.xml
<beans xmlns="http://www.springframework.org/schema/beans"
       xmlns:aop="http://www.springframework.org/schema/aop"
       xmlns:xsi="http://www.w3.org/2001/XMLSchema-instance"
       xsi:schemaLocation="
       http://www.springframework.org/schema/beans http://www.springframework.org/schema/beans/spring-beans.xsd
       http://www.springframework.org/schema/aop http://www.springframework.org/schema/aop/spring-aop.xsd">

    <bean id="userService" class="cn.itsource._03aopxml.service.impl.UserServiceImpl"/>
    <bean id="departmentService" class="cn.itsource._03aopxml.service.impl.DepartmentServiceImpl"/>


    <bean id="txManager" class="cn.itsource._03aopxml.TxManager"/>

    <aop:config>


        <aop:pointcut id="txPoint" expression="execution(* cn.itsource._03aopxml.service.I*Service.*(..))"/>

        <aop:aspect ref="txManager">


            <aop:around method="around" pointcut-ref="txPoint"/>
        aop:aspect>
    aop:config>
beans>
测试
详细见工程代码
注解方式实现
A 引入容器扫描头 Spring AOP
SpringTest-Context.xml
<beans xmlns="http://www.springframework.org/schema/beans"
       xmlns:aop="http://www.springframework.org/schema/aop"
       xmlns:context="http://www.springframework.org/schema/context"
       xmlns:xsi="http://www.w3.org/2001/XMLSchema-instance"
       xsi:schemaLocation="
       http://www.springframework.org/schema/beans http://www.springframework.org/schema/beans/spring-beans.xsd
       http://www.springframework.org/schema/aop http://www.springframework.org/schema/aop/spring-aop.xsd
       http://www.springframework.org/schema/context http://www.springframework.org/schema/context/spring-context.xsd">


    <context:component-scan base-package="cn.itsource._04aopanno"/>


    <aop:aspectj-autoproxy/>

beans>
后面的几步,都是在TxManager中完成
B 将扩展业务交给容器管理 @Component
C 申明pointcut,@Pointcut,需要提供一个空方法
D 配置各种通知
只用@Around环绕通知,其他四种通知不能确定执行顺序,
/*我们自己的扩展功能*/
@Component //组件 把当前类交给Spring容器管理
@Aspect //==  配置切面
public class TxManager {

    //配置切点  ==
    @Pointcut("execution(* cn.itsource._04aopanno.service.I*Service.*(..))")
    public void  txPoint(){
        /*这个方法指明在业务类中的每个方法*/
    }

    /*配置前置通知*/
    /*@Before("txPoint()")*/
    public void open (){
        System.out.println("开启事物");
    }

    /*@AfterReturning("txPoint()")*/
    public void commit (){
        System.out.println("提交事物");
    }

    /*@AfterThrowing(value = "txPoint()", throwing = "e")*/
    public void rollback(Throwable e){
        e.printStackTrace();//处理异常
        System.out.println("回滚事务");
    }

    /*@After("txPoint()")*/
    public void close(){
    System.out.println("关闭事物");
    }

    @Around("txPoint()")
    public void around(ProceedingJoinPoint point){
        try {
            open();
            point.proceed();//执行真正的业务
            commit();
        } catch (Throwable e) {
            e.printStackTrace();
            rollback(e);
        } finally {
            close();
        }
    }
}
测试
详细见工程代码