centos7安装k8s 1.24.3版本 Error getting node“ err=“node “master01“ not found
简介
kubernetes 1.24.0以上版本已经移除了docker cri,因此在使用的docker来的安装k8s时,你需要自己安装cri-docker
名词解释
- cri:容器运行时,这个东东是用来在pod中控制容器的
服务器最低配置要求
- cpu:2核心
- 内存:2G
服务器上设置
- 关闭swap
- 关闭firewalld
- 禁用selinux
- 启用br_netfilter模块
- 6443端口
必要服务
- docker 每个节点必须
- iptables 每个节点必须
- cri-docker 每个节点必须:注意:启动服务时需要指定–pod-infra-container-image选项,否则可能导致初始化失败
- kubelet 每个节点必须
- kubeadm 每个节点必须
- kubectl 按需安装,用来的与集群交互
服务器初始化
以下为ansible的剧本,cri-docker.service设置部分没写,自己搞搞
---
- hosts: localhost
remote_user: root
tasks:
- name: 关闭firewalld并且取消开机启动
systemd:
enabled: FALSE
state: stopped
name: firewalld.service
- name: 永久关闭selinux
lineinfile:
dest: /etc/selinux/config
regexp: "^SELINUX="
line: "SELINUX=disabled"
- name: 临时关闭selinux
shell: "setenforce 0"
failed_when: FALSE
- name: 关闭swap
shell: "swapoff -a && sed -i 's/^[^#]*swap/#&/g' /etc/fstab"
- name: 安装yum-utils
yum: name=yum-utils state=present
- name: 添加docker-ce repo文件
shell: yum-config-manager --add-repo https://download.docker.com/linux/centos/docker-ce.repo
- name: 安装docker
shell: yum install docker-ce -y
- name: 创建/root/cri目录
file:
state: directory
path: /root/cri
- name: 拷贝cri-docker rpm包
copy:
src: /root/cri/cri-dockerd-0.2.5-3.el7.x86_64.rpm
dest: /root/cri/cri-dockerd-0.2.5-3.el7.x86_64.rpm
- name: 安装cri-docker
shell: rpm -ivh /root/cri/cri-dockerd-0.2.5-3.el7.x86_64.rpm
- name: 创建k8s.config文件
shell:
cmd: |
cat <<EOF | sudo tee /etc/modules-load.d/k8s.conf
overlay
br_netfilter
EOF
- name: 安装overlay模块
shell: sudo modprobe overlay
- name: 安装br_netfilter模块
shell: sudo modprobe br_netfilter
- name: 设置所需的 sysctl参数,参数在重新启动后保持不变
shell:
cmd: |
cat <<EOF | sudo tee /etc/sysctl.d/k8s.conf
net.bridge.bridge-nf-call-iptables = 1
net.bridge.bridge-nf-call-ip6tables = 1
net.ipv4.ip_forward = 1
EOF
- name: 应用 sysctl 参数而不重新启动
shell: sudo sysctl --system
cri-docker rpm包下载地址
https://github.com/Mirantis/cri-dockerd/releases/tag/v0.2.5
kubeadm 初始化文件init.yaml
此文件可命令kubeadm config print init-defaults生成,生产以后按自己实际情况修改文件,不要抄!
apiVersion: kubeadm.k8s.io/v1beta3
bootstrapTokens:
- groups:
  - system:bootstrappers:kubeadm:default-node-token
  token: abcdef.0123456789abcdef
  ttl: 24h0m0s
  usages:
  - signing
  - authentication
kind: InitConfiguration
localAPIEndpoint:
  advertiseAddress: 192.168.100.101  #改成你自己的IP地址
  bindPort: 6443
nodeRegistration:
  criSocket: unix:///run/cri-dockerd.sock #改成这个套接字
  imagePullPolicy: IfNotPresent
  name: master01  #改成你自己的主机名
  taints: null
---
apiServer:
  timeoutForControlPlane: 4m0s
apiVersion: kubeadm.k8s.io/v1beta3
certificatesDir: /etc/kubernetes/pki
clusterName: kubernetes
controllerManager: {}
dns: {}
etcd:
  local:
    dataDir: /var/lib/etcd
imageRepository: registry.aliyuncs.com/google_containers
kind: ClusterConfiguration
kubernetesVersion: 1.24.3
networking:
  dnsDomain: cluster.local
  serviceSubnet: 10.96.0.0/12
scheduler: {}
拉取必要镜像
kubeadm config images list命令可以查看1.24.3版本需要的镜像文件
国内仓库:registry.aliyuncs.com/google_containers
注意:etcd在registry.aliyuncs.com/google_containers仓库中可能找不到,可以上dockerhub上找找
[root@master01 ~]# kubeadm config images list
k8s.gcr.io/kube-apiserver:v1.24.3
k8s.gcr.io/kube-controller-manager:v1.24.3
k8s.gcr.io/kube-scheduler:v1.24.3
k8s.gcr.io/kube-proxy:v1.24.3
k8s.gcr.io/pause:3.7
k8s.gcr.io/etcd:3.5.3-0
k8s.gcr.io/coredns/coredns:v1.8.6
拉取指定仓库的镜像
kubeadm config images pull --image-repository="registry.aliyuncs.com/google_containers" --cri-socket="unix:///run/cri-dockerd.sock"
注意事项
安装好cri-docker 以后,直接kubeadm init --config init.yaml 会提示超时,查看kubelet日志会提示找不到节点
这时,你需要配置cri-docker.service文件,ExecStart=/usr/bin/cri-dockerd项后面指定你的指定你的pause版本,
例如:–pod-infra-container-image=registry.aliyuncs.com/google_containers/pause:3.7,
错误如下
Error getting node" err="node \"master01\" not found
解决方法
[root@master01 ansible]# cat /usr/lib/systemd/system/cri-docker.service
[Unit]
Description=CRI Interface for Docker Application Container Engine
Documentation=https://docs.mirantis.com
After=network-online.target firewalld.service docker.service
Wants=network-online.target
Requires=cri-docker.socket

[Service]
Type=notify
ExecStart=/usr/bin/cri-dockerd --pod-infra-container-image=registry.aliyuncs.com/google_containers/pause:3.7 --container-runtime-endpoint fd://
ExecReload=/bin/kill -s HUP $MAINPID
TimeoutSec=0
RestartSec=2
Restart=always

# Note that StartLimit* options were moved from "Service" to "Unit" in systemd 229.
# Both the old, and new location are accepted by systemd 229 and up, so using the old location
# to make them work for either version of systemd.
StartLimitBurst=3

# Note that StartLimitInterval was renamed to StartLimitIntervalSec in systemd 230.
# Both the old, and new name are accepted by systemd 230 and up, so using the old name to make
# this option work for either version of systemd.
StartLimitInterval=60s

# Having non-zero Limit*s causes performance problems due to accounting overhead
# in the kernel. We recommend using cgroups to do container-local accounting.
LimitNOFILE=infinity
LimitNPROC=infinity
LimitCORE=infinity

# Comment TasksMax if your systemd version does not support it.
# Only systemd 226 and above support this option.
TasksMax=infinity
Delegate=yes
KillMode=process

[Install]
WantedBy=multi-user.target
完成后重启cri-service服务
[root@master01 ~]# systemctl daemon-reload && systemctl restart cri-docker.service
此时在此运算kubeadm init 就能成功初始化集群
reset集群
与以往不同的是需要指定一下cri-socket
[root@master01 ~]# kubeadm reset --cri-socket="unix:///run/cri-dockerd.sock" --v=5
tmux
拉取镜像时需要很长时间,避免长时间不操作导致远程断开,你可以在tmux中执行,非常好用的小工具,建议安装
文档
部署CNI
可选CNI方案有如下几种
- Flannel:https://github.com/coreos/flannel
- Calico:https://github.com/projectcalico/cni-plugin
- Canal:https://github.com/projectcalico/canal
- Weave:https://www.weave.works/oss/net/
这几种方案的对比请参考https://www.infoq.cn/article/gxFTM0X8z2zlhw9xlEzv
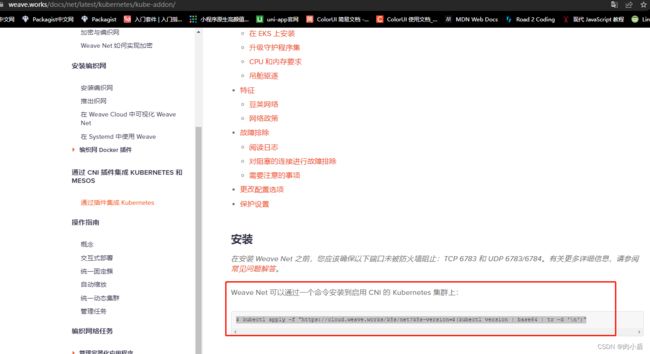
以weave为例,官网上找到,复制下来运行一下
https://www.weave.works/docs/net/latest/kubernetes/kube-addon/
$ kubectl apply -f "https://cloud.weave.works/k8s/net?k8s-version=$(kubectl version | base64 | tr -d '\n')"