【容器化】Docker 使用Ⅰ
【容器化】Docker 使用Ⅰ
- Docker Hello World
- 运行交互式的容器
- 启动容器(后台模式)
- 停止容器
- Docker 的使用
- 获取镜像
- 启动容器
-
- 后台运行
- 停止一个容器
- 进入容器
- 导出和导入容器
- 删除容器
- 运行一个 web 应用
- 查看 WEB 应用容器
- 网络端口的快捷方式
- 查看 WEB 应用程序日志
- 查看WEB应用程序容器的进程
- 检查 WEB 应用程序
- 停止 WEB 应用容器
- 重启WEB应用容器
- 移除 WEB 应用容器
- Docker 镜像使用
-
- 列出本地镜像
- 获取一个新的镜像
- 查找镜像
- 拖取镜像
- 删除镜像
- 创建镜像
-
- 更新镜像
- 构建镜像
- 设置镜像标签
Docker Hello World
Docker 允许你在容器内运行应用程序, 使用
docker run命令来在容器内运行一个应用程序。
输出Hello world
C:\Users\www49>docker run hello-world

Hello from Docker!
This message shows that your installation appears to be working correctly.

To generate this message, Docker took the following steps:
 1. The Docker client contacted the Docker daemon.
 2. The Docker daemon pulled the "hello-world" image from the Docker Hub.
    (amd64)
 3. The Docker daemon created a new container from that image which runs the
    executable that produces the output you are currently reading.
 4. The Docker daemon streamed that output to the Docker client, which sent it
    to your terminal.

To try something more ambitious, you can run an Ubuntu container with:
 $ docker run -it ubuntu bash

Share images, automate workflows, and more with a free Docker ID:
 https://hub.docker.com/

For more examples and ideas, visit:
 https://docs.docker.com/get-started/
Ubuntu 下运行 Hello world 镜像
runoob@runoob:~$ docker run ubuntu:15.10 /bin/echo "Hello world"
Hello world
参数解析:
- docker:Docker 的二进制执行文件。
- run:与前面的 docker 组合来运行一个容器。
- ubuntu:15.10 指定要运行的镜像,Docker 首先从本地主机上查找镜像是否存在,如果不存在,Docker 就会从镜像仓库 Docker Hub 下载公共镜像。
/bin/echo "Hello world":在启动的容器里执行的命令
以上命令完整的意思可以解释为:
Docker 以 ubuntu15.10 镜像创建一个新容器,然后在容器里执行 bin/echo "Hello world",然后输出结果。
运行交互式的容器
我们通过 docker 的两个参数 -i -t,让 docker 运行的容器实现 “对话” 的能力:
runoob@runoob:~$ docker run -i -t ubuntu:15.10 /bin/bash
root@0123ce188bd8:/#
参数解析:
- -t:在新容器内指定一个伪终端或终端。
- -i:允许你对容器内的标准输入 (STDIN) 进行交互。
注意第二行 root@0123ce188bd8:/#,此时我们已进入一个 ubuntu15.10 系统的容器。
在容器中运行命令 cat /proc/version 和 ls 分别查看当前系统的版本信息和当前目录下的文件列表。
root@0123ce188bd8:/#  cat /proc/version
Linux version 4.4.0-151-generic (buildd@lgw01-amd64-043) (gcc version 5.4.0 20160609 (Ubuntu 5.4.0-6ubuntu1~16.04.10) ) #178-Ubuntu SMP Tue Jun 11 08:30:22 UTC 2019
root@0123ce188bd8:/# ls
bin  boot  dev  etc  home  lib  lib64  media  mnt  opt  proc  root  run  sbin  srv  sys  tmp  usr  var
root@0123ce188bd8:/#
通过运行 exit 命令或者使用 CTRL+D 来退出容器。
root@0123ce188bd8:/#  exit
exit
root@runoob:~#
注意第三行中 root@runoob:~# 表明我们已经退出了当前的容器,返回到当前的主机中。
启动容器(后台模式)
使用以下命令创建一个以进程方式运行的容器
runoob@runoob:~$ docker run -d ubuntu:15.10 /bin/sh -c "while true; do echo hello world; sleep 1; done"
2b1b7a428627c51ab8810d541d759f072b4fc75487eed05812646b8534a2fe63
在输出中,我们没有看到期望的 “hello world”,而是一串长字符。
2b1b7a428627c51ab8810d541d759f072b4fc75487eed05812646b8534a2fe63
这个长字符串叫做容器 ID,对每个容器来说都是唯一的,我们可以通过容器 ID 来查看对应的容器发生了什么。
首先,我们需要确认容器有在运行,可以通过 docker ps 来查看:
runoob@runoob:~$ docker ps
CONTAINER ID        IMAGE                  COMMAND              ...
5917eac21c36        ubuntu:15.10           "/bin/sh -c 'while t…"    ...
输出详情:
- CONTAINER ID:容器 ID
- IMAGE:使用的镜像
- COMMAND:启动容器时运行的命令
- CREATED:容器的创建时间
- STATUS:容器状态
状态(STATUS)有7种:
- created(已创建)
- restarting(重启中)
- running 或 Up(运行中)
- removing(迁移中)
- paused(暂停)
- exited(停止)
- dead(死亡)
- PORTS:容器的端口信息和使用的连接类型
tcp/udp。 - NAMES:自动分配的容器名称。
在宿主主机内使用 docker logs 命令,查看容器内的标准输出:
docker logs 5917eac21c36
停止容器
使用 docker stop 命令来停止容器
docker logs 5917eac21c36
通过 docker ps 查看,容器已经停止工作:
docker ps
Docker 的使用
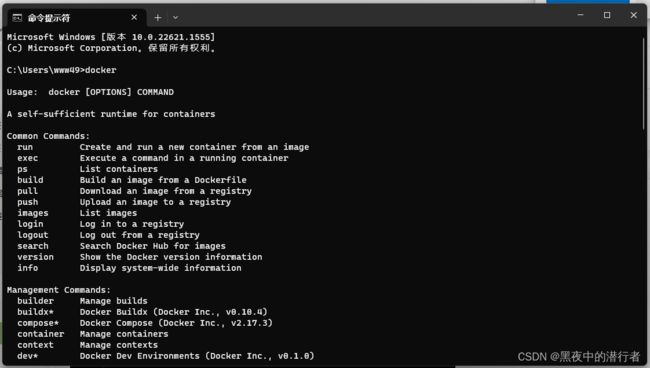
输入 docker 命令来查看到 Docker 客户端的所有命令选项。
docker
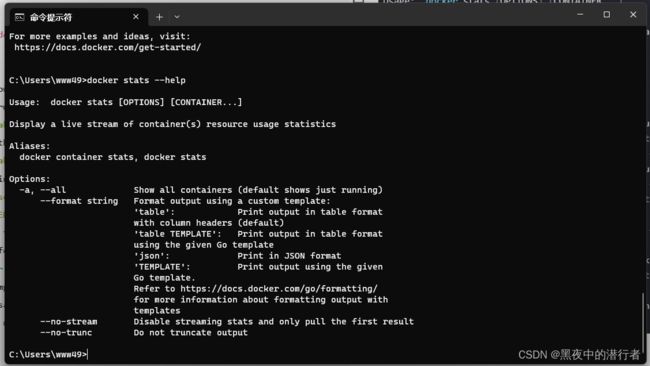
可以通过命令
docker command --help更深入的了解指定的 Docker 命令使用方法。
例如我们要查看 docker stats 指令的具体使用方法:
C:\Users\www49>docker stats --help

Usage:  docker stats [OPTIONS] [CONTAINER...]

Display a live stream of container(s) resource usage statistics

Aliases:
  docker container stats, docker stats

Options:
  -a, --all             Show all containers (default shows just running)
      --format string   Format output using a custom template:
                        'table':            Print output in table format
                        with column headers (default)
                        'table TEMPLATE':   Print output in table format
                        using the given Go template
                        'json':             Print in JSON format
                        'TEMPLATE':         Print output using the given
                        Go template.
                        Refer to https://docs.docker.com/go/formatting/
                        for more information about formatting output with
                        templates
      --no-stream       Disable streaming stats and only pull the first result
      --no-trunc        Do not truncate output
获取镜像
如果我们本地没有 ubuntu 镜像,我们可以使用 docker pull 命令来载入 ubuntu 镜像:
$ docker pull ubuntu
启动容器
以下命令使用 ubuntu 镜像启动一个容器,参数为以命令行模式进入该容器:
$ docker run -it ubuntu /bin/bash
参数说明:
- -i:交互式操作。
- -t:终端。
- ubuntu:ubuntu 镜像。
- /bin/bash:放在镜像名后的是命令,这里我们希望有个交互式 Shell,因此用的是 /bin/bash。
要退出终端,直接输入 exit:
root@ed09e4490c57:/# exit
后台运行
在大部分的场景下,我们希望 docker 的服务是在后台运行的,我们可以过
-d指定容器的运行模式。
$ docker run -itd --name ubuntu-test ubuntu /bin/bash
注:加了 -d 参数默认不会进入容器,想要进入容器需要使用指令 docker exec
停止一个容器
停止容器的命令如下:
$ docker stop <容器 ID>
停止的容器可以通过 docker restart 重启:
$ docker restart <容器 ID>
进入容器
在使用 -d 参数时,容器启动后会进入后台。此时想要进入容器,可以通过以下指令进入:
docker attach
docker exec:推荐大家使用 docker exec 命令,因为此命令会退出容器终端,但不会导致容器的停止。
attach 命令
$ docker attach 1e560fca3906
exec 命令
docker exec -it 243c32535da7 /bin/bash

注意: 如果从这个容器退出,容器不会停止,这就是为什么推荐大家使用 docker exec 的原因
导出和导入容器
导出容器
如果要导出本地某个容器,可以使用 docker export 命令。
$ docker export 1e560fca3906 > ubuntu.tar
导出容器 1e560fca3906 快照到本地文件 ubuntu.tar。

导入容器快照
可以使用 docker import 从容器快照文件中再导入为镜像,以下实例将快照文件 ubuntu.tar 导入到镜像 test/ubuntu:v1:
$ cat docker/ubuntu.tar | docker import - test/ubuntu:v1
$ docker import http://example.com/exampleimage.tgz example/imagerepo
删除容器
删除容器使用 docker rm 命令:
$ docker rm -f 1e560fca3906
$ docker container prune
运行一个 web 应用
接下来让我们尝试使用 docker 构建一个 web 应用程序。
我们将在docker容器中运行一个 Python Flask 应用来运行一个web应用。
runoob@runoob:~# docker pull training/webapp  # 载入镜像
runoob@runoob:~# docker run -d -P training/webapp python app.py
参数说明:
- -d:让容器在后台运行。
- -P:将容器内部使用的网络端口随机映射到我们使用的主机上。
查看 WEB 应用容器
使用 docker ps 来查看我们正在运行的容器:
runoob@runoob:~#  docker ps
CONTAINER ID        IMAGE               COMMAND             ...        PORTS
d3d5e39ed9d3        training/webapp     "python app.py"     ...        0.0.0.0:32769->5000/tcp
这里多了端口信息。
PORTS
0.0.0.0:32769->5000/tcp
Docker 开放了 5000 端口(默认 Python Flask 端口)映射到主机端口 32769 上。
这时我们可以通过浏览器访问WEB应用

我们也可以通过 -p 参数来设置不一样的端口:
runoob@runoob:~$ docker run -d -p 5000:5000 training/webapp python app.py
runoob@runoob:~#  docker ps
CONTAINER ID        IMAGE                             PORTS                     NAMES
bf08b7f2cd89        training/webapp     ...        0.0.0.0:5000->5000/tcp    py_web
d3d5e39ed9d3        training/webapp     ...        0.0.0.0:32769->5000/tcp   xenodochial_hoov
容器内部的 5000 端口映射到我们本地主机的 5000 端口上。
网络端口的快捷方式
通过
docker ps命令可以查看到容器的端口映射,docker 还提供了另一个快捷方式docker port,使用docker port可以查看指定 (ID 或者名字)容器的某个确定端口映射到宿主机的端口号。
上面我们创建的 web 应用容器 ID 为 bf08b7f2cd89 名字为 py_web。
我可以使用 docker port bf08b7f2cd89 或 docker port py_web 来查看容器端口的映射情况。
runoob@runoob:~$ docker port bf08b7f2cd89
5000/tcp -> 0.0.0.0:5000
runoob@runoob:~$ docker port py_web
5000/tcp -> 0.0.0.0:5000
查看 WEB 应用程序日志
docker logs [ID或者名字] 可以查看容器内部的标准输出。
runoob@runoob:~$ docker logs -f bf08b7f2cd89
 * Running on http://0.0.0.0:5000/ (Press CTRL+C to quit)
192.168.239.1 - - [09/May/2016 16:30:37] "GET / HTTP/1.1" 200 -
192.168.239.1 - - [09/May/2016 16:30:37] "GET /favicon.ico HTTP/1.1" 404 -
-f:让 docker logs 像使用 tail -f 一样来输出容器内部的标准输出。
从上面,我们可以看到应用程序使用的是 5000 端口并且能够查看到应用程序的访问日志。
查看WEB应用程序容器的进程
使用 docker top 来查看容器内部运行的进程
runoob@runoob:~$ docker top py_web
UID     PID         PPID          ...       TIME                CMD
root    23245       23228         ...       00:00:00            python app.py
检查 WEB 应用程序
使用
docker inspect来查看 Docker 的底层信息。它会返回一个 JSON 文件记录着 Docker 容器的配置和状态信息。
runoob@runoob:~$ docker inspect py_web
[
    {
        "Id": "bf08b7f2cd897b5964943134aa6d373e355c286db9b9885b1f60b6e8f82b2b85",
        "Created": "2018-09-17T01:41:26.174228707Z",
        "Path": "python",
        "Args": [
            "app.py"
        ],
        "State": {
            "Status": "running",
            "Running": true,
            "Paused": false,
            "Restarting": false,
            "OOMKilled": false,
            "Dead": false,
            "Pid": 23245,
            "ExitCode": 0,
            "Error": "",
            "StartedAt": "2018-09-17T01:41:26.494185806Z",
            "FinishedAt": "0001-01-01T00:00:00Z"
        },
......
停止 WEB 应用容器
runoob@runoob:~$ docker stop py_web
py_web
重启WEB应用容器
已经停止的容器,我们可以使用命令 docker start 来启动。
runoob@runoob:~$ docker start py_web
py_web
docker ps -l 查询最后一次创建的容器:
 docker ps -l
CONTAINER ID        IMAGE                             PORTS                   NAMES
bf08b7f2cd89        training/webapp     ...        0.0.0.0:5000->5000/tcp    py_web
- 正在运行的容器,我们可以使用
docker restart命令来重启。
移除 WEB 应用容器
使用 docker rm 命令来删除不需要的容器
runoob@runoob:~$ docker rm py_web
py_web
删除容器时,容器必须是停止状态,否则会报如下错误
unoob@runoob:~$ docker rm wizardly_chandrasekhar
Error response from daemon: You cannot remove a running container bf08b7f2cd897b5964943134aa6d373e355c286db9b9885b1f60b6e8f82b2b85. Stop the container before attempting removal or force remove
Docker 镜像使用
当运行容器时,使用的镜像如果在本地中不存在,docker 就会自动从 docker 镜像仓库中下载,默认是从 Docker Hub 公共镜像源下载。
列出本地镜像
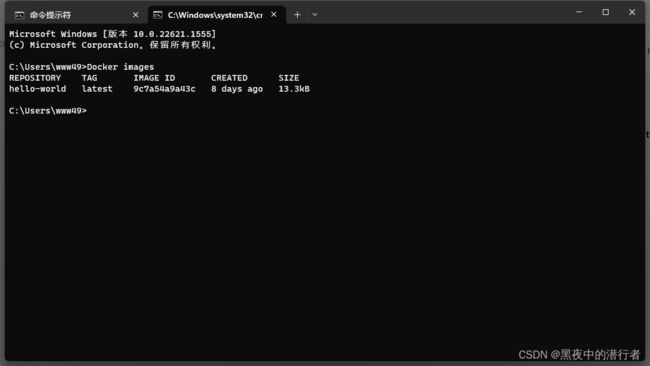
- 使用
docker images来列出本地主机上的镜像。
各个选项说明:
- REPOSITORY:表示镜像的仓库源
- TAG:镜像的标签
- IMAGE ID:镜像ID
- CREATED:镜像创建时间
- SIZE:镜像大小
同一仓库源可以有多个 TAG,代表这个仓库源的不同个版本,如 ubuntu 仓库源里,有 15.10、14.04 等多个不同的版本,我们使用 REPOSITORY:TAG 来定义不同的镜像。
所以,我们如果要使用版本为15.10的ubuntu系统镜像来运行容器时,命令如下:
runoob@runoob:~$ docker run -t -i ubuntu:15.10 /bin/bash
root@d77ccb2e5cca:/#
参数说明:
- -i:交互式操作。
- -t:终端。
- ubuntu:15.10:这是指用 ubuntu 15.10 版本镜像为基础来启动容器。
- /bin/bash:放在镜像名后的是命令,这里我们希望有个交互式 Shell,因此用的是 /bin/bash。
如果要使用版本为 14.04 的 ubuntu 系统镜像来运行容器时,命令如下:
runoob@runoob:~$ docker run -t -i ubuntu:14.04 /bin/bash
root@39e968165990:/#
如果你不指定一个镜像的版本标签,例如你只使用 ubuntu,docker 将默认使用 ubuntu:latest 镜像。
获取一个新的镜像
当我们在本地主机上使用一个不存在的镜像时 Docker 就会自动下载这个镜像。如果我们想预先下载这个镜像,我们可以使用
docker pull命令来下载它。
Crunoob@runoob:~$ docker pull ubuntu:13.10
13.10: Pulling from library/ubuntu
6599cadaf950: Pull complete
23eda618d451: Pull complete
f0be3084efe9: Pull complete
52de432f084b: Pull complete
a3ed95caeb02: Pull complete
Digest: sha256:15b79a6654811c8d992ebacdfbd5152fcf3d165e374e264076aa435214a947a3
Status: Downloaded newer image for ubuntu:13.10
查找镜像
可以从 Docker Hub 网站来搜索镜像,Docker Hub 网址为: https://hub.docker.com/
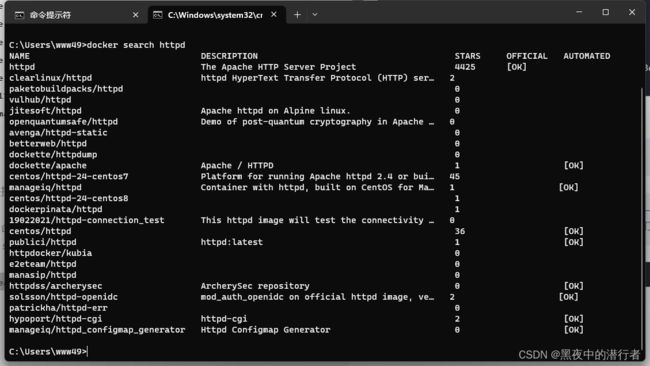
也可以使用 docker search 命令来搜索镜像。比如我们需要一个 httpd 的镜像来作为我们的 web 服务。我们可以通过 docker search 命令搜索 httpd 来寻找适合我们的镜像。
docker search httpd
NAME:镜像仓库源的名称
DESCRIPTION:镜像的描述
OFFICIAL:是否 docker 官方发布
STARS:类似 Github 里面的 star,表示点赞、喜欢的意思
AUTOMATED:自动构建
拖取镜像
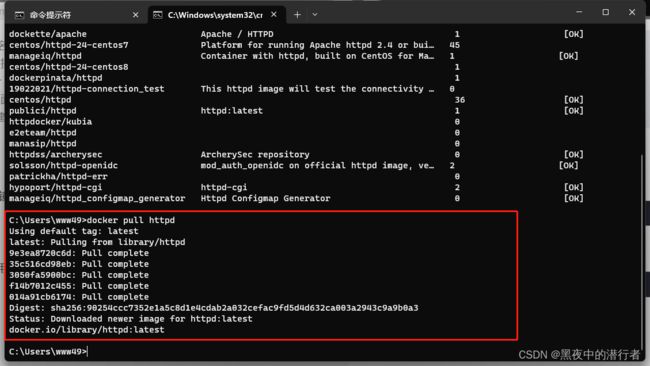
使用命令 docker pull 来下载镜像。
C:\Users\www49>docker pull httpd
Using default tag: latest
latest: Pulling from library/httpd
9e3ea8720c6d: Pull complete
35c516cd98eb: Pull complete
3050fa5900bc: Pull complete
f14b7012c455: Pull complete
014a91cb6174: Pull complete
Digest: sha256:90254ccc7352e1a5c8d1e4cdab2a032cefac9fd5d4d632ca003a2943c9a9b0a3
Status: Downloaded newer image for httpd:latest
docker.io/library/httpd:latest
docker run httpd
删除镜像
镜像删除使用 docker rmi 命令,比如我们删除 hello-world 镜像:
$ docker rmi hello-world
创建镜像
当我们从 docker 镜像仓库中下载的镜像不能满足我们的需求时,我们可以通过以下两种方式对镜像进行更改。
1、从已经创建的容器中更新镜像,并且提交这个镜像
2、使用 Dockerfile 指令来创建一个新的镜像
更新镜像
更新镜像之前,我们需要使用镜像来创建一个容器。
runoob@runoob:~$ docker run -t -i ubuntu:15.10 /bin/bash
root@e218edb10161:/#
在运行的容器内使用
apt-get update命令进行更新。
在完成操作之后,输入 exit 命令来退出这个容器。
此时 ID 为 e218edb10161 的容器,是按我们的需求更改的容器。我们可以通过命令 docker commit 来提交容器副本。
runoob@runoob:~$ docker commit -m="has update" -a="runoob" e218edb10161 runoob/ubuntu:v2
sha256:70bf1840fd7c0d2d8ef0a42a817eb29f854c1af8f7c59fc03ac7bdee9545aff8
参数说明:
- -m:提交的描述信息
- -a:指定镜像作者
- e218edb10161:容器 ID
- runoob/ubuntu:v2:指定要创建的目标镜像名
我们可以使用 docker images 命令来查看我们的新镜像 runoob/ubuntu:v2
runoob@runoob:~$ docker images
REPOSITORY          TAG                 IMAGE ID            CREATED             SIZE
runoob/ubuntu       v2                  70bf1840fd7c        15 seconds ago      158.5 MB
ubuntu              14.04               90d5884b1ee0        5 days ago          188 MB
php                 5.6                 f40e9e0f10c8        9 days ago          444.8 MB
nginx               latest              6f8d099c3adc        12 days ago         182.7 MB
mysql               5.6                 f2e8d6c772c0        3 weeks ago         324.6 MB
httpd               latest              02ef73cf1bc0        3 weeks ago         194.4 MB
ubuntu              15.10               4e3b13c8a266        4 weeks ago         136.3 MB
hello-world         latest              690ed74de00f        6 months ago        960 B
training/webapp     latest              6fae60ef3446        12 months ago       348.8 MB
构建镜像
我们使用命令
docker build,从零开始来创建一个新的镜像。为此,我们需要创建一个 Dockerfile 文件,其中包含一组指令来告诉 Docker 如何构建我们的镜像。
runoob@runoob:~$ cat Dockerfile
FROM    centos:6.7
MAINTAINER      Fisher "[email protected]"

RUN     /bin/echo 'root:123456' |chpasswd
RUN     useradd runoob
RUN     /bin/echo 'runoob:123456' |chpasswd
RUN     /bin/echo -e "LANG=\"en_US.UTF-8\"" >/etc/default/local
EXPOSE  22
EXPOSE  80
CMD     /usr/sbin/sshd -D
每一个指令都会在镜像上创建一个新的层,每一个指令的前缀都必须是大写的。
第一条 FROM,指定使用哪个镜像源
RUN 指令告诉 docker 在镜像内执行命令,安装了什么
然后,我们使用 Dockerfile 文件,通过docker build命令来构建一个镜像
runoob@runoob:~$ docker build -t runoob/centos:6.7 .
Sending build context to Docker daemon 17.92 kB
Step 1 : FROM centos:6.7
 ---> d95b5ca17cc3
Step 2 : MAINTAINER Fisher "[email protected]"
 ---> Using cache
 ---> 0c92299c6f03
Step 3 : RUN /bin/echo 'root:123456' |chpasswd
 ---> Using cache
 ---> 0397ce2fbd0a
Step 4 : RUN useradd runoob
......
参数说明:
- -t:指定要创建的目标镜像名
- .:Dockerfile 文件所在目录,可以指定 Dockerfile 的绝对路径
设置镜像标签
我们可以使用 docker tag 命令,为镜像添加一个新的标签。
runoob@runoob:~$ docker tag 860c279d2fec runoob/centos:dev
docker tag 镜像ID,这里是 860c279d2fec ,用户名称、镜像源名(repository name)和新的标签名(tag)。
使用 docker images 命令可以看到,ID为 860c279d2fec 的镜像多一个标签。
runoob@runoob:~$ docker images
REPOSITORY          TAG                 IMAGE ID            CREATED             SIZE
runoob/centos       6.7                 860c279d2fec        5 hours ago         190.6 MB
runoob/centos       dev                 860c279d2fec        5 hours ago         190.6 MB
runoob/ubuntu       v2                  70bf1840fd7c        22 hours ago        158.5 MB
ubuntu              14.04               90d5884b1ee0        6 days ago          188 MB
php                 5.6                 f40e9e0f10c8        10 days ago         444.8 MB
nginx               latest              6f8d099c3adc        13 days ago         182.7 MB
mysql               5.6                 f2e8d6c772c0        3 weeks ago         324.6 MB
httpd               latest              02ef73cf1bc0        3 weeks ago         194.4 MB
ubuntu              15.10               4e3b13c8a266        5 weeks ago         136.3 MB
hello-world         latest              690ed74de00f        6 months ago        960 B
centos              6.7                 d95b5ca17cc3        6 months ago        190.6 MB
training/webapp     latest              6fae60ef3446        12 months ago       348.8 MB
