| 利用 pytest 玩转数据驱动测试框架
pytest架构是什么?
首先,来看一个 pytest 的例子:
def test_a():

  print(123)
collected 1 item

test_a.py .                                                                                                            [100%]

============ 1 passed in 0.02s =======================
输出结果很简单:收集到 1 个用例,并且这条测试用例执行通过。
此时思考两个问题:
1.pytest 如何收集到用例的?
2.pytest 如何把 python 代码,转换成 pytest 测试用例(又称 item) ?
pytest如何做到收集到用例的?
这个很简单,遍历执行目录,如果发现目录的模块中存在符合“ pytest 测试用例要求的 python 对象”,就将之转换为 pytest 测试用例。
比如编写以下 hook 函数:
def pytest_collect_file(path, parent):

    print("hello", path)
hello C:\Users\yuruo\Desktop\tmp\tmp123\tmp\testcase\__init__.py

hello C:\Users\yuruo\Desktop\tmp\tmp123\tmp\testcase\conftest.py

hello C:\Users\yuruo\Desktop\tmp\tmp123\tmp\testcase\test_a.py
会看到所有文件内容。
pytest 像是包装盒,将 python 对象包裹起来,比如下图:
当写好 python 代码时:
def test_a:

    print(123)
会被包裹成 Function :
可以从 hook 函数中查看细节:
def pytest_collection_modifyitems(session, config, items):

    pass
[外链图片转存失败,源站可能有防盗链机制,建议将图片保存下来直接上传(img-wl2JwJuG-1650944516627)(https://ceshiren.com/uploads/default/original/3X/2/1/219a3ad7536d20f87137118b357aab2a3bb52ff6.png)]
于是,理解包裹过程就是解开迷题的关键。pytest 是如何包裹 python 对象的?
下面代码只有两行,看似简单,但暗藏玄机!
def test_a:

    print(123)
把代码位置截个图,如下:
[外链图片转存失败,源站可能有防盗链机制,建议将图片保存下来直接上传(img-BAQNd5KN-1650944517424)(https://ceshiren.com/uploads/default/original/3X/8/5/852d35464a9de648cc7035baf5126d83cd213d11.png)]
我们可以说,上述代码是处于“testcase包”下的 “test_a.py模块”的“test_a函数”, pytest 生成的测试用例也要有这些信息:
处于“testcase包”下的 “test_a.py模块”的“test_a测试用例:
把上述表达转换成下图:
pytest 使用 parent 属性表示上图层级关系,比如 Module 是 Function 的上级, Function 的 parent 属性如下:
:

  parent:
当然 Module 的 parent 就是 Package:
:

  parent:
这里科普一下,python 的 package 和 module 都是真实存在的对象,你可以从 obj 属性中看到,比如 Module 的 obj 属性如下:
[外链图片转存失败,源站可能有防盗链机制,建议将图片保存下来直接上传(img-jZzvDnY0-1650944519559)(https://ceshiren.com/uploads/default/original/3X/e/1/e1139e9b8d5fc81acf526a91f2766b9334592d73.png)]
如果理解了 pytest 的包裹用途,非常好!我们进行下一步讨论:如何构造 pytest 的 item ?
以下面代码为例:
def test_a:

    print(123)
构造 pytest 的 item ,需要:
3.构建 Package
4.构建 Module
5.构建 Function
以构建 Function 为例,需要调用其from_parent()方法进行构建,其过程如下图:
[外链图片转存失败,源站可能有防盗链机制,建议将图片保存下来直接上传(img-OMBBu26L-1650944521553)(https://ceshiren.com/uploads/default/original/3X/6/8/68b1a9303a97d16f58accb1bacce554d0a36ba16.png)]
,就可以猜测出,“构建 Function”一定与其 parent 有不小联系!又因为 Function 的 parent 是 Module :
根据下面 Function 的部分代码(位于 python.py 文件):
class Function(PyobjMixin, nodes.Item):

    # 用于创建测试用例
    @classmethod
    def from_parent(cls, parent, **kw):
        """The public constructor."""
        return super().from_parent(parent=parent, **kw)
    # 获取实例
    def _getobj(self):
        assert self.parent is not None
        return getattr(self.parent.obj, self.originalname)  # type: ignore[attr-defined]
    # 运行测试用例
    def runtest(self) -> None:
        """Execute the underlying test function."""
        self.ihook.pytest_pyfunc_call(pyfuncitem=self)
得出结论,可以利用 Module 构建 Function!其调用伪代码如下:
Function.from_parent(Module)
既然可以利用 Module 构建 Function, 那如何构建 Module ?
当然是利用 Package 构建 Module!
Module.from_parent(Package)
既然可以利用 Package 构建 Module 那如何构建 Package ?
别问了,快成套娃了,请看下图调用关系:
[外链图片转存失败,源站可能有防盗链机制,建议将图片保存下来直接上传(img-qwjp1tpi-1650944527986)(https://ceshiren.com/uploads/default/original/3X/d/9/d910f93c604b94245cb3aa72e6fd788b112dccac.png)]
pytest 从 Config 开始,层层构建,直到 Function !Function 是 pytest 的最小执行单元。
手动构建 item 就是模拟 pytest 构建 Function 的过程。也就是说,需要创建 Config ,然后利用 Config 创建 Session ,然后利用 Session 创建 Package ,…,最后创建 Function。
[外链图片转存失败,源站可能有防盗链机制,建议将图片保存下来直接上传(img-o4CYwy2q-1650944529336)(https://ceshiren.com/uploads/default/original/3X/b/5/b55bfde22e1d341c82720ff96349cab4783e6be8.png)]
其实没这么复杂, pytest 会自动创建好 Config, Session和 Package ,这三者不用手动创建。
[外链图片转存失败,源站可能有防盗链机制,建议将图片保存下来直接上传(img-R1743YmG-1650944530224)(https://ceshiren.com/uploads/default/original/3X/7/e/7eeaebf239c5ca95fb2cdb0d8828d419216b3301.png)]
比如编写以下 hook 代码,打断点查看其 parent 参数:
def pytest_collect_file(path, parent):

    pass
[外链图片转存失败,源站可能有防盗链机制,建议将图片保存下来直接上传(img-qZCZ5X6J-1650944531361)(https://ceshiren.com/uploads/default/original/3X/3/9/39c9bcdaf728217616aaff01adb78212768cb952.png)]
如果遍历的路径是某个包(可从path参数中查看具体路径),比如下图的包:
[外链图片转存失败,源站可能有防盗链机制,建议将图片保存下来直接上传(img-sbqR2ejT-1650944532281)(https://ceshiren.com/uploads/default/original/3X/7/b/7b16e5616af6ad87346d492266a5d82f02bc3e56.png)]
其 parent 参数就是 Package ,此时可以利用这个 Package 创建 Module :
[外链图片转存失败,源站可能有防盗链机制,建议将图片保存下来直接上传(img-lFUDjPtp-1650944533583)(https://ceshiren.com/uploads/default/original/3X/b/9/b949301ee8519bec6d210102722777e91604e7b3.png)]
编写如下代码即可构建 pytest 的 Module ,如果发现是 yaml 文件,就根据 yaml 文件内容动态创建 Module 和 module :
from _pytest.python import Module, Package

def pytest_collect_file(path, parent):

    if path.ext == ".yaml":
        pytest_module = Module.from_parent(parent, fspath=path)
        # 返回自已定义的 python module
        pytest_module._getobj = lambda : MyModule
        return pytest_module
需要注意,上面代码利用猴子补丁改写了 _getobj 方法,为什么这么做?
Module 利用 _getobj 方法寻找并导入(import语句) path 包下的 module ,其源码如下:
# _pytest/python.py Module

class Module(nodes.File, PyCollector):

    def _getobj(self):
        return self._importtestmodule()
def _importtestmodule(self):

    # We assume we are only called once per module.
    importmode = self.config.getoption("--import-mode")
    try:
        # 关键代码:从路径导入 module
        mod = import_path(self.fspath, mode=importmode)
    except SyntaxError as e:
        raise self.CollectError(
            ExceptionInfo.from_current().getrepr(style="short")
        ) from e
        # 省略部分代码...
但是,如果使用数据驱动,即用户创建的数据文件 test_parse.yaml ,它不是 .py 文件,不会被 python 识别成 module (只有 .py 文件才能被识别成 module)。
这时,就不能让 pytest 导入(import语句) test_parse.yaml ,需要动态改写 _getobj ,返回自定义的 module !
因此,可以借助 lambda 表达式返回自定义的 module :
lambda : MyModule
这就涉及元编程技术:动态构建 python 的 module ,并向 module 中动态加入类或者函数:
import types

# 动态创建 module

module = types.ModuleType(name)

def function_template(*args, **kwargs):

    print(123)
# 向 module 中加入函数

setattr(module, "test_abc", function_template)
综上,将自己定义的 module 放入 pytest 的 Module 中即可生成 item :
# conftest.py

import types

from _pytest.python import Module

def pytest_collect_file(path, parent):

    if path.ext == ".yaml":
        pytest_module = Module.from_parent(parent, fspath=path)
        # 动态创建 module
        module = types.ModuleType(path.purebasename)
        def function_template(*args, **kwargs):
            print(123)
        # 向 module 中加入函数
        setattr(module, "test_abc", function_template)
        pytest_module._getobj = lambda: module
        return pytest_module
创建一个 yaml 文件,使用 pytest 运行:
[外链图片转存失败,源站可能有防盗链机制,建议将图片保存下来直接上传(img-bHTf174p-1650944549893)(https://ceshiren.com/uploads/default/original/3X/c/5/c5e5888967f320ec01ef4d9a3d3176f11045c695.png)]
======= test session starts ====

platform win32 -- Python 3.8.1, pytest-6.2.4, py-1.10.0, pluggy-0.13.1

rootdir: C:\Users\yuruo\Desktop\tmp

plugins: allure-pytest-2.8.11, forked-1.3.0, rerunfailures-9.1.1, timeout-1.4.2, xdist-2.2.1

collected 1 item

test_a.yaml 123

.

======= 1 passed in 0.02s =====

PS C:\Users\yuruo\Desktop\tmp>
现在停下来,回顾一下,我们做了什么?
借用 pytest hook ,将 .yaml 文件转换成 python module。
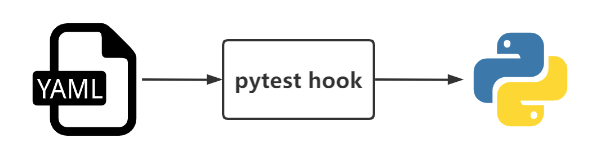
作为一个数据驱动测试框架,我们没做什么?
没有解析 yaml 文件内容!上述生成的 module ,其内的函数如下:
def function_template(*args, **kwargs):

    print(123)
只是简单打印 123 。数据驱动测试框架需要解析 yaml 内容,根据内容动态生成函数或类。比如下面 yaml 内容:
test_abc:

  - print: 123
表达的含义是“定义函数 test_abc,该函数打印 123”。
可以利用 yaml.safe_load 加载 yaml 内容,并进行关键字解析,其中path.strpath代表 yaml 文件的地址:
import types

import yaml

from _pytest.python import Module

def pytest_collect_file(path, parent):

    if path.ext == ".yaml":
        pytest_module = Module.from_parent(parent, fspath=path)
        # 动态创建 module
        module = types.ModuleType(path.purebasename)
        # 解析 yaml 内容
        with open(path.strpath) as f:
            yam_content = yaml.safe_load(f)
            for function_name, steps in yam_content.items():


                def function_template(*args, **kwargs):
                    """
                    函数模块
                    """
                    # 遍历多个测试步骤 [print: 123, print: 456]
                    for step_dic in steps:
                        # 解析一个测试步骤 print: 123
                        for step_key, step_value in step_dic.items():
                            if step_key == "print":
                                print(step_value)


                # 向 module 中加入函数
                setattr(module, function_name, function_template)
        pytest_module._getobj = lambda: module
        return pytest_module
上述测试用例运行结果如下:
=== test session starts ===

platform win32 -- Python 3.8.1, pytest-6.2.4, py-1.10.0, pluggy-0.13.1

rootdir: C:\Users\yuruo\Desktop\tmp

plugins: allure-pytest-2.8.11, forked-1.3.0, rerunfailures-9.1.1, timeout-1.4.2, xdist-2.2.1

collected 1 item

test_a.yaml 123

.

=== 1 passed in 0.02s ====
当然,也支持复杂一些的测试用例:
test_abc:

  - print: 123
  - print: 456
test_abd:

  - print: 123
  - print: 456
其结果如下:
== test session starts ==

platform win32 -- Python 3.8.1, pytest-6.2.4, py-1.10.0, pluggy-0.13.1

rootdir: C:\Users\yuruo\Desktop\tmp

plugins: allure-pytest-2.8.11, forked-1.3.0, rerunfailures-9.1.1, timeout-1.4.2, xdist-2.2.1

collected 2 items

test_a.yaml 123

456

.123

456

.

== 2 passed in 0.02s ==
利用pytest创建数据驱动测试框架就介绍到这里啦,希望能给大家带来一定的帮助。大家有什么不懂的地方或者有疑惑也可以留言讨论哈,让我们共同进步呦!
⬇️ 点击“阅读原文”,提升测试核心竞争力!
原文链接
获取更多相关资料+v~ ceshiren001
获取更多技术文章分享