微信公众号扫码实现网站登录-Django+Vue版本-超详细保姆级教程
实现网页端微信扫码登录有三种方式:
- PlanA:微信开放平台 — 需认证 — 300元
- PlanB:微信公众号 — 需服务号且已认证 — 300元
- PlanC:微信小程序 — 需已上线备案的小程序 — 0元
本教程为Django+vue举例的微信公众号扫码登录,从微信扫码登录从注册公众号到最后实现的全部流程,会附上github链接,只是基本大致思路,后续根据自己情况再做修改,跟着流程一步步来,绝对能实现。细节都会列举。
demo实现最终效果
本文实现逻辑与流程:使用微信提供的带参临时二维码返回前端,并在前端开启长轮询请求后端登录情况。用户扫码跳转到微信公众号,如果是新用户,则需关注,关注后微信返回公众号 新用户登录成功 ,如果是老用户微信返回公众号 老用户登录成功 。完成返回公众号后,并将关键凭证信息保存到相应的用户中。前端的长轮询查询到数据库有此数据,则返回用户信息,登录成功。长轮询结束,前端跳提示登陆成功。
申请测试号
-
注册公众号
首先就是注册一个微信公众号了,随便注册就行了,但是如果你要上线使用,请记住申请服务号,至于服务号和订阅号的区别我这里不展开的的赘述,有相关需求的可以去微信官方查看。
注册完成后点击左侧 设置与开发 下面的 接口权限 也能简单看看这些相关功能所需要的公众号的类别。一般咱自己申请的就是个体号,基本没啥功能,就只能发发文章罢了

公众号注册链接
https://mp.weixin.qq.com/cgi-bin/registermidpage?action=index&lang=zh_CN
-
进入测试号
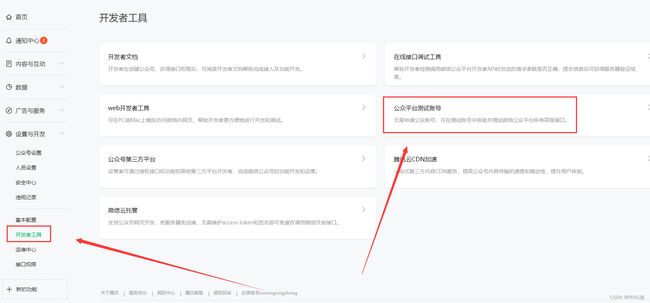
位置:左侧导航栏 开发者工具 下的 公众平台测试账号
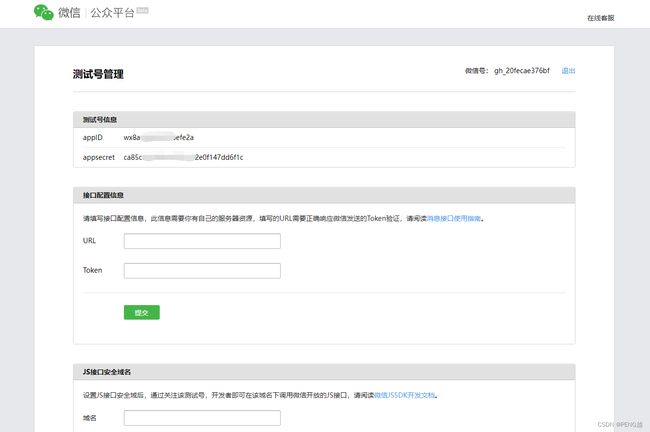
进入后会给你一个appID和一个appsecret,这个是关键参数,等会测试要用。这个接口配置信息就是与微信后端交互的关键。
-
实现接口配置信息
要与微信交互,必须通过此接口配置信息,完成后,点击提交测试,通过了才能进行后续的操作
注意事项:
URL必须 http:// 或者 https:// 开头,分别支持80端口和443端口
Token为英文或数字,长度为3-32字符

PS:意思就是你要有一个在线上的服务器,开启了80端口和443端口
然后你填写一个接口的URL,确保线上服务器的这个接口能用,能被微信访问到
然后在你填写的后端API上,做出对微信的响应
接口配置信息原文链接:https://developers.weixin.qq.com/doc/offiaccount/Basic_Information/Access_Overview.html
Django实现思路:
from django.http import HttpResponse
from rest_framework.response import Response
from rest_framework.views import APIView
import hashlib

class WeChatSignature(APIView):
    def get(self, request):
        signature = request.query_params.get("signature")
        timestamp = request.query_params.get("timestamp")
        nonce = request.query_params.get("nonce")
        yue_token = 'yueyue'
        sort_str = ''.join(sorted([yue_token, timestamp, nonce]))
        hash_str = hashlib.sha1(sort_str.encode()).hexdigest()
        if hash_str == signature:
            return HttpResponse(request.query_params.get("echostr"), content_type="text/html; charset=utf-8")
        else:
            return Response("Invalid signature", status=403)
填写了URL和Token后点提交,微信公众号那里填写的token,和我示例代码中的yue_token要一样。其他的照抄就行。如果微信能访问的到并且与Token校验成功即可
获取带参二维码
以上为前期对接工作,接下来开始描述应用代码。首先前端需要打开页面就请求登录的二维码,后端根据请求去访问微信拿到二维码链接。建议看看文档,有些参数和细节需要注意,用的Django的话直接看我代码也能懂大概意思。
生成带参二维码原文链接:https://developers.weixin.qq.com/doc/offiaccount/Account_Management/Generating_a_Parametric_QR_Code.html
实现步骤:
- 获取公众号全局接口调用凭证(有效期2h)AccessToken
- 获取二维码Ticket
- Ticket拼接URL,得到二维码的URL
- 把scene(最后轮询的时候用的)和url一起返回前端
Django代码:
import requests
import uuid
import json

# Demo先定义在View中,这两个参数在测试号管理页看得到
appID = "wx8axxxxxx236efe2a"
appSecret = "131b8d9dxxxxxxxx11d3b751ce6b2"

class WeChatLogin(APIView):
    """
    微信登录
    """

    def get(self, request):
        qr_data = self.createShortTicket(str(uuid.uuid4()))
        qr_code_url = "https://mp.weixin.qq.com/cgi-bin/showqrcode?ticket={}".format(qr_data[0])
        return Response({'url': qr_code_url, 'scene': qr_data[1]})

    def createShortTicket(self, scene_str):
        """
        生成短效二维码
        :param scene_str:
        :return:
        """
        print("scene_str-------{}".format(scene_str))
        url = "https://api.weixin.qq.com/cgi-bin/qrcode/create?access_token={}".format(self.getAccessToken())
        data = {
            "expire_seconds": 180,              # 二维码有效时间, 以秒为单位
            "action_name": "QR_STR_SCENE",      # 二维码类型, QR_STR_SCENE为临时的字符串参数值
            "action_info": {                    # 二维码详细信息
                "scene": {
                    "scene_str": scene_str      # 场景值ID(字符串形式的ID, 字符串类型, 长度限制为1到64
                }
            }
        }
        return [json.loads(requests.post(url, json=data).content.decode("utf-8")).get("ticket"), scene_str]

    def getAccessToken(self):
        """
        获取公众号全局接口调用凭证(有效期2h)
        建议公众号开发者使用中控服务器统一获取和刷新access_token
        """
        url = 'https://api.weixin.qq.com/cgi-bin/token?grant_type=client_credential&appid={}&secret={}' \
            .format(appID, appSecret)
        return requests.get(url).json().get('access_token')
Vue代码:
getQrUrl() {
      axios.get('https://api.xxxxx.pro/api/weChatLogin').then((res) => {
        console.log(res.data);
        this.qr_url = res.data.url
        this.scene = res.data.scene
        this.loading = false
      })
    }
// getQrUrl我放mounted里面的,打开页面就会执行这个方法
此时前端拿到的URL就是二维码的URL,直接点就能查看二维码,自己嵌在img就行。
处理用户扫码回调
此二维码会携带ticket以及scene,至于你要用哪个参数作为唯一凭证去校验登录成功都行。我这里用是scene。用ticket会方便很多,代码懒得改了。之前不确定ticket在并发是否会冲突的决定。这里写了很多print做测试用的,自己根据需求删掉就行。
这里需要清楚,你定义的这个WeChatSignature接口的get方法用于给微信做校验用,post就是微信给你的会调用的。
在用户扫了你给的二维码登录后。微信就会给你的服务器回调一个XML。用ET解析一下就行,然后去拿你需要的参数,我这里写了很多if判断,你去看看原文档就懂了,事件的类型罢了。
关注/取消关注事件原文档:
https://developers.weixin.qq.com/doc/offiaccount/Message_Management/Receiving_event_pushes.html
公众号回复消息原文档:
https://developers.weixin.qq.com/doc/offiaccount/Message_Management/Passive_user_reply_message.html#0
Django代码:
import xml.etree.ElementTree as ET
from django.utils import timezone
from app.models import TextMsg, User

class WeChatSignature(APIView):
    def get(self, request):
        signature = request.query_params.get("signature")
        timestamp = request.query_params.get("timestamp")
        nonce = request.query_params.get("nonce")
        yue_token = 'yueyue'
        sort_str = ''.join(sorted([yue_token, timestamp, nonce]))
        hash_str = hashlib.sha1(sort_str.encode()).hexdigest()
        if hash_str == signature:
            return HttpResponse(request.query_params.get("echostr"), content_type="text/html; charset=utf-8")
        else:
            return Response("Invalid signature", status=403)

    def post(self, request):
        """
        to_user_name: 公众号的微信号
        from_user_name: 发送方OpenId
        create_time:消息创建时间(时间戳)
        msg_type: 消息类型
        :return:
        """
        wx_data = request.body
        xml_data = ET.fromstring(wx_data)
        to_user_name = xml_data.find('ToUserName').text
        from_user_name = xml_data.find('FromUserName').text
        create_time = xml_data.find('CreateTime').text
        msg_type = xml_data.find('MsgType').text
        event_key = xml_data.find('EventKey').text
        print('---------------------------')
        print("EventKey---------{}".format(event_key))
        print('---------------------------')
        if msg_type == 'event':
            event = xml_data.find('Event').text
            print(event)
            # 如果未关注
            if event == 'subscribe':
                tmp_scene_str = event_key.split('_')[1]
                scene_str = User.objects.filter(tmp_scene_str=tmp_scene_str)
                # 如果查询到此凭证已经存在,就证明此二维码已经被人扫过且登录了。直接走else
                if not scene_str.exists():
                    ticket = xml_data.find('Ticket').text
                    print("ticket-----------{}".format(ticket))
                    datetime_obj = timezone.datetime.fromtimestamp(int(create_time))
                    create_time = datetime_obj.strftime('%Y-%m-%d %H:%M:%S')
                    new_user = User.objects.get_or_create(openId=from_user_name)[0]
                    new_user.tmp_scene_str = tmp_scene_str
                    new_user.lastLoginTime = create_time
                    new_user.save()
                    xml_text = TextMsg(to_user_name, from_user_name, '新用户--登录成功').structReply()
                else:
                    xml_text = TextMsg(to_user_name, from_user_name, '二维码已失效').structReply()
                return HttpResponse(xml_text)
            # 如果关注了
            elif event == 'SCAN':
                scene_str = User.objects.filter(tmp_scene_str=event_key)
                # 同上,码被扫过,登录了就不走这里了
                if not scene_str.exists():
                    ticket = xml_data.find('Ticket').text
                    print("ticket-----------{}".format(ticket))
                    datetime_obj = timezone.datetime.fromtimestamp(int(create_time))
                    create_time = datetime_obj.strftime('%Y-%m-%d %H:%M:%S')
                    User.objects.filter(openId=from_user_name).update(tmp_scene_str=event_key, lastLoginTime=create_time)
                    xml_text = TextMsg(to_user_name, from_user_name, '老用户--登录成功').structReply()
                else:
                    xml_text = TextMsg(to_user_name, from_user_name, '二维码已失效').structReply()
                return HttpResponse(xml_text)
         # 如果不是你已知的微信回调,就返回一个故障。。
        xml_text = TextMsg(to_user_name, from_user_name, '服务器故障,请联系管理员或重试').structReply()
        return HttpResponse(xml_text)
解释一下上面代码的作用,就是去判断微信的回调,如果是已关注和未关注事件。去User表找一下有没有这个event_key。微信给你回调的event_key就是你之前定义的scene_str。但是注意关注和为未关注返回的时候有区别,一个有前缀一个没有,文档写了,去看看,我代码里也处理了。通过from_user_name就知道是哪个用户登录的,然后把scene_str作为临时凭证保存。返回给微信的xml需要处理解析,这里我定义在models.py中了。就是这个TextMsg方法,顺便把User也粘贴来了。格式化这个字符串然后返回给的HttpResponse就是返回给微信公众号。依葫芦画瓢自己再改。后续前端轮询的时候只需要去找scene_str在数据库中是否存在就行。如果存在就把此scene_str对应的用户数据返回前端。
models.py
from django.db import models
import time

class TextMsg:
    def __init__(self, to_user, from_user, recv_msg):
        self._toUser = to_user
        self._fromUser = from_user
        self._recvMsg = recv_msg
        self._nowTime = int(time.time())

    def structReply(self):
        text = """


                {}


                """.format(self._fromUser, self._toUser, self._nowTime, self._recvMsg)  # 前面两个参数的顺序需要特别注意
        return text


class User(models.Model):
    openId = models.CharField(null=True, blank=True, max_length=200, verbose_name='用户唯一凭证')
    tmp_scene_str = models.CharField(null=True, blank=True, max_length=100, verbose_name='登录临时凭证')
    lastLoginTime = models.CharField(null=True, blank=True, max_length=50, verbose_name='最后登录时间')
前端长轮询
为了方便看懂,把之前的getQrUlr也粘贴来了,意思就是如果用户打开网页,就开始执行getQrUrl。然后开启长轮询loginPoll方法,我这里为了做测试就这样写,你开发的时候自己再改。
Vue代码
methods: {
    getQrUrl() {
      axios.get('https://api.xxxx.pro/api/weChatLogin').then((res) => {
        console.log(res.data);
        this.qr_url = res.data.url
        this.scene = res.data.scene
        this.loading = false
      })
      this.tem_poll = setInterval(this.loginPoll, 1000)
    },

    loginPoll() {
    // 这里就是请求后端的时候顺便带上这个scene
      axios.get('https://api.xxxxx.pro/api/verifyLogin?scene=' + this.scene).then((res) => {
        console.log(res.data);
        if (res.data == 'success') {
        // 清除定时器
          clearInterval(this.tem_poll)
          this.$notify({
            title: '登录成功',
            type: 'success',
            duration: 0
          });
          return;
        }
      })
    }
  }
Django代码
class VerifyLogin(APIView):
    def get(self, request):
    	# 拿到前端给的scene
        scene_str = request.query_params.get('scene')
        # 查询数据库有没有此scene
        tmp_scene_str = User.objects.filter(tmp_scene_str=scene_str)
        print('scene_str-----------{}------------'.format(scene_str))
        print('tmp_scene_str-----------{}------------'.format(tmp_scene_str))
        # 如果有的话就证明这个用户扫码已经关注了,要么是新用户关注进来要么是老用户扫码进来
        if tmp_scene_str:
            print('-------------登录成功!-------------')
            return Response('success')
        # 如果没登陆就一直返回空
        return Response({})
前端长轮询拿到success,就代办登录成功,然后跳转啥页面或者要干啥再根据业务去做就行
整体逻辑不复杂,就是微信文档写的模糊。如果后续要消息推送啥的以上那个post方法都有用
要发模板消息可以看看这篇教程
微信公众号模板消息推送测试Python版无需服务器-保姆级教程
https://blog.csdn.net/qq_44718932/article/details/132223216
以上全部教程步骤就结束了,前端用了点饿了么UI,如果想要全部代码,可以上github查看。如果觉得有用麻烦来个三连。不懂的评论,我开了邮箱提醒,看到就解答
Github地址:https://github.com/BioYue/WeChatLogin


