python 连接钉钉传输工作数据监控
先导
Hello ,这里是百里。
工作中运维工作经常会遇到一些数据汇报,数据监控, 作为一个新人真心感觉这些数据没有什么意思(当然也许是我菜),有句话怎么说,懒惰是人类进步的阶梯.这里使用python 连接数据把数据 传到钉钉, 这样可以进行数据监控 ,看看是哪家小可爱又 搞事情了 ╭(╯^╰)╮
钉钉接口
钉钉提供了群机器人接口等很多很多接口,网上demo 一大堆.这里只制作简单的表述
钉钉官网:
${title} - 钉钉开放平台
可以给群里增加一个机器人,通过@固定人 ,或者所有人,广播等方式发送信息
创建钉钉机器人
首先你得建立个群
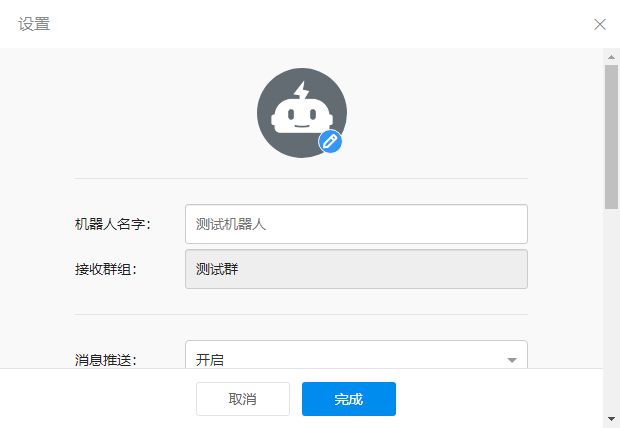
增加群机器人
完成必要的安全设置,勾选我已阅读并同意《自定义机器人服务及免责条款》,然后单击完成。
目前有3种安全设置方式,请根据需要选择一种:
-
自定义关键词:最多可以设置10个关键词,消息中至少包含其中1个关键词才可以发送成功。
例如添加了一个自定义关键词:监控报警,则这个机器人所发送的消息,必须包含监控报警这个词,才能发送成功。
-
加签:
把
timestamp+"\n"+密钥当做签名字符串,使用HmacSHA256算法计算签名,然后进行Base64 encode,最后再把签名参数再进行urlEncode,得到最终的签名(需要使用UTF-8字符集)。
https://oapi.dingtalk.com/robot/send?access_token=XXXXXX×tamp=XXX&sign=XX
X
测试机器人
python 代码版本
这里直接使用 加签版本的,因为这种时间判定的才是最常用的
import requests
import json
import time
import hmac
import hashlib
import base64
import urllib.parse

timestamp = str(round(time.time() * 1000))   #毫秒级时间戳
secret = '你的secret'
secret_enc = secret.encode('utf-8')
string_to_sign = '{}\n{}'.format(timestamp, secret)
string_to_sign_enc = string_to_sign.encode('utf-8')
hmac_code = hmac.new(secret_enc, string_to_sign_enc, digestmod=hashlib.sha256).digest()
sign = urllib.parse.quote_plus(base64.b64encode(hmac_code))
#往post接口里面仍数据

def dingmessage():

# 请求的URL,WebHook地址

    webhook = "https://oapi.dingtalk.com/robot/send?access_token=你的token×tamp="+str(timestamp)+"&sign="+str(sign)
    print(webhook)
#构建请求头部
    header = {
        "Content-Type": "application/json",
        "Charset": "UTF-8"
}
#构建请求数据
    tex = "能力越大,责任越大。"
    message ={

        "msgtype": "text",
        "text": {
            "content": tex
        },
        "at": {

            "isAtAll": False
        }

    }
#对请求的数据进行json封装
    message_json = json.dumps(message)
#发送请求
    info = requests.post(url=webhook,data=message_json,headers=header)
#打印返回的结果
    print(info.text)

if __name__=="__main__":
    dingmessage()
打印结果
如果显示ok 那么就是说数据传输成功了
这时候接入钉钉即可 查看数据
好了现在py已经能够给钉钉发送信息了,那么怎么做监控呢
创建时间监控 实时发送信息
我这里以apscheduler 框架 进行定时巡回
一、安装APScheduler
pip install apscheduler二、基本概念
APScheduler有四大组件:
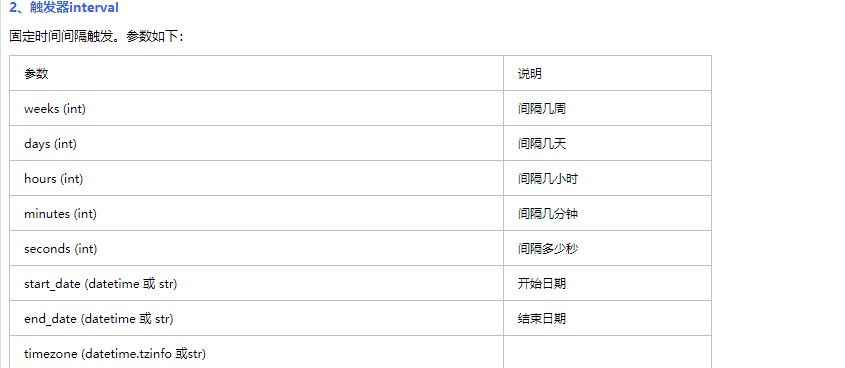
1、触发器 triggers :触发器包含调度逻辑。每个作业都有自己的触发器,用于确定下一个任务何时运行。除了初始配置之外,触发器是完全无状态的。有三种内建的trigger:
(1)date: 特定的时间点触发
(2)interval: 固定时间间隔触发
(3)cron: 在特定时间周期性地触发
2、任务储存器 job stores:用于存放任务,把任务存放在内存(为默认MemoryJobStore)或数据库中。3、执行器 executors: 执行器是将任务提交到线程池或进程池中运行,当任务完成时,执行器通知调度器触发相应的事件。
4、调度器 schedulers: 把上方三个组件作为参数,通过创建调度器实例来运行根据开发需求选择相应的组件,下面是不同的调度器组件:BlockingScheduler 阻塞式调度器:适用于只跑调度器的程序。BackgroundScheduler 后台调度器:适用于非阻塞的情况,调度器会在后台独立运行。AsyncIOScheduler AsyncIO调度器,适用于应用使用AsnycIO的情况。GeventScheduler Gevent调度器,适用于应用通过Gevent的情况。TornadoScheduler Tornado调度器,适用于构建Tornado应用。TwistedScheduler Twisted调度器,适用于构建Twisted应用。QtScheduler Qt调度器,适用于构建Qt应用。
三、使用步骤
1、新建一个调度器schedulers
2、添加调度任务
3、运行调度任务
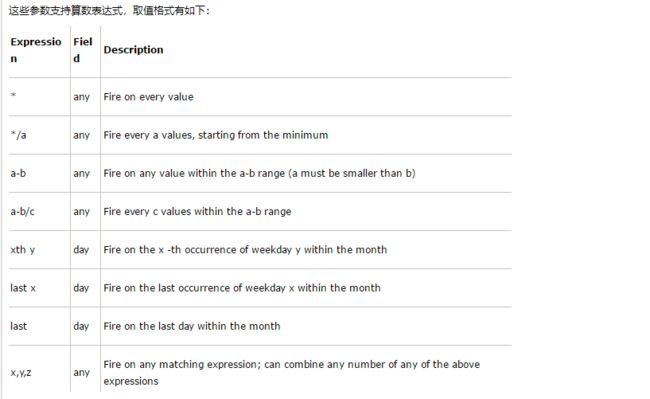
比如写3 就是说 , 逢3触发
*/3 就是说 每隔3单位触发
假设触发条件
我们这里判定如果当前时间4个数据加起来大于12 那么 就发送消息
每分钟发送一次
from apscheduler.schedulers.blocking import BlockingScheduler
import datetime
# 输出时间
import pymssql
import copy
import time
import requests
import json
import hmac
import hashlib
import base64
import urllib.parse

timestamp = str(round(time.time() * 1000))
secret = '你的secret'
secret_enc = secret.encode('utf-8')
string_to_sign = '{}\n{}'.format(timestamp, secret)
string_to_sign_enc = string_to_sign.encode('utf-8')
hmac_code = hmac.new(secret_enc, string_to_sign_enc, digestmod=hashlib.sha256).digest()
sign = urllib.parse.quote_plus(base64.b64encode(hmac_code))

# now = time.time() #返回float数据
#
#
# #毫秒级时间戳
# print(int(round(now * 1000)))
# now1=int(round(now * 1000))


def dingmessage(num):

# 请求的URL,WebHook地址

    webhook = "https://oapi.dingtalk.com/robot/send?access_token=你的token×tamp="+str(timestamp)+"&sign="+str(sign)
    print(webhook)
#构建请求头部
    header = {
        "Content-Type": "application/json",
        "Charset": "UTF-8"
}
#构建请求数据
    tex = "能力越大,责任越大。"+str(num)
    message ={

        "msgtype": "text",
        "text": {
            "content": tex
        },
        "at": {

            "isAtAll": False
        }

    }
#对请求的数据进行json封装
    message_json = json.dumps(message)
#发送请求
    info = requests.post(url=webhook,data=message_json,headers=header)
#打印返回的结果
    print(info.text)


def job():
    hour = datetime.datetime.now().hour
    min = datetime.datetime.now().minute
    f1 = str(hour)[0]
    f2 = str(hour)[1]
    f3 = str(min)[0]
    f4 = str(min)[1]
    print(f1)
    print(f2)
    print(f3)
    print(f4)
    print(int(f1) + int(f2) + int(f3) + int(f4))
    if int(f1) + int(f2) + int(f3) + int(f4) > 12:
        dingmessage(int(f1) + int(f2) + int(f3) + int(f4) )


# BlockingScheduler
scheduler = BlockingScheduler()
#1-23小时内,每一分钟触发一次, 后面那个意思是说如果3600 秒触发 那么讲重新执行该任务
scheduler.add_job(job, 'cron', hour='1-23', minute='*/1',misfire_grace_time=3600)#1
scheduler.start()
结果
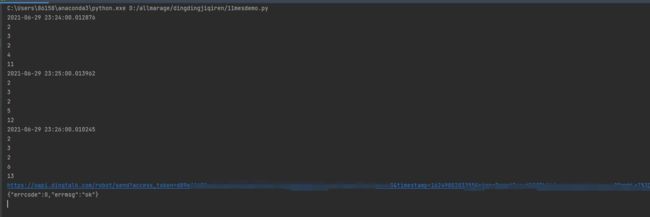
运行结果
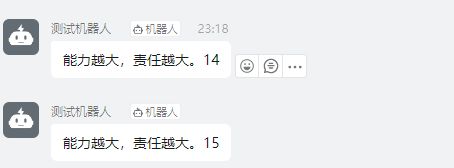
钉钉结果
如图 23.18分 2+3+1+8=14 >12 触发条件 就给钉钉 发送信息了
致此一个 发送文字功能实现,出现异常问题即可发送钉钉,实时解答.
还有一点就是钉钉一定要调成前台允许显示, 然后在录音个对应的提示. 懒人必备,
个人总结
科技改变生活,'懒人'懂得创新,这里是百里, 带给大家小技能,踩坑笔记,学习反思。
本期内容,适用从事db,运维相关工作人员,代码内容简单,注册迅速,希望大家喜欢~ .


