713-C++11容器emplace方法原理剖析

C++11容器emplace方法的现象

C++11容器的push和insert方法,都匹配了emplace的新的方法,也是用来添加数据的。
emplace使用的时候感觉和之前的功能是一样的,都是添加新的元素,但是到底有什么不同呢?

示例代码1

#include
#include
using namespace std;

class Test
{
public:
	Test(int a) { cout << "Test(int)"<<endl; }
	Test(int a, int b) { cout << "Test(int,int)"<<endl; }
	Test(const Test&a) { cout << "Test(const Test&)" << endl; }
	Test(const Test&&a) { cout << "Test(const Test&&)" << endl; }
	~Test() { cout << "~Test()" << endl; }
};

int main()
{
	Test t1(10);//是左值哦
	vector<Test>v; 
	v.reserve(100);//只开辟空间,没有构建对象
	cout << "=====================" << endl;
	v.push_back(t1);//匹配的是带左值引用参数的拷贝构造函数
	v.emplace_back(t1);//匹配的是带左值引用参数的拷贝构造函数
	cout << "=====================" << endl;

	return 0;
}

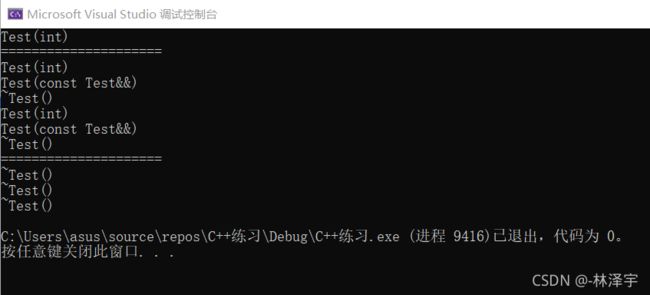
713-C++11容器emplace方法原理剖析_第1张图片
如果是直接插入 已存在的 是左值的 对象,两个方法是没有区别的,都是调用带左值引用参数的拷贝构造函数构建vector上的对象

示例代码2

如果插入的是临时对象呢?

#include
#include
using namespace std;

class Test
{
public:
	Test(int a) { cout << "Test(int)"<<endl; }
	Test(int a, int b) { cout << "Test(int,int)"<<endl; }
	Test(const Test&a) { cout << "Test(const Test&)" << endl; }
	Test(const Test&&a) { cout << "Test(const Test&&)" << endl; }
	~Test() { cout << "~Test()" << endl; }
};

int main()
{
	Test t1(10);//是左值哦
	vector<Test>v; 
	v.reserve(100);//只开辟空间,没有构建对象
	cout << "=====================" << endl;
	v.push_back(Test(20));//匹配的是带右值引用参数的拷贝构造函数
	v.emplace_back(Test(20));//匹配的是带右值引用参数的拷贝构造函数
	cout << "=====================" << endl;

	return 0;
}

临时对象的生命周期很短,只存在当前语句中。
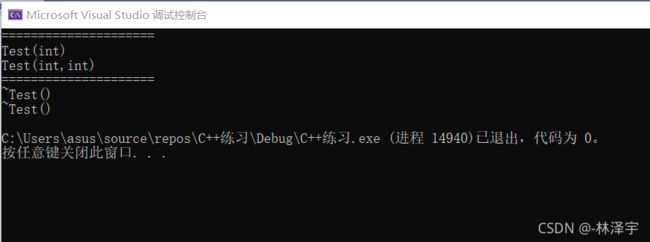
713-C++11容器emplace方法原理剖析_第2张图片
都是生成临时对象,然后调用带右值引用参数的拷贝构造函数构建vector上的对象
这两种方法还是没有区别啊!

只要是插入对象,这2种方法是没有区别的!!!

示例代码3

我们现在传入的是整数参数

#include
#include
using namespace std;

class Test
{
public:
	Test(int a) { cout << "Test(int)"<<endl; }
	Test(int a, int b) { cout << "Test(int,int)"<<endl; }
	Test(const Test&a) { cout << "Test(const Test&)" << endl; }
	Test(const Test&&a) { cout << "Test(const Test&&)" << endl; }
	~Test() { cout << "~Test()" << endl; }
};

int main()
{
	vector<Test>v; 
	v.reserve(100);//只开辟空间,没有构建对象
	cout << "=====================" << endl;
	v.emplace_back(20);
	v.emplace_back(20, 40);
	cout << "=====================" << endl;

	return 0;
}

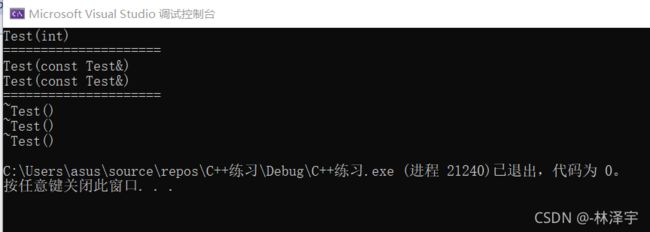
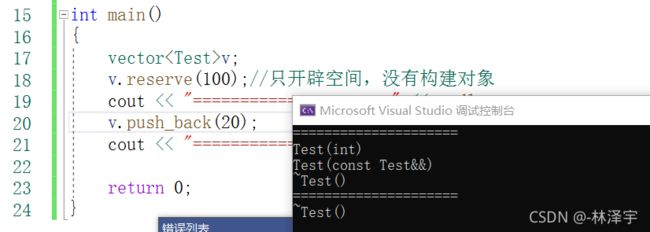
713-C++11容器emplace方法原理剖析_第3张图片
现在相当于是实参在传递的过程中,没有定义过对象,没有生成过临时对象!!!
直接传入你要构建Test对象所需要的参数(构造函数的参数),然后直接在vector底层调用了相应的构造函数—在vector底层直接构造Test对象了。
在这里插入图片描述
这样做,当然好,效率直接就提升了啊!而且写起来特别简单,不需要像push_back必须要传Test对象参数:

713-C++11容器emplace方法原理剖析_第4张图片
713-C++11容器emplace方法原理剖析_第5张图片

代码示例4

int main()
{
	unordered_map<int, string>map;
	map.insert(make_pair(10, "linzeyu"));
	//构建临时对象,然后拿临时对象调用右值引用参数的拷贝构造函数构造map上的对象
	//在map底层构建好对象后,出了这条语句,临时对象析构。

	map.emplace(10, "zhang san");
	//直接传入构建对象所需要的参数,在map底层直接调用普通构造函数生成对象了,
	//没有产生临时对象等额外的对象,没有额外的函数的调用
	return 0;
}

713-C++11容器emplace方法原理剖析_第6张图片

我们看看emplace的实现原理

emplace是通过可变参模板参数来实现的。我们可以理解成C语言的可变参函数:printf
在这里插入图片描述

#include 
using namespace std;

//定义容器的空间配置器,和C++标准库的allocator实现一样
template<typename T>
struct MyAllocator//模板类 struct定义 默认公有的 
{
	T* allocate(size_t size)//负责内存开辟
	{
		return (T*)malloc(sizeof(T) * size);
	}
	void deallocate(void* p)//负责内存释放
	{
		free(p);
	}
	template<typename...Types>
	void construct(T* p, Types&& ...args)
	{
		//如果args是个Test对象,T是Test类型,调用的是Test的拷贝构造函数了
		//如果args是构建对象的参数,匹配的也就是相应的构造函数了
		new (p) T(std::forward<Types>(args)...);
	}
	void destroy(T* p)//负责对象析构
	{
		p->~T();// ~T()代表了T类型的析构函数
	}

};
template<typename T, typename Alloc = MyAllocator<T>>//初始化,让用户不用指定,用默认的 
class Vector
{
public:
	Vector(int size = 10)//构造函数 
	{
		//需要把内存开辟和对象构造分开处理
		//_first = new T[size];
		_first = _allocator.allocate(size);
		_last = _first;
		_end = _first + size;
	}
	~Vector()//析构函数 
	{
		//析构容器有效的元素,然后释放_first指针指向的堆内存
		//delete[]_first;
		for (T* p = _first; p != _last; ++p)
		{
			_allocator.destroy(p);//把_first指针指向的数组的有效元素进行析构操作
		}
		_allocator.deallocate(_first);//释放堆上的数组内存
		_first = _last = _end = nullptr;
	}
	Vector(const Vector<T>& rhs)//拷贝构造函数 
	{
		int size = rhs._end - rhs._first;//空间大小 
		//_first = new T[size];
		_first = _allocator.allocate(size);
		int len = rhs._last - rhs._first;//有效数据的长度 
		for (int i = 0; i < len; ++i)
		{
			//_first[i] = rhs._first[i];
			_allocator.construct(_first + i, rhs._first[i]);
		}
		_last = _first + len;
		_end = _first + size;
	}
	Vector<T>& operator=(const Vector<T>& rhs)//赋值函数 
	{
		if (this == &rhs)
			return *this;

		//delete[]_first;
		for (T* p = _first; p != _last; ++p)
		{
			_allocator.destroy(p);//把_first指针指向的数组的有效元素进行析构操作
		}
		_allocator.deallocate(_first);

		int size = rhs._end - rhs._first;
		//_first = new T[size];
		_first = _allocator.allocate(size);
		int len = rhs._last - rhs._first;
		for (int i = 0; i < len; ++i)
		{
			//_first[i] = rhs._first[i];
			_allocator.construct(_first + i, rhs._first[i]);
		}
		_last = _first + len;
		_end = _first + size;
		return *this;
	}
	/*void push_back(const T& val)//向容器末尾添加元素
	{
		if (full())
			expand();
		//*_last++ = val;   _last指针指向的内存构造一个值为val的对象
		_allocator.construct(_last, val);
		_last++;
	}
	void push_back(T&& val)//接收右值 一个右值引用变量本身还是一个左值
	{
		if (full())
			expand();

		_allocator.construct(_last, std::move(val));
		//val本身还是左值啊。匹配的还是左值的construct。怎么办? 
		//使用std::move把val 强转成右值引用类型 
		_last++;
	}*/

	template<typename Ty>//函数模板的类型推演 + 引用折叠
	void push_back(Ty&& val)//Ty CMyString& + && = CMyString&
	{
		if (full())
			expand();

		//move(左值):移动语义,得到右值类型   (int&&)a
		//forward:类型完美转发,能够识别左值和右值类型
		_allocator.construct(_last, std::forward<Ty>(val));
		_last++;
	}

	void pop_back()//从容器末尾删除元素
	{
		if (empty())
			return;
		//--_last; //不仅要把_last指针--,还需要析构删除的元素
		--_last;
		_allocator.destroy(_last);
	}
	T back()const//返回容器末尾的元素的值
	{
		return *(_last - 1);
	}
	bool full()const { return _last == _end; }
	bool empty()const { return _first == _last; }
	int size()const { return _last - _first; }

	//引用折叠,这个概念在我的《理解C++的右值引用并进行应用(CMyStirng)》博客中有解释
	//可接收实参的左值或者右值,动态可变
	template<typename...Types>//可变参模板参数
	void emplace_back(Types&&...args)//右值引用,而且函数可以接受多个参数,不固定的任意的
	//我们可以传很多个参数,但是它底层看Test构造函数需要几个参数,如果传入的参数超过了,就报错
	{
		_allocator.construct(_last, std::forward<Types>(args)...);
		_last++;
	}
private:
	T* _first;//指向数组起始的位置
	T* _last; //指向数组中有效元素的后继位置
	T* _end;//指向数组空间的后继位置
	Alloc _allocator;//定义容器的空间配置器对象

	void expand()//容器的二倍扩容
	{
		int size = _end - _first;
		//T *ptmp = new T[2 * size];
		T* ptmp = _allocator.allocate(2 * size);
		for (int i = 0; i < size; ++i)
		{
			//ptmp[i] = _first[i];
			_allocator.construct(ptmp + i, _first[i]);
		}
		//delete[]_first;
		for (T* p = _first; p != _last; ++p)
		{
			_allocator.destroy(p);
		}
		_allocator.deallocate(_first);
		_first = ptmp;
		_last = _first + size;
		_end = _first + 2 * size;
	}
};


class Test
{
public:
	Test(int a) { cout << "Test(int)" << endl; }
	Test(int a, int b) { cout << "Test(int,int)" << endl; }
	Test(const Test& a) { cout << "Test(const Test&)" << endl; }
	Test(const Test&& a) { cout << "Test(const Test&&)" << endl; }
	~Test() { cout << "~Test()" << endl; }
};

int main()
{
	Vector<Test>v;
	cout << "=====================" << endl;
	v.emplace_back(20);
	v.emplace_back(20, 40);
	cout << "=====================" << endl;

	return 0;
}

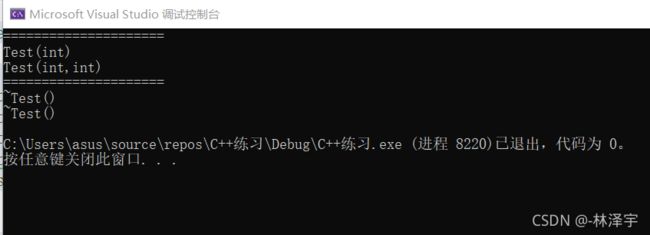
713-C++11容器emplace方法原理剖析_第7张图片
非常的OK!!!

我摘出emplace的实现核心代码如下,方便大家观看:

//定义容器的空间配置器,和C++标准库的allocator实现一样
template<typename T>
struct MyAllocator//模板类 struct定义 默认公有的 
{
	T* allocate(size_t size)//负责内存开辟
	{
		return (T*)malloc(sizeof(T) * size);
	}
	void deallocate(void* p)//负责内存释放
	{
		free(p);
	}
	template<typename...Types>
	void construct(T* p, Types&& ...args)
	{
		//如果args是个Test对象,T是Test类型,调用的是Test的拷贝构造函数了
		//如果args是构建对象的参数,匹配的也就是相应的构造函数了
		new (p) T(std::forward<Types>(args)...);
	}
	void destroy(T* p)//负责对象析构
	{
		p->~T();// ~T()代表了T类型的析构函数
	}

};

//引用折叠,这个概念在我的《理解C++的右值引用并进行应用(CMyStirng)》博客中有解释
//可接收实参的左值或者右值,动态可变
template<typename...Types>//可变参模板参数
void emplace_back(Types&&...args)//右值引用,而且函数可以接受多个参数,不固定的任意的
//我们可以传很多个参数,但是它底层看Test构造函数需要几个参数,如果传入的参数超过了,就报错
{
	_allocator.construct(_last, std::forward<Types>(args)...);
	_last++;
}

你可能感兴趣的:(C++的学习,c++,容器,vector)