RabbitMQ - 安装配置及入门案例
RabbitMQ - 安装配置及入门案例
目录
- RabbitMQ - 安装配置及入门案例
-
- 1. 安装及配置 RabbitMQ
-
- 1.1 安装 gcc
- 1.2 安装 Erlang
- 1.3 安装 RabbitMQ
- 1.4 开启管理界面及配置
- 1.5 启动
- 1.6 配置虚拟主机及用户
-
- 1.6.1 用户⻆色
- 1.6.2 Virtual Hosts 配置
- 2. RabbitMQ 入门案例
-
- 2.1 搭建示例工程
-
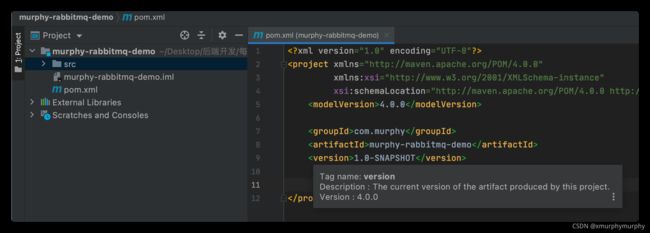
- 2.1.1 创建工程
- 2.1.2 添加依赖
- 2.2 编写生产者
- 2.3 编写消费者
- 2.4 小结
1. 安装及配置 RabbitMQ
注意:此处使用CentOS 7虚拟机安装,并在主机进行测试
1.1 安装 gcc
在线安装依赖环境:gcc
yum install build-essential openssl openssl-devel unixODBC unixODBC-devel make gcc gcc-c++ kernel-devel m4 ncurses-devel tk tc xz
1.2 安装 Erlang
# 上传rpm文件
erlang-18.3-1.el7.centos.x86_64.rpm
socat-1.7.3.2-5.el7.lux.x86_64.rpm
rabbitmq-server-3.6.5-1.noarch.rpm

# 安装
rpm -ivh erlang-18.3-1.el7.centos.x86_64.rpm
如果出现如下错误(注意:如果没有报错,直接跳转到安装RabbitMQ)
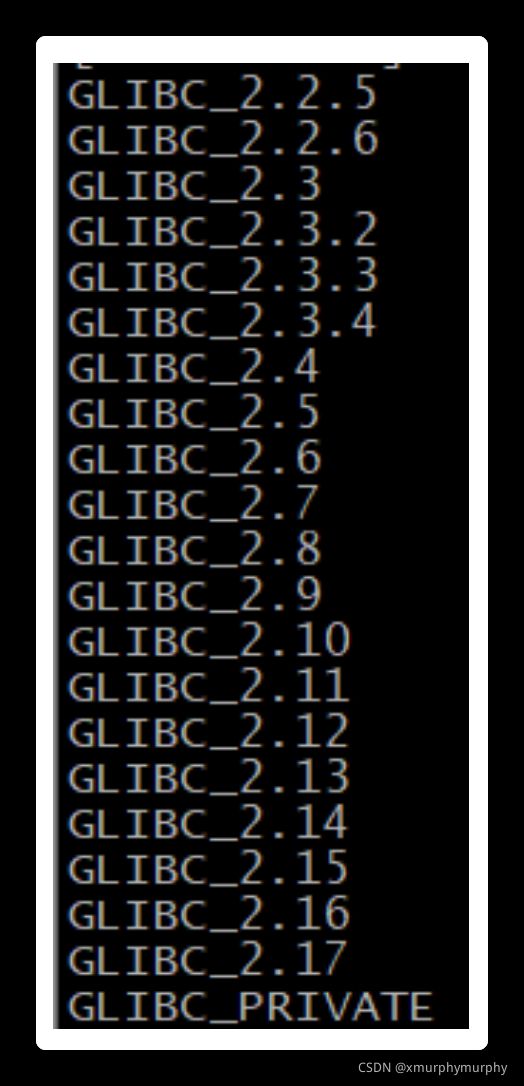
说明gblic版本太低。我们可以查看当前机器的gblic版本
strings /lib64/libc.so.6 | grep GLIBC
运行版本需要2.15,报错由于版本过低,所以需要升级glibc
下面进行glibc的升级操作:
- 使用
yum更新安装依赖
sudo yum install zlib-devel bzip2-devel openssl-devel ncurses-devel sqlite-devel readline-devel tk-devel gcc make -y
- 下载
rpm包
wget http://copr-be.cloud.fedoraproject.org/results/mosquito/myrepo-el6/epel-6-x86_64/glibc-2.17-55.fc20/glibc-utils-2.17-55.el6.x86_64.rpm &
wget http://copr-be.cloud.fedoraproject.org/results/mosquito/myrepo-el6/epel-6-x86_64/glibc-2.17-55.fc20/glibc-static-2.17-55.el6.x86_64.rpm &
wget http://copr-be.cloud.fedoraproject.org/results/mosquito/myrepo-el6/epel-6-x86_64/glibc-2.17-55.fc20/glibc-2.17-55.el6.x86_64.rpm &
wget http://copr-be.cloud.fedoraproject.org/results/mosquito/myrepo-el6/epel-6-x86_64/glibc-2.17-55.fc20/glibc-common-2.17-55.el6.x86_64.rpm &
wget http://copr-be.cloud.fedoraproject.org/results/mosquito/myrepo-el6/epel-6-x86_64/glibc-2.17-55.fc20/glibc-devel-2.17-55.el6.x86_64.rpm &
wget http://copr-be.cloud.fedoraproject.org/results/mosquito/myrepo-el6/epel-6-x86_64/glibc-2.17-55.fc20/glibc-headers-2.17-55.el6.x86_64.rpm &
wget http://copr-be.cloud.fedoraproject.org/results/mosquito/myrepo-el6/epel-6-x86_64/glibc-2.17-55.fc20/nscd-2.17-55.el6.x86_64.rpm &
- 安装
rpm包
sudo rpm -Uvh socat-1.7.3.2-1.1.el7.x86_64.rpm --force --nodeps
- 安装完毕后再查看
glibc版本,发现glibc版本已经到 2.17
strings /lib64/libc.so.6 | grep GLIBC
1.3 安装 RabbitMQ
# 安装
rpm -ivh socat-1.7.3.2-1.1.el7.x86_64.rpm --force --nodeps
# 安装
rpm -ivh rabbitmq-server-3.6.5-1.noarch.rpm
1.4 开启管理界面及配置
# 开启管理界面
rabbitmq-plugins enable rabbitmq_management
# 修改默认配置信息
vim /usr/lib/rabbitmq/lib/rabbitmq_server-3.6.5/ebin/rabbit.app
# 比如修改密码、配置等等,例如:loopback_users 中的<<"guest">>,去除尖括号及引号,只保留 guest
1.5 启动
service rabbitmq-server start # 启动服务
service rabbitmq-server stop # 停止服务
service rabbitmq-server restart # 重启服务

netstat -tlnpl # 查看端口
- 设置配置文件,即属于
RabbitMQ的Config File
cd /usr/share/doc/rabbitmq-server-3.6.5/

cp rabbitmq.config.example /etc/rabbitmq/rabbitmq.config
1.6 配置虚拟主机及用户
1.6.1 用户⻆色
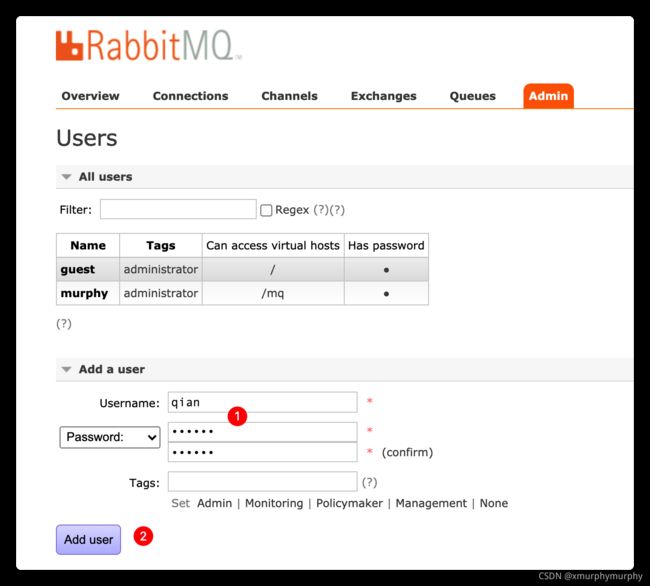
RabbitMQ在安装好后,可以访问http://ip地址:15672;其自带了guest/guest的用户名和密码;
如果需要创建自定义用户;那么也可以登录管理界面后,如下操作:
⻆色说明:
- 超级管理员
(administrator)
可登陆管理控制台,可查看所有的信息,并且可以对用户,策略(policy)进行操作。
- 监控者
(monitoring)
可登陆管理控制台,同时可以查看rabbitmq节点的相关信息(进程数,内存使用情况,磁盘使用情况等)
- 策略制定者
(policymaker)
可登陆管理控制台,同时可以对policy进行管理。但无法查看节点的相关信息(上图红框标识的部分)。
- 普通管理者
(management)
仅可登陆管理控制台,无法看到节点信息,也无法对策略进行管理。
- 其他
无法登陆管理控制台,通常就是普通的生产者和消费者。
1.6.2 Virtual Hosts 配置
- 像
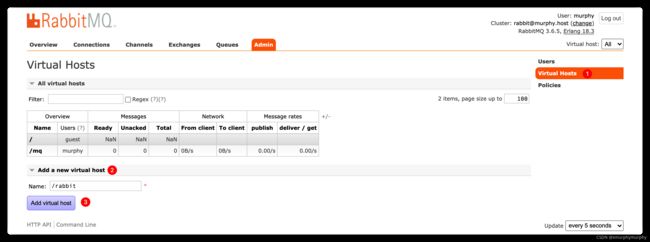
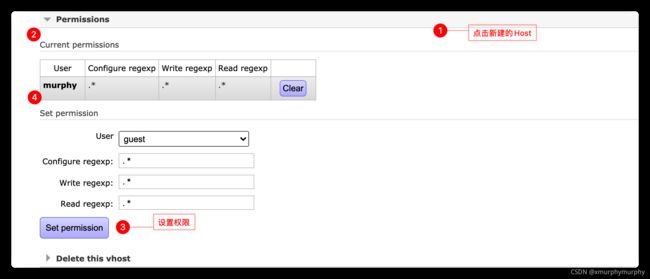
mysql拥有数据库的概念并且可以指定用户对库和表等操作的权限。RabbitMQ也有类似的权限管理;在RabbitMQ中可以虚拟消息服务器Virtual Host,每个Virtual Hosts相当于一个相对独立的RabbitMQ服务器,每个VirtualHost之间是相互隔离的。 exchange、queue、message不能互通。 相当于mysql的db。Virtual Name一般以/开头。
创建 Virtual Hosts
设置 Virtual Hosts 权限 - 单机需要设置的Hosts Name
- 至此,完成
RabbitMQ的简单配置!
2. RabbitMQ 入门案例
简单模式
在上图的模型中,有以下概念:
P:生产者,也就是要发送消息的程序C:消费者:消息的接收者,会一直等待消息到来queue:消息队列,图中红色部分。类似一个邮箱,可以缓存消息;生产者向其中投递消息,消费者从其中取出消息
2.1 搭建示例工程
2.1.1 创建工程
2.1.2 添加依赖
- 往
murphy-rabbitmq-demo的pom.xml文件中添加如下依赖:
<dependency>
		<groupId>com.rabbitmqgroupId>
		<artifactId>amqp-clientartifactId>
		<version>5.6.0version>
dependency>
2.2 编写生产者
- 编写消息生产者 -
com.murphy.rabbitmq.simple.Producer
import com.rabbitmq.client.Channel;
import com.rabbitmq.client.Connection;
import com.rabbitmq.client.ConnectionFactory;

import java.io.IOException;
import java.util.concurrent.TimeoutException;

/**
 * 生产者
 *
 * @author murphy
 * @since 2021/9/11 6:28 下午
 */
public class Producer {

    private static String QUEUE_NAME = "simple_queue";

    public static void main(String[] args) throws IOException, TimeoutException {
        // 创建连接工厂
        ConnectionFactory connectionFactory = new ConnectionFactory();
        // 主机地址:默认为localhost - 这里使用Linux虚拟机的地址
        connectionFactory.setHost("192.168.XXX.XXX");
        // 连接端口:默认5672
        connectionFactory.setPort(5672);
        // 虚拟主机名称:默认为 /
        connectionFactory.setVirtualHost("/mq");
        // 连接用户名:默认为guest - 这里使用自定义用户
        connectionFactory.setUsername("murphy");
        // 连接密码:默认为guest - 这里使用自定义用户
        connectionFactory.setPassword("xmf123123");

        // 创建连接
        Connection connection = connectionFactory.newConnection();
        // 创建频道
        Channel channel = connection.createChannel();
        // 声明(创建)队列
        /**
         * 参数1: 队列名称
         * 参数2: 是否定义持久化队列
         * 参数3: 是否独占本次连接,只能有一个Consumer监听这个队列
         * 参数4: 是否在不使用的时候自动删除队列,当没有Consumer的时候,自动删除
         * 参数5: 队列其它参数
         */
        channel.queueDeclare(QUEUE_NAME, true, false, false, null);
        // 发送消息
        String message = "Hello! RabbitMQ";
        /**
         * 参数1: 交换机名称,如果没有指定则使用默认Default Exchange
         * 参数2: 路由key,简单模式可以传递队列名称
         * 参数3: 消息其它属性
         * 参数4: 消息内容
         */
        channel.basicPublish("", QUEUE_NAME, null, message.getBytes());
        System.out.println("Send Successful —— " + message);
        // 释放资源
        channel.close();
        connection.close();
    }
}
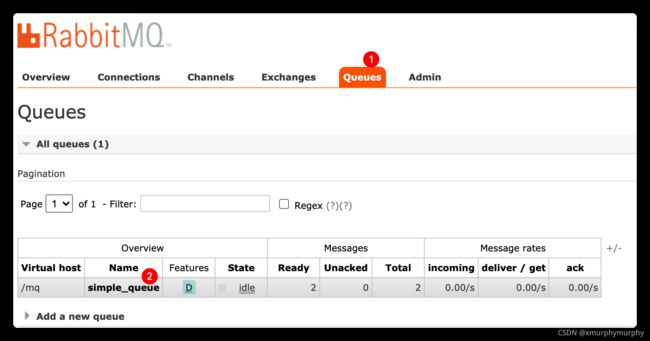
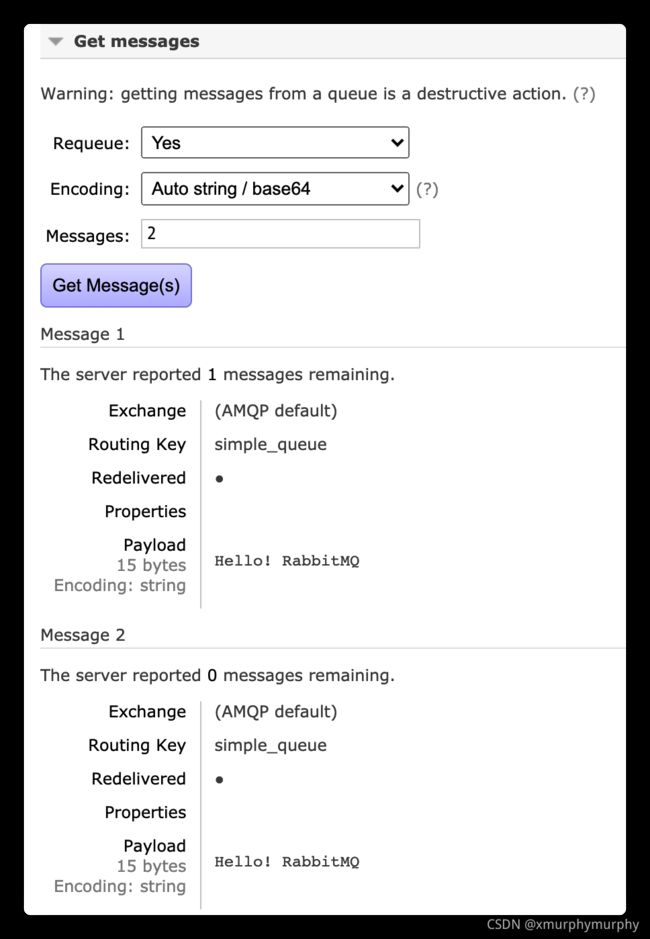
在执行上述的消息发送之后;可以登录rabbitMQ的管理控制台,可以发现队列和其消息:
2.3 编写消费者
抽取创建connection的工具类com.murphy.rabbitmq.util.ConnectionUtil;
/**
 * @author murphy
 * @since 2021/9/11 9:14 下午
 */
public class ConnectionUtil {

    public static Connection getConnection() throws IOException, TimeoutException {
        // 创建连接工厂
        ConnectionFactory connectionFactory = new ConnectionFactory();
        // 主机地址:默认为localhost - 这里使用虚拟机地址
        connectionFactory.setHost("192.168.XXX.XXX");
        // 连接端口:默认5672
        connectionFactory.setPort(5672);
        // 虚拟主机名称:默认为 /
        connectionFactory.setVirtualHost("/mq");
        // 连接用户名:默认为guest - 这里使用自定义用户名
        connectionFactory.setUsername("murphy");
        // 连接密码:默认为guest - 这里使用自定义密码
        connectionFactory.setPassword("xmf123123");

        // 创建连接
        return connectionFactory.newConnection();
    }
}
编写消息的消费者com.murphy.rabbitmq.simple.Consumer
/**
 * 消费者
 *
 * @author murphy
 * @since 2021/9/11 6:28 下午
 */
public class Consumer {
    public static void main(String[] args) throws IOException, TimeoutException {
        // 创建连接
        Connection connection = ConnectionUtil.getConnection();
        // 创建频道
        Channel channel = connection.createChannel();
        // 声明(创建)队列
        /**
         * 参数1: 队列名称
         * 参数2: 是否定义持久化队列
         * 参数3: 是否独占本次连接,只能有一个Consumer监听这个队列
         * 参数4: 是否在不使用的时候自动删除队列,当没有Consumer的时候,自动删除
         * 参数5: 队列其它参数
         */
        channel.queueDeclare(Producer.QUEUE_NAME, true, false, false, null);

        //监听消息
        DefaultConsumer consumer = new DefaultConsumer(channel) {
            /**
             * 接收到消息执行的回调
             *
             * consumerTag 消息者标签,在channel.basicConsume时候可以指定
             * envelope 消息包的内容,可从中获取消息id,消息routing key,交换机,消息和重传标志(收到消息失败后是否需要重新发送)
             * properties 属性信息
             * body 消息
             */
            @Override
            public void handleDelivery(String consumerTag, Envelope envelope, AMQP.BasicProperties properties, byte[] body) throws IOException {
                // 路由 key
                System.out.println("路由key为:" + envelope.getRoutingKey());
                // 交换机
                System.out.println("交换机为:" + envelope.getExchange());
                // 消息ID
                System.out.println("消息ID为:" + envelope.getDeliveryTag());
                // 收到的消息内容
                System.out.println("接收到的消息为:" + new String(body, "UTF-8"));
            }
        };
        /**
         * 参数1: 队列名称
         * 参数2: 是否自动确认,设置为true为表示消息接收到自动向mq回复接收到了,mq接收到回复后会删除消息,设置为false则需要手动确认
         * 参数3: 消息接收到后回调 - 接收到消息的做法
         */
        channel.basicConsume(Producer.QUEUE_NAME, true, consumer);
    }
}
2.4 小结
- 上述的入门案例中,其实使用的是简单模式,即一个生产者,一个中间件,一个消费者。至此,入门案例简单实现。

