Transformers架构系列---transformers库的使用
Transformers最初是由Google发布的论文 Attention is All You Need (2017) 提出的一种新的深度学习网络架构,这篇论文证明了序列模型(如 LSTM)可以完全被注意力机制取代,甚至可以获得更好的性能。Transformers网络结构自2017年提出之后仅仅一两年的时间内就一直在NLP领域及其子任务霸榜,目前的LLM大语言模型(ChatGPT、ChatGLM等)都是基于Transformers网络架构。Transformers不仅在NLP领域表现出色,自2020年开始,Transformers开始席卷CV领域,一度有碾压CV领域常用的CNN网络结构。
率先实现Transformers 网络模型架构的是 HuggingFace 的transformer库,因此,目前我们通过调用transformer库就可以帮助我们解决CV、NLP领域的绝大部分任务。transformers库中支持的任务包括:
['audio-classification', 'automatic-speech-recognition', 'conversational', 'depth-estimation', 'document-question-answering', 'feature-extraction', 'fill-mask', 'image-classification', 'image-segmentation', 'image-to-text', 'mask-generation', 'ner', 'object-detection', 'question-answering', 'sentiment-analysis', 'summarization', 'table-question-answering', 'text-classification', 'text-generation', 'text2text-generation', 'token-classification', 'translation', 'video-classification', 'visual-question-answering', 'vqa', 'zero-shot-audio-classification', 'zero-shot-classification', 'zero-shot-image-classification', 'zero-shot-object-detection', 'translation_XX_to_YY']
其中,在NLP领域常见的任务包括:
- 文本分类
- 问答
- 翻译
- 文本摘要
- 文本生成
除此以外还有计算机视觉和音频任务(主要也是基于transformer的)虽然Transformer目前被CV、NLP领域广泛使用,但是限于篇幅,至于Transformers网络结构及其在图像、视频、音频的具体应用,本篇文章暂不做讨论,本篇文章我们主要介绍Transformer库在NLP领域的应用。
1.从安装开始
在安装 transformers 前,需要先安装深度学习框架(PyTorch,TensorFlow其中之一)
pip install transformers 2、使用
Transformer库应用在NLP领域的最最常用的类主要包括Pipeline,AutoTokenizer等
2.1 pipeline
我们首先使用transformers库中的Pipeline进行实验演示:通过向Pipeline对象提供任务名称(我们这里进行 sentiment-analysis),然后从 Hugging Face 模型存储库中自动下载合适的模型,然后就可以使用了!
from transformers import pipeline
classifer=pipeline("sentiment-analysis")
result=classifer('I am very sad!')
print(f"{result[0]['label']} with score {result[0]['score']}")
如果你的电脑不能访问huggingface官网,运行上述代码,大概率会报错:
No model was supplied, defaulted to distilbert-base-uncased-finetuned-sst-2-english and revision af0f99b (https://huggingface.co/distilbert-base-uncased-finetuned-sst-2-english).
Using a pipeline without specifying a model name and revision in production is not recommended.
'(ReadTimeoutError("HTTPSConnectionPool(host='huggingface.co', port=443): Read timed out. (read timeout=10)"), '(Request ID: 62aff957-4fca-4be8-a336-884a2073bc8c)')' thrown while requesting HEAD https://huggingface.co/distilbert-base-uncased-finetuned-sst-2-english/resolve/main/config.json
Traceback (most recent call last):
  File "D:\anaconda3\envs\pytorch_study\lib\site-packages\transformers\utils\hub.py", line 417, in cached_file
    resolved_file = hf_hub_download(
  File "D:\anaconda3\envs\pytorch_study\lib\site-packages\huggingface_hub\utils\_validators.py", line 118, in _inner_fn
    return fn(*args, **kwargs)
  File "D:\anaconda3\envs\pytorch_study\lib\site-packages\huggingface_hub\file_download.py", line 1291, in hf_hub_download
    raise LocalEntryNotFoundError(
huggingface_hub.utils._errors.LocalEntryNotFoundError: Connection error, and we cannot find the requested files in the disk cache. Please try again or make sure your Internet connection is on.
During handling of the above exception, another exception occurred:
Traceback (most recent call last):
  File "D:\anaconda3\envs\pytorch_study\lib\site-packages\IPython\core\interactiveshell.py", line 3460, in run_code
    exec(code_obj, self.user_global_ns, self.user_ns)
  File "", line 1, in
    runfile('E:/PythonWorkSpace/pytorch_project/pytorch_demo/transform_demo/transformer_study.py', wdir='E:/PythonWorkSpace/pytorch_project/pytorch_demo/transform_demo')
  File "D:\Program Files\PyCharm 2021.1.3\plugins\python\helpers\pydev\_pydev_bundle\pydev_umd.py", line 197, in runfile
    pydev_imports.execfile(filename, global_vars, local_vars)  # execute the script
  File "D:\Program Files\PyCharm 2021.1.3\plugins\python\helpers\pydev\_pydev_imps\_pydev_execfile.py", line 18, in execfile
    exec(compile(contents+"\n", file, 'exec'), glob, loc)
  File "E:/PythonWorkSpace/pytorch_project/pytorch_demo/transform_demo/transformer_study.py", line 2, in
    classifer=pipeline("sentiment-analysis")
  File "D:\anaconda3\envs\pytorch_study\lib\site-packages\transformers\pipelines\__init__.py", line 759, in pipeline
    config = AutoConfig.from_pretrained(model, _from_pipeline=task, **hub_kwargs, **model_kwargs)
  File "D:\anaconda3\envs\pytorch_study\lib\site-packages\transformers\models\auto\configuration_auto.py", line 983, in from_pretrained
    config_dict, unused_kwargs = PretrainedConfig.get_config_dict(pretrained_model_name_or_path, **kwargs)
  File "D:\anaconda3\envs\pytorch_study\lib\site-packages\transformers\configuration_utils.py", line 617, in get_config_dict
    config_dict, kwargs = cls._get_config_dict(pretrained_model_name_or_path, **kwargs)
  File "D:\anaconda3\envs\pytorch_study\lib\site-packages\transformers\configuration_utils.py", line 672, in _get_config_dict
    resolved_config_file = cached_file(
  File "D:\anaconda3\envs\pytorch_study\lib\site-packages\transformers\utils\hub.py", line 452, in cached_file
    raise EnvironmentError(
OSError: We couldn't connect to 'https://huggingface.co' to load this file, couldn't find it in the cached files and it looks like distilbert-base-uncased-finetuned-sst-2-english is not the path to a directory containing a file named config.json.
Checkout your internet connection or see how to run the library in offline mode at 'https://huggingface.co/docs/transformers/installation#offline-mode'.
这是由于语句 classifer=pipeline("sentiment-analysis") 会让程序去本地.cache目录下寻找进行sentiment-analysis 任务所需的权重文件(在只指定了任务名为sentiment-analysis 而没有指定用哪个具体模型的情况下,缺省使用“distilbert-base-uncased-finetuned-sst-2-english”这个预训练模型,这是一个针对“distilbert-base-uncased”的微调后的模型)如果本地目录没有就会去hugging face官网下载,但是我们无法连接hugging face官网,因此程序报错。其实,上面这段程序要加载的模型原文件地址在:
https://huggingface.co/distilbert-base-uncased-finetuned-sst-2-english/tree/main
我们这里演示的是NLP中的sentiment-analysis任务,如果我要进行其他任务比如,那么怎么找我是怎么知道pipeline()要下载的模型权重在哪里呢,或者说我想要自己下载相关任务的模型权重然后保存到本地,去哪里找呢?答案还是hugggingface官网
如上图所示,我们可以在该网站上找到几乎深度学习所有任务的模型,比如CV领域的 Image Classification、多模态领域的Text-to-Image等等
比如我们我们点开适用于 sentence-similarity 任务的模型。 页面就会反馈适用于该任务的模型,之后我们就可以点进去下载。
我们还选择从搜索模型框中搜索适用于 sentiment-analysis 任务的模型,然后点击下载。
如果你能够进入hugging face官网的话,推荐手动下载这些文件,下载大文件时,可以使用迅雷或者IDM下载器以保证连接中断的时候不至于要重新下载。下载到本地之后,我们可以把文件放在.cache目录下,比如我的是C:\Users\zex\.cache\huggingface\hub

不过我们也可以不放在该目录下,自己指定其他的目录,在这里我还是指定到原目录.cache,然后在pipeline中添加模型路径参数
from transformers import pipeline
from transformers import AutoTokenizer
model_path=r"C:\Users\zex\.cache\huggingface\hub\models--distilbert-base-uncased-finetuned-sst-2-english"

classifer=pipeline(task="sentiment-analysis",model=model_path)
result=classifer('I am very sad!')
print(f"{result[0]['label']} with score {result[0]['score']}")
点击运行,然后控制台就会有输出:
![]()
这里模型的输出是一个字典列表,其中每个字典都有一个标签(对于这个特定示例,值为“POSITIVE”或“NEGATIVE”)和一个分数(即预测标签的分数)。通过控制台输出,可以看到模型正确判断了“I am very sad”这句话的情绪正负。
我们也可以为分类器提供多个句子,并在一个函数调用中获得所有结果。
classifer=pipeline(task="sentiment-analysis",model=model_path)
result=classifer(['I am very sad!','I am happy'])
print(result)
# 输出
[{'label': 'NEGATIVE', 'score': 0.999451220035553}, {'label': 'POSITIVE', 'score': 0.9998801946640015}]
2.2 AutoTokenizer
在nlp领域Transformers以及基于BERT家族的预训练模型+微调模式已经成为标配。而作为文本数据预处理的主要方法-Tokenizer(分词器)则成为了必不可少的工具。我们可以直接使用AutoTokenizer分词器进行数据预处理,也可以根据实际场景使用BERT、ALBERT等预训练模型对应的Tokenizer,例如transformers.BertModel对应的Tokenizer是transformers.BertTokenizer,但是通常,我们会直接使用Transformers包中的AutoTokenizer类来创建并使用分词器。分词器的工流程如下:
- 将给定的文本拆分为称为Token(词或标记)的单词(或部分单词、标点符号等)
- 将这些Token转换为数字编码,以便构建张量并将其提供给模型。
- 添加模型正常工作所需的任何输入数据。例如特殊字符[CLS],[SEP]等
我们先看一下tokenizer的单句输入和对应输出。
from transformers import AutoTokenizer
tokenizer=AutoTokenizer.from_pretrained("bert-base-cased")
sentence="I am very happy today!"
encodeing=tokenizer(sentence)
print(encodeing)
print("-----------------------")
tokenize_sentence=tokenizer.tokenize(sentence)
print(tokenize_sentence)
{'input_ids': [101, 146, 1821, 1304, 2816, 2052, 106, 102], 'token_type_ids': [0, 0, 0, 0, 0, 0, 0, 0], 'attention_mask': [1, 1, 1, 1, 1, 1, 1, 1]}
-----------------------
['I', 'am', 'very', 'happy', 'today', '!']
tokenizer.tokenize(sentence)方法接受单句的输入,完成上述的第1步任务,将文本拆分为token的数字。而tokenizer(sentence)则直接完成第1到第3步的工作。可以看出。输出的数字编码(encodeing)是一个字典,它包含"input_ids"、"token_type_ids"、"attention_mask"。
“input_ids”字段是输出的数字编码字典中唯一不可少的字段,即以数组形式存储的标记索引(token indices),比如下面输出中的数字146对应 "I"、1821对应 "am",至于开头的“101”以及结尾的“102”可以看做开始标志和结束标志,每一个句子都会有。
“attention_mask”是对应于注意力机制的计算,各元素的值为0或1,如果当前token被mask或者是只是用来作为填充的元素,那么其不需要进行注意力机制的计算,其值为0。后面会再详细解释一下。
“token_type_ids”是对应于不同的文本序列,例如在NSP(BERT及某些语言模型中的“Next Sentence Prediction”)任务中需要输入两个文本序列。后面会在深入解释一下。
当然,我们也可以反过来,用tokenizer.decode()方法逆向解码一个token索引序列,并返回原始句子(实际是原始句子的一个超集)。
from transformers import AutoTokenizer
tokenizer=AutoTokenizer.from_pretrained("bert-base-cased")
sentence="I am very happy today!"
encodeing=tokenizer(sentence)
deconding=tokenizer.decode(encodeing['input_ids'])
print(deconding)
[CLS] I am very happy today! [SEP]
可以看出,解码后的句子跟原句子不完全一致,而是多了两个特殊字符。这两个特殊字符是tokenizer()方法在第3步任务时自动添加的,例如[CLS]表示句子开始或分类标志,[SEP]表示句子结束或分隔标志。当调用方法逆向解码时,也会一并显示多加的字符。
下面我们进行Tokenizer多句子输入,从输出中进一步理解attention_mask
from transformers import AutoTokenizer
tokenizer=AutoTokenizer.from_pretrained("bert-base-cased")
sentence_a='this is a short sentence'
sentence_b='this is a long sentence,which is longer than sencten_a'
encode=tokenizer([sentence_a,sentence_b],padding=True)
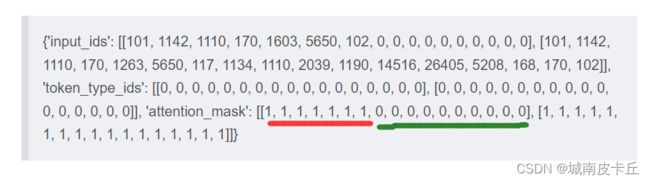
print(encode){'input_ids': [[101, 1142, 1110, 170, 1603, 5650, 102, 0, 0, 0, 0, 0, 0, 0, 0, 0, 0], [101, 1142, 1110, 170, 1263, 5650, 117, 1134, 1110, 2039, 1190, 14516, 26405, 5208, 168, 170, 102]], 'token_type_ids': [[0, 0, 0, 0, 0, 0, 0, 0, 0, 0, 0, 0, 0, 0, 0, 0, 0], [0, 0, 0, 0, 0, 0, 0, 0, 0, 0, 0, 0, 0, 0, 0, 0, 0]], 'attention_mask': [[1, 1, 1, 1, 1, 1, 1, 0, 0, 0, 0, 0, 0, 0, 0, 0, 0], [1, 1, 1, 1, 1, 1, 1, 1, 1, 1, 1, 1, 1, 1, 1, 1, 1]]}
多句子输入的时候,需要标准化,使其能够整齐划一的进行比较。例如,输入的两个句子长度不一致,需要通过短句填充(padding)的方式让其长度一致。不过这样也会带来额外的问题。比如,在训练的时候,机器并不知道填充的内容无意义,仍然会忠实的按照填充的数值来计算,从而可能引入错误的信息。为了避免这个问题,toknenizer的缺省输出会返回第二个字段"attention_mask"。它会告诉机器返回的数字编码中哪些是需要注意的实际数据,哪些是不需要关心的填充数据。上述输出中,attention_mask中包含了两个长度一样数组,如下图所示,由于第一个句子较短,进行了文本对齐,但是红线部分才是真正对应 “this is a short sentence”,而绿色线的部分为0,是填充的部分。
看完了 attention_mask 所代表的的函数,接下来再看一下 token_type_ids

有些NLP任务需要将两个句子拼接在一起,比如序列标注/分类和问答。例如问答时,需要第一个作为上下文,第二个句子作为问题,要求模型输出答案。这时tokenizer接受两个句子的顺序输入并输出数字编码。虽然返回的数字编码中也包含了句子的分隔信息,Tokenizer的输出仍然提供可选的第3个常用字段"token_type_ids"。它用来表明返回的数字编码中哪些属于第一个句子,哪些属于第二个句子。例如上图中,token_type_ids是两个数组,依次来区分不同的句子。
最后,AutoTokenizer类的参数有很多,不同的参数控制着类的功能,具体如下
- text (str, List[str], List[List[str]]`):就是输入的待编码的序列(或1个batch的),可以是字符串或字符串列表。
- text_pair (str, List[str], List[List[str]]`):输入待编码的序列对。
- add_special_tokens(bool, optional, defaults to True) :True就是给序列加上特殊符号,如[CLS],[SEP]
- padding (Union[bool, str], optional, defaults to False) :给序列补全到一定长度,True or ‘longest’: 是补全到batch中的最长长度,max_length’:补到给定max-length或没给定时,补到模型能接受的最长长度。
- truncation (Union[bool, str], optional, defaults to False) :截断操作,true or ‘longest_first’:给定max_length时,按照max_length截断,没给定max_lehgth时,到,模型接受的最长长度后截断,适用于所有序列(单或双)。only_first’:这个只针对第一个序列。only_second’:只针对第二个序列。
- max_length (Union[int, None], optional, defaults to None) :控制padding和truncation的长度。
- stride (int, optional, defaults to 0) :和max_length一起使用时,用于标记截断和溢出的重叠数量(不知道怎么用)。
- is_pretokenized (bool, defaults to False):表示这个输入是否已经被token化。
- pad_to_multiple_of :将序列以倍数形式padding
- return_tensors (str, optional, defaults to None):返回数据的类型,可选tf’, ‘pt’ or ‘np’ ,分别表示tf.constant, torch.Tensor或np.ndarray
- return_token_type_ids (bool, optional, defaults to None):默认返回token_type_id(属于哪个句子)。
- return_attention_mask (bool, optional, defaults to none):默认返回attention_mask(是否参与attention计算)。
- return_overflowing_tokens (bool, optional, defaults to False):默认不返回溢出的token
- return_special_tokens_mask (bool, optional, defaults to False) :默认不返回特殊符号的mask信息.
限于篇幅,本篇文章讲解了transformers库中最常用的两个类 pipeline 和 AutoTokenizer,后续会在其他章节继续介绍transformers库。